Front-End Web & Mobile
AWS Amplify enables CloudWatch Logging Support for Swift and Android
We are excited to announce the AWS Amplify Logger for Swift and Android developers, which enables you to send logs to Amazon CloudWatch for errors happening from the Amplify libraries, or write your own custom logs for errors in different parts of your app.
Using the Amplify Logger, you can configure the logging levels you want to send to CloudWatch. If you are using Amplify Auth, you can also add an allow list of users enabling you to granularly track errors and resolve them for your users. You can also change the logging levels in your app remotely if needed, enabling you to have full control over your logging strategy for your deployed production Swift and Android apps.
In this tutorial, you will learn how to add the Amplify Logger to your Swift Application. This will include setting up your backend resources, and adding the Amplify libraries to handle the sending of log messages. We will also use the Authenticator connected UI component, to quickly and easily provide a sign in and registration experience with less than 10 lines of code.
Prerequisites
To follow this tutorial, you need the following prerequisites:
- New Swift application targeting iOS 13.0, using Xcode 14.1 or later.
- Node.js v14.x or later
- npm v6.14.4 or later
- git v2.14.1 or later
- Set up Amplify CLI
Installing the Amplify libraries
To get started with the Amplify Logger for your Swift app, you need to add the Amplify libraries to your app. We will also add the Authenticator connected UI component, which gets you a full sign in and registration experience out of the box by inferring how you set up your backend. You can use the Amplify Logger without using the Amplify Auth category, for this tutorial however we will use the Auth category to demonstrate how you can use an allow list to control which users can send logs to your backend.
Open your Swift iOS app in Xcode and select File > Add Packages… and add the following dependencies:
Amplify Library for Swift: Enter its GitHub URL (https://github.com/aws-amplify/amplify-swift), select Up to Next Major Version and click Add Package
-
- Select the following libraries:
- Amplify
- AWSCognitoAuthPlugin
- AWSCloudWatchLoggingPlugin
- Select the following libraries:
Amplify UI Swift – Authenticator: Enter its GitHub URL (https://github.com/aws-amplify/amplify-ui-swift-authenticator), select Up to Next Major Version and click Add Package
-
- Select the following library:
- Authenticator
- Select the following library:
Setting up your backend resources
We will now start with setting up the backend resources needed for this tutorial. The resources set up will include:
- Setting up a new Amplify project using the Amplify CLI, to enable us to easily configure backend resources and add categories of features such as Amplify Auth for handling sign in and registration.
- Set up the backend resources for logging messages to the backend for debugging, which include an Amazon CloudWatch log group.
Initialize Amplify project and add the Auth resources
After you configure the Amplify CLI as required in the prerequisite steps to this tutorial, you can initialize a new Amplify project by navigating in your terminal to the root directory of your Swift project. Then, you can run the following command in your terminal:
amplify init
You can then follow the prompts from the CLI – you can use the default configuration options you are presented with.
? Enter a name for the project MyAmplifyApp
The following configuration will be applied:

Project information
| Name: MyAmplifyApp
| Environment: dev
| Default editor: Visual Studio Code
| App type: ios


? Initialize the project with the above configuration? Yes
Using default provider awscloudformation
? Select the authentication method you want to use: AWS profile

Deployment state saved successfully.
✔ Initialized provider successfully.
✅ Initialized your environment successfully.
You can now start adding the Amplify Auth category to your app, which is necessary to enable your users to sign in and register an account. You can run the following command in your terminal:
amplify add auth
You can follow the default configuration, and then select username as your default option for how users sign in to your app. You will need to push your resources now to your backend, so that you can use the auth resources to provide access to the Amazon CloudWatch log group in your app. To deploy your auth resources run the following command in your terminal:
amplify push
You are now ready to add your Amazon CloudWatch log group resources for the Amplify Logger.
Add Amplify Logger resources
To use the Amplify logger, you need to have an Amazon CloudWatch log group created in your AWS account. You can use an existing Amazon CloudWatch log group if you want to and configure it using the Amplify libraries. To accomplish that, you can use the Amplify CLI to add customer resources using CDK, and insfrastructure as code language.
Start off by running the following command in your terminal to create the required resources. Select yes when asked if you want to edit the CDK stack when following the CLI prompts.
amplify add custom

✔ How do you want to define this custom resource? · AWS CDK
✔ Provide a name for your custom resource · customResourceba25a680 // you can use any value you want here
✅ Created skeleton CDK stack in amplify/backend/custom/customResourceba25a680 directory
✔ Do you want to edit the CDK stack now? (Y/n) · yes
Once the cdk-stack.ts file opens in your IDE, you can replace the contents of that file with the following code snippet.
You will need to update the following values in the code snippet. For the values of unAuthRoleName and unAuthRoleName, you can get these values by navigating to the amplify folder in the root directory of your app, and the opening the team-provider-info.json file.
unAuthRoleNameunAuthRoleNamelogGroupName
import * as cdk from "aws-cdk-lib";
import * as AmplifyHelpers from "@aws-amplify/cli-extensibility-helper";
import { AmplifyDependentResourcesAttributes } from "../../types/amplify-dependent-resources-ref";
import { Construct } from "constructs";
import { UserPool } from "aws-cdk-lib/aws-cognito";
import {
  AmplifyAuthCognitoStackTemplate,
  AmplifyRootStackTemplate,
} from "@aws-amplify/cli-extensibility-helper";

import * as logs from "aws-cdk-lib/aws-logs";
import * as path from "path";
import * as iam from "aws-cdk-lib/aws-iam";

export class cdkStack extends cdk.Stack {
  constructor(
    scope: Construct,
    id: string,
    props?: cdk.StackProps,
    amplifyResourceProps?: AmplifyHelpers.AmplifyResourceProps
  ) {
    super(scope, id, props);

    new cdk.CfnParameter(this, "env", {
      type: "String",
      description: "Current Amplify CLI env name",
    });

    // get the Amplify auth/unAuth role names from the team-provider.json file
    const unAuthRoleName = "amplify-myamplifyapp-dev-XXXXX-authRole";
    let authRoleName = "amplify-myamplifyapp-dev-XXXXX-unauthRole";

    new RemoteLoggingConstraintsConstruct(
      this,
      "RemoteLogging",
      authRoleName,
      unAuthRoleName
    );
  }
}

class RemoteLoggingConstraintsConstruct extends Construct {
  constructor(
    scope: Construct,
    id: string,
    authRoleName: string,
    unAuthRoleName: string
  ) {
    super(scope, id);

    const region = cdk.Stack.of(this).region;
    const account = cdk.Stack.of(this).account;


    const logGroupName = "my-log-group";

    new logs.LogGroup(this, "Log Group", {
      logGroupName: logGroupName,
      retention: logs.RetentionDays.INFINITE,
    });

    const authRole = iam.Role.fromRoleName(this, "Auth-Role", authRoleName);
    const unAuthRole = iam.Role.fromRoleName(
      this,
      "UnAuth-Role",
      unAuthRoleName
    );
    const logResource = `arn:aws:logs:${region}:${account}:log-group:${logGroupName}:log-stream:*`;
    const logIAMPolicy = new iam.PolicyStatement({
      effect: iam.Effect.ALLOW,
      resources: [logResource],
      actions: [
        "logs:PutLogEvents",
        "logs:DescribeLogStreams",
        "logs:CreateLogStream",
      ],
    });

    authRole.addToPrincipalPolicy(logIAMPolicy);
    unAuthRole.addToPrincipalPolicy(logIAMPolicy);
  }
}
Make sure to keep the logGroupName handy, since we will use that when configuring the Amplify Logger in your app. You can now push these resources by running the below command in your terminal.
amplify push
You have now completed setting up your backend resources needed to authenticate your users and use the Amplify Logger.
Setting up sign in and registration in less than 2 minutes with the Amplify Authenticator
We will set up the Amplify Authenticator in your Swift app, which will quickly create a full sign in and sign up experience for users of your app. Open your app in Xcode, and then go to the <YourAppName>App file. Replace its contents with the following code snippet.
import Amplify
import Authenticator
import AWSCognitoAuthPlugin
import SwiftUI
import Foundation
// add the Amplify Logger import
import AWSCloudWatchLoggingPlugin
@main
struct MyApp: App {
// defining the log message format
struct logMessage: Codable {
let Message: String
}
init() {
do {
//add the Amplify Logger configuration
try Amplify.add(plugin: AWSCognitoAuthPlugin())
let loggingConstraints = LoggingConstraints(defaultLogLevel: .debug)
let loggingConfiguration = AWSCloudWatchLoggingPluginConfiguration(logGroupName: "my-log-group", region: "us-west-2", localStoreMaxSizeInMB: 1, flushIntervalInSeconds: 60, loggingConstraints: loggingConstraints)
let loggingPlugin = AWSCloudWatchLoggingPlugin(loggingPluginConfiguration: loggingConfiguration)
try Amplify.add(plugin: loggingPlugin)
try Amplify.configure()
} catch {
print("Unable to configure Amplify \(error)")
}
}
var body: some Scene {
WindowGroup {
Authenticator { state in
VStack {
Text("Hello, \(state.user.username)")
Button("Sign out") {
Task {
// define the custom logger instance
let logger = Amplify.Logging.logger(forCategory: "myCustomCategory", forNamespace: "testingSignOut")
// send the log message
let jsonEncoder = JSONEncoder()
let signOutMessage = logMessage(Message: "Testing Sign Out again")
let jsonData = try jsonEncoder.encode(signOutMessage)
let jsonString = String(data: jsonData, encoding: String.Encoding.utf8)!
logger.debug(jsonString)
// flush log messages before sign out
let cloudWatchPlugin = try Amplify.Logging.getPlugin(for: "awsCloudWatchLoggingPlugin") as? AWSCloudWatchLoggingPlugin
try await cloudWatchPlugin?.flushLogs()
await state.signOut()
}
}
}
}
}
}
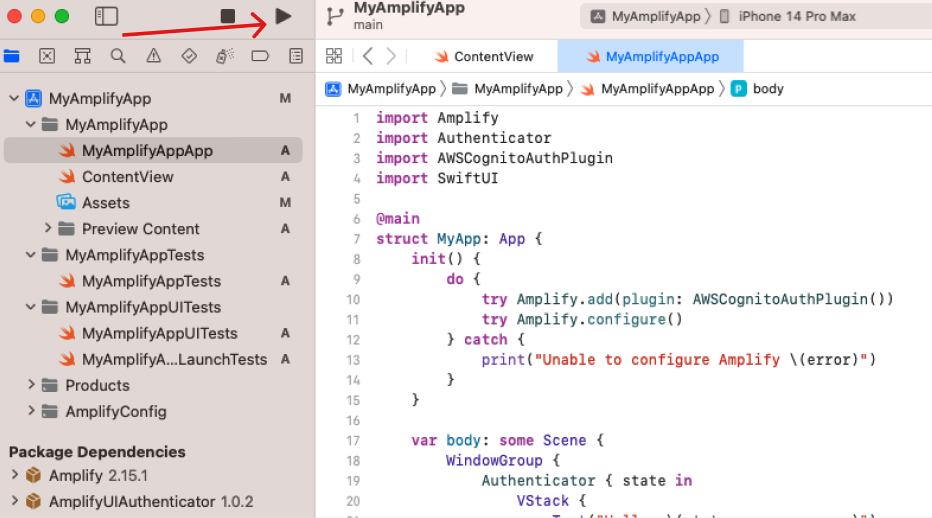
}Now, you can in your Xcode run your app by clicking on the play button as shown in the following screenshot. Select any device you would like as an emulator.
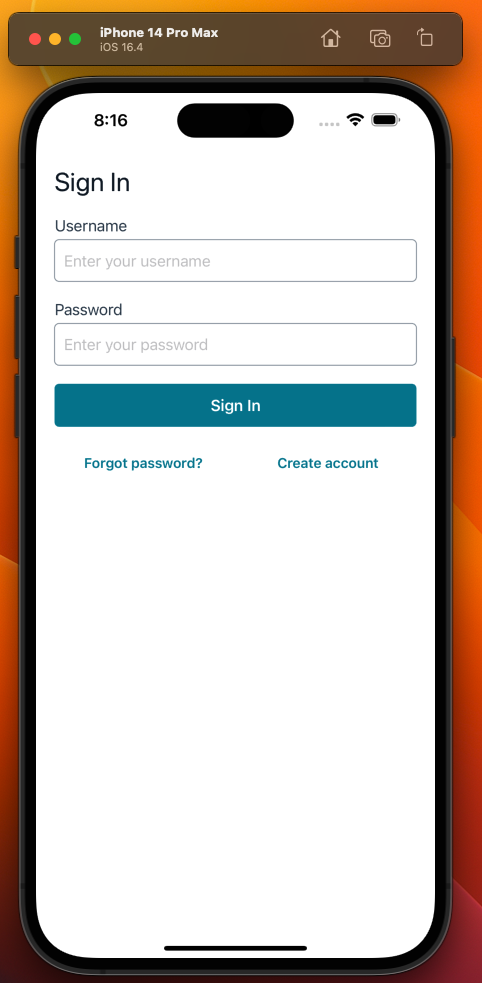
Once your app builds, you should see the following screen. You can now try registering a new user.
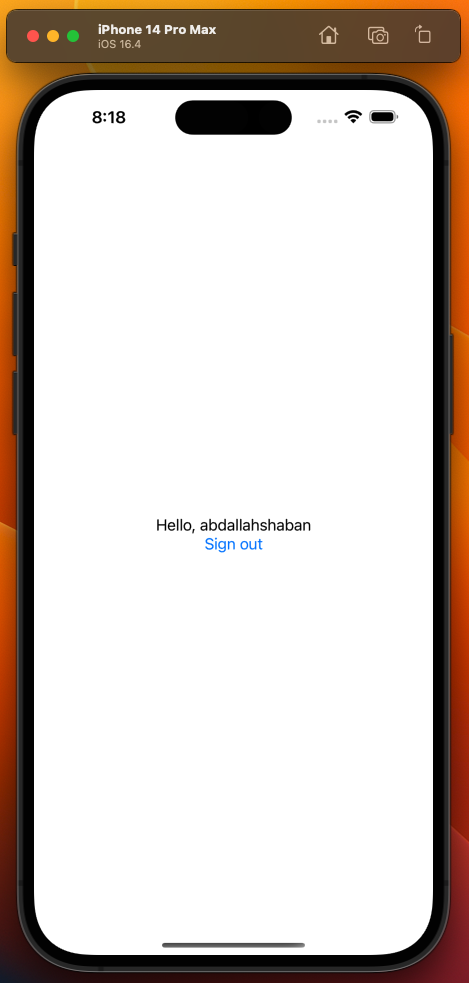
Once you create an account and try to login, the Authenticator will redirect you to the following screen.
Setting up the Amplify Logger in your app
We will now set up the Amplify Logger in your app to start catching errors that might occur from the Amplify Libraries, or to write custom logs. In this section, we will walk through how to send a custom log message. We will be adding the necessary configuration to for the Amplify Logger in the same file we added the Amplify Authenticator. You can replace the content of the <Your App Name>App file with the following code snippet. Make sure to change the values under the “logGroupName” and “region” to reflect the values you had configured when setting up your backend resources.
import Amplify
import Authenticator
import AWSCognitoAuthPlugin
import SwiftUI
import Foundation
// add the Amplify Logger import
import AWSCloudWatchLoggingPlugin

@main
struct MyApp: App {
    init() {
        do {
            //add the Amplify Logger configuration
            try Amplify.add(plugin: AWSCognitoAuthPlugin())
            let loggingConstraints = LoggingConstraints(defaultLogLevel: .debug)
            let loggingConfiguration = AWSCloudWatchLoggingPluginConfiguration(logGroupName: "my-log-group", region: "us-west-2", localStoreMaxSizeInMB: 1, flushIntervalInSeconds: 60, loggingConstraints: loggingConstraints)
            let loggingPlugin = AWSCloudWatchLoggingPlugin(loggingPluginConfiguration: loggingConfiguration)
            try Amplify.add(plugin: loggingPlugin)
            try Amplify.configure()
        } catch {
            print("Unable to configure Amplify \(error)")
        }
    }

    var body: some Scene {
        WindowGroup {
            Authenticator { state in
                VStack {
                    Text("Hello, \(state.user.username)")
                    Button("Sign out") {
                        Task {
                            // define the custom logger instance
                            let logger = Amplify.Logging.logger(forCategory: "myCustomCategory", forNamespace: "testingSignOut")
                            logger.debug("testing sign out")
                            await state.signOut()

                        }
                    }
                }
            }
        }
    }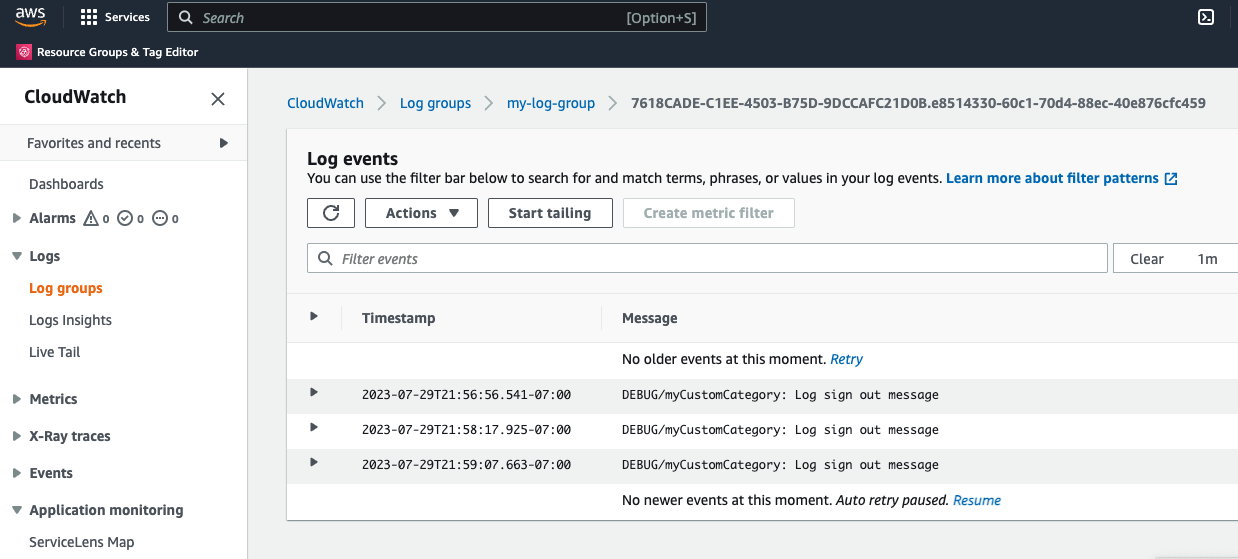
}Viewing your logs in Amazon CloudWatch
After the logs are sent from your device, you can view them in the AWS console using Amazon CloudWatch. You can follow these steps to access your logs in AWS Console:-
-
-
- Log into AWS Console
-
-
-
-
-
- Navigate to Amazon CloudWatch
-
-
-
-
-
- In the left navigation panel and under the Logs menu, click the Log groups menu item.
-
-
-
-
-
- In the Log groups window, enter your log group name in the Filter field
-
-
-
-
-
- Click on your log group that is returned in the filtered results to view all log streams
-
-
In conclusion
The Amplify Logger is a powerful tool for helping you granularly debug issues for your users for your deployed Swift and Android apps. You can further control the granularity of the logging be enabling remote logging configuration. In the future, the Amplify Logger will be available for JavaScript and Flutter developers. To build apps with AWS Amplify you can visit our documentation. To stay connected with our community, follow us on Github for Swift or Android, and join our Discord server.Clean up
To ensure that you don’t have any unused resources in you AWS account, run the following command to delete all the resources that were created in this project if you don’t intend to keep them.amplify delete