Front-End Web & Mobile
Benchmarking your Mobile App with Rooted Android Private Devices and AWS Device Farm
Until recently, the primary reasons for rooting an Android device were to install custom ROMS, themes, or have access to file explorer on the device. Now, however, rooting devices is not just for customization but also unlocks utilities that help analyze and improve the performance of your app. With the launch of support for rooted Android devices on AWS Device Farm, you can now run tests that require rooting your device — such as granular performance benchmarking for your apps — helping uncover potential performance bottlenecks and battery drain.
As an example, the Android ecosystem provides two types of benchmarking that benefit from this new feature: Macrobenchmark and Microbenchmark. The Macrobenchmark domain deals with parameters associated with end user interactions, allowing you to monitor your app behavior as it would appear in the real world. These metrics include app startup time, splash screen load, animations, and interactions with UI elements. Using the Macrobenchmark library, you can inject events and monitor the results via an external test app. The Microbenchmarking domain, on the other hand, addresses the performance of your app code or smaller areas of your application. For example, it can help to identify hot code paths, redundant code execution, or identify complex data structures that consume cycles and cause unexpected CPU spikes. It provides specific information about your application, but not the overall end user experience.
In addition to accessing these benchmarks, rooted devices are useful and in some cases required, to have granular control over the state of the device due to expanded root access to metrics and the file system. Rooted devices can, for example, allow you to place the device CPUs at a fixed frequency and disable thermal throttling. This ability to lock the CPU clocks ensures stable performance under load by keeping the CPU clocks from getting high enough to overheat the device or low enough to gather a benchmark when not fully utilizing the CPU.
A locked CPU helps get a stable baseline performance setup on a rooted device which gives you a high confidence in identifying potential deviations in app performance over multiple versions. In this two-part blog series, we demonstrate the use of microbenchmark for an app using rooted Android devices on Device Farm. In part one, we look at how to access and set up rooted Android devices, understand the tooling, set up the execution environment, schedule a dry run, and analyze the output with a locked CPU clock to gather insights on its steady-state performance. In part two, we gather a baseline performance benchmark of your app with a locked clock on rooted devices and identify potential bottlenecks.
Getting access and setting up rooted devices in AWS Device Farm
Rooted devices are offered for select Android Private Devices on Device Farm. Private Devices are dedicated devices that are exclusively procured for the you based on their requirements. These devices are not available to any other customer and can be shared across multiple AWS accounts as per your requirements. You can request private rooted devices by contacting the service team or raising an AWS support case. When considering a Private Device, note that you’ll often want to test across different OS and device versions before releasing your apps. For example, a common pattern is for customers to test on the latest, latest – 1, and latest – 2 generation of OS version and devices. In addition, a best practice is to design your private fleet with multiple instances of each device type to improve the availability posture.
In your AWS Device Farm Console, Rooted devices show up with the wording “Rooted” in their name when you search for them under “Private devices” as shown in the following picture:
 Figure 1: Rooted private devices in the Device Farm console
You can also assign labels to your rooted devices by clicking on “Edit” and adding a label. You add a label called “Rooted” in this case. Labels are a useful construct as they help group devices that share certain characteristics and can also be used for logical separation of hardware resources among your team. For example, you can assign multiple labels to the same device instance such as “Team1” and “Rooted”. This helps you filter rooted devices assigned to your team when selecting devices to schedule tests on.
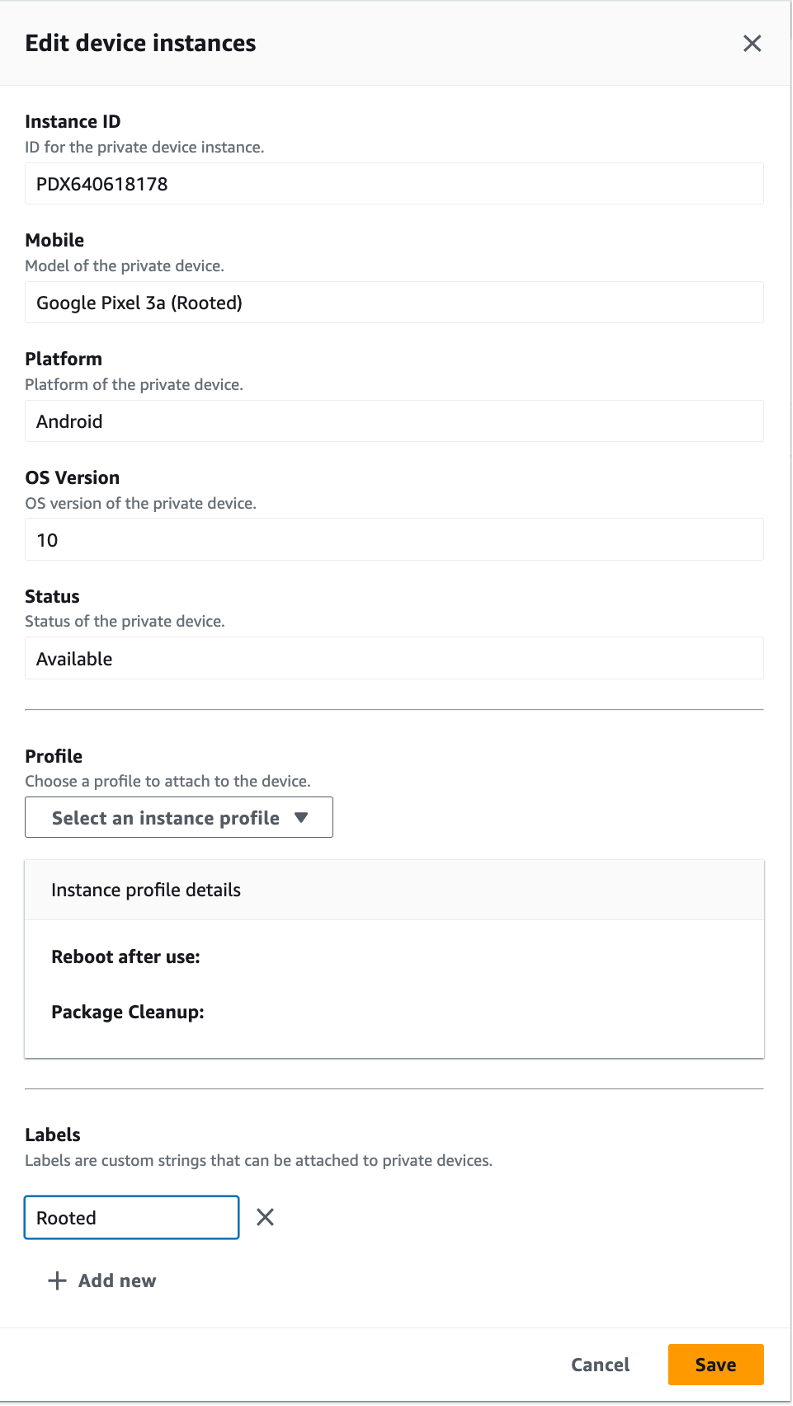 Figure 2: Add Labels to a rooted device instance
Locking clocks
The central idea of setting up an environment that can do microbenchmarking is to first lock the CPU clocks of the rooted device. Locking ensures that the device is always running on a fixed frequency. Since benchmarks typically run in a loop it is critical to have a predictable setup on the device. This is achieved by pushing a lockClocks.sh script, available in the Android source code, on to the device using the following adb commands.
adb push path/lockClocks.sh /data/local/tmp/lockClocks.sh
adb shell /data/local/tmp/lockClocks.sh
adb shell rm /data/local/tmp/lockClocks.sh
You want to run these commands before initiating our benchmarking to make sure the CPU on rooted devices operates at a fixed frequency. This can be achieved by using custom mode of execution on Device Farm.
Custom mode of execution
Device Farm has two modes of execution: Standard and Custom. Standard mode provides granular reporting for your tests written in test frameworks such as Espresso and XCUI. As it does pre-processing and post processing of your test package and results, it can end up taking slightly more time than your local execution time.
In contrast, custom mode provides a highly flexible and configurable environment which can be used to closely replicate your local configuration and run tests at scale on Device Farm. It provides all the artifacts that you would get locally and additional artifacts such as videos, logs, and screenshots that help to accelerate your debugging process. It also provides live video and log streams from the device and host machine where the tests are running.
Custom mode lets you configure a yaml file called the “Testspec file” where your can add shell commands to configure the host machine to which the device is connected. Using the Testspec file, you can install dependencies and run custom commands such as our adb commands to lock cycles on the rooted device before the test begins.
It is strongly suggested to use custom mode of execution for all your test frameworks on AWS Device Farm.
Scheduling a test on rooted devices
Now that you’ve looked at the difference between standard and custom mode and chosen the latter for this blog, let us schedule a dry run on a rooted device where we will lock the CPU at a fixed frequency before kicking off the actual benchmarking tests.
To schedule a test on Device Farm, you only need the following primary inputs:
- App to be tested.
- Tests
Let us walk through these steps in detail and schedule a run:
- Create a new project or use an existing one from the landing page of AWS Device Farm Mobile Device Testing.
- Choose “Automated Tests”.
- Click on “Create a new run”.
- Select “Choose File” and upload the .apk file of your application. Once upload is complete, click on “Next“.
- On the “Setup test framework” page , select “Appium NodeJS” from the dropdown menu. Note, that this does not mean we are running an Appium Test. Selecting Appium NodeJS lets you upload shell scripts and source code for all file extensions. Thus, you are going with this selection of test framework.
- You want to upload the lockClocks.sh script as a test package so that we can push it to the device and run it. Download the lockClocks.sh file.
- Create a zip file that contains the lockClocks.sh file at the root of the zip file. Make sure the file name with extension only has “.zip“ as the extension. For example, a zip file with the name ”lockClocks.sh.zip“ will get rejected by Device Farm.
- Upload the zip file from step 7 by clicking on “Choose File” on the Setup test framework page.
- Once uploaded successfully, the default Testspec yaml file is selected in the dropdown of testspec files. Click on “Create a TestSpec”. This opens an editor where you can edit the TestSpec file.
- Modify the default testspec file to include the adb commands to lock CPU at a fixed frequency as shown here:
adb push $DEVICEFARM_TEST_PACKAGE_PATH/lockClocks.sh /data/local/tmp/lockClocks.sh
adb shell /data/local/tmp/lockClocks.sh
adb shell rm /data/local/tmp/lockClocks.sh
Figure 3: Testspec yaml file with changes for locking clock
Save the testspec file with a name such as “rooted_test” and click on “Save as New”. Click “Next”
11. To select your rooted devices click on “Create device pool”. Name your device pool “Rooted Devices”.
It is strongly suggested that you use the default Dynamic device pool selection method. This improves your availability posture when used with availability filter. For more information on designing device pools with private devices, check out our documentation.
Here, add an “Instance Labels” filter with value “Rooted”. This shows all the device instances that match that criteria of having the word “Rooted” in their name. We assign “Max devices“ a value of 1. This selects one available device out of the multiple device instances that match the given criteria.
 Figure 4: Dynamic Device pool creation with labels
Click on “Create”. Then, click on “Next“.
12. You are not making any changes to the “Specify Device State” page. Click “Next”.
13. On the Review and start run page, Click “Confirm and start Run”.
Analyzing the results
Once the test run is complete, click on the “Test Specification Log” on the job page by clicking on the name of the device in your test run. This shows the output of the Testspec yaml file execution. Here you can see the lockClocks.sh got pushed on the device and execute successfully showing the updated CPU clock frequency in the output.
 Figure 5: Output of successful adb commands to lock clocks on rooted device
This gives you a predictable CPU set up for our benchmarking tests, which typically run multiple times in a loop to obtain a baseline with high confidence.
In contrast, the same command on an unrooted device shows the following result.
 Figure 6: Output of failed adb commands to lock clocks on unrooted device
The command does not execute on an unrooted device as there is no root access.
Conclusion
You looked at an easy way to quickly provision and configure Android rooted devices to have them run on a fixed CPU clock frequency. With AWS Device Farm, you do not have to maintain your own fleet of rooted devices or worry about the scale at which you can run your benchmarking tests. In the next part, you will run benchmarking tests with this fixed clock frequency and identify potential bottlenecks for the scope of your application. To learn more about Android rooted private devices on AWS Device farm, check out our documentation.