AWS Cloud Operations & Migrations Blog
Securely share AWS CloudTrail Lake logs across accounts without replicating data
In 2022, we launched AWS CloudTrail Lake, an immutable managed data lake designed to simplify audit, security, and compliance investigations by capturing, storing, and analyze AWS user and API activities. By providing immutable storage for your activity logs, CloudTrail Lake protects the integrity of your audit data by providing read-only access. CloudTrail Lake integrates seamlessly across AWS accounts through AWS Organizations, providing a consolidated view of activities with an unchangeable record. A significant enhancement in security and compliance capabilities is the integration of zero-ETL analysis with Amazon Athena for CloudTrail Lake. This feature enables direct querying of immutable CloudTrail Lake logs alongside other data sources, dramatically simplifying compliance reporting and enhancing the efficacy of security investigations with trustworthy, tamper-proof data.
One of the challenges in querying your CloudTrail data is the ability to filter out data that you want specific teams to have access to query. For example, let’s say you set up a CloudTrail Organization event data store (EDS) in a delegated admin account for CloudTrail. However, specific teams in your organization require access to the CloudTrail data for the accounts they manage. But, due to your security requirements you are unable to provide access to query the CloudTrail Organization EDS, since it would provide them access to view data outside the accounts they managed. By using the AWS Lake Formation integration with CloudTrail Lake, you can now securely filter and share the data in your event data store across multiple AWS accounts within your Organization without duplication of the data.
In this post, you will learn how to use Lake Formation to set up data filters to only include specific account IDs from your CloudTrail Lake EDS. Then, we will demonstrate how to share the filtered data cross accounts within your Organization. This will allow us to securely allow a subset of filtered data to be queried from another account within your Organization.
Overview of solution

Figure 1. Organization event data store with Data filter applied
Prerequisites
For this post, you must have the following prerequisites:
- An AWS Organization with two or more AWS accounts
- Account A – Delegated Admin account for CloudTrail hosting the CloudTrail Lake Organization EDS with Lake query federation enabled.
- Account B – The account you would like to share the filter data for your CloudTrail EDS.
- Set up Lake query federation for CloudTrail Lake Organization EDS.
- Set up Resource Access Manager (RAM) for your Organization.
- Update AWS Lake Formation for cross-account data sharing.
Set up a Data Filter in Lake Formation for your CloudTrail EDS in account A
- Open AWS Lake Formation.
- Select Data filters.
- Select Create new filter.
- For Data filter name: cloudtrail-lake-account-b
- For Target database: aws:cloudtrail
- For Target table: [EDS table] (this is the table created for you during the query federation setup).
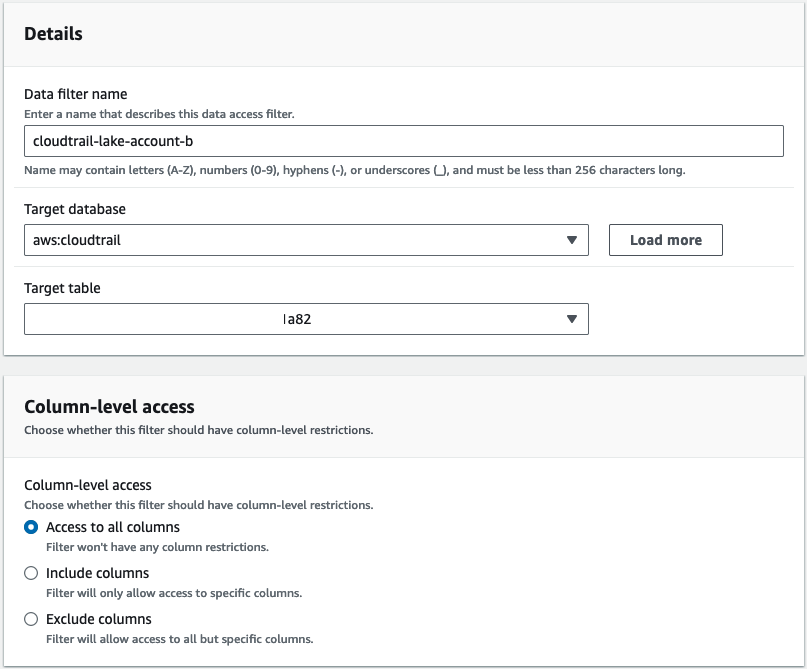
Figure 2. Create the data filter for account b
- Under Row-level access choose filter rows.
- Enter in: recipientaccountid = ‘[shared_account_id]’

Figure 3. Provide the account number for account b
Note: In the filter expression you can also include an expression to include multiple account IDs. For example recipientaccountid IN [‘123456789012′,’123456789012′,’123456789012’] would include all three accounts. For more information about what is supported in row filter expressions, see PartiQL support in row filter expressions.
- Select Create data filter.
Set up Lake Formation cross-account sharing for your CloudTrail EDS in account A
- Open AWS Lake Formation
- Select Databases.
- Select aws:cloudtrail and select Actions | Grant.
- Select External accounts and choose the Account you want to share with.
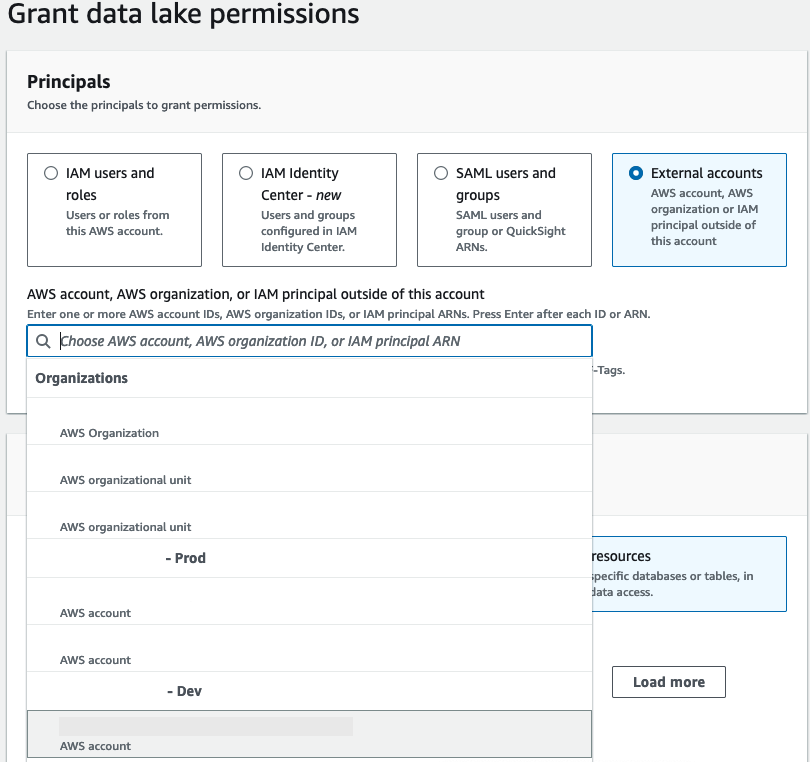
Figure 4. Select the account you provided as the recipient account in the previous section.
- Select describe under the sections Database permissions and Grantable permissions, then choose Grant.
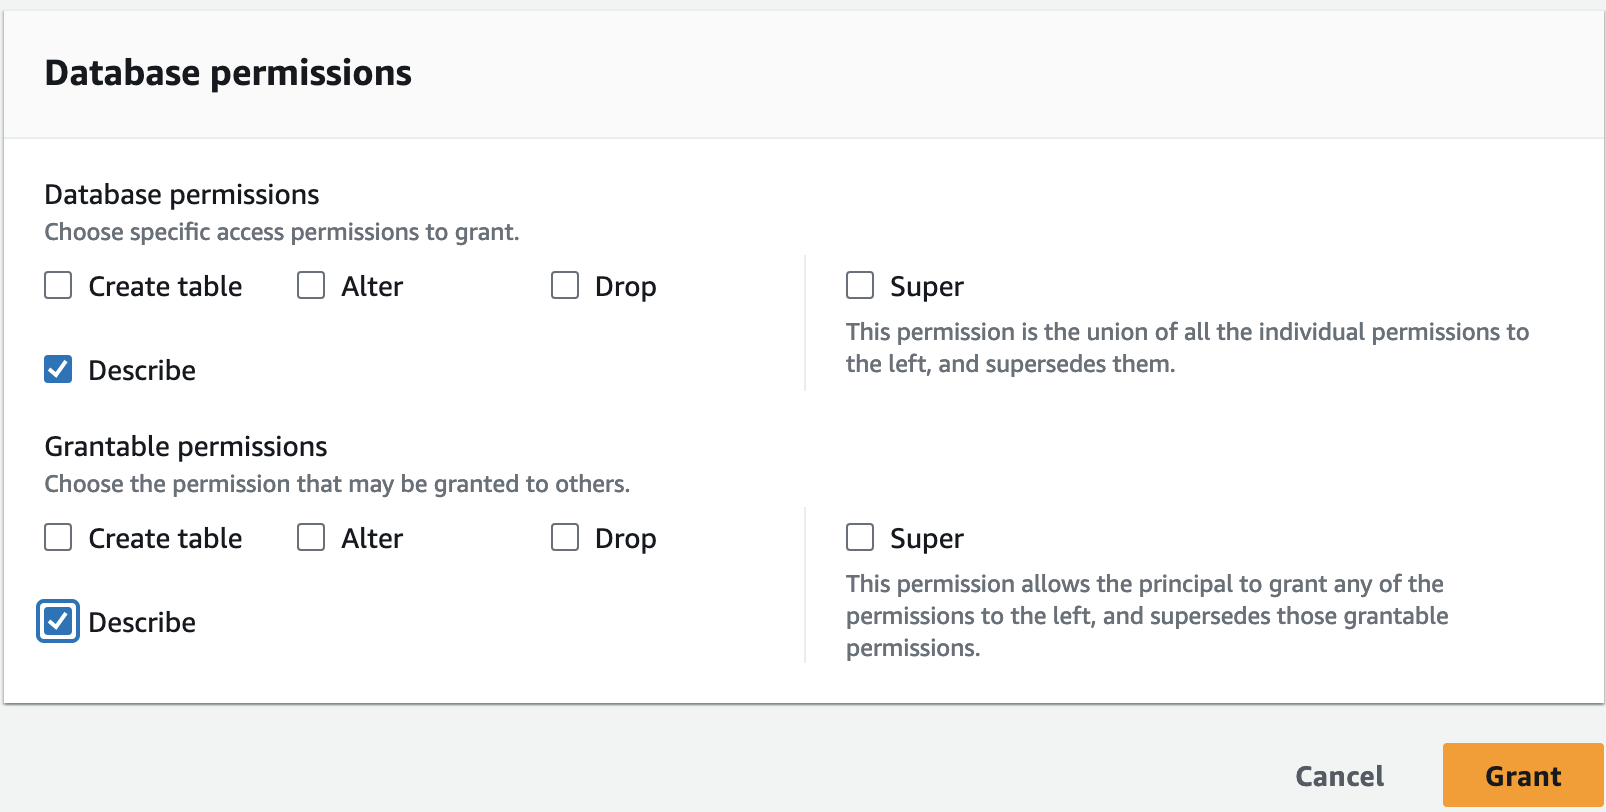
Figure 5. Grant describe permissions to account B
- Again, select Databases from the AWS Lake Formation menu.
- Select External accounts and choose the Account you want to share with.
- Select the aws:cloudtrail database and select Actions | Grant.
- Under Tables select CloudTrail Table.
- Under Data filters select the filter you created previously: cloudtrail-lake-account-b
- Under the section Database permissions choose “Select” for Data filter & Grantable permissions.
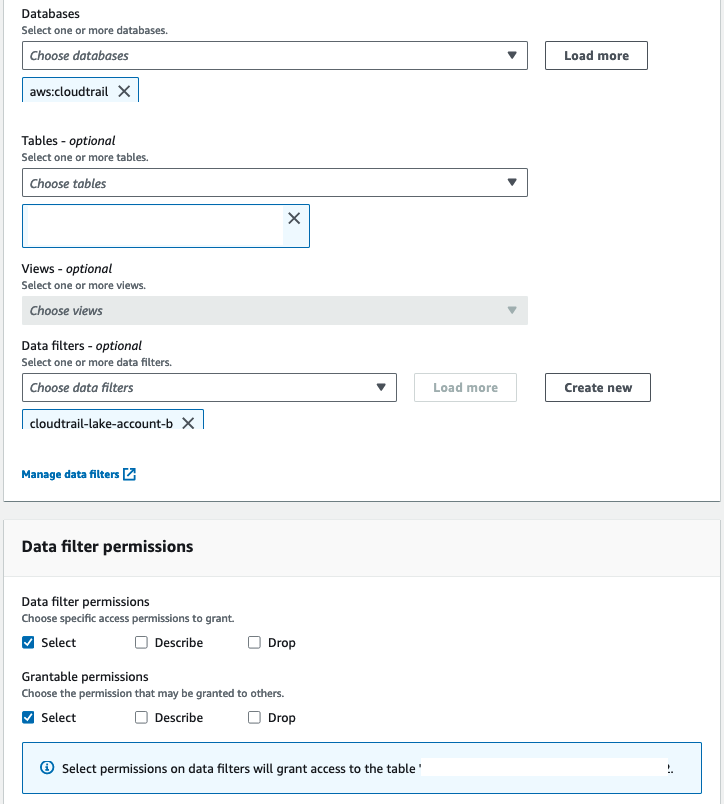
Figure 6. Grant permissions for cross account sharing
Accept resource share invitation in account B
AWS Resource Access Manager (RAM) helps you securely share your resources across AWS accounts, within your organization or organizational units (OUs). We will use RAM to accept the resource share which will allow account B to query data that has been filtered for account B.
- Open Resource Access Manager.
- Select Resource shares under the Shared with me section.
- You should have received two invitations, select each invitation and choose Accept resource share.
Note: If you have RAM set up to share resources without invitations, then you wouldn’t see the invitations.
Create a new database in AWS Glue to host shared CloudTrail DB in account B
- Open AWS Glue.
- Select Databases.
- Select Add database.
- Enter in account_b_cloudtrail for the database name.
- Select Create database.
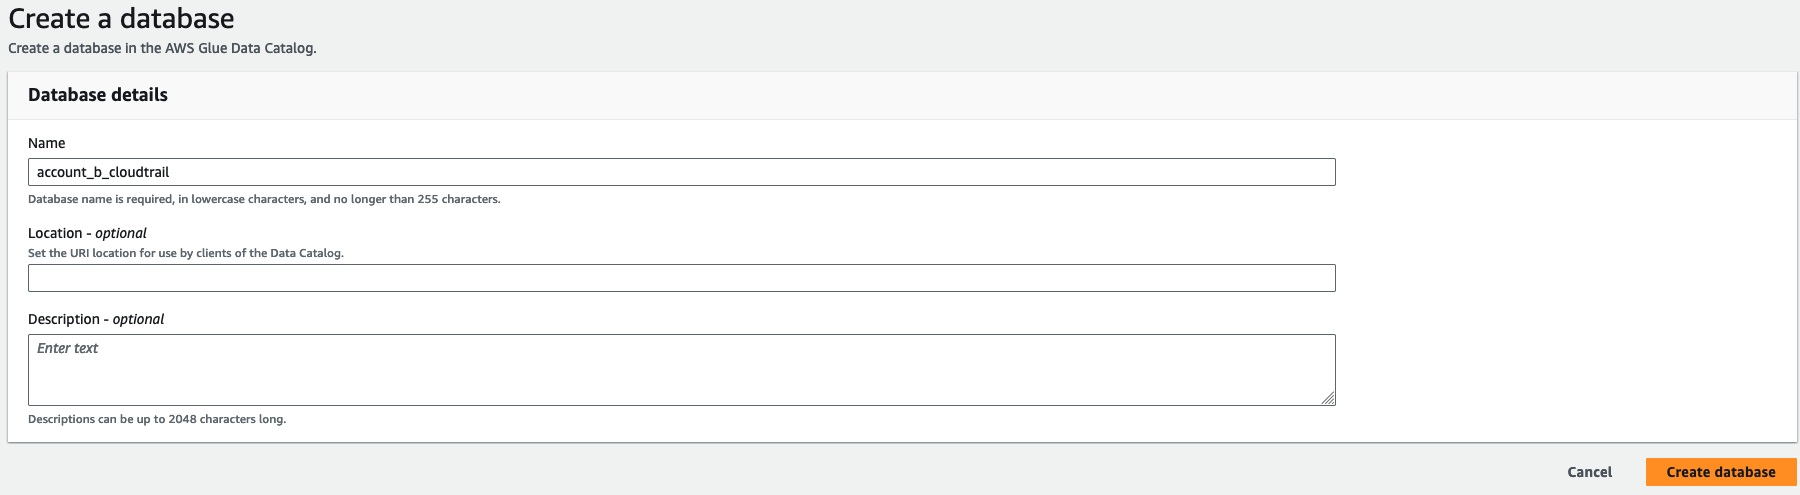
Figure 7. Database details for shared CloudTrail database
Set up a resource link in Account B for the CloudTrail EDS table in account B
- Open AWS Lake Formation.
- Select Tables.
- Choose the shared EDS table.
- Select Actions | Create resource link.
- For Resource link name type account_b_eds.
- For Database choose account_b_cloudtrail.
- Select Create.
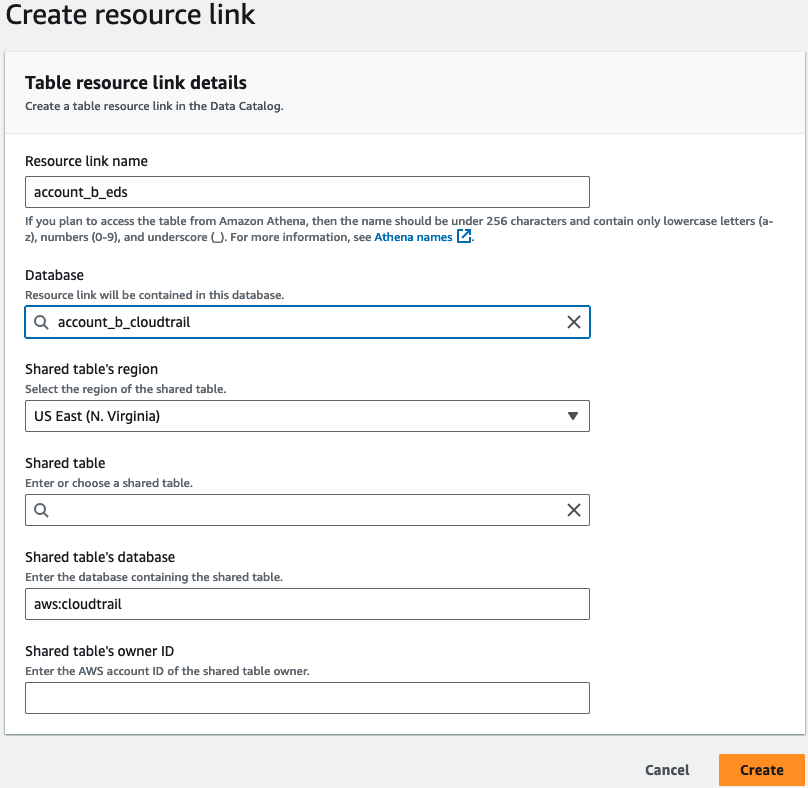
Figure 8. Resource link in account B for the CloudTrail EDS table in account b
Verify filtered data for CloudTrail Lake in Athena in account B
- Open Athena.
- Run the below query to verify data is filtered.
Note: We will query using Athena and we should only receive results that are pertaining to the account ID for account B.
Select * from account_b_cloudtrail.account_b_eds where recipientaccountid='[account_id]' limit 20;- Then, run the same above query using an account id that is not included in the data filter. This should return no records
Providing access to additional users in Account B
- In Account A, open AWS Lake Formation.
- Select Databases.
- Select aws:cloudtrail and select Actions | Grant.
- Select External accounts and enter in the IAM ARN from Account B you want to share with.
- Select describe under the sections Database permissions and Grantable permissions, then choose Grant.
Figure 9. Add additional users with permissions
- Next, select the aws:cloudtrail database and select Actions | Grant.
- Select External accounts and enter in the IAM ARN from Account B you want to share with.
- Under Tables select the CloudTrail Table.
- Under Data filters select the filter you created previously: cloudtrail-lake-account-b.
- Under the section Database permissions choose “Select” for Data filter.
- In Account B, open AWS Lake Formation.
- Select Databases [Region].
- Select account_b_cloudtrail and select Actions | Grant.
- Select IAM users and roles and select the IAM ARN you want to share with.
- Under the section Database permissions choose describe and select Grant.
(Optional) Automate set up using AWS CloudFormation
We will now download the CloudFormation templates which will allow us to automate the steps which we will go through manually below. If you would like to automate the process, please follow these optional steps in order to deploy the sample templates.
Note: Please ensure you have completed all prerequisites before proceeding with the CloudFormation deployment or with the manual process. We will need data from the prerequisites in order to complete the subsequent steps.
Download the sample AWS CloudFormation templates:
The following templates will create an AWS Glue Database, create a resource link table, and create a Lake Formation Data Cells Filter.
Now that you have downloaded the two templates, open a text editor to copy down some information from the resources that were created in the prerequisites. First, we will head to AWS CloudTrail Lake to get some data from our event data store.
Note: Ensure that you are in the management account for the AWS Organization or Delegated Administrator account for AWS CloudTrail.
- Navigate to the CloudTrail Lake console where the Organization EDS is located.
- Select Event data stores from the menu on the left side of the screen.
- Select the event data store that you created in the prerequisites (or an existing EDS with Lake query federation enabled) to view the details.
- In the Lake query federation section you will see a link to View Glue resources. Select the link to view the table details in AWS Glue.
- Take note of the number that is given under Name in the Table overview tab and copy it into a text editor.
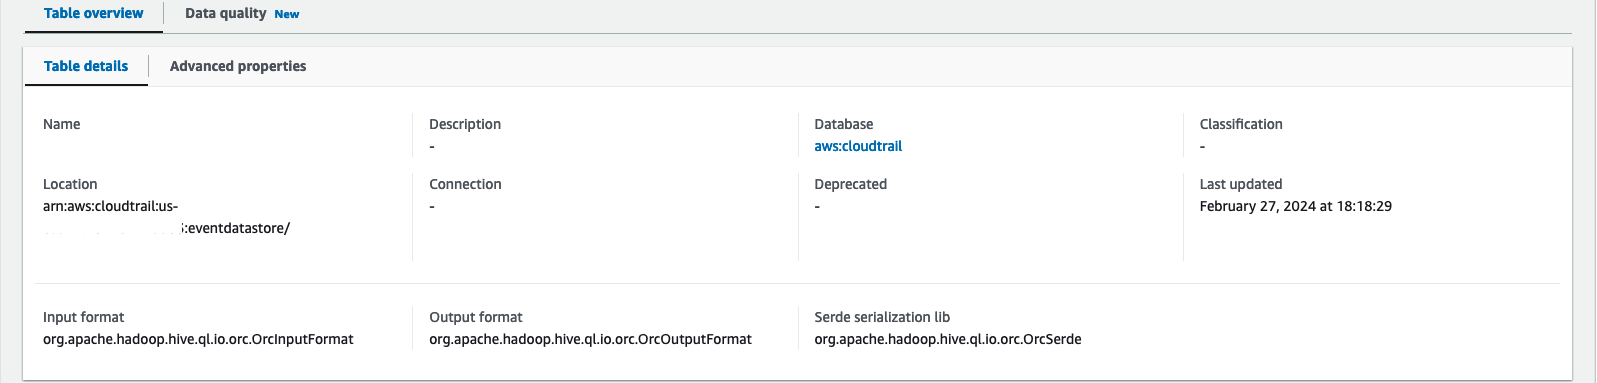
Figure 10. AWS Glue resources created by AWS CloudTrail lake
- Navigate the AWS CloudFormation console.
- Select Create stack and choose Upload a template file, then select the Lake Formation–Data filter file that you downloaded earlier.
- Provide a stack name and then add the member account IDs that you would like added to the filter.
- Provide the table name that you copied in step 5 and then choose next.
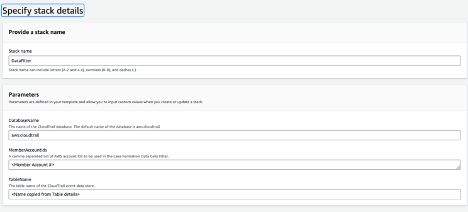
Figure 10. Stack details for the Data Filter template
- Accept the acknowledgements and choose submit.
Once the CloudFormation template successfully deploys you will now log in to the member account where the shared database will be hosted.
- Log in to the member account and navigate the AWS CloudFormation console.
- Again, choose Create stack and select upload a template file. This time you will choose the Lake Formation setup—Member Account file that you downloaded.
- Choose Next and then provide the stack details on the next screen.
- Ensure to provide the name that you copied from the Glue Table details screen. You will need to provide this name again in the SourceTableName parameter box.
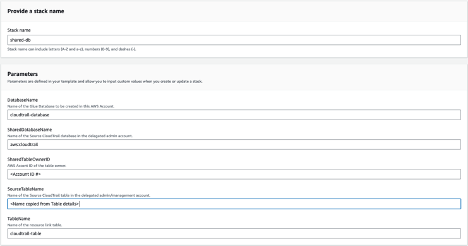
Figure 11. Parameters for the member account template
- Choose Next.
- Review the details and then choose Submit.
You have now seen how you can automate the processes that we initially walked through manually. By using CloudFormation it will be much easier to deploy a filter data solution at scale. Next, you will clean up any unwanted resources.
Clean up
To avoid further charges, delete any resources created during the previous steps.
- Delete the CloudFormation stacks that were launched earlier.
- Delete any event data store that you do not want to retain.
- Delete any resources used in Lake Formation.
Conclusion
In this post we demonstrated how the integration of AWS CloudTrail Lake and AWS Lake Formation simplifies the process of aggregating and analyzing CloudTrail logs while also introducing a robust, security-focused approach to data sharing across organizational accounts. By offering granular control over data access, you can effectively address the dual challenges of data security and accessibility. Now, event logs can be centralized for compliance while providing users and teams access to a subset of logs that are appropriate for their level of access to be used for security and operational troubleshooting.
Additonal resources:
- Announcing AWS CloudTrail Lake one-year extendable retention pricing option
- Audit and visualize ephemeral EC2 instances using AWS CloudTrail Lake as a zero-ETL data source in Amazon Athena
- Gain compliance insights using the open source community for AWS CloudTrail