AWS Cloud Operations Blog
Migrating from HashiCorp Packer to EC2 Image Builder
Customers often ask how to migrate their Windows and Linux operating system golden image build factory configured in Hashicorp Packer over to Amazon EC2 Image Builder so they can be free from the operational management of their build infrastructure, reduce developer dependency, create re-usable components, and easily integrate with Amazon Web Services (AWS) native services for end-to-end automation and cross account availability of standard machine images.
This post will demonstrate how to migrate Packer template build components specifically for commonly used Packer Provisioners, such as Ansible, Chef, Shell, and Files to their corresponding EC2 Image Builder components.
Prerequisites
This post assumes that you have a basic understanding of the following:
- JSON and YAML
- Programming experience
- Linux Operating Systems
- AWS Cloud
- Hashicorp Packer
- Ansible, Chef, or Puppet
Overview of EC2 Image Builder
EC2 Image Builder is a fully managed AWS service that eases automate of the creation, management, and deployment of customized, secure, and up-to-date server images pre-installed and pre-configured with software and settings to meet specific IT standards. Image Builder requires no manual steps for updating an image, nor do you have to build your own automation pipeline.
OS Image Build Workflow
Here’s a basic workflow of how Image Builder creates a new Amazon Machine Image (AMI) from base image:
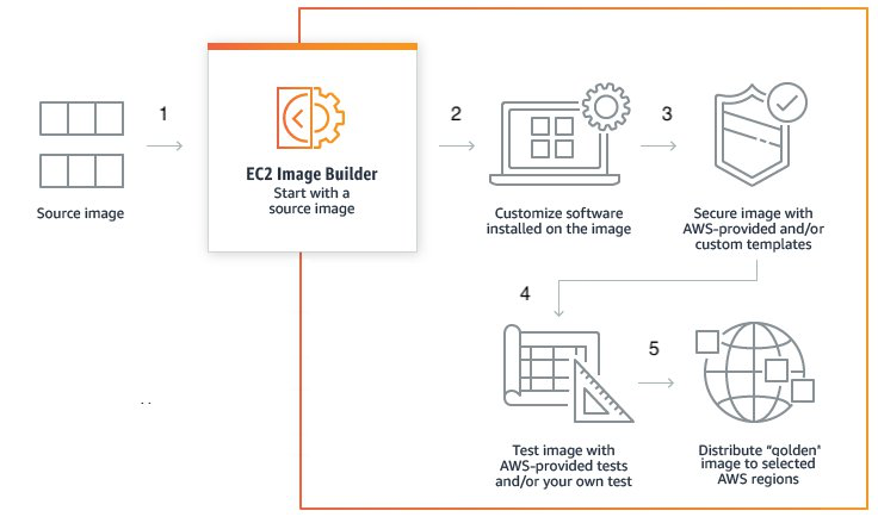
Figure 1: Image Creation Workflow in Image Builder
Utilize the Image Builder with the AWS console, AWS CLI, or APIs in order to create images in your AWS account. When used with the AWS console, Image Builder provides a step-by-step wizard covering the following steps:
Step 1: Provide starting artifacts: Start with a base OS image — either AWS Managed images or Custom AMI’s. Customers can also import their On-prem VM Images or snapshots and create Custom AMIs within AWS to use as an Image Builder input.
Step 2: Add and remove software, setting, and scripts: Select additional pieces of software for installation along with the required answer files, scripts, and settings from registered repositories and S3 buckets. Apply either your own or AWS-provided security settings (e.g., Amazon Inspector).
Step 3: Secure image: Use AWS-provided and/or custom templates.
Step 4: Run tests: Run your own tests and AWS-provided tests to validate images before deployment.
Step 5: Distribute images to accounts and regions: New AMI is generated and distributed across user-defined AWS regions.
Understanding Image Builder building blocks
In order to setup an Image Builder environment, you must understand these terminologies:
Components: A component defines the step sequence required to either customize an instance prior to image creation (a build component), or to test an instance launched from the created image (a test component).
After they are created, one or more components are grouped together via an image recipe or container recipe to define the plan for building and testing a virtual machine or container image.
Image recipes: A document defining the source image and the components applied to the source image in order to produce the desired configuration for the output AMI image.
Image pipelines: An image pipeline provides an automation framework for building secure AMIs and container images on AWS. The Image Builder image pipeline is associated with an image recipe or container recipe defining the build, validation, and test phases for an image build lifecycle.
Infrastructure Configuration: Image Builder launches ephemeral EC2 instances in your account in order to customize images and run validation tests. Create infrastructure configuration to specify the infrastructure details for the ephemeral instances that will run in your AWS account during the build process. Also, enable settings such as exporting image builder logs to Amazon S3 and disabling EC2 Instance Termination to help diagnose failures.
Distribution settings: Configuration that allows sharing AMI ID with other AWS accounts.
Learn more about Image Builder and its key components, Image Pipeline, Image Recipe, Build Component, Test Component, and Distribution settings, by visiting How-Image-Builder-Works.
Image Builder also enables re-use of existing building blocks into newer Image Pipelines.
Overview of Packer
Packer is an open-source tool developed by HashiCorp for creating identical machine images for multiple platforms from a single source configuration. When building images, Packer utilizes tools like Chef, Puppet, or Ansible to install and configure software within your Packer-made images.
OS Image Build Workflow
Here’s a basic workflow of how Packer creates an AMI as per the configuration defined in Packer template:
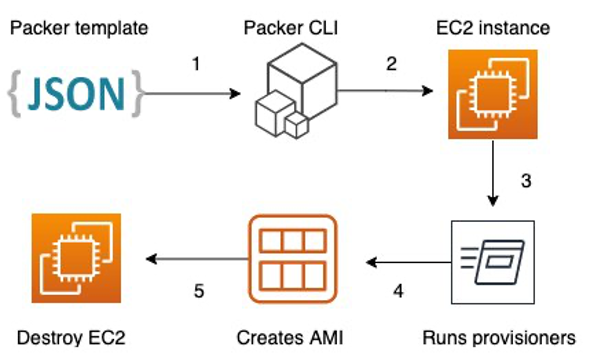
Figure 2: Image Creation Workflow in Packer
Step 1: Packer Template (Written in HCL or JSON): A single source configuration describing the customization.
Step 2: Execute Packer: Utilizes the Packer template file as an input to provision an EC2 instance.
Step 3: Build: Then it customizes that EC2 instance based on the Packer Provisioners provided in the Packer template.
Step 4: Register AMI: New AMI is generated and registered.
Step 5: Cleanup: Destroys the temporary EC2 instance created in step 2.
Understanding Packer Template and its Components
Packer’s behavior is determined by the Packer template, consisting of a series of declarations and commands for Packer to follow. This template tells Packer what plugins (builders, provisioners, and post-processors) to use, how to configure each of those plugins, and what order in which to run them. This can be written either in JSON format or with the newer HashiCorp Configuration Language (HCL) format.
Packer templates consist of three main components:
Builders: These define communication with the service creating the image, AWS in our case. It has a base image name and configuration to connect to it.
Provisioners: These help image customizations — installing packages, patching, OS Configuration, application deployment, and testing. Apart from shell scripts, utilize Chef, Ansible, or Puppet to deploy configuration.
Post-processors (optional): These run extra tasks to perform after the image has been created such as sharing AMI ID with other AWS accounts.
Mapping Packer Components to EC2 Image Builder Components
Keeping the functional role in mind, we mapped related components from both products that will help you plan individual component migration.
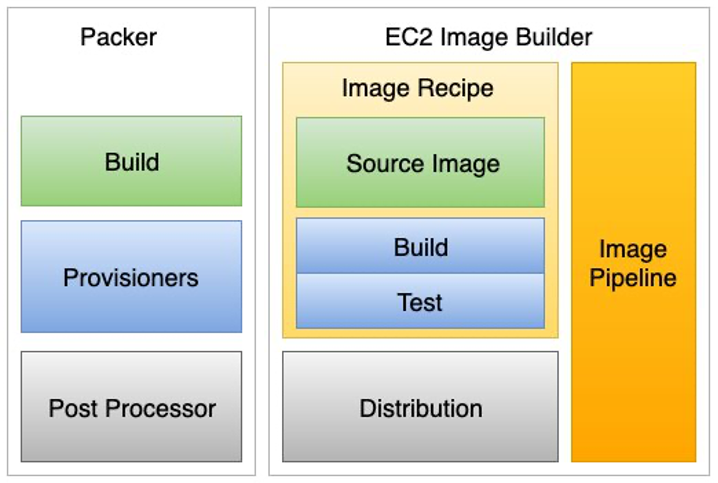
Figure 3: Mapping Components
Migrating the Builder component
The Packer Builder component is responsible for declaring base image. Below is a sample builder component from a Packer template. Here we’re pulling the latest Amazon EBS-backed AMI which will be used as base image and customized for generating a new AMI.
This configuration can be mapped in Image Builder via the Image Builder recipe in JSON just like Packer.
Migrating the Provisioner Components
Packer supports more than 15+ provisioners that help customize base image. Similarly, EC2 Image Builder offers Build and Test Components to customize images. Select from a pre-defined list of Amazon-managed components, write custom, reusable components. The AWS Task Orchestrator and Executor application is a standalone application that EC2 Image Builder utilizes to run components during the image build workflow. Utilize this application to develop new component definitions. In order to build a component, provide a YAML-based document, which represents the phases and steps to create the component. Create multiple build and test components instead of adding all customizations to a single component. Visit the EC2 Image Builder documentation link to learn about authoring custom components.
Read on to discover migration methods for commonly used provisioners.
File Provisioner
The File Packer provisioner uploads files to machines built by Packer. Achieve the same results in Image Builder by first uploading the required files to Amazon S3 and then utilizing action module S3Download to download an Amazon S3 object or KeyPrefix to a local destination path.
Below is an example of transferring a file to generated image. In Packer, the source file is uploaded from the host. In the Image Builder, the source file is stored in an Amazon S3 bucket.
Packer’s file transfer:
Image Builder’s file transfer:
Shell Provisioner
The Shell Packer provisioner provisions machines built by Packer via shell scripts. It can execute an array of commands via Inline option or execute scripts via script option. Similar outcome can be achieved in Image Builder via the ExecuteBash action module, which allows you to run bash scripts with inline shell code/commands.
Below is an example of executing a set of commands in shell environment and the method to execute scripts.
Packer’s shell execution:
Image Builder’s shell execution:
Furthermore, select from the applicable list of Image Builder Managed Build and Test components as an alternative to developing and maintaining your own custom scripts. For example, instead of using ‘yum’ command to update the image, add the AWS Managed Component update-linux in the Image Recipe’s Build Component section. Likewise, to enable security assessment for your image, add the AWS Managed Component inspector-test-linux to your Image Recipe’s Test Component section.
Ansible Provisioner
The Ansible Packer provisioner runs Ansible playbooks. It dynamically creates an Ansible inventory file configured to use SSH, runs an SSH server, executes ansible-playbook, and marshals Ansible plays through the SSH server to the machine being provisioned by Packer.
In Image Builder, the host executing the playbook is also the host that must be configured. Therefore, the playbook must be configured to execute via the localhost. In this example, the host is set to 127.0.0.1, which is localhost. The gather_facts is set to false, and the connection type is set to local.
Below is an example of executing a playbook. Packer deploys playbook via Ansible provisioner, but in Image Builder we first install Ansible, then download the playbook from an Amazon S3 bucket, and finally perform a cleanup at the end.
Packer’s Ansible playbook execution:
Image Builder’s Ansible playbook execution:
For a more detailed explanation, refer to this post: Executing Ansible playbooks in your Amazon EC2 Image Builder pipeline.
Chef Client Provisioner
The Chef Client Packer provisioner installs and configures software on machines built by Packer using chef-client. Packer configures a Chef client to communicate to a remote Chef Server to provision the image. In Image Builder, the host executing the recipe is also the host that must be configured as a Chef Server. Chef client is installed and run-in local mode to execute recipe.
Below is an example of Packer executing a Chef recipe. In Image Builder, we first install Chef, then download a recipe from an Amazon S3 bucket, and finally perform a cleanup at the end.
Packer’s Chef Client Provisioner:
Image Builder’s chef client:
For more detailed explanations, refer to https://github.com/aws-samples/amazon-ec2-image-builder-samples/tree/master/Components/Linux/chef-recipe-execution-linux
Migrating the Post Processor component
Packer’s ‘Post Processor’ can run extra tasks to conduct after the image has been created, like sharing AMI ID with other AWS accounts. In Image Builder, this can be achieved by creating distribution settings. A distribution configuration allows you to specify the name and description of your output AMI, authorize other AWS accounts to launch the AMI, copy the AMI to other accounts, and replicate the AMI to other AWS Regions. For a more detailed explanation, refer to this user guide: Setting up cross-account AMI distribution.
Create Image Builder Pipeline
Once every Packer component is migrated, set up, configure, and manage AMI image pipelines via the Image Builder console, through the Image Builder API, or with Image Builder commands in the AWS Command Line Interface (AWS CLI). Refer to the setting up image pipeline instructions in order to create a pipeline via an existing recipe, components, and distribution settings.
Conclusion
This post demonstrated how to migrate from HashiCorp Packer to EC2 Image Builder. We discussed how to map Packer components to different EC2 image builder resources. Moreover, we shared additional features offered by EC2 Image Builder like AWS Managed Components, Image Builder Pipeline, and Distribution Settings, which increases productivity and reduces operations for building compliant images. Also, there are no additional costs to utilize EC2 Image Builder. However, standard pricing applies for the underlying AWS resources used to create, store, and share the images.
For further reading, see Amazon EC2 Image Builder documentation in order to deep dive into every feature offered by this service.