AWS Cloud Operations Blog
Root and Nested Organizational Unit Support for Customizations for AWS Control Tower
Customers often use AWS accounts as a boundary to segregate their workloads, environments, business units, compliance requirements, or any type of logical isolation that suits their business. An AWS account serves as a hard boundary by design – each account is its own logical entity with controls, limits, and guardrails. Large customers typically have many AWS accounts serving various functions, and, at that scale, it becomes difficult for them to manage and govern accounts on their own.
Over the years, we have introduced various services to help customers grow and scale their AWS resources. Recently, we introduced a new feature that lets you scale further by providing added customization when managing your AWS accounts. First, we will introduce you to various services and concepts, and then we will dive into the purpose of this post.
AWS Organizations lets you group your accounts into organizational units (OUs) that you can centrally manage. Apply tag polices to classify or track resources in your organization, and provide attribute-based access control for users or applications. In addition, you can delegate responsibility for supported AWS services to accounts so that users can manage them on behalf of your organization.
AWS Control Tower creates your landing zone using AWS Organizations, bringing together ongoing account management and governance, as well as implementation best practices based on AWS’ experience working with thousands of customers as they move into the cloud. AWS Control Tower lets builders provision new AWS accounts in a few clicks, while you have peace of mind knowing that your accounts conform to company-wide policies. AWS Control Tower provides guardrails that can be attached to your OUs to simplify governance.
The Customizations for AWS Control Tower (CfCT) solution combines AWS Control Tower and other highly-available, trusted AWS services to help customers more quickly set up a secure, multi-account AWS environment using AWS best practices. You can easily add customizations to your AWS Control Tower landing zone using an AWS CloudFormation template and service control policies (SCPs). You can deploy the custom template and policies to individual accounts and OUs within your organization. This solution integrates with AWS Control Tower lifecycle events to make sure that resource deployments remained synced with your landing zone. For example, when a new account is created using the AWS Control Tower account factory, the solution makes sure that all of the resources attached to the account’s OUs will be automatically deployed.
On November 18, 2021, we announced the support for AWS Organizations nested OUs in AWS Control Tower. This feature provides further customization between groups of accounts within your OUs, thereby giving you more flexibility when applying policies for different workloads or applications. This becomes an important scaling mechanism as you add accounts in your AWS Control Tower environment, and as policies applied at the OU-level automatically apply to accounts within the OU. In the AWS Control Tower console, the governance status of each OU is representative of the status of the OUs nested beneath it in the hierarchy. To learn more about this feature, considerations, and limitations, visit the Nested OUs in AWS Control Tower section of the AWS Control Tower User Guide.
We are excited to announce the support for root as an OU and nested OUs deployments in the CfCT solution. This lets you deploy to nested OUs, thereby taking advantage of the added flexibility that AWS Control Tower nested OUs offers. CfCT has also added a feature allowing deployments to your entire organization by specifying the organization Root OU instead of listing each OU independently as previously required. Both features, Root when Root OU is used and nested OU, are fully supported for CloudFormation StackSets and SCPs.
In this post, we will demonstrate how you can leverage the new nested OU support for CfCT, which lets you create a robust OU structure that makes more sense to you and your business requirements. We will also demonstrate how to deploy resources and apply SCPs to these nested OUs and organization Root, should you need this ability.
Example Use Case
In the following configuration we want to enable our developers to freely use any service during the development of our application “Pet Store”, but we need some budgets in place to make sure that the expense does not get out of control. We would like to put an AWS Budget in place with notification to the developer’s manager when the forecasted expense will exceed 80% of $1,000 USD. In addition, we want to make sure that any budgets we put in place for the entire organization are not modified except via the CfCT pipeline, so that changes can be tracked.
We will walk you through the following use case where the root OUs, and nested OUs can be used with AWS Control Tower and CfCT using both CloudFormation templates and SCPs.
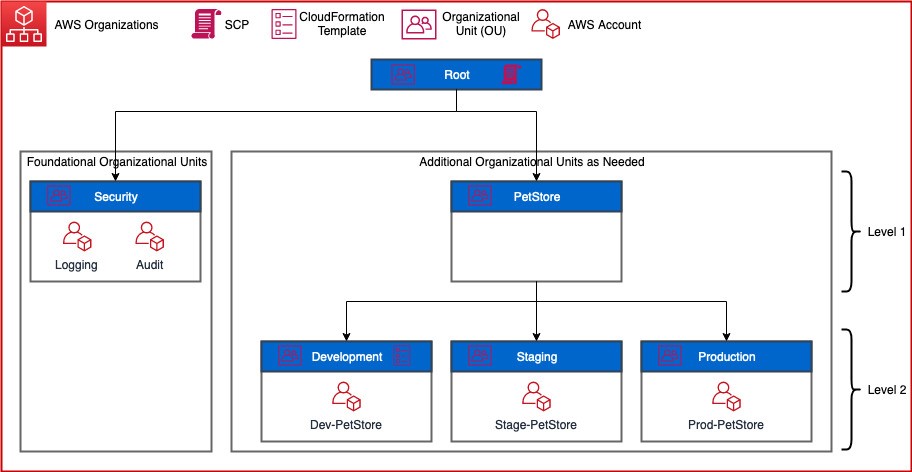
Figure 1: Architecture of Pet Store with SCP applied to the root OU
Solution Overview
- Foundational OUs – This is the OU that AWS Control Tower deploys when it’s setup in your account. Within this OU, it will place two accounts that it creates: Logging and Audit. Note that some of the names could be different because AWS Control Tower lets you modify names.
- Additional OUs as Needed – This is the structure you create that works best for your organization. Above, I have decided to have my parent OU named for the project, PetStore. Within each nested OU (Development, Staging, and Production) I have a single account.
- Deploy a CloudFormation template to my development OU within my parent OU of PetStore, thereby setting the AWS Budget.
- Deploy an SCP to the root OU that limits changes to AWS Budgets outside of the CfCT pipeline.
Best Practices
- You may only go five levels deep, which is consistent with AWS Organizations, and AWS Control Tower.
- If you specify the Root OU in the CfCT manifest.yaml, then any other Ous should not be included as they will be ignored.
- If you are specifying the Root OU, then only the accounts enrolled in AWS Control Tower will be deployed targets.
- When specifying the OU path, you should exclude the Root OU
- Incorrect: Root:PetStore:Development
- Correct: PetStore:Development
Prerequisites
- AWS Control Tower – Please make sure that you have AWS Control Tower deployed and it is upgraded to the minimum version of 2.7.
- CfCT – Please ensure you have the the minimum version (2.2.0) deployed which released in December of 2021
- Please review the following blog for concepts and steps which we will not cover, Fast and Secure Account Governance with Customizations for AWS Control Tower
- Please ensure AWS Cost Management is configured by following this link to you AWS Console. If the page displays “Since this is your first visit, it will take some time to prepare your cost and usage data. Please check back in 24 hours” it can take up to 24 hours for you to have a successful deployment.
Solution Walkthrough
We will demonstrate the deployment of a CloudFormation template to a nested OU for setting up AWS Budgets, and then we will deploy an SCP limiting the modification and creation of AWS Budges outside of the CfCT pipeline.
CloudFormation Template Example
Create a CloudFormation template named pet-store-developer-budget.yaml under the templates folder of your deployed CfCT pipeline with the following contents.
Edit the manifest.yaml file under the root of your pipeline configuration with the following under resources:
- Note that under organizational_units I have a list with a single item which contains my parent OU (level 1) with my nested OU (level 2) on the same line separated with a colon. This is how we address nested OUs within the pipeline.
When complete, your manifest should look like mine.
SCP Example
Create the SCP policy file using JSON named budget-scp.json under the policies folder of your deployed CfCT pipeline with the following contents:
- This SCP will do the following:
Edit the manifest.yaml file under the root of your pipeline configuration with the following under resources, just like you did for the CloudFormation step.
Complete manifest.yaml
You should now have a manifest like mine as follows, pet-store-developer-budget.yaml copied to the templates folder, and budget-scp.json copied to the policies folder.
The following is a screenshot of my folder structure. Yours should look very similar at this point.
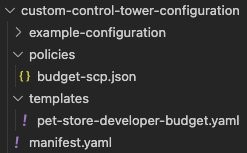
Figure 2: File and folder layout
Once your configuration has been successfully deployed, you should see a screen like mine (as follows) if you go to CodePipeline → Pipelines → Custom-Control-Tower-CodePipeline.
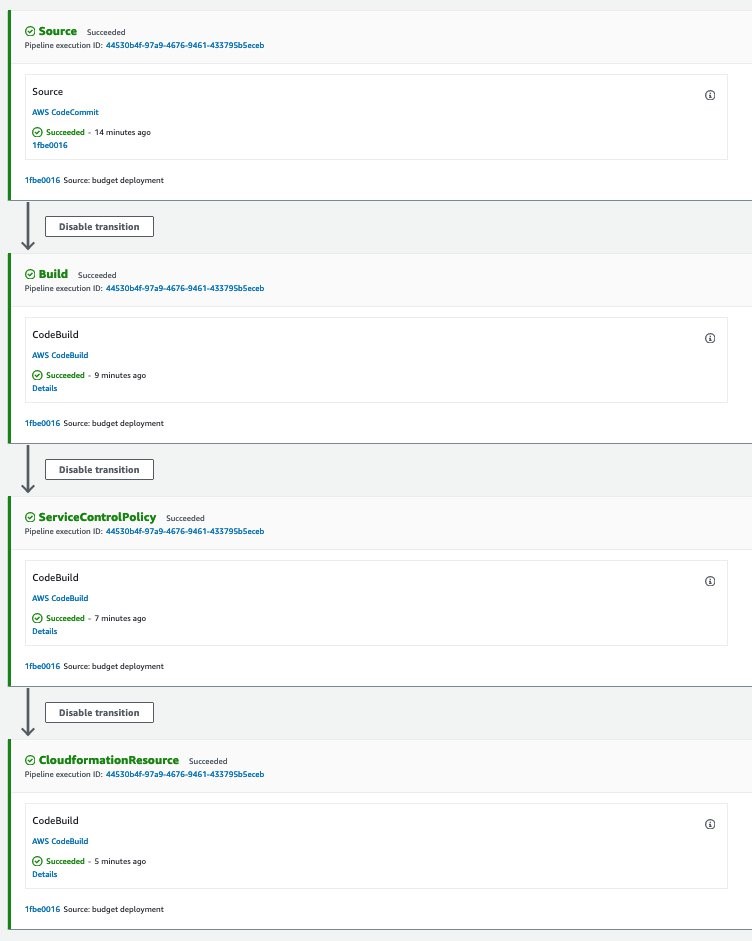
Figure 3: Successful CodePipeline deployment
Verification
Make sure that your manifest.yaml has all of the same settings, the CloudFormation template, and the SCP in place, and then update your code repository. Once updated, your pipeline will run deploying the configuration to the nested OUs.
Once the CloudFormation template to our nested OU is deployed, then we can log in to the Dev-PetStore account, go to CloudFormation → Stacks →. Find the stack with PetStore-Devloper-Budget in the name→ Resources tab →. And then select Pet Store Developer Budget.
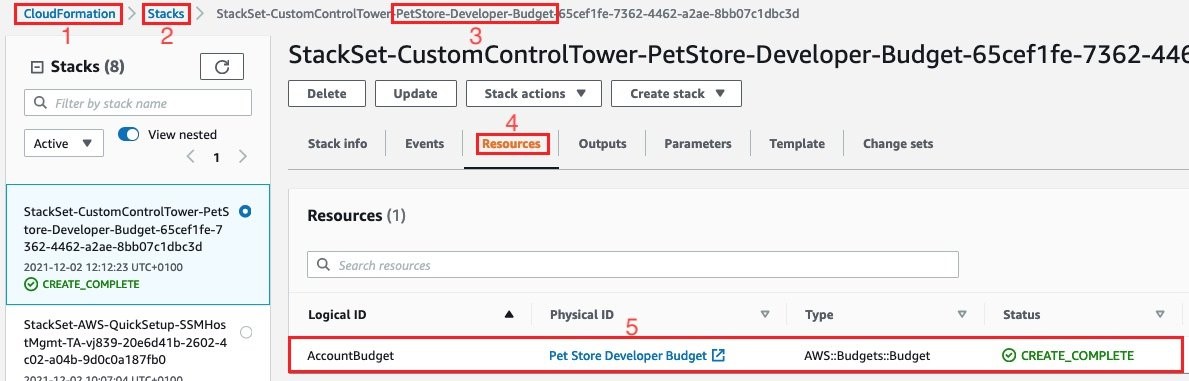
Figure 4: PetStore-Devloper-Budget CloudFormation Resource
- You can now explore the budget that was deployed using nested OUs via CfCT.
From the previous step, selecting #5 would bring us to the following screen, and would test if the SCP that I put in place is working from the Root OU of AWS Organizations. Select the Pet Store Developer Budget → Actions → Delete.
- You should now get an error, such as the following one, that indicates an error deleting the budget. This is because of the protections that we put in place for this budget via the SCP.
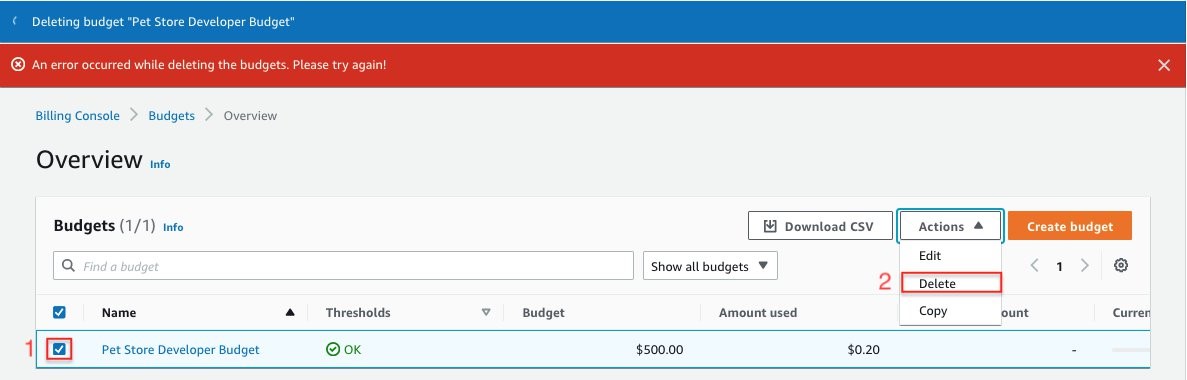
Figure 5: Trying to delete the budget results in error
Clean-up
- Remove the resources that you put in the manifest.yaml file by deleting the lines, and refer to the Complete Manifest section above.
- Remove the templates/pet-store-developer-budget.yaml file from the pipeline.
- Remove the policies/budget-scp.json from the pipeline.
- Make sure that the pipeline completes successfully.
- Delete the CloudFormation StackSet Instances of CustomControlTower-PetStore-Developer-Budget by following these instructions.
- Delete the CloudFormation StackSet CustomControlTower-PetStore-Developer-Budget by following these instructions.
Conclusion
We have walked you through the process of deploying both a CloudFormation template and an SCP to nested AWS OUs. Using this new feature from CfCT, we can create OUs that make more sense to you and your organization. Try out this solution and let us know your thoughts in the comments section.
For more information about the solution, see the CfCT Implementation Guide for a description of solution components, step-by-step directions, cost estimates, and more. Visit our GitHub repository to download the source code for this solution, and to share your customizations with others as needed. For more solutions like this one, visit the AWS Solutions Library.