AWS Cloud Operations Blog
Strategies to Distribute Visibility in Multi-account Environments
Speed matters in business, and AWS customers want to move quickly and securely when they choose to innovate and develop on our platform. As customers scale their AWS footprint, a majority of them adopt a multi-account strategy to separate their workloads and better enable their teams to build rapidly. The AWS multi-account strategy provides guidance to help customers design a multi-account architecture to securely and efficiently manage their applications.
Many AWS customers adopt a multi-account environment, such as UMB. UMB Fund Services has been a leader in leveraging the cloud to service alternative investment funds. UMB’s AltPro® product has been moving rapidly to become a SaaS-based solution. By establishing a multi-account strategy in an AWS environment, the core shared services could be utilized while providing the ability to operate as a SaaS-based solution. UMB leverages several foundational AWS services paired with a well-thought-out multi-account AWS Organizations design. They leverage an account structure that separates their workloads into the 3 different areas of the SDLC lifecycle (Dev, QA, and Prod) and allows them to more easily map costs and usage to various business units (BUs).
Providing access to the logs, data, metrics, or reports associated with accounts to different teams or business units within a central IT organization can reduce management burden and improve efficiency for those teams or business units. It is often necessary to provide access to only the data the teams require, and ensure other data within the broader AWS environment is not visible. The ability of a team or BU to see the data associated with their respective set of accounts reduces the need for central IT teams to create ad hoc reports and can put more ownership on teams or BUs to keep their resources compliant with required policies.
This blog post discusses three design patterns that you can apply to your multi-account environment, and walks you through two examples that showcase how you can implement these patterns in your own environment.
Three patterns to distribute visibility in your multi-account environment
We define 3 patterns below that can help determine the strategies you can use to distribute visibility to the right team/BUs within your organization. Each of these patterns takes into consideration the need to not only grant visibility to a set of information, but also to restrict visibility to other sets of similar information in your AWS environment. Once we have provided an overview of each pattern, we will give examples to go along with these patterns and walk you through implementing 2 of these examples in your own AWS environment.
Note: not all patterns will work for all data or services. If you are trying to provide visibility to specific data or a service that is not listed as an example, determine which pattern is possible to best meet your requirements.
Pattern 1 – Partitioning within AWS Services
Many AWS Services support the ability to define what can be viewed within the AWS Management Console via AWS Identity and Access Management (IAM). For certain services, you might need to create additional resources that aggregate data, and you can then apply IAM policies to users and roles that define which of these aggregating entities they have permissions to view.
Creating multiple AWS Config aggregators that aggregate against sets of accounts and restricting access via IAM policies is one example illustrated in this blog. Another example is delegating visibility or management of portions of AWS Organizations using delegated administrator for AWS Organizations.
Pattern 2 – Data visualization using dashboards
Dashboards can be a flexible way to not only visualize data, but control access to who can see portions of a broader dataset. In AWS, you can leverage Amazon QuickSight for data visualization, which is a serverless business intelligence tool with native machine-learning integrations. Amazon QuickSight supports row level and column level security so you can define the right level of access to the dashboard users from your various BUs/teams.
Examples include creating a dashboard based on your aggregated cost and usage report (CUR) and then defining access to subsets of accounts so lines of business or account owners can view cost data only for their account.
Pattern 3 – Direct data distribution to teams
In certain cases, teams are self-sufficient once they have the data they need. This can help reduce the demand on Central IT teams to maintain dashboards, or configure service level permissions. In this pattern, data is fed to a secure location and then the appropriate members of the various teams/BUs within your business can pull down this data to build dashboards, run ad hoc queries, and use the data as they wish to operate more effectively.
An example would be setting up multiple S3 buckets and delivering CloudTrail log files to separate buckets, where each bucket receives log files only from a subset of your AWS accounts. You then give appropriate access to those S3 buckets to allow your teams to self-serve the CloudTrail data related to their accounts.
Walkthroughs
Partitioning within AWS services using AWS Config
Solution Overview
AWS Config aggregators collect AWS Config configuration and compliance data for supported resources in multiple accounts and regions. In some instances, teams want central visibility to their resource configuration data, but it’s important for them to not see the resource configuration data of other teams. In this example solution we are assuming there are two business units (BU1 and BU2). We have created an organization that follows the AWS multi-account strategy best practices for designing workload accounts based on business units. Although AWS Config aggregator integrates with AWS Organizations, we will not be using this integration. By doing this without the integration, it will allow us the ability to create multiple aggregators and only allow access to their respective business unit accounts using invitation authorizations.
In this walkthrough, we will:
- Create 2 Config Aggregators in a Shared Viewing account – 1 for each example BU with Aggregator Invites to the respective BU accounts using a CloudFormation StackSet from the management account.
- This can be expanded to match your environment. For Example: Creating 1 Aggregator for each team or BU.
- Using a CloudFormation StackSet for each business unit, we accept the invite from the respective aggregator which effectively grants permissions for the aggregators to view the respective business unit accounts’ Config information.
- Create an IAM Identity Center permission set and user for each business unit that allows access to view only their respective aggregator.
Architecture Diagram
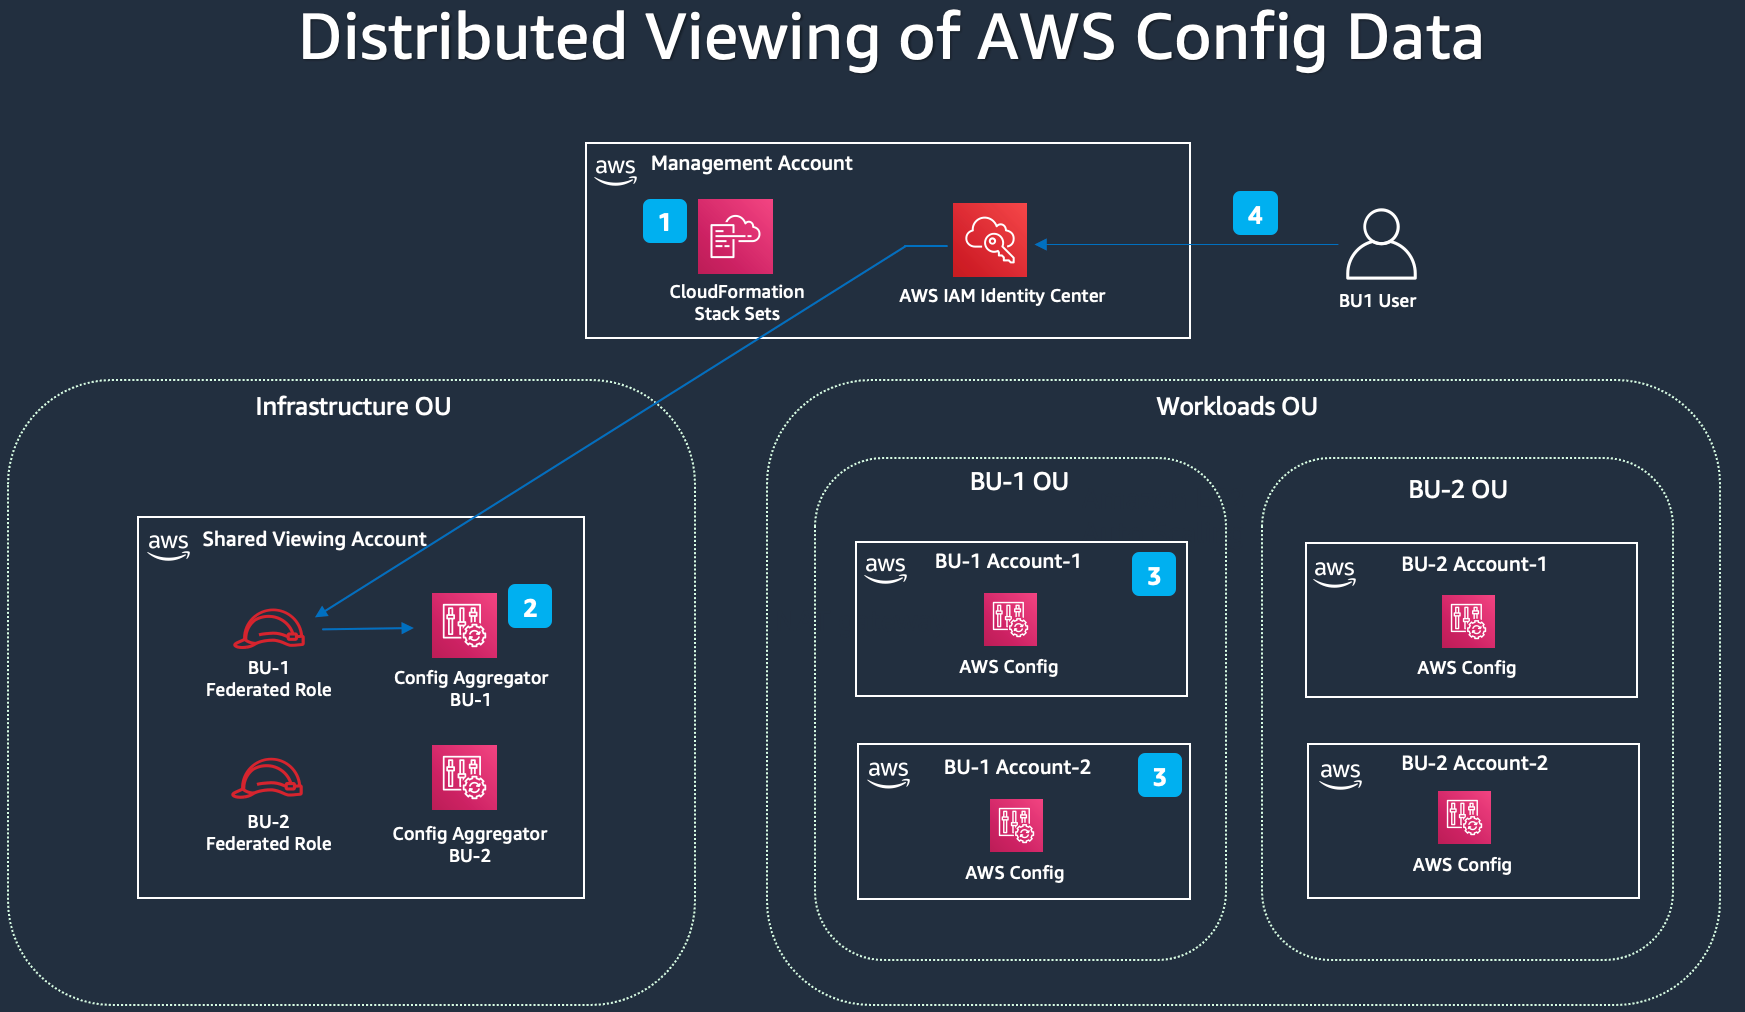
Figure 1. Within our multi-account environment we have a shared viewing account that contains multiple Config aggregators. Users from different business units can leverage identities created through AWS IAM Identity Center to assume a role and access the shared viewing account. The permissions applied to their role will allow them only to see the Config aggregators associated with accounts they are responsible for.
Prerequisites
For this walkthrough, you should have the following prerequisites:
- AWS Config enabled in each BU-1 account (you can create 2 additional test accounts within your AWS Organization to follow along with this walkthrough)
- AWS Organizations enabled with all features enabled
- Trusted access will enabled within your AWS Organization
Solutions Walkthrough
- Deploy a Config Aggregator for each Business Unit
- Log into your Shared Viewing Account, and ensure you are in your home region (in this example the home region is us-east-1).
- From the CloudFormation StackSets console, create a StackSet using the below template which is configured to build the base aggregator in the Shared Viewing Account, and request an aggregator authorization from each member account sharing data with the aggregator. In this example, the source accounts are 2 account ids associated with BU-1, and the source regions will be us-east-1 and us-east-2.
-
- On the Specify StackSet details page of the CloudFormation StackSet wizard, set the StackSet Name as ConfigAggregator-BU-1, the pAWSConfigAggregatorName parameter to AWSConfigAggregator-BU1 and enter the account IDs for each BU-1 account as comma separated values in the pAggregatorSources parameter (these are the 2 source accounts associated with BU-1 in this example, and you can add additional accounts here based on your AWS environment).
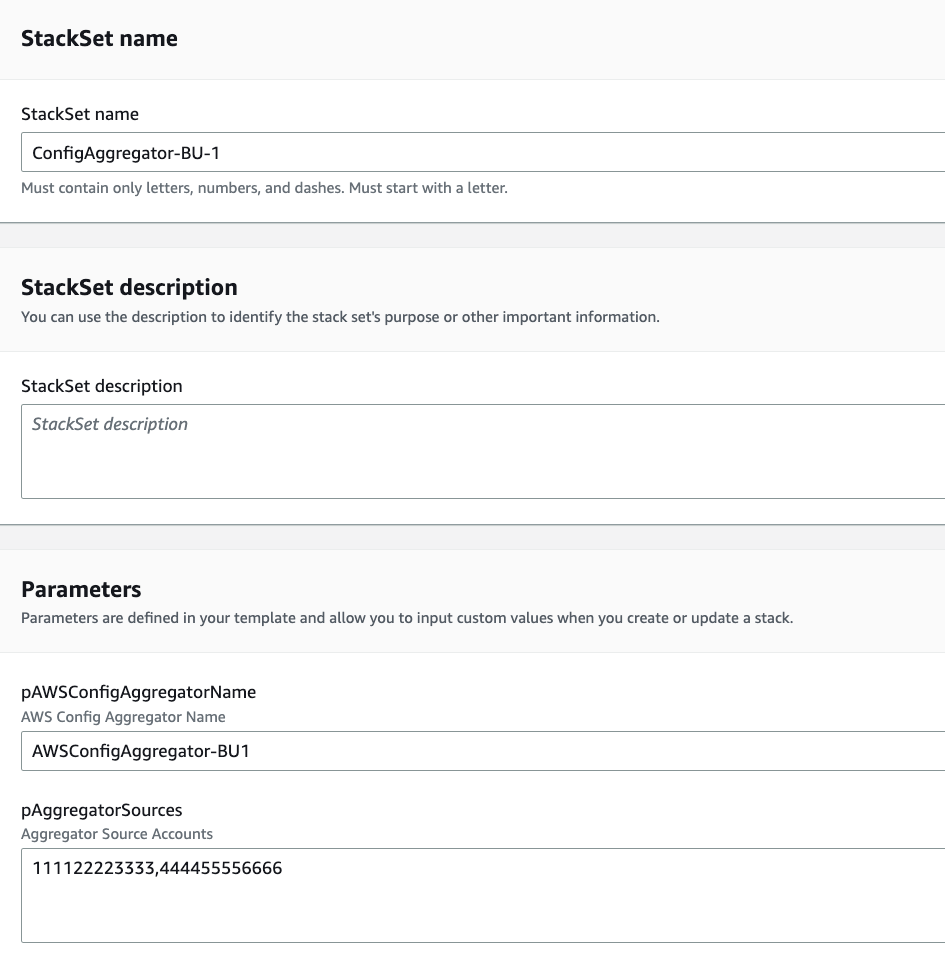
Figure 2. The StackSet name field should display “ConfigAggregator-BU-1”, the StackSet description field should be empty, the pAWSConfigAggregatorName parameter should display “AWSConfigAggregator-BU1” and the pAggregatorSources parameter should list the 2 source accounts associated with BU1.
-
- On the Configure StackSet options screen of the CloudFormation StackSet wizard, accept defaults.
- On the “Set deployment options” screen of the CloudFormation StackSet wizard, set the below parameters.
-
-
- Set the AWS OU ID to the Infrastructure OU ID (found in AWS Organizations console) where the Shared Viewing account (the account where different business unit users would log in to see the AWS Config information for the resources in their own accounts) exists in our environment.
- Select Intersection from the drop down and add the account number for the Shared Viewing account to ensure that a stack is not deployed to other accounts within the Infrastructure OU.
-

-
- On the Set deployment options screen, set the deployment region to us-east-1 to deploy a Config Aggregator in us-east-1 and request aggregator authorization from the source accounts and regions that were specified for BU-1.

Figure 4. For deployment options of your StackSet, select “US East (N. Virginia)” from the drop-down in the Specify regions section
-
- Select Submit to deploy the StackSet.
- Deploy aggregation authorizations to BU-1 accounts
Using CloudFormation StackSets from us-east-1 region (home region) of the Shared Viewing account, deploy Config aggregation authorizations to the BU-1 accounts. Since all of the BU-1 accounts (BU-1 Account-1 and BU-1 Account-2) are in the BU-1 OU, deploy the StackSet to the BU-1 OU without any filters.
-
- Log into the Shared Viewing Account
- From the CloudFormation StackSet console, create a StackSet using Service Managed permissions using the below template. This StackSet will authorize the aggregation for Config to the Shared Viewing Aggregator created in the previous step.
-
- On the Specify StackSet details page of the CloudFormation StackSet wizard, set the StackSet Name to ConfigAggregatorAuthorization-BU-1, set the pAWSConfigManagementAccountId parameter to the Shared Viewing account ID, set the pAggregationRegion to us-east-1 (or the appropriate home region based on your environment).

-
- On the Configure StackSet options page of the CloudFormation StackSet wizard, keep the default values.
- On the Set deployment options page of the CloudFormation StackSet wizard, put the BU-1 Organizational Unit ID (found on the AWS Organizations console) in the AWS OU ID field. Do not specify an account filter, as the deployment is scoped to all accounts within the Organizational Unit. For regions, select US East (N.Virginia) and US East (Ohio) as the regions (or whatever regions you want to authorize for sharing Config data with the aggregator).

-
- Select Submit to deploy the StackSet, this will allow the member accounts from BU-1 to authorize the Shared Viewing Account to aggregate their Config data for the regions specified (us-east-1 and us-east-2).
- Create an IAM Identity Center permission set, User, and provision access to the Shared Viewing accountIn order to allow access to a BU-1 user to view the AWS Config aggregator that is aggregating BU-1 accounts, create a permission set that only allows access to view that aggregator to ensure that BU-1 users would not have access to other business unit aggregators. In order to allow permissions to the BU-1 Config aggregator, get the ARN of the aggregator, as seen below.
-
- Log into the Shared Viewing account console in the home region and navigate to AWS CloudShell with a role that has permissions to use CloudShell and AWS Config and run the following command to retrieve the ARN for the BU-1 Config Aggregator.
-
- Record the ARN of the BU-1 Config Aggregator.

-
- From IAM Identity Center console in the home region of the management account, select Permission Sets and then Create Permission Set.

Figure 8. Within IAM Identity Center, under permission sets, Create permission set should be selected.
-
- Select Custom Permission set and then select Next.
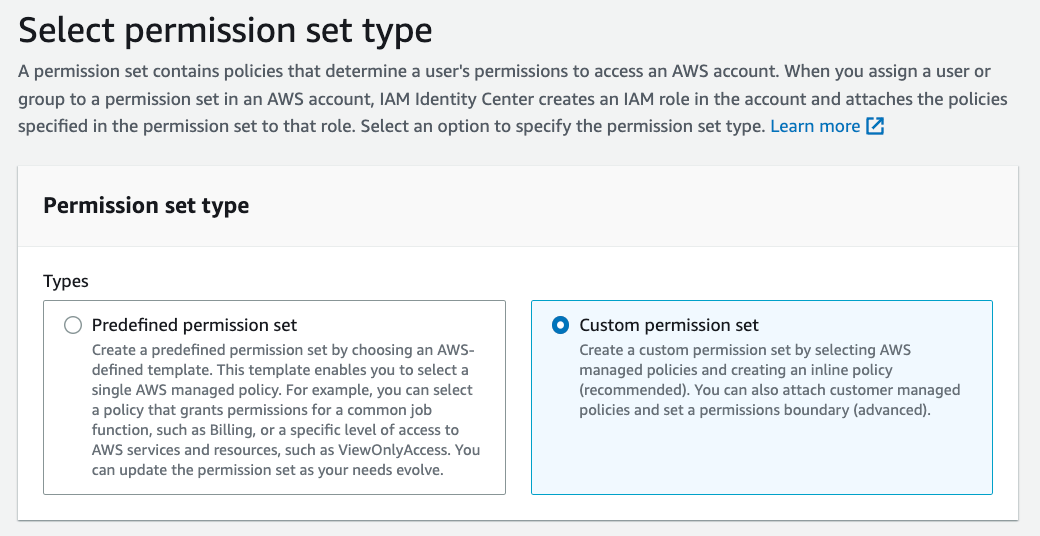
Figure 9. Permission set type should be set to “Custom permission set.
-
- Expand Inline Policy and paste the below statement. This statement allows access to view details from the BU-1 aggregator and also general Config permissions that are needed to see the aggregators in the console. Note: if you are using this statement in your environment, ensure that you replace the account number in the ARN with the account where the Config Aggregator exists.
-
- Using the permission set from the previous step, provision access to the Shared Viewing account for a BU-1 user within IAM Identity Center. To do this, within IAM Identity Center, select AWS accounts and select the Shared Viewing Account (in the example shown here, this account name is dist-vis-distributedview) and then select Assign users or groups.
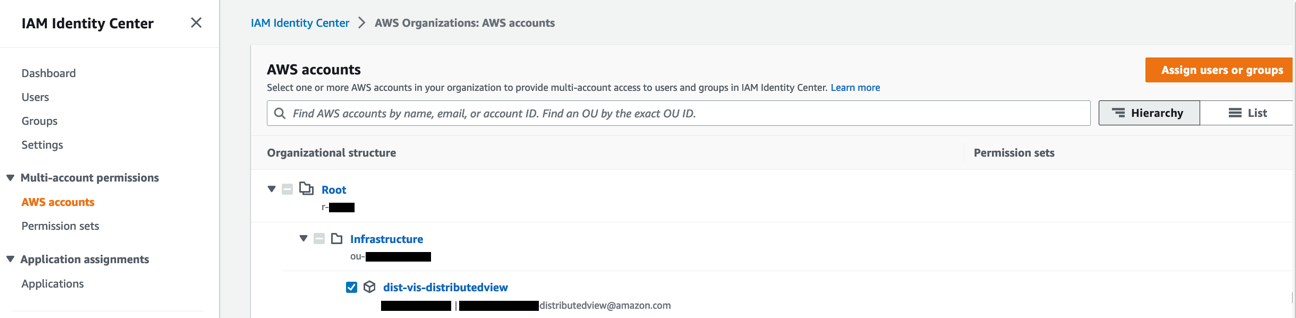
Figure 10. Select the shared viewing account from the list of AWS accounts within IAM Identity Center.
-
- Select the BU-1 user created for this example.
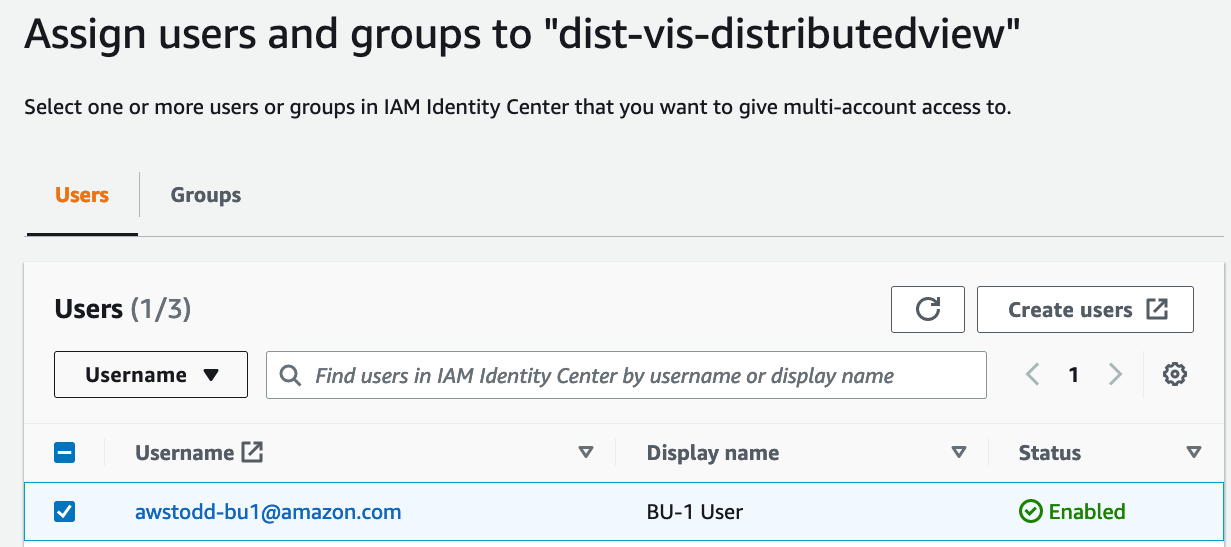
Figure 11. Select the BU-1 User that we created for the example.
-
- Select the permission set BU1-Distributed-Viewer that allows access to the BU-1 aggregator and then select Submit to allow access to the BU-1 aggregator for the BU-1 user.
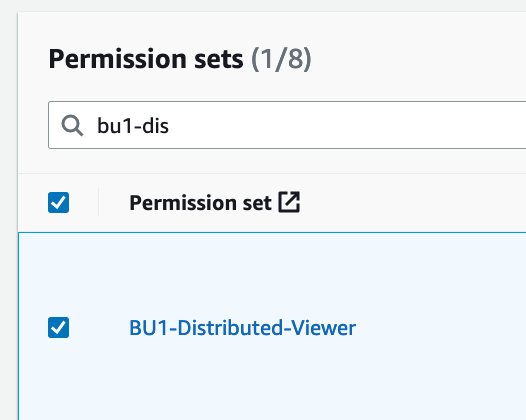
Figure 12. Select the permission set titled BU1-Distributed-Viewer.
-
- Log into the Shared Viewing account using the IAM Identity Center User with the permissions that were created in the previous steps. From the Config console the BU-1 aggregator is visible when logged in as this user with the appropriate permission set.
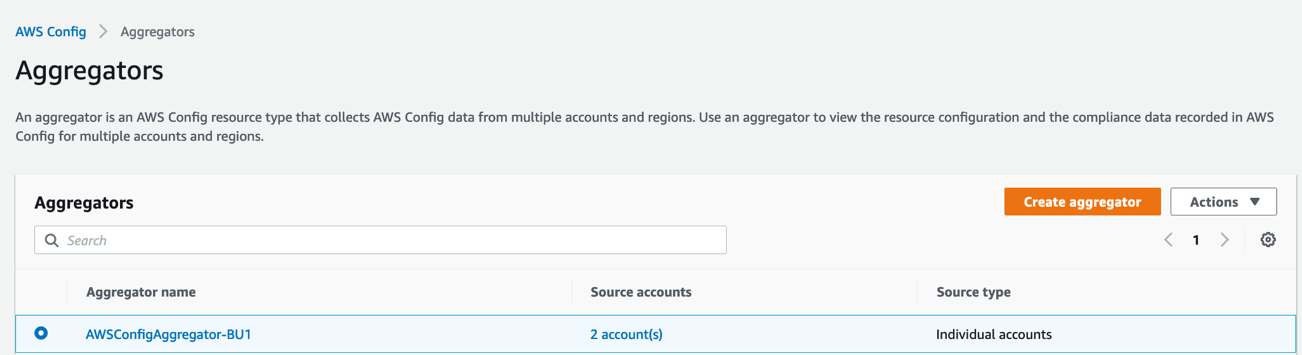
Figure 13. After logging into the Shared Viewing account and navigating to the Aggregators section of AWS Config, the BU-1 aggregator should be visible.
-
- Select Resources under Aggregators on the left navigation pane of the AWS Config console to see the resources from the BU-1 aggregator.

Figure 14. Upon selecting the aggregator the resources associated with this aggregator are visible.
-
- Change the aggregator to the BU-2 aggregator (note: creating the BU-2 aggregator was not shown in this example, however, the same process used to create BU-1 aggregator should be used to create the BU-2 aggregator), and a permission denied message is displayed because the permission set being used only allows access to see the resources associated with the BU-1 aggregator.
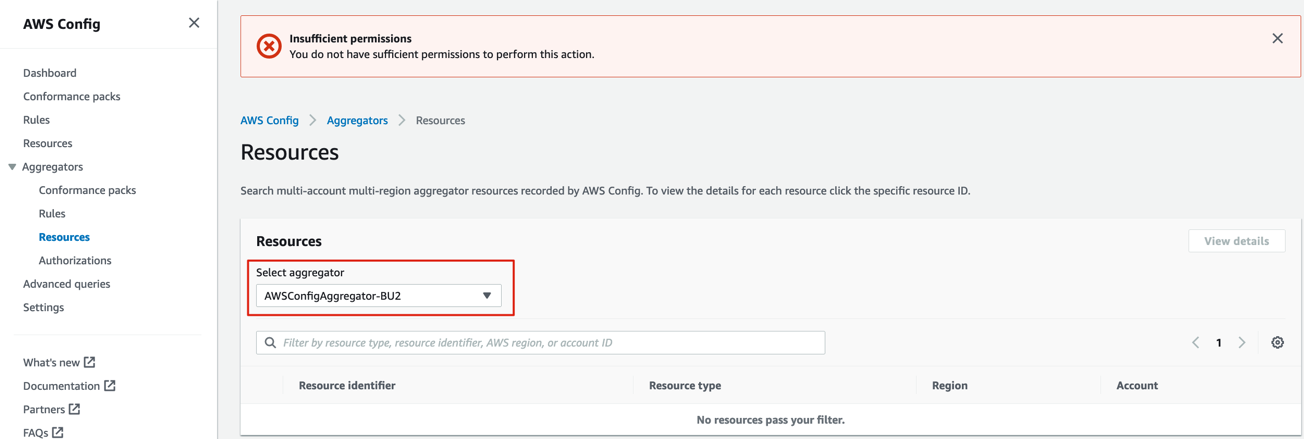
Figure 15. When the BU2 aggregator is selected, an Insufficient permissions error message is displayed.
Data visualization using Amazon QuickSight with access control based on cost categories
Solution Overview
This solution leverages AWS Cost Categories, the Cost Intelligence Dashboard, and QuickSight Row-level Security (RLS) to create a cost dashboard that dynamically adjusts visualizations based on the subset of accounts the QuickSight user should be able to view cost data for. By creating a cost category to represent our business units and then mapping the appropriate account ids to each business unit, we create an additional column in our Cost and Usage Report that contains the business unit associated with a particular cost line item. We then use that additional column to give users permissions to view cost data only for the business units they are responsible for in the Cloud Intelligence Dashboard using QuickSight RLS.
In this walkthrough, you will:
- Create an AWS Cost Category to represent your business units and map your accounts to these business units.
- Deploy the Cloud Intelligence Dashboard.
- Modify the Athena views in the Cloud Intelligence Dashboard to allow your newly created cost category representing your business units to flow into QuickSight.
- Create user-based rules to implement RLS in your Cloud Intelligence Dashboard restricting 2 users to a separate selection of business units.
Architecture Diagram
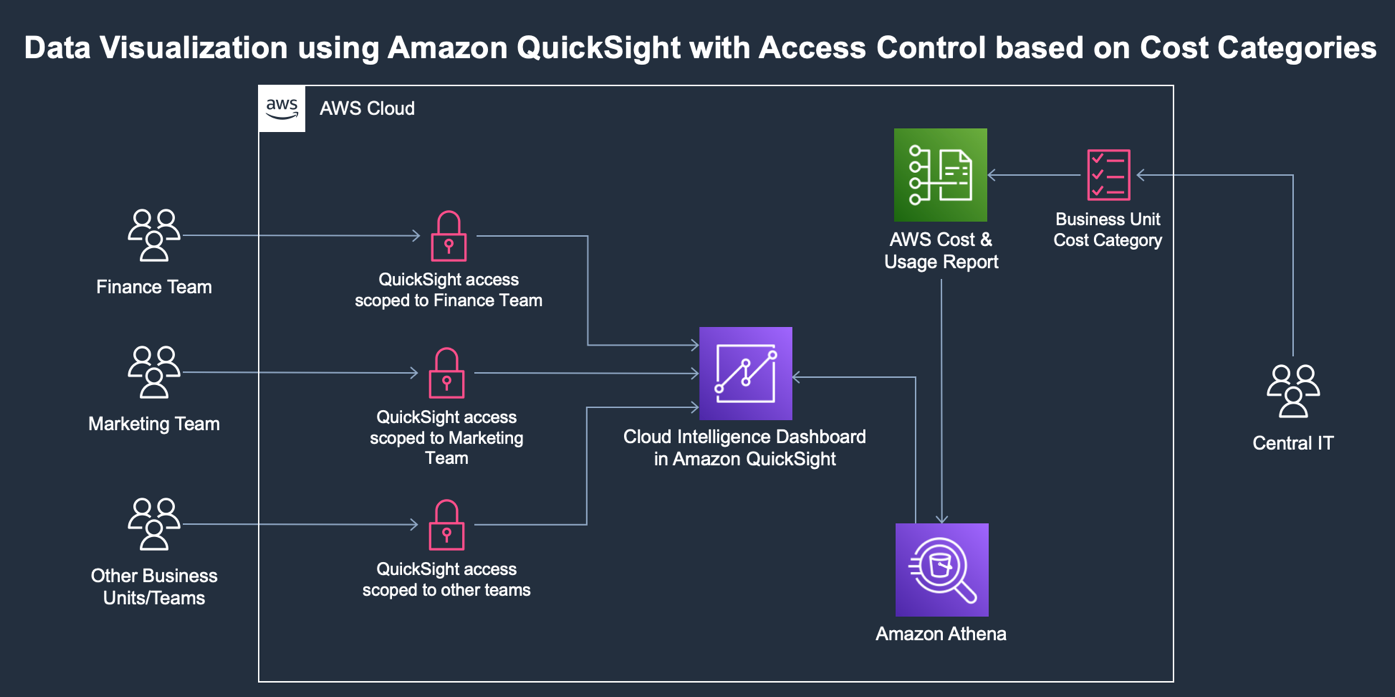
Figure 16. The various business units can access a Cloud Intelligence Dashboard hosted in Amazon QuickSight using row-level security. The Cloud Intelligence Dashboard leverages views created in Amazon Athena, and the cost data comes from the AWS Cost & Usage Report. We use AWS Cost Categories to specify a business unit for each of our accounts, and then use this business unit to define our row-level security.
Prerequisites
For this walkthrough, you should have the following prerequisites:
- An AWS account and permissions to create AWS Cost Categories, create and execute Athena Queries, deploy Amazon
- QuickSight Dashboards, and create S3 buckets.
- Any permissions required to deploy the Cost Intelligence Dashboard using the Basic Setup.
Solution Walkthrough
- Create an AWS Cost Category to represent your business units
-
- Log into your AWS account, select the account drop down in the upper right corner, and then select Billing Dashboard.
- Select Cost categories from the menu on the left.
- Select Create cost category and enter a Name under Cost category details (for the purposes of this walkthrough we use the name “BusinessUnit”).
- Select Next.
- Use the Rule builder to define a rule for each of your business units, the Rule type should be Regular, the BusinessUnits value should be the name of your business unit, and Dimension 1 should use the “Account” Dimension and the “Is” Operator which will allow you to select any accounts associated with a particular business unit (for the purposes of this walkthrough we define 3 business units titled: BU1, BU2, and CentralIT).

-
- Select Create cost category.
- It may take up to 24 hours for your costs to be categorized after you create or edit a cost category, once the cost category completes, processing the Status of the cost category will show as Applied and you will be able to visualize the distribution of your categorized costs (please wait until the cost category status shows as Applied before proceeding with the walkthrough).
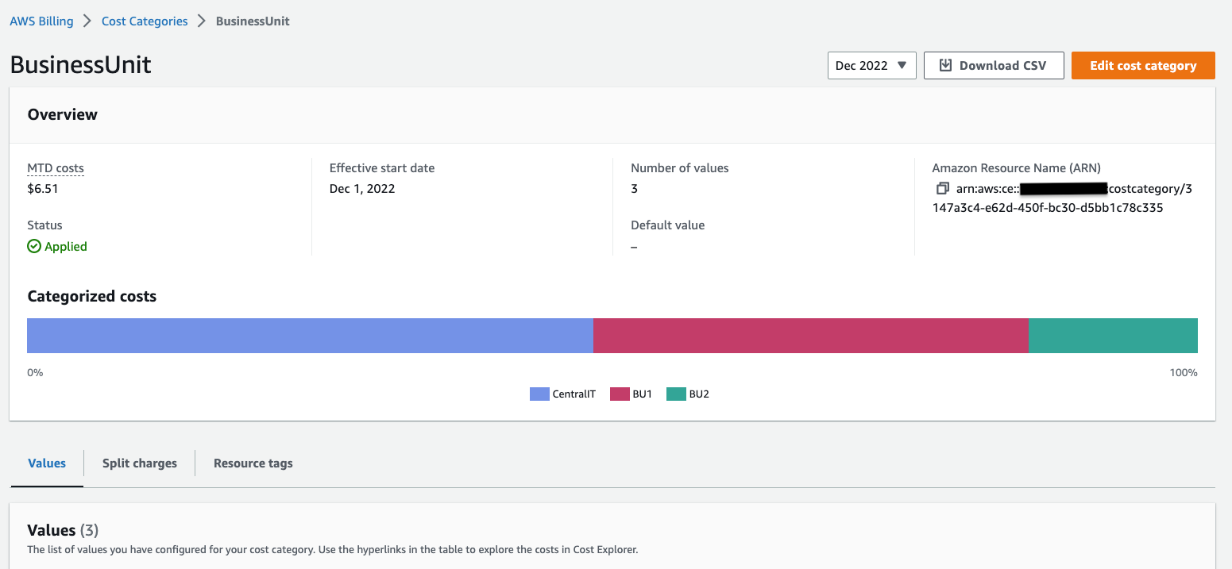
Figure 18. We can obtain information about the percentage of our total costs between Central IT, BU1 and BU2 from within our Cost Categories dashboard.
- Deploy the Cloud Intelligence Dashboard
-
- Deploy the Cloud Intelligence Dashboard by following the Basic Setup in the Cost Optimization lab (Note: there are other deployment options of the Cloud Intelligence Dashboard, this solution should be adaptable to the other methods, but for the purposes of this walkthrough we assume the Basic Setup is used).
- If this is your first time setting up the Cost and Usage Report (CUR), you will need to wait 24 hours before proceeding with this walkthrough, as your first CUR may require up to 24 hours before being delivered to S3.
- Modify the Athena Views to include business unit
-
- Modify the following Athena Views to include cost_category_business_unit as business_unit: summary_view, s3_view, ri_sp_mapping, ec2_running_cost, compute_savings_plan_eligible_spend (note you do not need to modify the account_map View).
- For example, to modify the summary_view navigate to Amazon Athena > Query editor select the three vertical dots on the right side of summary_view and then select Show/edit query.
- After line 36, you can insert , “cost_category_business_unit”
“business_unit and in the GROUP BY clause you can add , 35 to the end of the clause, you can then select Run to execute the query and update the summary_view View.
![Figure 19. ] Within the Query Editor of AWS Athena, we can select the 3 vertical dots next to our Views to then select “Show/edit query”.](https://d2908q01vomqb2.cloudfront.net/972a67c48192728a34979d9a35164c1295401b71/2023/03/14/cloudops-1084_19.png)
Figure 19. Within the Query Editor of AWS Athena, we can select the 3 vertical dots next to our Views to then select “Show/edit query”.
- Define row-level security (RLS) with user-based rules in QuickSight to restrict access by business unit
-
- For a detailed overview of using row-level security (RLS) with user-based rules see the Amazon QuickSight Documentation.
- For the purposes of this walkthrough we created a .csv file that defines permissions for 2 QuickSight users.
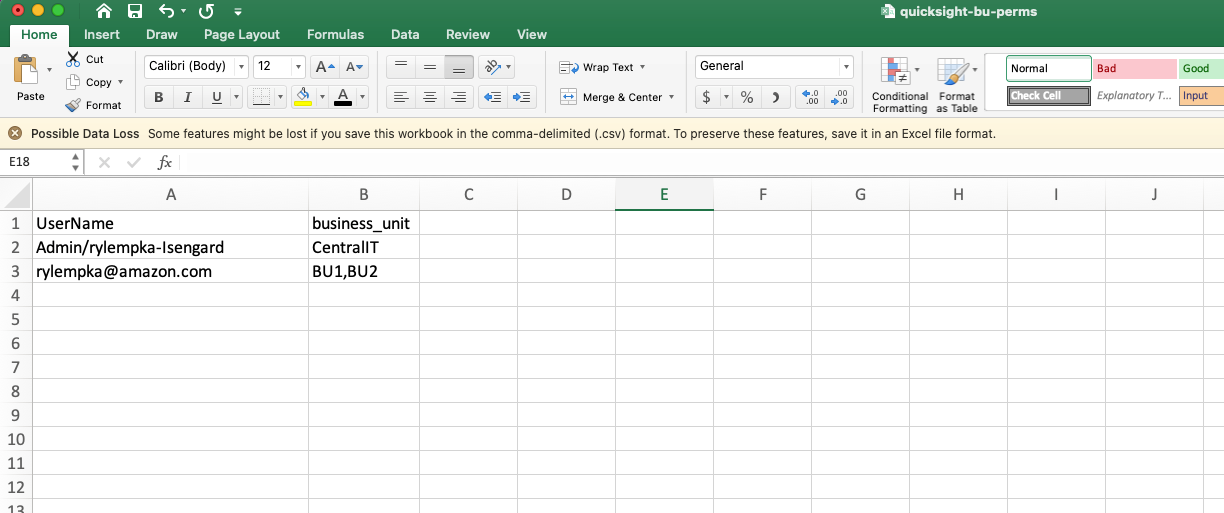
Figure 20. Our permissions csv file includes 2 fields, “UserName” and “business_unit”. Within the UserName column, we include 1 row that contains the name of each of our QuickSight users, and within the business_unit column we include a comma separated .
- Upload your permissions .csv file to an S3 bucket
-
- Create or use an existing S3 bucket that will contain your permissions file from step 4.
- Authorize QuickSight to access this S3 bucket following instructions in the QuickSight documentation.
- Create a dataset in QuickSight based on your permission file
-
- Navigate to QuickSight and select Datasets from the menu on the left.
- Select New dataset and then S3 as the data source.
- Give your Data source a name and upload a manifest file which specifies the file location and name in S3.
![Figure 21. ] We input the name “Quicksight BU Row Level Permissions CI Dashboard” as our Data source name when creating our new S3 data source, and upload our manifest file which is stored locally.](https://d2908q01vomqb2.cloudfront.net/972a67c48192728a34979d9a35164c1295401b71/2023/03/14/cloudops-1084_21.png)
Figure 21. We input the name “Quicksight BU Row Level Permissions CI Dashboard” as our Data source name when creating our new S3 data source, and upload our manifest file which is stored locally.
-
- Here is an example of the manifest file contents we used for this blog walkthrough
-
-
- Select Connect.
-
- Apply RLS to the datasets associated with your Cost Intelligence Dashboard
-
- Navigate to QuickSight and select Datasets from the menu on the left.
- For each dataset associated with your Cloud Intelligence dashboard select the 3 vertical dots on the far left of the dataset and then Row-level security.
Select your permissions dataset and then select Apply dataset.
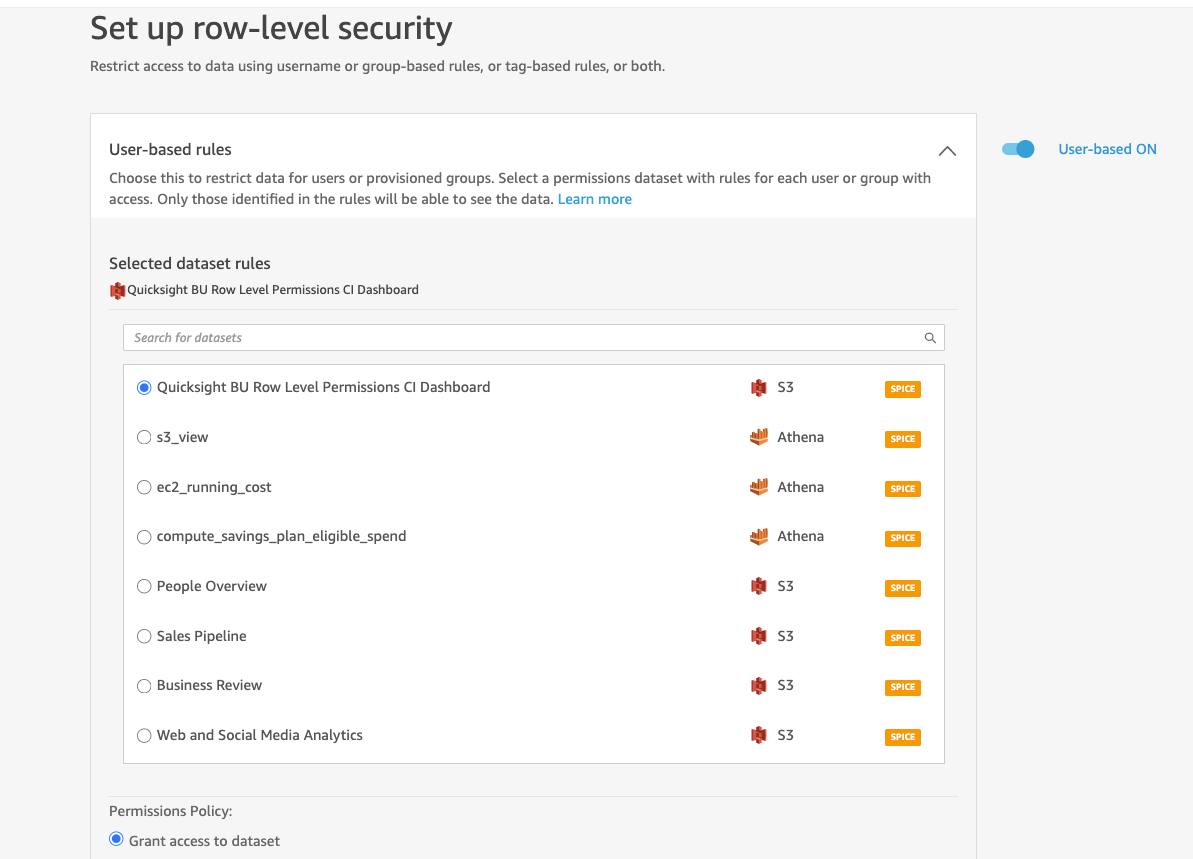
Figure 22.
- Access the Cost Intelligence QuickSight dashboard
-
- Have your users access the Cost Intelligence dashboard, they should now only be able to view data associated with accounts in their Team/Business Unit.
- View 1 example
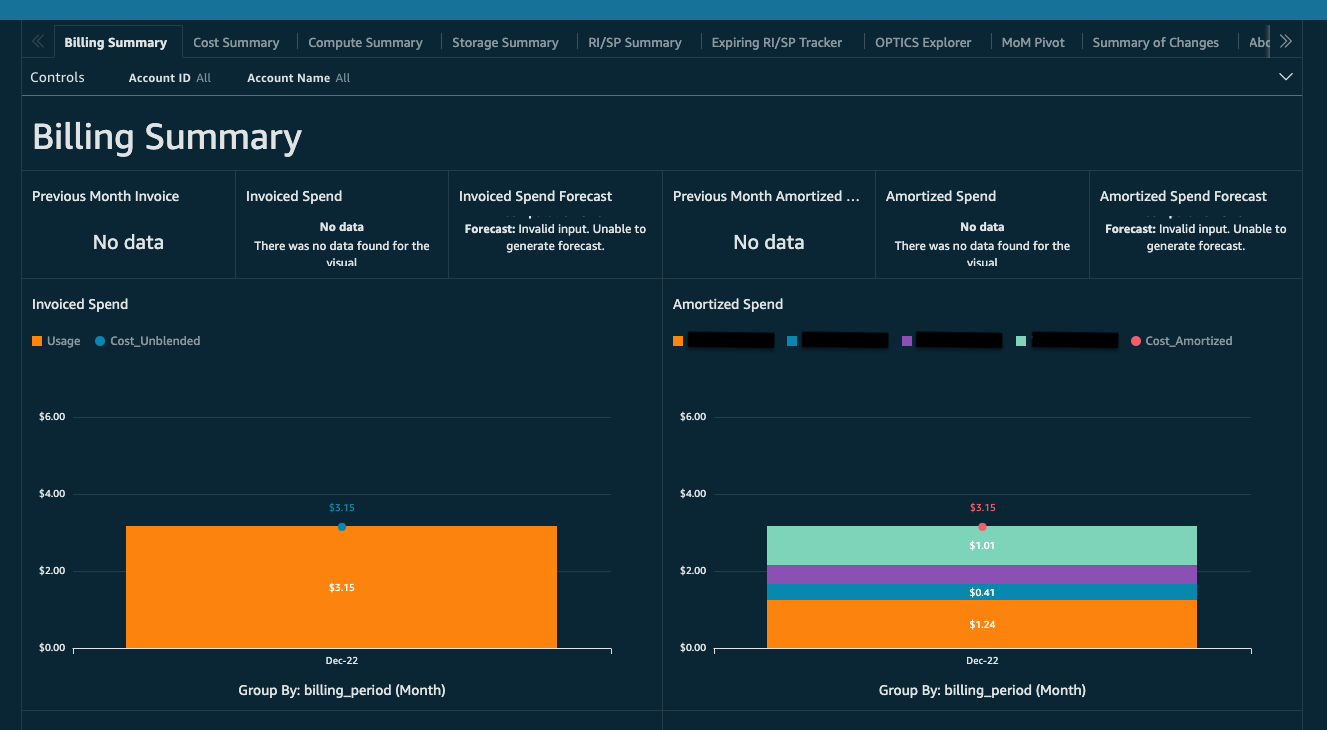
Figure 23. In the Cloud Intelligence dashboard for our first user we only see the billing data associated with CentralIT.
-
- View 2 example
![Figure 24. ] In the Cloud Intelligence dashboard for our second user we only see the billing data associated with BU1 and BU2.](https://d2908q01vomqb2.cloudfront.net/972a67c48192728a34979d9a35164c1295401b71/2023/03/14/cloudops-1084_24.png)
Figure 24. In the Cloud Intelligence dashboard for our second user we only see the billing data associated with BU1 and BU2.
Clean-up
To remove these resources from your account, delete the CloudFormation Stack associated with the Cost Intelligence dashboard.
Conclusion
Allowing the various Teams / Business Units in your organization to have access to view data associated with accounts that they are responsible for enables those Teams / Business Units to operate independently. It is also important that the data associated with other accounts outside the purview of a particular Team / Business Unit is not visible to them. This will allow teams to be more agile on AWS and work independently, while allowing the Central IT team to focus on other priorities while ensuring confidentiality of data between internal teams.
In this blog post, we discussed strategies you can use within your organization to distribute visibility to your teams in a secure way. We provided multiple examples for each strategy, and provided walkthroughs that you can follow along with for two specific examples. We encourage you to implement these strategies in your own AWS account as a next step.
About the authors: