Networking & Content Delivery
Centralized logging platform for EC2 instances over AWS PrivateLink
September 8, 2021: Amazon Elasticsearch Service has been renamed to Amazon OpenSearch Service. See details.
Introduction
Running enterprise applications and workloads requires visibility and insight. Debugging errors or investigating a security incident in your application across hundreds of log files on hundreds of servers is time consuming and complicated. A common approach to resolve this problem is building a centralized logging platform that collects and aggregates different types of logs in one central location. Having such operational visibility enables you to understand your environment better and build secure systems.
From ELK Stack to EKK presents a solution for ingesting logs from Amazon EC2 instances to Amazon Elasticsearch Service using Amazon Kinesis Data Firehose. This blog post describes an alternative approach – ingesting logs to Amazon Elasticsearch using a fleet of Logstash instances behind a Network Load Balancer (NLB). An Autoscaling group is used to provision instances across multiple Availability Zones making logging platform highly available and scalable. Logstash accepts data from a variety of sources and transforms it to meet application specific needs by using any one of many supported plugins.
By using AWS PrivateLink, we secure access to the Logstash fleet from other VPCs, as well as other AWS accounts. The setup scales seamlessly and provides a platform for aggregating logs from EC2 instances hosted in a multi account landscape. We also showcase the use of Kibana for data visualization and wrap up with a tutorial of the CloudFormation templates used here.
Solution overview
Let’s get started by understanding the setup and functionality of the individual components deployed during the setup. At a bare minimum, we need two AWS accounts; 1) a Central Logging account and, 2) a consumer account.
The logging platform is built using Amazon Elasticsearch, Logstash, reverse proxy, and Kibana in the central logging account. The logstash and reverse proxies are in separate target groups and in an Auto Scaling group. The reverse proxies allow Kibana dashboards to be accessible via AWS PrivateLink interface endpoints from various consumer accounts. The consumer account has application servers running on EC2 instances that use Filebeat agent for pushing logs to central logging platform. The central logging platform is exposed to other consumer accounts via an interface endpoint.
The use of interface endpoints provides additional security for your logging infrastructure. You can whitelist what principal accounts can push logs to the logging platform that is hosted in the Provider account. Access to the logging platform is additionally controlled by security groups associated to interface endpoints in the consumer account.
This example uses a two account setup. The use of interface endpoints makes the logging strategy suitable in a multi-account landscape.
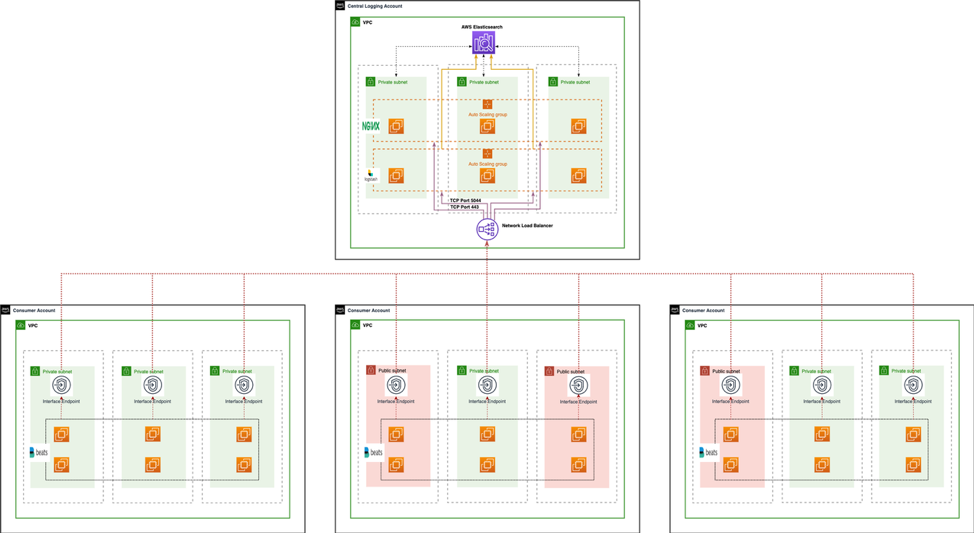
An example Centralized logging platform for EC2 instances over AWS PrivateLink
All the above mentioned components can be deployed using the AWS CloudFormation templates. Invoking these templates, deploys the following resources in us-west-2 region.
In the Central Logging Account
- Amazon Elasticsearch Service for mining logs.
- An Auto Scaling Group for Logstash servers (Logstash ASG).
- An Auto Scaling Group for Reverse Proxy servers (ReverseProxy ASG).
- An NLB with two target groups :
- Logstash TargetGroup – receives requests from all the consumer accounts and feeds into Elasticsearch Service domain.
- Reverse proxy TargetGroup – provides a mechanism to render Kibana dashboard outside the VPC in which Elasticsearch domain is hosted.
- Endpoint Service associated to above created NLB.
- Three security groups :
- For regulating access to Elasticsearch domain.
- For regulating access to Logstash servers.
- For regulating access to Reverse Proxy servers.
Note – Both the Logstash Auto Scaling group and ReverseProxy Auto Scaling group ensures that this setup always runs with a minimum number of instances. The EC2 instances created from these Auto Scaling groups are added to the above mentioned respective target groups.
In the Consumer Account
- Client Instances in an Auto Scaling group configured with FileBeat.
- Interface Endpoints used to push the logs.
- A hosted zone with a domain name and CNAME created to your logging platform used by client instances.
Before we get in to the weeds, here are the pre-requisites.
Pre-requisites:
Before running the deployment, make sure to have:
- Two AWS accounts
- One account designated as a Central Logging account.
- The other one, designated as a Consumer.
- Users deploying this solution should have appropriate permissions to use these AWS services:
- Amazon Elasticsearch
- Amazon EC2
- Amazon VPC
- Amazon EC2 Auto Scaling
- The subnets of VPCs in both accounts have required internet connectivity for installing the required packages.
Note: You should be able to run both the central logging and consumer templates in the same account for testing and evaluation.
Deployment steps
The deployment of a centralized logging platform basically consists of three steps:
- Set up the Central Logging Account
- Set up the Consumer Account
- Configure the Kibana dashboards
Set up the Central Logging Account:
- Launch the below template from the AWS CloudFormation console. This stack creates necessary service linked that is required for creating Elasticsearch domain in the Central Logging VPC.
AWSTemplateFormatVersion: 2010-09-09
Description: Creates SLR
Resources:
  ServiceLinkedRole:
    Type: 'AWS::IAM::ServiceLinkedRole'
    Properties:
      AWSServiceName: es.amazonaws.com
Description: 'Role for ES to access resources in my VPC'- Next, launch the next template from the AWS CloudFormation console.
AWSTemplateFormatVersion: 2010-09-09
Description: Template creates a Network Load Balancer in 2 AZs with EIPs listening on a TCP port
Metadata:
  'AWS::CloudFormation::Interface':
    ParameterGroups:
      - Label:
          default: Networking Configuration
        Parameters:
          - VPC
          - CentralLoggingAccountPrivateSubnets
      - Label:
          default: AutoScaling Logstash and Reverse Proxy Target Configurations
        Parameters:
          - ELBType
          - ELBIpAddressType
          - LogstashInstanceType
          - LogstashKeyName
          - LogstashSSHLocation
          - ReverseProxyInstanceType
          - ReverseProxyKeyName
          - ReverseProxySSHLocation
      - Label:
          default: Elasticsearch Cluster Configuration
        Parameters:
          - ElasticsearchDomainName
          - ElasticsearchVersion
          - ElasticsearchInstanceType
          - ElasticsearchSubnetIds

Parameters:
  VPC:
    Type: 'AWS::EC2::VPC::Id'
  CentralLoggingAccountPrivateSubnets:
    Description: Provide Private Subnets associated to Logstash AutoScalingGroup. Select atleast one subnet in each AZ.
    Type: 'List<AWS::EC2::Subnet::Id>'
  ELBType:
    Type: String
    Default: network
  ELBIpAddressType:
    Type: String
    AllowedValues:
      - ipv4
      - dualstack
    Default: ipv4
  LogstashInstanceType:
   Description: Logstash EC2 instance type
   Type: String
   Default: t2.small
   AllowedValues:
    - t1.micro
    - t2.small
   ConstraintDescription: must be a valid EC2 instance type.
  LogstashKeyName:
   Description: The EC2 Key Pair to allow SSH access to the Logstash instances
   Type: 'AWS::EC2::KeyPair::KeyName'
   ConstraintDescription: must be the name of an existing EC2 KeyPair.
  LogstashTargetgroupName:
    Description: Enter the target group name for logstash
    Type: String
  ReverseProxyTargetGroupName:
    Description: Enter the reverse proxy target group name for kibana. The name cannot be same as logstashtarget group name.
    Type: String
  LogstashSSHLocation:
   Description: The IP address range that can be used to SSH to the logstash instances
   Type: String
   MinLength: '9'
   MaxLength: '18'
   Default: 0.0.0.0/0
   AllowedPattern: '(\d{1,3})\.(\d{1,3})\.(\d{1,3})\.(\d{1,3})/(\d{1,2})'
   ConstraintDescription: must be a valid IP CIDR range of the form x.x.x.x/x.

  ReverseProxyInstanceType:
   Description: Reverse Proxy EC2 instance type
   Type: String
   Default: t2.small
   AllowedValues:
    - t1.micro
    - t2.small
   ConstraintDescription: must be a valid EC2 instance type.
  ReverseProxyKeyName:
   Description: The EC2 Key Pair to allow SSH access to the reverse proxy instances
   Type: 'AWS::EC2::KeyPair::KeyName'
   ConstraintDescription: must be the name of an existing EC2 KeyPair.
  ReverseProxySSHLocation:
   Description: The IP address range that can be used to SSH to the reverse proxy instances
   Type: String
   MinLength: '9'
   MaxLength: '18'
   Default: 0.0.0.0/0
   AllowedPattern: '(\d{1,3})\.(\d{1,3})\.(\d{1,3})\.(\d{1,3})/(\d{1,2})'
   ConstraintDescription: must be a valid IP CIDR range of the form x.x.x.x/x.

  ElasticsearchDomainName:
   Description: Domain name - must start with lowercase
   Type: String
   MinLength: '3'
   MaxLength: '28'
   ConstraintDescription: Valid characters are a-z (lowercase only), 0-9, and - (hyphen)
  ElasticsearchVersion:
   Description: Version for Elastisearch
   Type: String
   Default: 6.5
   AllowedValues:
    - 6.5
    - 6.4
    - 6.3
    - 6.2
    - 6.0
    - 5.6
    - 5.5
    - 5.3
    - 5.1
    - 2.3
    - 1.5
  ElasticsearchInstanceType:
   Description: Instance type for Elasticsearch
   Type: String
   Default: t2.medium.elasticsearch
   AllowedValues:
    - t2.medium.elasticsearch
    - t3.2xlarge.elasticsearch
    - c5.18xlarge.elasticsearch
  ElasticsearchSubnetIds:
   Type: "List<AWS::EC2::Subnet::Id>"
   Description: Enter Subnets that can be associated to Elasticsearch

Mappings:
  AWSInstanceType2Arch:
    t1.micro:
      Arch: HVM64
    t2.small:
      Arch: HVM64
    t2.medium:
      Arch: HVM64
    t2.large:
      Arch: HVM64
    m1.small:
      Arch: HVM64
    m1.medium:
      Arch: HVM64
    c1.medium:
      Arch: HVM64
    c3.large:
      Arch: HVM64
    c3.xlarge:
      Arch: HVM64
  AWSRegionArch2AMI:
    us-west-2:
      HVM64: ami-095cd038eef3e5074
     # HVM64: ami-08d489468314a58df

Resources:
  NetworkLoadBalancer:
    Type: AWS::ElasticLoadBalancingV2::LoadBalancer
    Properties:
      Scheme: internal
      Subnets: !Ref CentralLoggingAccountPrivateSubnets
      Type: !Ref ELBType
      IpAddressType: !Ref ELBIpAddressType
  TargetGroup:
    Type: 'AWS::ElasticLoadBalancingV2::TargetGroup'
    Properties:
      Name: !Ref LogstashTargetgroupName
      Port: 5044
      Protocol: TCP
      TargetGroupAttributes:
        - Key: deregistration_delay.timeout_seconds
          Value: '20'
      VpcId: !Ref VPC
  Listener:
    Type: 'AWS::ElasticLoadBalancingV2::Listener'
    DependsOn: TargetGroup
    Properties:
      DefaultActions:
        - Type: forward
          TargetGroupArn: !Ref TargetGroup
      LoadBalancerArn: !Ref NetworkLoadBalancer
      Port: '5044'
      Protocol: TCP
  ReverseProxyTargetGroup:
    Type: 'AWS::ElasticLoadBalancingV2::TargetGroup'
    Properties:
      Name: !Ref ReverseProxyTargetGroupName
      Port: 443
      Protocol: TCP
      TargetGroupAttributes:
        - Key: deregistration_delay.timeout_seconds
          Value: '20'
      VpcId: !Ref VPC
  ReverseProxyListener:
    Type: 'AWS::ElasticLoadBalancingV2::Listener'
    DependsOn: ReverseProxyTargetGroup
    Properties:
      DefaultActions:
        - Type: forward
          TargetGroupArn: !Ref ReverseProxyTargetGroup
      LoadBalancerArn: !Ref NetworkLoadBalancer
      Port: '443'
      Protocol: TCP
  ReverseProxyASG:
    Type: 'AWS::AutoScaling::AutoScalingGroup'
    Properties:
      VPCZoneIdentifier: !Ref CentralLoggingAccountPrivateSubnets
      LaunchConfigurationName: !Ref ReverseProxyLaunchConfig
      MinSize: '2'
      MaxSize: '2'
      TargetGroupARNs:
        - !Ref ReverseProxyTargetGroup
  ReverseProxyLaunchConfig:
    Type: 'AWS::AutoScaling::LaunchConfiguration'
    DependsOn: ElasticsearchDomain
    Properties:
      KeyName: !Ref ReverseProxyKeyName
      ImageId: !FindInMap
        - AWSRegionArch2AMI
        - !Ref 'AWS::Region'
        - !FindInMap
          - AWSInstanceType2Arch
          - !Ref ReverseProxyInstanceType
          - Arch
      UserData:
        Fn::Base64: !Sub |
          #!/bin/bash
          amazon-linux-extras install nginx1.12 -y
          rm /etc/nginx/nginx.conf
          touch /etc/nginx/nginx.conf
          mkdir /etc/ssl/private
          chmod 700 /etc/ssl/private
          openssl req -new -newkey rsa:4096 -days 365 -nodes -x509 -subj "/C=US/ST=WA/L=Seattle/O=AWS/CN=/" -keyout /etc/ssl/private/nginx-selfsigned.key -out /etc/ssl/certs/nginx-selfsigned.crt
          cat << 'EOF' | tee /etc/nginx/nginx.conf
          user nginx;
          worker_processes auto;
          error_log /var/log/nginx/error.log;
          pid /run/nginx.pid;
          include /usr/share/nginx/modules/*.conf;
          events {
            worker_connections 1024;
          }
          http {
              log_format  main  '$remote_addr - $remote_user [$time_local] "$request" '
                                '$status $body_bytes_sent "$http_referer" '
                                '"$http_user_agent" "$http_x_forwarded_for"';
              access_log  /var/log/nginx/access.log  main;
              sendfile            on;
              tcp_nopush          on;
              tcp_nodelay         on;
              keepalive_timeout   65;
              types_hash_max_size 2048;
              include             /etc/nginx/mime.types;
              default_type        application/octet-stream;
              include /etc/nginx/conf.d/*.conf;
              server {
                  listen       443 ssl;
                  listen       [::]:443 ssl;
                  listen       80;
                  listen       [::]:80;
                  server_name  _;
                  ssl_certificate /etc/ssl/certs/nginx-selfsigned.crt;
                  ssl_certificate_key /etc/ssl/private/nginx-selfsigned.key;
                  root         /usr/share/nginx/html;
                  include /etc/nginx/default.d/*.conf;

                  location /_plugin/kibana/ {
                    proxy_pass https://${ElasticsearchDomain.DomainEndpoint}/_plugin/kibana/;
                    proxy_set_header X-Real-IP '$remote_addr';
                    proxy_set_header X-Forwarded-For '$proxy_add_x_forwarded_for';
                    proxy_set_header X-Forwarded-Proto '$scheme';
                    proxy_set_header X-Forwarded-Host '$host:443';

                  }
                  error_page 404 /404.html;
                    location = /40x.html {
                  }
                  error_page 500 502 503 504 /50x.html;
                    location = /50x.html {
                  }
                }
            }
          EOF
          systemctl start nginx
      SecurityGroups:
        - !Ref ReverseProxyInstanceSecurityGroup
      InstanceType: !Ref ReverseProxyInstanceType
  ReverseProxyInstanceSecurityGroup:
    Type: 'AWS::EC2::SecurityGroup'
    Properties:
      GroupDescription: Enable SSH access
      SecurityGroupIngress:
        - IpProtocol: tcp
          FromPort: '22'
          ToPort: '22'
          CidrIp: !Ref ReverseProxySSHLocation
        - IpProtocol: tcp
          FromPort: '443'
          ToPort: '443'
          CidrIp: !Ref ReverseProxySSHLocation
      VpcId: !Ref VPC
  LogstashASG:
    Type: 'AWS::AutoScaling::AutoScalingGroup'
    Properties:
      VPCZoneIdentifier: !Ref CentralLoggingAccountPrivateSubnets
      LaunchConfigurationName: !Ref LogstashLaunchConfig
      MinSize: '2'
      MaxSize: '2'
      TargetGroupARNs:
        - !Ref TargetGroup
  LogstashLaunchConfig:
    Type: 'AWS::AutoScaling::LaunchConfiguration'
    DependsOn: ElasticsearchDomain
    Properties:
      KeyName: !Ref LogstashKeyName
      ImageId: !FindInMap
        - AWSRegionArch2AMI
        - !Ref 'AWS::Region'
        - !FindInMap
          - AWSInstanceType2Arch
          - !Ref LogstashInstanceType
          - Arch
      UserData:
        Fn::Base64: !Sub |
          #!/bin/bash
          rpm --import https://packages.elastic.co/GPG-KEY-elasticsearch
          touch /etc/yum.repos.d/logstash.repo
          cat << EOF | tee /etc/yum.repos.d/elastic.repo
          [logstash-6.x]
          name=Elastic repository for 6.x packages
          baseurl=https://artifacts.elastic.co/packages/6.x/yum
          gpgcheck=1
          gpgkey=https://artifacts.elastic.co/GPG-KEY-elasticsearch
          enabled=1
          autorefresh=1
          type=rpm-md
          EOF
          yum update -y
          yum install logstash -y
          chmod -R 777 /usr/share/logstash/data
          chmod -R 777 /usr/share/logstash/data/queue
          chmod -R 777 /usr/share/logstash/data/dead_letter_queue
          chmod -R 777 /usr/share/logstash/data/.lock
          usermod -a -G logstash ec2-user
          yum install java-1.8.0 -y
          cat << EOF | tee -a /etc/profile
          export JAVA_HOME=/usr/lib/jvm/java-1.8.0-openjdk-1.8.0.191.b12-0.amzn2.x86_64/jre
          export PATH=\$JAVA_HOME/bin:\$PATH
          export LS_JAVA_OPTS="-Xms500m -Xmx500m -XX:ParallelGCThreads=1"
          export PATH=\$LS_JAVA_OPTS:\$PATH
          EOF
          source /etc/profile
          touch /etc/logstash/conf.d/logstash_simple.conf
          cat << EOF | tee /etc/logstash/conf.d/logstash_simple.conf
          input {
            beats {
              port => 5044
            }
          }
          filter {
            if [source]=="/var/log/httpd/error_log"
              {
                mutate {
                  remove_tag => [ "beats_input_codec_plain_applied" ]
                  add_tag => [ "httpd_logs" ]
                }
              }
            if [source]=="/var/log/httpd/access_log"
              {
                mutate {
                  remove_tag => [ "beats_input_codec_plain_applied" ]
                  add_tag => [ "httpd_logs" ]
                }
              }
          }
          output {
            elasticsearch {
              hosts => ["https://${ElasticsearchDomain.DomainEndpoint}:443"]
              index => "%{[@metadata][beat]}-%{+YYYY.MM.dd}"
              document_type => "testing-access-logs"
            }
          }
          EOF
          /usr/share/logstash/bin/system-install /etc/logstash/startup.options systemd
          systemctl start logstash.service
      SecurityGroups:
        - !Ref LogstashInstanceSecurityGroup
      InstanceType: !Ref LogstashInstanceType
  LogstashInstanceSecurityGroup:
    Type: 'AWS::EC2::SecurityGroup'
    Properties:
      GroupDescription: Enable SSH access
      SecurityGroupIngress:
        - IpProtocol: tcp
          FromPort: '22'
          ToPort: '22'
          CidrIp: !Ref LogstashSSHLocation
        - IpProtocol: tcp
          FromPort: '5044'
          ToPort: '5044'
          CidrIp: !Ref LogstashSSHLocation
      VpcId: !Ref VPC

  EndpointService:
    Type: 'AWS::EC2::VPCEndpointService'
    Properties:
      NetworkLoadBalancerArns:
        - !Ref NetworkLoadBalancer
      AcceptanceRequired: true

  ElasticsearchDomain:
    Type: AWS::Elasticsearch::Domain
    Properties:
      DomainName: !Ref ElasticsearchDomainName
      ElasticsearchVersion: !Ref ElasticsearchVersion
      ElasticsearchClusterConfig:
        InstanceCount: '2'
        InstanceType: !Ref ElasticsearchInstanceType
        DedicatedMasterEnabled: "true"
        DedicatedMasterType: "m3.medium.elasticsearch"
        DedicatedMasterCount: "2"
        ZoneAwarenessEnabled: 'true'
      EBSOptions:
        EBSEnabled: 'true'
        Iops: 0
        VolumeSize: 10
        VolumeType: "gp2"
      VPCOptions:
        SubnetIds: !Ref ElasticsearchSubnetIds
        SecurityGroupIds:
          - !Ref ElasticsearchSecurityGroups
      AccessPolicies:
        Statement:
        - Action: es:*
          Effect: Allow
          Principal: "*"
          Resource:
            !Sub 'arn:aws:es:${AWS::Region}:${AWS::AccountId}:domain/${ElasticsearchDomainName}/*'
        Version: '2012-10-17'
  ElasticsearchSecurityGroups:
    Type: AWS::EC2::SecurityGroup
    Properties:
      GroupDescription: Elasticsearch security group
      VpcId: !Ref VPC
      SecurityGroupIngress:
        - FromPort: '443'
          IpProtocol: tcp
          ToPort: '443'
          CidrIp: 0.0.0.0/0

Outputs:
  NLB:
    Description: ARN for the NLB
    Value: !Ref NetworkLoadBalancer
  ElasticSearchASG:
    Description: AutoScaling group of Logstash nodes
    Value: !Ref LogstashASG
  ServiceEndpoint:
    Description: Endpoint service details
    Value: !Ref EndpointService
  ServiceEndpointName:
    Description: Endpoint service name
    Value: !Join
      - ''
      - - 'com.amazonaws.vpce.'
        - !Ref "AWS::Region"
        - '.'
        - !Ref 'EndpointService'
  DomainArn:
    Value: !GetAtt ElasticsearchDomain.DomainArn
  DomainEndpoint:
Value: !GetAtt ElasticsearchDomain.DomainEndpoint- Provide the Networking configuration. This consists of two steps:
- Select the VPC along with the subnets where the logging platform is hosted.
- Providing the Auto Scaling group configuration required for logstash and reverse proxies.
- An example is shown below as a reference:
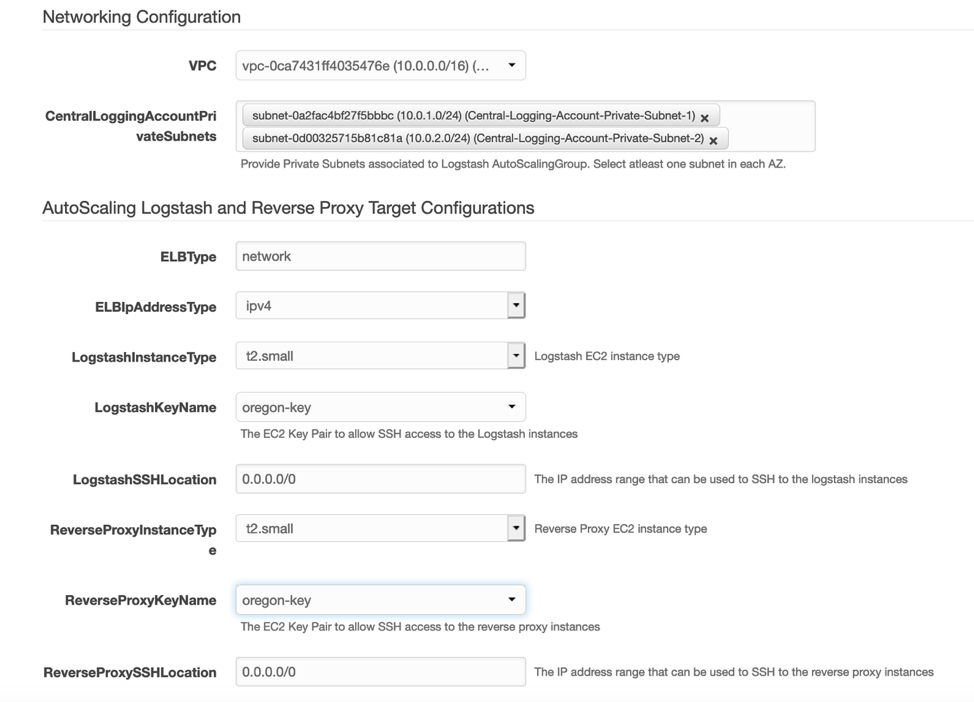
Networking, Autoscaling logstash and Reverse proxy target configurations
- Next, select the Elasticsearch version, the instance type, and subnets for launching your Elasticsearch domain. An example is shown as a reference:
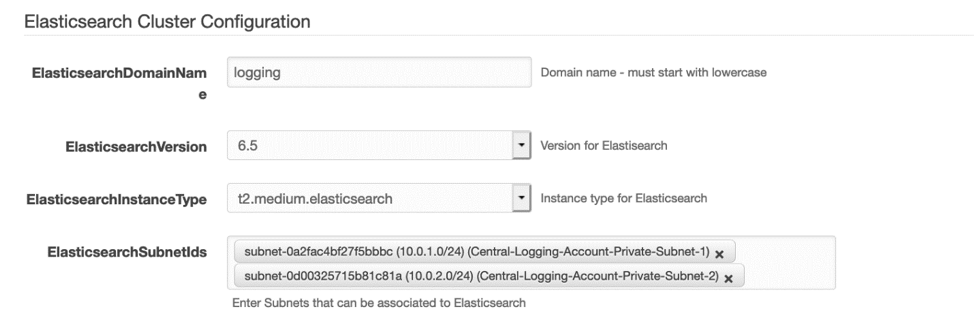
Elasticsearch Cluster Configuration
- Provide a target group name for logstash and reverse proxy instances.
- Approve AWS CloudFormation to create the appropriate IAM resources.
- Review the provided details and click Create the stack.
Set up at the Consumer Account:
- Navigate to the VPC console. Select the VPC in which you are going to launch the resources with filebeat client.
- Enable the DNS hostnames and DNS support for the VPC.
- Launch the below template from the AWS CloudFormation console.
AWSTemplateFormatVersion: 2010-09-09
Description: Template creates Interface Endpoints in 2 AZs with EIPs listening on a TCP port
Metadata:
  'AWS::CloudFormation::Interface':
    ParameterGroups:
      - Label:
          default: Networking Configuration
        Parameters:
          - VPC
          - ConsumerAccountFilebeatSubnets
      - Label:
          default: AutoScaling Group Filebeat Client Instance Configuration
        Parameters:
          - InstanceType
          - KeyName
          - SSHLocation
      - Label:
          default: Endpoint Details
        Parameters:
          - EndpointServiceName
          - CidrForEndpointSecurityGroup
      - Label:
          default: Domain name and Cannonical name for logging used in Route53 Private Hosted Zone
        Parameters:
          - DNSName
          - LogName
Parameters:
  VPC:
    Type: 'AWS::EC2::VPC::Id'
  ConsumerAccountFilebeatSubnets:
    Description: Consumer Account Filebeat Subnets. Ensure the subnets are in atleast two AZ's
    Type: 'List<AWS::EC2::Subnet::Id>'
  InstanceType:
    Description: EC2 instance type for Filebeat ASG
    Type: String
    Default: t2.small
    AllowedValues:
     - t1.micro
     - t2.small
    ConstraintDescription: must be a valid EC2 instance type.
  KeyName:
    Description: The EC2 Key Pair to allow SSH access to the Filebeat instances
    Type: 'AWS::EC2::KeyPair::KeyName'
    ConstraintDescription: must be the name of an existing EC2 KeyPair.
  SSHLocation:
    Description: The IP address range that can be used to SSH to the target EC2 instances
    Type: String
    MinLength: '9'
    MaxLength: '18'
    Default: 0.0.0.0/0
    AllowedPattern: '(\d{1,3})\.(\d{1,3})\.(\d{1,3})\.(\d{1,3})/(\d{1,2})'
    ConstraintDescription: must be a valid IP CIDR range of the form x.x.x.x/x.
  CidrForEndpointSecurityGroup:
    Description: The CIDR address range that require Logstash access
    Type: String
    MinLength: '9'
    MaxLength: '18'
    Default: 0.0.0.0/0
    AllowedPattern: '(\d{1,3})\.(\d{1,3})\.(\d{1,3})\.(\d{1,3})/(\d{1,2})'
    ConstraintDescription: must be a valid IP CIDR range of the form x.x.x.x/x.
  EndpointServiceName:
    Description: Enter Endpoint Service Name obtained from the Provider
    Type: String
  DNSName:
    Description: Enter  Domain name for the hosted zone that will be used within your environment
    Type: String
  LogName:
    Description: Enter cannonical name for interface endpoint that will be used for logging within your environment
    Type: String

Mappings:
  AWSInstanceType2Arch:
    t1.micro:
      Arch: HVM64
    t2.small:
      Arch: HVM64
  AWSRegionArch2AMI:
    us-west-2:
      HVM64: ami-095cd038eef3e5074
      #HVM64: ami-08d489468314a58df

Resources:
  FilebeatClientInstancesASG:
    Type: 'AWS::AutoScaling::AutoScalingGroup'
    Properties:
      VPCZoneIdentifier: !Ref ConsumerAccountFilebeatSubnets
      LaunchConfigurationName: !Ref LaunchConfig
      MinSize: '2'
      MaxSize: '2'

  LaunchConfig:
    Type: 'AWS::AutoScaling::LaunchConfiguration'
    DependsOn: RecordSet
    Properties:
      KeyName: !Ref KeyName
      ImageId: !FindInMap
        - AWSRegionArch2AMI
        - !Ref 'AWS::Region'
        - !FindInMap
          - AWSInstanceType2Arch
          - !Ref InstanceType
          - Arch
      UserData:
        Fn::Base64: !Sub |
            #!/bin/bash
            yum update -y
            yum install -y httpd
            chkconfig --levels 3 httpd on
            service httpd start
            rpm --import https://packages.elastic.co/GPG-KEY-elasticsearch
            touch /etc/yum.repos.d/elastic.repo
            cat << EOF | tee /etc/yum.repos.d/elastic.repo
            [elastic-6.x]
            name=Elastic repository for 6.x packages
            baseurl=https://artifacts.elastic.co/packages/6.x/yum
            gpgcheck=1
            gpgkey=https://artifacts.elastic.co/GPG-KEY-elasticsearch
            enabled=1
            autorefresh=1
            type=rpm-md
            EOF
            yum update -y
            yum install filebeat -y
            rm /etc/filebeat/filebeat.yml
            touch /etc/filebeat/filebeat.yml
            cat << EOF | tee /etc/filebeat/filebeat.yml
            filebeat:
              prospectors:
                -
                  paths:
                    - /var/log/httpd/access_log
                  input_type: log
            output:
              logstash:
                hosts: ["`dig CNAME ${RecordSet} +short | sed 's/\.$//'`:5044"]
            EOF
            service filebeat start

      SecurityGroups:
        - !Ref ConsumerAccountFilebeatClientInstanceSecurityGroup
      InstanceType: !Ref InstanceType

  ConsumerAccountFilebeatClientInstanceSecurityGroup:
    Type: 'AWS::EC2::SecurityGroup'
    Properties:
      GroupDescription: Enable SSH access
      SecurityGroupIngress:
        - IpProtocol: tcp
          FromPort: '22'
          ToPort: '22'
          CidrIp: !Ref SSHLocation
        - IpProtocol: tcp
          FromPort: '80'
          ToPort: '80'
          CidrIp: !Ref SSHLocation
      VpcId: !Ref VPC

  InterfaceEndpointSecurityGroup:
    Type: 'AWS::EC2::SecurityGroup'
    Properties:
      GroupDescription: Enable Logstash access
      SecurityGroupIngress:
        - IpProtocol: tcp
          FromPort: '5044'
          ToPort: '5044'
          CidrIp: !Ref CidrForEndpointSecurityGroup
        - IpProtocol: tcp
          FromPort: '443'
          ToPort: '443'
          CidrIp: !Ref CidrForEndpointSecurityGroup
      VpcId: !Ref VPC

  InterfaceEndpoint:
    Type: AWS::EC2::VPCEndpoint
    Properties:
      VpcId: !Ref VPC
      VpcEndpointType: Interface
      ServiceName: !Ref EndpointServiceName
      PrivateDnsEnabled: false
      SubnetIds: !Ref ConsumerAccountFilebeatSubnets
      SecurityGroupIds:
        - !Ref InterfaceEndpointSecurityGroup

  PrivateHostedZone:
    Type: "AWS::Route53::HostedZone"
    Properties:
      HostedZoneConfig:
        Comment: "Hosted zone for ELK stack"
      Name: !Ref DNSName
      VPCs:
        -
          VPCId: !Ref VPC
          VPCRegion: !Ref 'AWS::Region'
  RecordSet:
    Type: AWS::Route53::RecordSet
    Properties:
      HostedZoneId: !Ref PrivateHostedZone
      Comment: CNAME record entry for logging
      Name: !Join
              - ''
              - - !Ref LogName
                - '.'
                - !Ref DNSName
      Type: CNAME
      TTL: '900'
      ResourceRecords:
        !Split [",", !Select ["1",!Split [":",!Select ["0",!GetAtt InterfaceEndpoint.DnsEntries]]]]

Outputs:
  FilebeatClientInstancesASG:
    Description: AutoScaling group for Filebeat Client Instances
    Value: !Ref FilebeatClientInstancesASG
  InterfaceEndpontID:
    Description: Interface Endpoint ID
    Value: !Ref InterfaceEndpoint
  InterfaceEndpointDNSEntries:
    Description: DNS Entries for Interface Endpoint
    Value: !Join [',', !GetAtt InterfaceEndpoint.DnsEntries]
  PrivateHostedZone:
    Description: Private Hosted zone for Filebeat client environment
    Value: !Ref PrivateHostedZone
  RecordSet:
    Description: CNAME Entry for Interface Endpoint
Value: !Ref RecordSet- Provide the Networking configuration. This consists of two steps:
- Selecting the VPC along with the subnets in which your EC2 instances running your application is hosted.
- Providing the Auto Scaling group configuration required for your application instances.
- An example is shown as a reference:
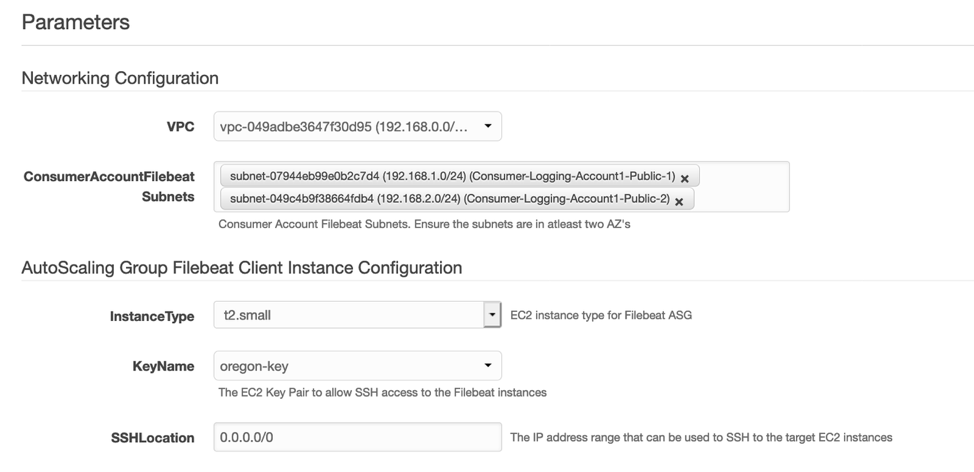
Networking, Autoscaling group filebeat client instance configurations
- Next, provide the endpoint service details used for logging, along with its security group. A reference is shown in the next image.
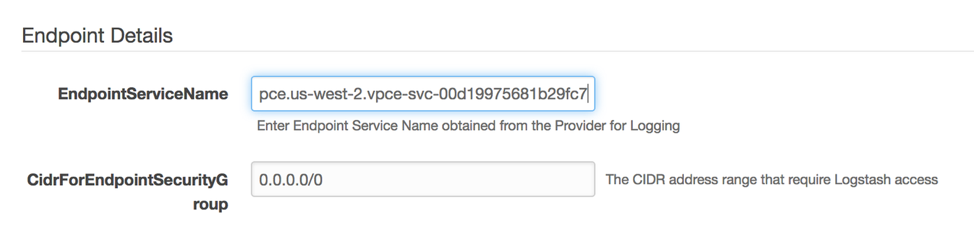
Endpoint details
- Next, provide the domain name and CNAME required for the logging service. The template creates a private hosted zone that filebeat client instances use for pushing the logging data to Central logging account.
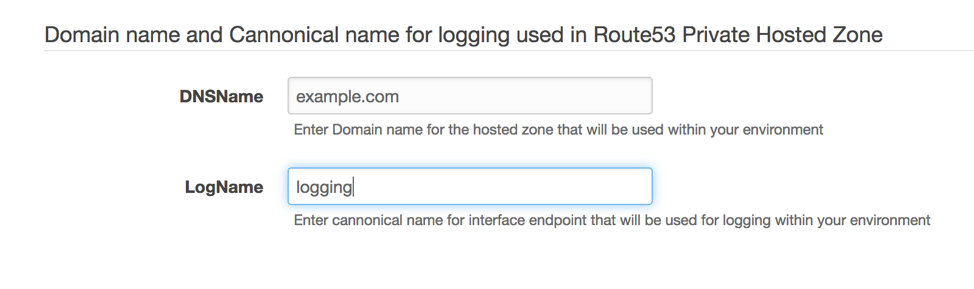
DNS entry for logging used in Route53 private hosted zone
- Approve AWS CloudFormation to create the appropriate IAM resources.
- Review the provided details and click Create the stack.
- Switch to the Provider AWS Account.
- Navigate to the VPC console. Select the Endpoint service created for the logging platform on the left pane.
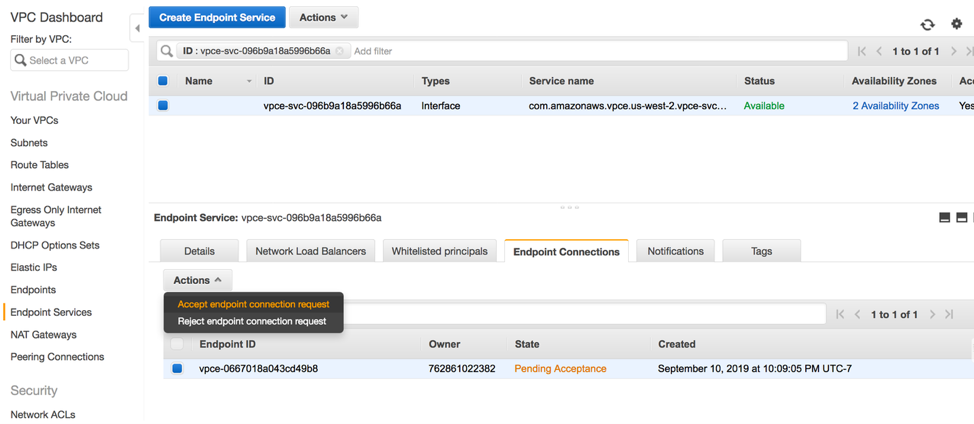
Endpoint service details
- Accept the endpoint connection request and confirm it is in available state.
Configure and access your Kibana dashboards:
- Launch a Windows or Linux EC2 instance in the consumer account. This EC2 instance is used to access the Kibana dashboards for visualizations of your logs.
- Find the Kibana URL by finding the regional DNS name of VPC interface endpoint that was created by navigating to VPC console. Alternatively, you can directly use the Kibana URL path mentioned in Elasticsearch service in the AWS Management Console. To use Kibana, you must configure at least one index pattern. You can also navigate to Management, Select Create index pattern.
- Under Index name or pattern, verify that filebeat-* index is present in the field, and then choose Next.
Select @timestamp in Time Filter field name and then create index pattern.
To graph your log sending events by type:
- Choose the Visualize tab on the top menu.
- Create a Visualization and select line chart as an example – or, choose another visualization option.
- Choose From a new search. If prompted for an index pattern, choose filebeat-*.
- On the metrics pane, next to Y-Axis, ensure that the metric is set to Count.
In the Buckets pane, choose X-Axis. - You can select Date Histogram in the aggregation field and @timestamp in the field.
- You can provide a custom label for both X and Y axis as appropriate.
Save the visualization with a friendly name.
An example of Kibana dashboard after the configuration is shown as below:
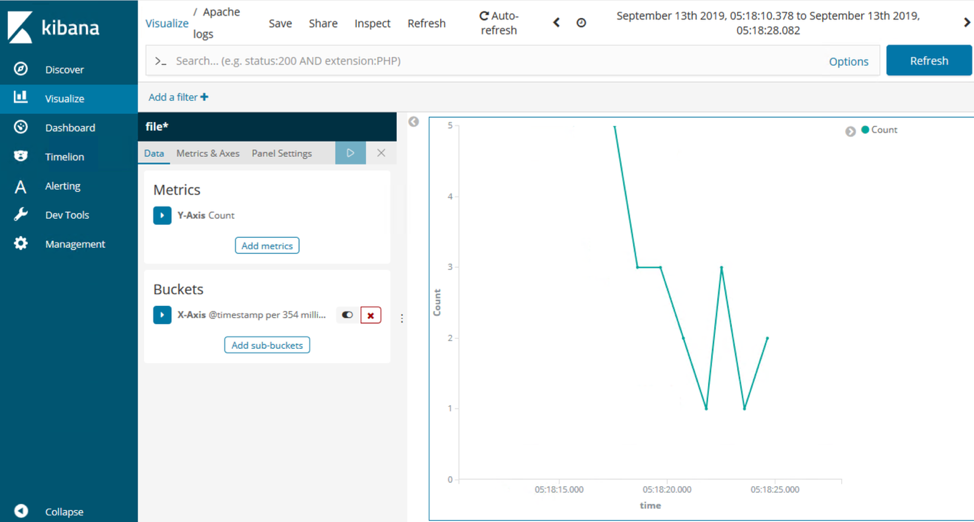
Kibana dashboard
Cleanup Steps
On successful testing and validation, all the resources deployed through CloudFormation templates should be deleted in order to avoid any unwanted costs. Simply go to the CloudFormation console, identify the stacks appropriately, and delete them.
Note: If you use a multi account setup, you must navigate through account boundaries and follow the above mentioned steps as needed.
Summary
This blog post describes a solution using an AWS PrivateLink interface endpoint to centralize application and system logs from EC2 instances. This setup greatly simplifies the process of aggregating logs in a multi account landscape all while keeping the data confined to AWS private networks. No matter how many EC2 instances and AWS accounts you have, you can use this approach for aggregating logs to a single Elasticsearch Service domain. This helps your Security Operation team perform security event and information management (SIEM) without crossing AWS account boundaries. All of the resources used in this solution scale seamlessly, allowing dev teams to use a single deployment rather than spinning up multiple Elasticsearch islands. This promotes cost effectiveness while reducing operational burden.

Shiva Vaidyanathan
Shiva Vaidyanathan is a Cloud Infrastructure Architect at AWS. He provides technical guidance, design and lead implementation projects to customers ensuring their success on AWS. Prior to joining AWS, he has worked on several research projects on how to perform secure computing in public cloud infrastructures. He holds a MS in Computer Science from Rutgers University and a MS in Electrical Engineering from New York University.

Vinay Kuchibhotla
Vinay Kuchibhotla is a consultant for the Amazon Web Services (AWS) Professional Services team in the Pacific Northwest United States. Vinay enjoys interacting with and solving AWS customers’ architectural challenges leveraging cloud native services. His core focus is in the areas of storage, compute, and networking in the cloud. Travel and photography are his favorite spare time activities.
| Blog: Using AWS Client VPN to securely access AWS and on-premises resources | ||
| More on AWS VPN services | ||
 |
Watch re:Invent 2019: Connectivity to AWS and hybrid AWS network architectures |