AWS Open Source Blog
Enabling SSL Offloading for WordPress Blog Posts in AWS GovCloud
Public sector organizations such as educational institutions need to be able to securely host web applications. Using AWS and open source content management systems like WordPress, users can create secure web applications in the AWS GovCloud (US) isolated regions for public sector organizations. WordPress is a popular, easy-to-use, open source tool for blogging and hosting content on the web, and as of 2021, 62% of the top fastest-growing companies in the United States use WordPress. Amazon Route 53 is an AWS Managed Service. It is a highly available and scalable Domain Name System (DNS) web service designed to give developers and businesses a reliable and cost-effective way to route end users to internet applications.
In this post, I will show you how to use the resources above to secure traffic between your WordPress site running in the AWS GovCloud (US) Regions and on Amazon Elastic Compute Cloud (Amazon EC2). I will use Route 53 for HTTPS TLS traffic and a public certificate requested in AWS Certificate Manager (ACM). However because Route53 is not yet available in the AWS GovCloud (US) Regions, the DNS for your site will be hosted through the commercial account. This solution will also use an Application Load Balancer for SSL offloading with potential options for an auto scaling group.
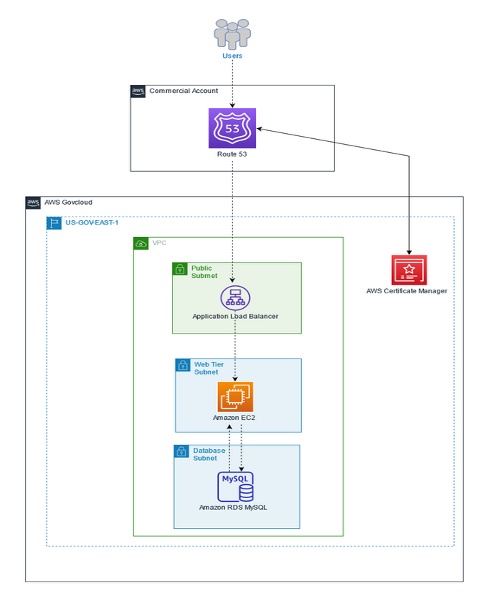
Sample architecture
Below is an example of how this architecture would look utilizing the described solution in this post’s introduction. Users would connect to the custom DNS managed through Route 53 in the commercial account, but would authenticate into the application hosted in the AWS GovCloud (US) account with certificates hosted in the same account.
Prerequisites
This post assumes that the following prerequisites are in place:
- The user has already installed and configured WordPress on Amazon EC2 with Amazon Relational Database Service (Amazon RDS)
- On your instance, you have a healthy .html file for Health Checks
- Have access to both the AWS GovCloud (US) Account and Commercial AWS Account
Walkthrough
The walkthrough is broken up into the seven following steps:
- Create a Route 53 hosted zone in the commercial account
- Request a public certificate within ACM
- Add certificate Canonical Name Record (CNAME) values to Route 53
- Create a target group and add your instance(s) to the target group
- Create an Application Load Balancer with HTTPS for SSL offloading
- Modify EC2 instance’s wpconfig.php file
- Connect to your website via HTTPS.
1. Create Route 53 hosted zone in the commercial account
First, we will need to create the Route 53 hosted zone from within the commercial account. Because Route53 is a global service, you must log in to the Route53 console using your standard AWS credentials.
To do that, you’ll need to do the following:
-
- Access the AWS Console from your standard AWS account.
- Navigate to the Amazon Route 53 Service console.
- Select Hosted Zones and select Create Hosted Zone.
- Give your domain a name—I used lastname.example.org—and a description.
- Make it a public hosted zone, add any tags you wish, and then select Create.
- Make a note of the domain name, as we’ll use this for the certificate creation.
2. Request a public certificate within ACM
We will need to sign in to the console using our AWS GovCloud (US) credentials in order to create the public certificate for our WordPress host. Next, we will create the certificate for SSL Traffic.
- Navigate to the ACM console from your AWS GovCloud (US) account.
- Select Request Certificate.
- Select Request a Public Certificate. Then, select Next.
- Enter in the fully qualified domain name from above and include an asterisk (*) before it. Using the example above, the final result would be *.lastname.example.org.
- Select DNS Validation or Email Validation. Since we’re creating this through Route 53, we’ll have the autonomy to modify the DNS URL.
- Provide tags, if necessary, and select Request.
- Wait for the certificate request to be completed.
- Once the domain is requested with a Success status, make note of the CNAME name and CNAME value as we’ll need these for Route 53.
3. Add certificate CNAME values to Route 53
Next, we will be creating the CNAME values within Route 53 and associated these with the certificate we created in the step above.
- Navigate to the Route 53 console using your standard AWS credentials in your commercial account.
- Select Create Record.
- For record type, choose CNAME.
- For record name, provide the CNAME name from Step 8 in Section 2.
- For Value, provide the CNAME value from Step 8 in Section 2.
- In this example, we’ll keep simple routing.
- Select Save.
4. Create a target group and add your EC2 instance
Before the load balancer is created, a target group needs to be created for SSL Certificate offloading.
- Navigate to the Amazon EC2 console from using your AWS GovCloud (US) credentials. Select Target Groups on the left pane.
- Select Create Target Groups.
- For this example, select Instances.
- Give the target group a name, and keep the protocol at HTTP on Port 80.
- Under Health Checks, keep the protocol as HTTP and provide the HTML file for your health checks. In this example, I used /healthy.html.
- Select Next.
- Under Register Targets, register your WordPress EC2 instance.
- Then, create the target group.
5. Create your Application Load Balancer for HTTPS traffic to your target group and modify Route 53
Now that the target group has been created, an Application Load Balancer can be created and associated with the target group. Then, we will take the address of the load balancer and associate it with the Route 53 hosted zone.
-
- Navigate to the Amazon EC2 console from using your AWS GovCloud (US) credentials. Select Elastic Load Balancers on the left pane.
- Select Create Load Balancer, and then select Create Application Load Balancer.
- Give your load balancer a name. I used MyWordpressGovCloudLB.
- Keep the type under Scheme and IP Address the same for this example. Under Network Mapping, select your virtual private cloud (VPC).
- Map the Application Load Balancer to at least Availability Zones, and a subnet within those Availability Zones.
- Under Listeners, change Protocol to HTTPS.
- For Default Action, Forward to, select your target group from Step H above.
- Under Secure Listening Settings, keep Security Policy at ELBSecurityPolicy-2016-08.
- For Default SSL Certificate, make sure From ACM is selected and select the certificate you requested at the beginning of this post.
- Provide tags, if desired, and create the load balancer.
- Take note and copy the DNS Name under Description. We’ll need this for the Route 53 entry.
- Navigate back to the Route 53 console and to your Hosted Zone and domain name. Select Create Record.
- Provide a name for your website under Record Name, and keep the Record Type as A and Routing Policy as Simple Routing.
- Select Alias toward the right of Quick Create Record. Under Route traffic, change the following drop downs:
- For Choose Endpoint, select Alias to Application and Classic Load Balancer.
- For Choose Region, select the GovCloud Region you’re launching in. In my case, it was us-gov-east-1.
- For Choose Load Balancer, paste in the DNS Name of your Application Load Balancer.
- Create your record. Make sure to take note of the DNS Name.
6. Modify your EC2 Instance’s wp-config.php file
Now that the resources are created for SSL offloading, the WordPress configuration file will need to be edited in order for HTTPS traffic to be accepted and successfully connect.
- Log in to your Amazon EC2 instance using your SSH (Secure Shell) credentials.
- Navigate to your wp-config.php file. For me, this file was in the directory /var/www/html and open this file with a preferred editor of your choosing.
- Navigate below to the beginning portion of the PHP file and add the following snippets of code. These will explicitly provide your DNS record names you made within Route53.
define(‘WP_SITEURL’, ‘https://mydns.route53.url/’)
define(‘WP_HOME’, ‘https://mydns.route53.url/’)
4. Toward the bottom of the wp-config.php file, above the “That’s All” portion, provide the following code. This will allow and force WordPress to use HTTPS forwarding for your WordPress blog to secure connections back and forth to your site.
/** SSL */
define('FORCE_SSL_ADMIN', true);
// in some setups HTTP_X_FORWARDED_PROTO might contain
// a comma-separated list e.g. http,https
// so check for https existence
if (strpos($_SERVER['HTTP_X_FORWARDED_PROTO'], 'https') !== false)
$_SERVER['HTTPS']='on';
5. Make sure to save the file and restart the apache service with the following command: sudo servicectl apache restart.
7. Navigate to your secured, unique WordPress blog post
Once the above is done, you should be able to access your WordPress blog using your unique URL created in Route 53. The URL should also be available via HTTPS for secure connections with the certificate being offloaded onto the load balancer.
You can also experiment with creating an auto scaling group and putting this behind the load balancer for increased scalability and availability. AWS documentation details how to accomplish this.
Exploration and cleanup
Now that the WordPress site is working with HTTPS, you may want to continue to configure your website and modify these resources for web hosting. If working with these services for testing or to maintain proper cloud hygiene, please clean up your resources. Follow the cleanup instructions. Additionally, delete your target group and Application Load Balancer, Route53 DNS entries and hosted zone, as well as your certificate hosted within ACM.
Conclusion
In this blog post, we used Amazon EC2, Route 53, ACM, and Elastic Load Balancing to create a secure WordPress site within AWS GovCloud (US). There are additional configurations you can add to your blog post to ensure high availability and resiliency such as creating an auto scaling group within your Amazon EC2 console. For details on how to do this, please read the documentation on Amazon EC2 Auto Scaling.