AWS Security Blog
How to centralize and automate IAM policy creation in sandbox, development, and test environments
To keep pace with AWS innovation, many customers allow their application teams to experiment with AWS services in sandbox environments as they move toward production-ready architecture. These teams need timely access to various sets of AWS services and resources, which means they also need a mechanism to help ensure least privilege is granted. In other words, your application team generally shouldn’t have access to administrative resources, such as an AWS Lambda function that takes periodic Amazon Elastic Block Store snapshot backups, or an Amazon CloudWatch Events rule that sends events to a centralized information security account managed by your security team.
In this blog post, I’ll show you how to create a centralized and automated workflow that creates and validates AWS Identity and Access Management (IAM) policies for application teams working in various sandbox, development, and test environments. Your security developers can customize this workflow according to the specific requirements of your security team. They can create logic to limit the allowed permission sets based on account type or owning team. I’ll use AWS CodePipeline to create and manage a workflow containing various stages and spanning multiple AWS accounts that I’ll describe in more detail in the next section.
Solution overview
I’ll start with this scenario: Alice is an administrator for an AWS sandbox account used by her organization’s data scientists to try out AWS analytics services such as Amazon Athena and Amazon EMR. The data scientists assess the suitability of these services for their production use cases by running sample analytics jobs on portions of real data sets after any sensitive information has been taken out. The data sets are stored in an existing Amazon Simple Storage Service (Amazon S3) bucket. For every new project, Alice authors a new IAM policy that allows the project team to access their requested Amazon S3 bucket and create their analytics clusters. However, Alice must follow a company guideline that sandbox accounts can only launch specific Amazon Elastic Compute Cloud (Amazon EC2) instance types. She must also restrict access to all administrative AWS Lambda functions and CloudWatch Events rules that the security team use to monitor sandbox account compliance. Below is the solution that meets these requirements and makes it easier for Alice and other administrators to perform their tasks.
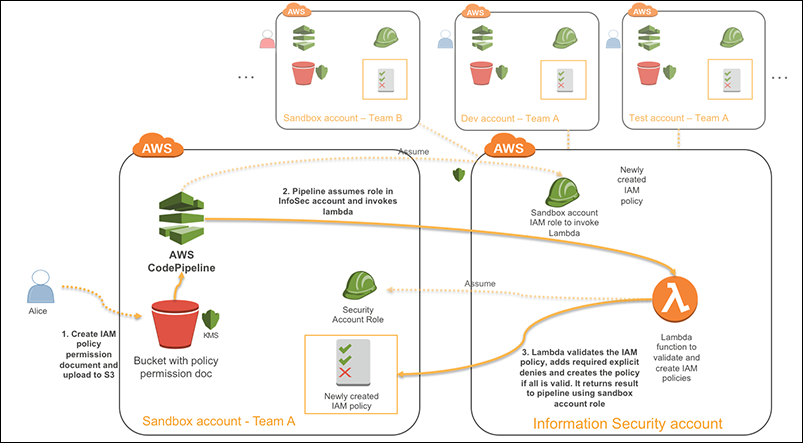
Figure 1: Solution architecture
- Alice uses the IAM visual editor to author a template that gives the data science team access to launch and manage EMR clusters that analyze S3-based data sets. She then uploads the IAM JSON policy document into an existing S3 bucket using an AWS Key Management Service (AWS KMS) key. The key and the S3 bucket are already created by the security team as part of account baselining, which I will detail later in this post.
- AWS CodePipeline automatically fetches the IAM JSON policy document and invokes a sequence of validation checks that use a single and central Lambda function hosted in an AWS account managed by the security team.
- If the IAM JSON policy adheres to all account and general security requirements coded by the security developers, the central Lambda function automatically creates the policy in Alice’s account and the pipeline will succeed. The central validation Lambda function will also attach a set of predefined explicit denies to the IAM policy to ensure that it limits undesired user capabilities in the sandbox account. If the IAM JSON policy fails the checks, the pipeline will fail and provide Alice the specific reason for non-compliance. Alice must then modify the policy and resubmit. When the policy has been successfully created, Alice will attach it to the right IAM user, group, or role.
Solution deployment
This solution includes the following three steps:
- Step 1: Deploy the solution prerequisites
- Create the sandbox account prerequisites
- Create the information security account prerequisites
- Create the sandbox account pipeline
- Step 2: Set up a policy validation Lambda function in the central information security account
- Step 3: Test the sandbox account pipeline
Prerequisites
As this solution manages permissions granted to AWS services or IAM entities, I highly recommend that you try the solution first in an isolated test environment to make sure it meets all your security requirements.
- You’ll need administrator access in two AWS accounts to set up the solution. The deployment of this solution is typically done by one of your organization’s administrators while setting up new AWS accounts. These are the two account types you’ll need access to:
- A sandbox account. This lets application teams experiment with various AWS architectures. This could be a development or test account, as mentioned earlier.
- A central information security account. Typically, this is owned by an information security team who monitors and enforces security compliance within a multi-account structure.
Important : Because the Lambda function that you’ll create in the information security account has highly privileged permissions, it’s important to strictly follow best practices for securing the account. You need to limit account access to security team members. Sandbox account administrators should also not give this central Lambda function any IAM permissions in their sandbox account beyond IAM Policy creation.
- Because you’ll use the AWS Management Console for both AWS accounts, I strongly recommended that you have roles in both AWS accounts and use the console’s Switch Role feature. You can attach an alias to each account and give each a different color code so that you always know which one you’re logged into.
- Make sure to use the same AWS region for all the resources that you create for this solution.
Step 1: Deploy the solution prerequisites
Before building the pipeline across the two AWS accounts, you must first configure the required resources in both accounts, such as IAM roles and encryption keys. This configuration is typically done according to your security team’s guidelines when your organization first sets up the sandbox, development, or test environment.
Important
- In addition to the initial setup you’ll create in this section, your security team must explicitly deny sandbox, development, or test account administrators from attaching IAM Policies that do not meet the allowed security policies for that account type, such as the AdministratorAccess IAM policy. Moreover, your security team must ensure any current or future users, groups, or roles in the account have no permissions to directly set or update IAM policies like (for example) CreatePolicy, CreatePolicyVersion, PutRolePolicy, PutUserPolicy, PutGroupPolicy, or UpdateAssumeRolePolicy. You want to ensure that creating permissions can only be done through the automation pipeline, which I’ll show you how to build shortly.
- Because the solution I’ll be describing focuses on the creation of least privilege permissions, it’s highly advisable that your security team combines the solution with IAM permission boundaries to make sure that any permissions defined in this solution are scoped by a set of pre-defined permissions for every type of account in the organization. For example, your account administrators might only be allowed to create IAM users or roles with a pre-defined set of permission boundaries that limit the permissions attached to those principals. For more information about permission boundaries, please refer to this AWS Security blog post.
Create the sandbox account prerequisites
Follow the steps below to deploy an AWS CloudFormation template that will create the following resources in the sandbox account:
- An S3 bucket where your sandbox administrators will upload IAM policies
- An IAM role that your automated pipeline will use to access the S3 bucket that stores the IAM policies
- An AWS KMS key that you will use to encrypt the IAM policies in your S3 bucket
- While logged in to your sandbox account in your default browser, select this link to launch an AWS stack with the sandbox environment prerequisites. You’ll be redirected to the CloudFormation console with the template URL already populated.

Figure 2: CloudFormation console with prepopulated URL
- Select Next and, optionally, provide a name for your stack. A suggested stack name, Sandbox-Prerequisites, should already be populated.
- The template defines an input parameter called CentralAccount that you can populate with the AWS account ID of your security account. For more information on how to find the account ID of your security account, check here.
- Select Next, and then select Next again.
- To have the stack create the IAM roles that your pipeline will use, select the check box that says I acknowledge that AWS CloudFormation might create IAM resources with custom names, and then select Create Stack.
- Select the Stack info tab and refresh periodically while watching the Stack Status field value. After your stack reaches the state CREATE_COMPLETE, navigate to the CloudFormation Outputs tab and copy the following output values to the text editor of your choice. You’ll use these values in subsequent CloudFormation stacks.

Figure 3: CloudFormation Outputs tab
Create the information security account prerequisites
Follow the steps below to deploy a CloudFormation template that will create the following resources in your information security account:
- An IAM role used by your automated pipeline to invoke your central Lambda function and to provide access to the sandbox account KMS key
- An IAM role used by the central Lambda function to assume a role in the sandbox account and manage IAM policies
- While logged in to your security account in your default browser, select this link to launch an AWS stack with the security environment prerequisites. You’ll be redirected to the CloudFormation console with the template URL already populated.
- Select Next and, optionally, provide a name for your stack. A suggested stack name, Sandbox-Prerequisites, should already be populated.
- Populate the following input parameter fields:
- SandboxAccount: The AWS account ID for the sandbox account.
- ArtifactBucket: The bucket name that you noted in your text editor from the previous stack run in the sandbox account
- CMKARN: The Amazon Resource Name (ARN) of the KMS key that you noted in your text editor from the previous stack run in the sandbox account
- PolicyCheckerFunctionName: The name of the Lambda function to be created later. The default value is PolicyChecker
- Select Next, and then select Next again.
- To have the stack create the IAM roles used by your pipeline, select the box that reads I acknowledge that AWS CloudFormation might create IAM resources with custom names, and then select Create Stack.
- Wait for your stack until it reaches the state CREATE_COMPLETE.
Create the sandbox account pipeline
Now, switch back to your sandbox account and deploy the CloudFormation template that will create the following resources in the sandbox account:
- An AWS CodePipeline automation pipeline that fetches the IAM policy document from S3 and sends it to the security account for centralized validation. If valid, a Lambda function in the information security account will also create the IAM policy in the sandbox account.
- An S3 bucket policy to allow your central Lambda function to fetch the IAM policy JSON document from your bucket
- An IAM role that will be assumed by the Lambda function in the central information security account and used to create IAM policies in the sandbox account. Sandbox account administrator can then attach those IAM policies to the required entities, like an IAM user or role.
- While logged in to your sandbox account in your default browser, select this link to launch an AWS stack with the sandbox environment prerequisites. You’ll be redirected to the CloudFormation console with the template URL already populated.
- Click Next and, optionally, provide a name for your stack. A suggested stack name, Sandbox-Pipeline, should already be populated.
- Populate the following input parameter fields:
- CentralAccount: The AWS account ID of the information security account, without hyphens.
- ArtifactBucket: The same bucket name that you noted in your text editor earlier and used in the previous stack in the information security account.
- CMKARN: The ARN of the KMS key that you noted in your text editor earlier and used in the previous stack in the information security account.
- PolicyCheckerFunctionName: Again, the name of the Lambda function to be created later. It must be the same value you provided to the information security account template.
- Select Next, and then select Next again.
- To have the stack create the required IAM roles, select the box that reads I acknowledge that AWS CloudFormation might create IAM resources with custom names, and then select Create Stack.
- Wait for your stack until it reaches the state CREATE_COMPLETE.
Step 2: Set up the policy validation Lambda function in the central information security account
In the central information security account, create the Lambda function to validate the IAM policies created in sandbox environment.
- In the AWS Lambda console, select Create Function and then select Author from scratch. Provide values for the following fields:
- Name. This must be the same function name defined as input parameter PolicyCheckerFunctionName to CloudFormation in step 1, when you set up the information security account prerequisites. If you did not change the default value in step 1, the default is still PolicyChecker.
- Runtime. Python 2.7.
- Role. To set the role, select Choose an existing role, and then select the role named policy-checker-lambda-role. This is the role you created in step 1, when you set up the information security account prerequisites.
Choose Create Function, scroll down to Function Code, and then paste the following code into the editor (replacing the existing code):
This sample code shows how the Lambda function checks the IAM JSON policy submitted by Alice for policies that are too permissive because they allow all IAM actions on all account resources. The sample code also shows an IAM Deny action that prevents the launch of Amazon EC2 instances that are not part of the T2 EC2 instance family. An explicit deny here ensures that only T2 instances can be launched. Your security developers should author code similar to this sample code, in order to meet the security policies of every account type and control the IAM policies created in various sandbox, development, and test environments.
- Before saving your new Lambda function code, scroll further down to the Basic Settings section and increase the function timeout to 10 seconds.
- Select Save.
Step 3: Test the sandbox account pipeline
Now it’s time to deploy the solution in your sandbox account.
- Create the following files and compress them into an archive with the name policy.zip (this is the name expected by your created pipeline).
- metadata.json: This file contains metadata like the name and description of the IAM policy to be created.
- policy.json: This file contains the JSON body of the IAM policy to be created.
- To upload your policy.zip file to the bucket you created earlier, go to the Amazon S3 console in the sandbox account and, in the search box at the top of the page, search for the bucket you noted in your text editor earlier as ArtifactBucket.
- When you locate your bucket, select the bucket name, and then select Upload. The upload dialog will appear.
- Select Add Files and navigate to the folder with the policy.zip file. Select the file, select Open, select Next, and then select Next again.

Figure 4: S3 upload dialog
- Select the AWS KMS master-key radio button, and then select the KMS key that has the alias codepipeline-policy-crossaccounts.

Figure 5: Selecting the KMS key
- Select Next, and then select Upload.
- Go to AWS CodePipeline console, select your sandbox pipeline, and wait for the pipeline to start running. It can take up to a minute for it to start.

Figure 6: AWS CodePipeline console
- Wait for your pipeline to complete. There should be no validation errors for the IAM policy you just uploaded and your IAM policy should be successfully created. To view the newly created IAM policy, open the AWS IAM console.
- Select Policies on the left and search for the policy with the name defined in the metadata.json file.

Figure 7: Viewing your new policy
- Select the policy name. Note the IAM deny that was automatically added to your defined policy.
If you’d like to test the pipeline further, you can modify the policy to permit all actions on all resources. When policy.zip is uploaded again, the pipeline should return the following error:
If you encounter any errors as you modify your Lambda function code, you can always go back to the Lambda function logs in the central information security account. For more information on how to access Lambda function logs, please refer to the documentation.
The same logic used here can be extended to other sandbox, development, or test environments. However, for the central information security account, the existing roles will need to be updated to trust and have access to the resources in the newly added sandbox, development, or test account.
Summary
In this blog post, I showed you how to centralize the validation and creation of IAM policies across various AWS accounts. This allows your security developers to start coding your security best practices; permitting automatic creation and validation of IAM policies across your various sandbox, development, and test accounts. Account administrators can then attach those validated IAM policies to the required IAM users, groups or roles. This process strikes the balance between agility and control. It empowers your account administrators to create compliant and least-privilege permission IAM policies, while also allowing your application teams to keep quickly experimenting and innovating. If you have feedback about this blog post, submit comments in the Comments section below.
Want more AWS Security how-to content, news, and feature announcements? Follow us on Twitter.