AWS Startups Blog
Internet of Beer: Introducing Simple Beer Service
Filling a need — literally!
As Solutions Architects for AWS, we get to work with companies of all sizes, helping customers bring interesting new products to market or improve existing ones. We also get inspired by the strong “maker” culture at AWS, which encourages employees to innovate and show the power of the AWS cloud. Recently, we were inspired to develop a side project that we found to be fun and educational. In this post, we share our project with you in the hopes that you will try it out, and also apply it to other parts of your business as you experiment with Internet of Things (IoT) devices.
First, a little background: By early 2014, our San Francisco office was expanding rapidly, but we still lacked the cornerstone of any self-respecting tech office: a kegerator. Given the AWS maker culture and our role as Solution Architects, we couldn’t have just ANY kegerator. Our business objective was zero-downtime beer delivery. The service had to connect to AWS and showcase the power of IoT.
The idea was simple: we’d attach a Raspberry Pi to a kegerator. A flow meter would detect when a pour was occurring, post the data to Amazon API Gateway, and display the data on a web page. It was an easy task for a group of motivated Solutions Architects, and we had a working unit in just a few days.
What follows is an outline of how to assemble your own version of what we call “Simple Beer Service,” with some key learning and advances we made along the way. The end result has much more capability than the initial idea, as I’ll discuss in this post. We’ve posted the code, the list of parts and materials, and even the CAD files for 3-D printing the case as open source (see the link at the bottom of this post). All-in, the project costs were under $1,250 to build, and will cost about $15/month to run in your own AWS account. Hopefully, you’ll be inspired to tap into your own creativity and extend this project.
The Architecture
To make the project build process easier, let’s break it down into layers.
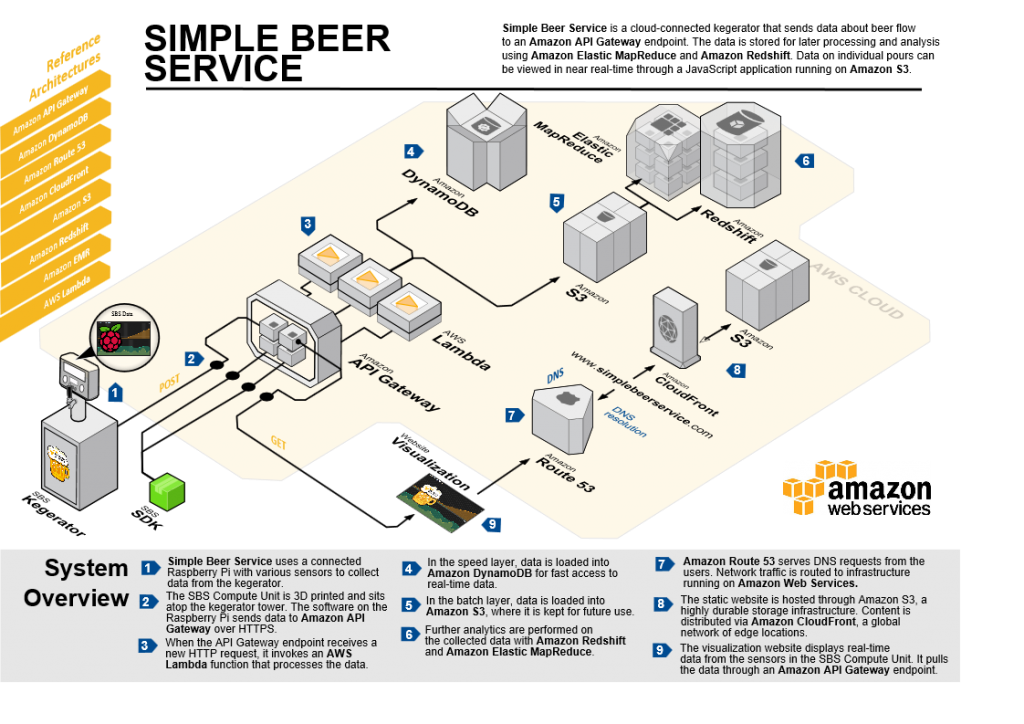
The Simple Beer Service Internet of Things reference architecture.
Kegerator
Key learning #1: Don’t buy the cheapest kegerator you can find. We’ve built a few of these now and have found that the Kegco units work quite well. The one we use is a basic single faucet model and runs about $550 plus shipping. For specifics, including a Build of Materials (BOM) worksheet, see the link at the end of this post.
Device Electronics
For this project, we used the Raspberry Pi 1 model B+ for local compute, which is a credit card-sized, single-board computer, developed in the UK by the Raspberry Pi Foundation. It leverages an ARM processor, provides an SD card for storage, and exposes several dozen pins that can communicate digitally (via +V or ground) by attaching sensors (to collect data) or actuators (to act in the physical world). It also sports an Ethernet port and four USB ports.
The combination of local compute, communications, sensor collection, and the ability to act, all in a small and cost-effective form factor, makes Raspberry Pi a popular choice for IoT projects. What tipped it for us was the fact that there is a well-maintained version of Debian Linux called Raspian with a large community of contributors, which meant that it was easy to get started.
One powerful feature of the Pi (and common to IoT devices) is the row of GPIO (general purpose input/output) pins along the edge of the board. These pins are a physical interface between the Pi and the outside world. At the simplest level, you can think of them as switches that you can turn on or off (input) or that the Pi can turn on or off (output).
Key learning #2: The Grove system. Much like Lego, Grove simplifies the building process significantly. The Grove system consists of a base shield and various modules with standardized connectors. The base shield allows for easy connection of any microprocessor input or output from the Grove modules, and every Grove module addresses a single function, such as a simple button, LED, or a more complex proximity sensor. Specifically, we used the GrovePi+ board that attaches directly to the Raspberry Pi and exposes the pins as an easy-to-connect cable system.
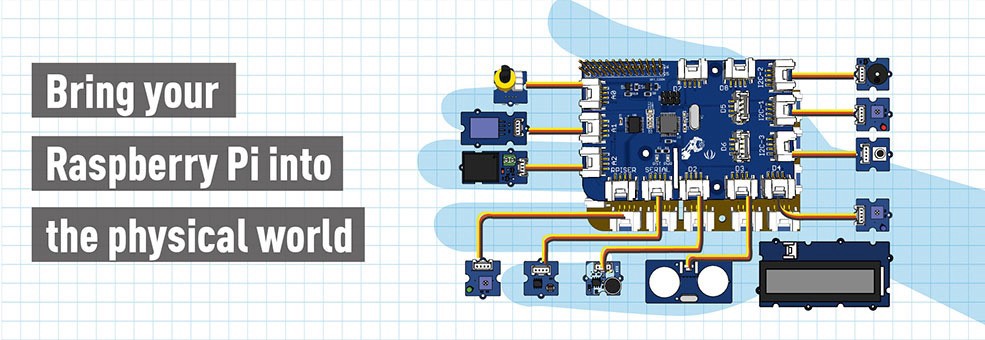
Image courtesy of SeeedStudio.com
With the GrovePi+ board attached directly to the Raspberry Pi, it was easy to connect our array of components via four-wire Grove cables.
Sensors and actuators used:
- Flow meter (beer flowing through the kegerator)
- Temperature and humidity sensor (measuring kegerator conditions)
- Ultrasonic sensor (distance of objects in front of the kegerator)
- Green LED (indicates a successful transmission of data into the cloud)
- Red LED (indicates ambient sound — think “equalizer”)
- Blue LED (indicates that a pour is occurring)
- RGB LCD (as a console display, indicates status information)
- Button (for system reset)
With the electronics in place and an Ethernet or WiFi connection to the Internet, we can layer in the software.
Device Software
With Raspian installed on the Pi, this brings us to the GrovePi open-source platform from the good people at Dexter Industries. GrovePi is a software framework that can be programmed in Python, C, C#, Go, and NodeJS. The key benefits of the GrovePi framework is that it is aware of the pin designations of the GrovePi+ board and true to the benefits of any software framework, which reduced the total amount of code we had to write. We chose to use Python. And, to make it as easy as possible to get started, we created an installer script that downloads the prerequisites and configures the Python code with prompts for key configuration options.
In addition, we installed the AWS Command Line Interface (AWS CLI), making it convenient to communicate with the AWS cloud. We used limited-scope AWS Identity and Access Management (IAM) credentials to ensure that each unit has only the minimum privileges required.
This tees up our next topic, IoT Cloud Architecture.
IoT Cloud Architecture
The Python code running on the Pi polls the sensors and collects the result into a JSON payload that it sends about once per second to Amazon API Gateway. API Gateway is a fully managed service that makes it easy for developers to create, publish, maintain, monitor, and secure APIs at any scale and fits perfectly with many IoT use cases.
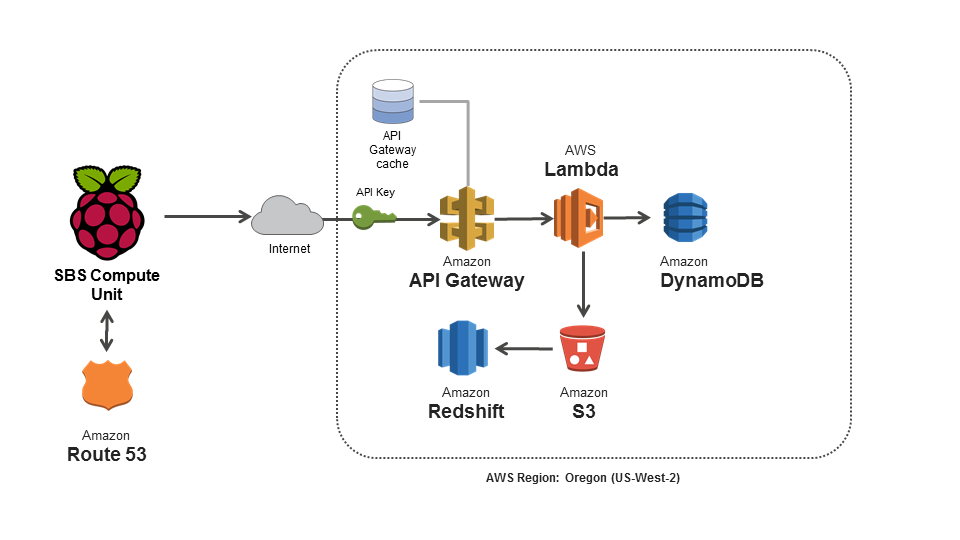
From API Gateway, the sensor payload takes two different paths: intermittent and speed. Using the Unreliable Town Clock pattern, the intermittent layer utilizes SNS to invoke an AWS Lambda function every 30 minutes. The Lambda function batches, compresses and moves data from DynamoDB to S3 for long term storage and analytics. Once the compressed data is in S3, it can be easily ingested by Amazon Elastic MapReduce (Amazon EMR) for batch processing and/or loaded into Amazon Redshift (data warehouse) for analytics. AWS Lambda also facilitates the speed layer, but this path leads to Amazon DynamoDB.
The dashboard is written in JavaScript and is served from an Amazon S3 static web site and distributed to users with low latency, high data transfer speeds via Amazon CloudFront. DNS is provided by Amazon Route 53.
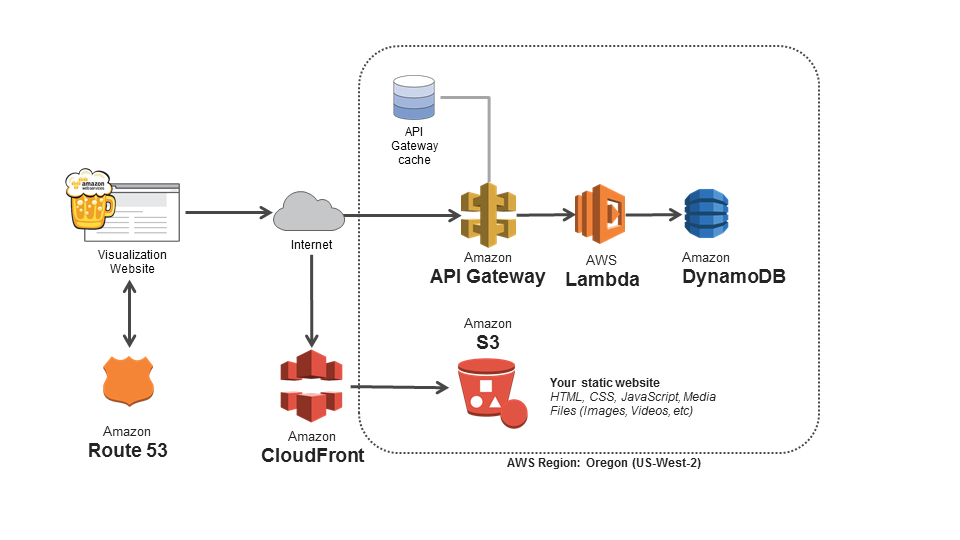
The following screenshot shows the dashboard portion of the project.

For dashboard implementation details, see the link to the AWS Labs site provided at the end of this post.
Project Case
We wanted the overall look of the result to be smart, which meant that the project case needed to look like a finished product. And, of course, we had to have switches, buttons, and blinking lights. For the first unit, we purchased an aluminum project case to house the Raspberry Pi and the associated electronics. It was basically a metal box about 10 inches tall, 10 inches wide, and about four inches thick that we drilled, cut, painted and otherwise forced to fit our need. While it worked, this approach certainly wasn’t going to scale.
Key learning #3: The case was the hardest part of the project and needed to be specially designed and 3-D printed.
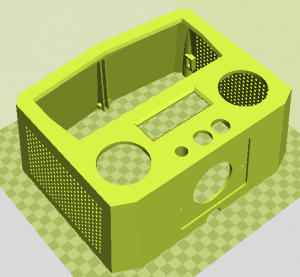
CAD model of device case ready for 3-D printing
When we started this project, we didn’t have any experience with device design or 3-D printing. The good news is that the folks at Atypical Products in Redwood City, CA (co-located at TechShop.ws) took up the challenge and created a spectacular design that we have since extended.
Conclusion
It is amazing how fast this space is evolving. Hardware really is becoming more like software. In just a little more than a year, it has become far easier to go from an IoT idea to something that looks and works great. While certainly not a mass-production-ready product, this project demonstrates what can be done with affordable and currently available technology and services. The use of the AWS cloud for heavy lifting combined with the decreasing size and cost of IoT devices is a powerful combination. The best part of this project, though, was the commitment to quality by the team, as demonstrated by many cycles of testing and data generation.
For more information and project assets, see the AWS Labs github repo at
https://github.com/awslabs/simplebeerservice.