AWS Storage Blog
Increasing application resilience with CloudEndure Disaster Recovery
UPDATE: For a more in-depth look at this topic, please visit the blog post “Configuring Cross-Region DR of your Amazon EC2 workloads with CloudEndure.”
If there is an IT disaster, you must get your workloads back up and running quickly to ensure business continuity. For business-critical applications, the priority is keeping your recovery time and data loss to a minimum, while lowering your overall capital expenses.
AWS CloudEndure Disaster Recovery helps you maintain business as usual during a disaster by enabling rapid failover from any source infrastructure to AWS. By replicating your workloads into a low-cost staging area on AWS, CloudEndure Disaster Recovery reduces compute costs by 95% and eliminates the need to pay for duplicate OS and third-party application licenses. In this post, I walk you through the principal steps of setting up CloudEndure Disaster Recovery for on-premises machines.
How CloudEndure Disaster Recovery works
CloudEndure Disaster Recovery is an agent-based solution that continually replicates your source machines into a staging area in your AWS account without impacting performance. It uses Continuous Data Replication technology, which provides continuous, asynchronous, block-level replication of all of your workloads running on supported operating systems. This allows you to achieve subsecond recovery point objectives (RPOs). Replication is performed at the OS level (rather than at the hypervisor or SAN level), enabling support of physical machines, virtual machines, and cloud-based machines. If these is a disaster, you can initiate failover by instructing CloudEndure Disaster Recovery to perform automated machine conversion and orchestration. Your machines are launched on AWS within minutes, complying with aggressive recovery time objectives (RTOs).
Replication has two major stages:
- Initial Sync: Once installed, the CloudEndure agent begins initial, block-level replication of all of the data on your machines to the staging area in your target AWS Region. The amount of time this requires depends on the volume of data to be replicated and the bandwidth available between your source infrastructure and target AWS Region.
- Continuous Data Protection: Once the initial sync is complete, CloudEndure Disaster Recovery continuously monitors your source machines to ensure constant synchronization, up to the last second. Any changes you make to your source machines are replicated into the staging area in your target AWS Region.

Architecture of CloudEndure Disaster Recovery
You can find additional information in the CloudEndure Disaster Recovery documentation.
Setting up CloudEndure Disaster Recovery in your environment
1. Requirements
- An AWS account
- A CloudEndure Disaster Recovery subscription in AWS Marketplace
- In order to install the CloudEndure agent on the source machines:
- At least 2 GB of free disk space on the root directory. Verify that the machine constantly has at least 300 MB of free RAM to run the agent.
- Python 2 (2.4 or above) or Python 3 (3.0 or above) for Linux source machines
2. Connectivity settings (refer to technical documentation for full network requirements)
- Communication over TCP Port 443:
- Between the source machines and the CloudEndure Service Manager.
- Between the staging area and the CloudEndure Service Manager.
- Communication over TCP Port 1500:
- Between the source machines and the staging area
3. Create and configure your Disaster Recovery Project:
Once you are logged into the CloudEndure User Console, start by creating a new Project. To do so, select Disaster Recovery from the Project type list:

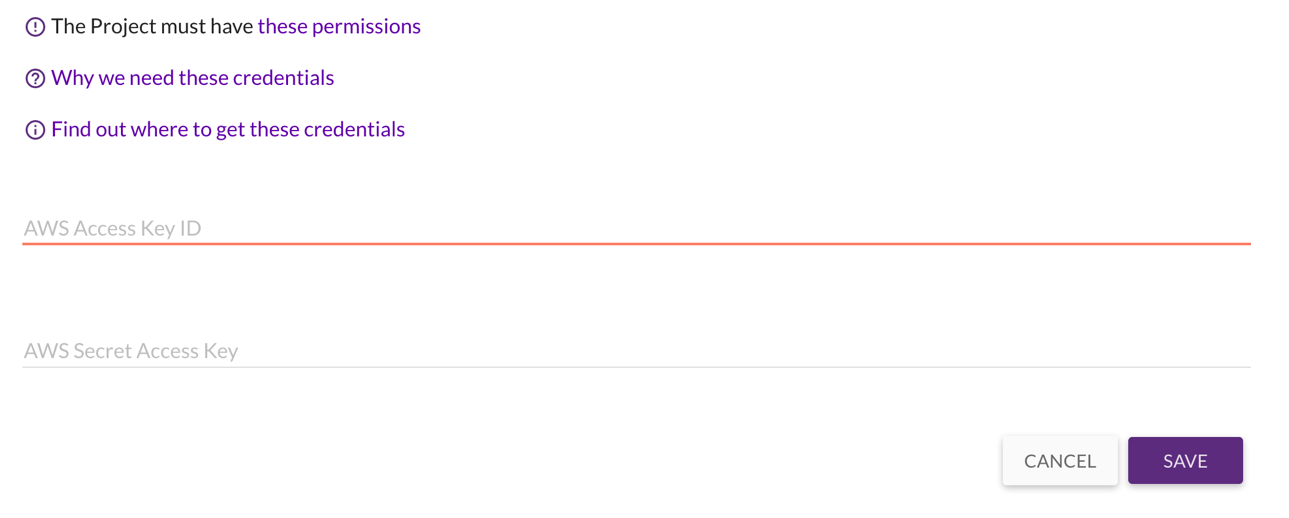
4. Set up AWS credentials
In order to launch resources on AWS, you must provide your AWS credentials. Add the AWS Access Key ID and the AWS Secret Access Key credentials in the CloudEndure User Console via Setup & Info > AWS Credentials. The necessary permissions are specified on the same page:
5. Configure the replication settings
Next, specify where your source machines are located and select your target infrastructure. In this example, the source is on-premises (Other Infrastructure) and the target machines are located on AWS EU (Frankfurt).

6. Add new machines and start initial sync
In order to add a machine to this disaster recovery project, download the CloudEndure Agent Installer and then follow the installation instructions. Use the generated Agent Installation Token:


After a few seconds, you will see the source servers on the CloudEndure User Console with their data replication progress.

Once initial sync is complete, the machines are launchable and will show Continuous Data Protection status in the Data Replication Progress column of the Machines page.

7. Configure the target machine blueprint settings
The last step of the preparation is to define the target machine settings for each source machine on your target machine blueprint. Select your preferred target infrastructure, as well as the other replication settings, such as subnets, security groups, and tags. You can configure the blueprint in the Machines tab of the Blueprint menu at any time during replication, even if the machine has not completed the initial sync.

Disaster recovery tests
After your machines are in Continuous Data Protection mode and you have configured the target blueprint, you can launch the machines in Test Mode. Simply select the machines you want to test and click “Test Mode” in the top-right menu. Run disaster recovery tests regularly to ensure that your disaster recovery plan works as it should, and your business-critical workloads are recovered within your defined recovery objectives.

If your environment contains applications running on several servers, you may want to orchestrate the launch of these servers. In this case, you can use the Recovery Plans feature to define steps, such as launch order and launch wait times, for each machine.

Similar to launching in Test Mode for one machine, you can use the top-right menu to initiate Test Mode for machines in your Recovery Plan. This launches your machines in the order that you specified in the Recovery Plan steps:

You also have the option to choose a recovery point to launch the Recovery Plan on the Recovery Point dialog. Choose a Recovery Point and click Continue with Launch.

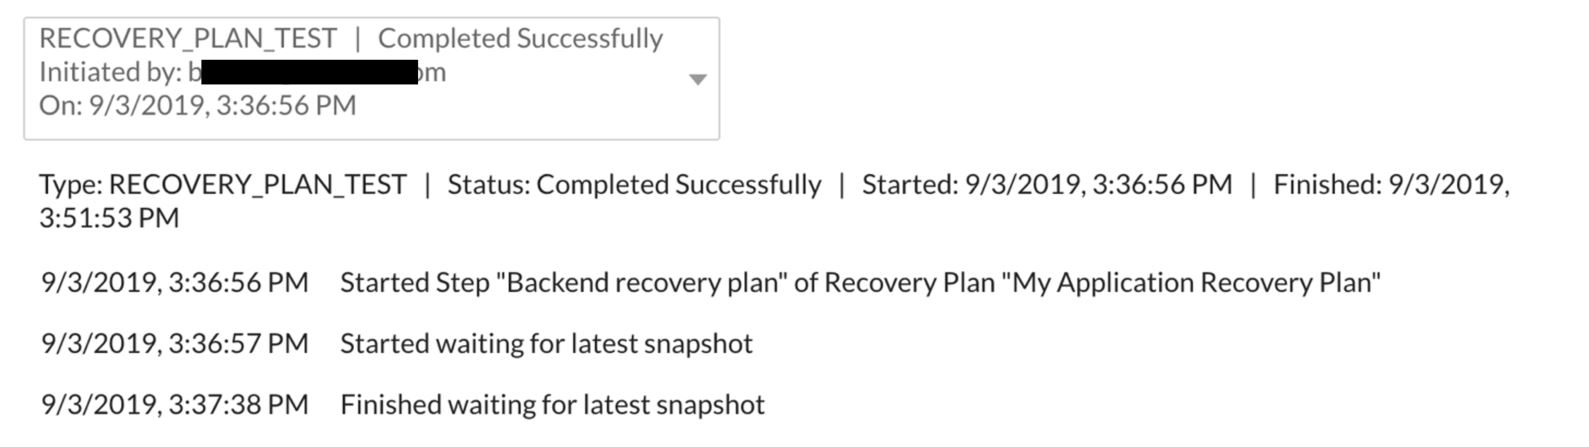
During the launch, you can follow the status of your machines being tested in the Job Progress Menu:
Once the target machines are up and running and finished booting, you can run tests on the application to ensure that everything is working correctly.

Conduct failover
Your applications are kept continuously in sync. If there is a disaster, launch your Recovery Plan in Recovery Mode. The functionality of CloudEndure Disaster Recovery is the same when launching machines in Recovery Mode as when launching in Test Mode. However, Test Mode is used for testing and Recovery Mode is used during a disaster.

As described for the Test Mode, you must specify the recovery point, and you can monitor the updates in the Job Progress menu.

After launching your servers in Recovery Mode, complete the failover by redirecting network traffic to the new target servers.
Post-disaster: failback
CloudEndure Disaster Recovery enables you to prepare for failback. Once the disaster is over, it reverses the direction of data replication from your target machines on AWS back to your source machines. The CloudEndure User Console then treats the currently launched target machines as source machines and data flows from your selected target AWS Region back to your original source infrastructure.
Conclusion
In this post, I showed you how to set up CloudEndure Disaster Recovery for on-premises machines. With a robust disaster recovery solution, your workloads are replicated into AWS. This puts you in a position to easily test your production applications in AWS, speeding up your familiarity with the AWS Cloud. You can protect your environment in the event of a disaster and prepare for a full migration to AWS at the same time.
Getting started with the new reduced cost offering
AWS recently reduced the cost of CloudEndure Disaster Recovery by 80%. With a hourly billing model, you can easily use the solution without having to commit to a long-term contract or set number of servers. Visit CloudEndure Disaster Recovery in AWS Marketplace to get started or learn more on the CloudEndure Disaster Recovery product page.