AWS Security Blog
Enable Office 365 with AWS Managed Microsoft AD without user password synchronization
In this post, we explain how you can use AWS Directory Service for Microsoft Active Directory (AWS Managed Microsoft AD) to enable your users to access Microsoft Office 365 without synchronizing passwords using Azure Active Directory (Azure AD) Pass-through Authentication (PTA). This makes it easier to configure Microsoft Office 365 with AWS Managed Microsoft AD. Azure AD PTA reduces management overhead by eliminating the need to deploy and manage complex federation or password synchronization infrastructure. It also helps you meet your organization’s security standards because you can continue to apply and manage stronger password policies using AWS Managed Microsoft AD.
Previously, AWS enabled you to access Office 365 with credentials that you manage in AWS Managed Microsoft AD. AWS did this by deploying Azure AD Connect and Active Directory Federation Services for Windows Server 2016 (AD FS 2016) with AWS Managed Microsoft AD. While AWS continues to support this model, the focus of this post is to explain a new, supported model that produces the same result without deploying a federation or password synchronization implementation. In the new model, when users sign in to Office 365, Azure AD PTA validates their passwords against AWS Managed Microsoft AD directly.
We explain how to use Azure AD Connect to synchronize users from AWS Managed Microsoft AD into Azure AD. We then show you how to enable Azure AD Connect PTA to automatically authenticate users directly against your AWS Managed Microsoft AD directory. We do this in four steps:
- Delegate permissions to your Active Directory Domain Services (AD DS) Connector account.
- Configure the AWS security group rules for your Azure AD Connect server.
- Install and configure Azure AD Connect Pass-through Authentication with AWS Managed Microsoft AD.
- Use an AWS Managed Microsoft AD user account to sign in to Office 365.
Prerequisites
The instructions in this post assume that you understand how to create Amazon Elastic Compute Cloud (Amazon EC2) for Windows Server instances and how to use Remote Desktop Protocol (RDP) to log in to the instances. They also assume you completed the following tasks:
- Created an AWS Managed Microsoft AD directory.
- Joined an Amazon EC2 for Windows Server instance to the AWS Managed Microsoft AD domain you will use as your Azure AD Connect server. We show you how to install Azure AD Connect on this instance later. Azure AD Connect supports Windows Server 2012 R2 or later, for this post, we use Windows Server 2019. While not in scope of this blog, because the Azure AD Connect server only requires outbound traffic, you should run the Azure AD Connect server in a private subnet, with outbound traffic routed via a NAT gateway or instance in a public subnet, see VPC with public and private subnets.
- Joined an Amazon EC2 for Windows Server instance to the AWS Managed Microsoft AD domain you will use as your management server instance (Management).
- Install Active Directory Administration Tools on your Management instance.
- Using Active Directory Users and Computers on your Management instance, create a standard user named AADConnectSvc in your AWS Managed Microsoft AD directory. The AADConnectSvc standard user will be used as your AD DS Connector account. You will use the AD DS Connector account (AADConnectSvc) in Azure AD Connect later.
- Created an active Office 365 subscription.
- Added and verified your domain in Office 365.
Solution overview
You can use Azure AD Pass-through Authentication with AWS Managed Microsoft AD to:
- Synchronize users from AWS Managed Microsoft AD to Azure AD.
- Assign a license to and use an AWS Managed Microsoft AD identity to sign in to Office 365.
Figure 1 shows how Azure AD Connect Server orchestrates the synchronization of AD identities from AWS Managed Microsoft AD to Azure AD. It also shows you how Azure AD Connect Pass-through authentication validates users’ credentials when a user signs in to Office 365.
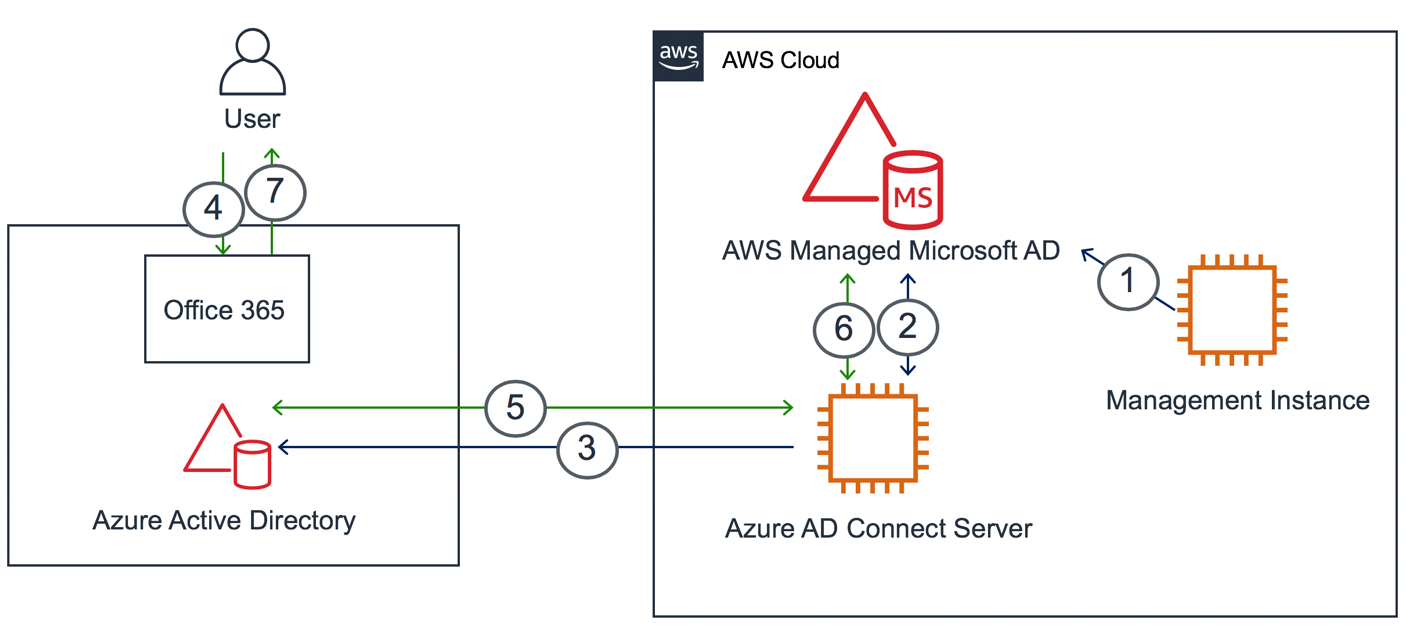
Figure 1: Architecture diagram of AD synchronization and pass-through authentication between the AWS Managed Microsoft AD and Office 365
- Delegate AD permissions to the AD DS Connector account using the Management instance.
- You install and configure Azure AD Connect Pass-through authentication with AWS Managed Microsoft AD.
- AWS Managed Microsoft AD identities are synchronized to Azure AD using the Azure AD Connect server.
- User signs in to Office 365.
- Azure AD communicates with the Azure AD Connect server to validate user credentials.
- Azure AD Connect server validates user’s credentials with the AWS Managed Microsoft AD.
- User successfully signed in to Office 365 with AWS Managed Microsoft AD credentials.
Note: This blog post uses a single Microsoft Windows Server running Azure AD Connect Pass-through Authentication agent. For high availability, you can install additional Authentication agents on Microsoft Windows Servers, see Ensure high availability.
Step 1: Delegate permissions to your Active Directory Domain Services (AD DS) Connector account
In this step, you delegate basic read AD permissions to your AD DS Connector account (AADConnectSvc). The AD DS Connector account (AADConnectSvc) is used by Azure AD Connect to connect to and read AD objects in your AWS Managed Microsoft AD directory. To delegate the permissions, download and use the ADSyncConfig PowerShell module included in the Azure AD Connect installation.
Perform the following steps after signing in to the Management instance using the admin user account for the AWS Managed Microsoft AD directory:
A. Download the ADSyncConfig PowerShell module from the Azure AD Connect installation
- Download and initiate the Azure AD Connect installation on the Management instance.
- On the Welcome page of the Microsoft Azure Active Directory Connect wizard, close the installation by selecting x. At this stage, the Azure AD Connect installation has downloaded the ADSyncConfig PowerShell module to the Management instance.
- Verify the ADSyncConfig PowerShell module has been downloaded and is in the following location:
B. Configure permissions to your AD DS Connector account
- Import the ADSyncConfig PowerShell module, using the following Windows PowerShell command.
- Add basic read permissions to your AWS Managed Microsoft AD directory for the AD DS Connector account (AADConnectSvc) by running the following Windows PowerShell command. Be sure to replace the names in <red italic> text with the names from your AWS Managed Microsoft AD directory.
- Next, you will add permissions to your AD DS Connector account (AADConnectSvc) by running the following Windows PowerShell command. The permissions allow Azure to manage the source anchor for AWS Managed Microsoft AD identities synchronized to Azure AD. Be sure to replace the names in <red italic> text with the names from your AWS Managed Microsoft AD directory.
Step 2: Configure the AWS security group rules for your Azure AD Connect server
In this step, you configure the AWS security group rules so that your Azure AD Connect server can communicate with Azure AD. To do this, you must add outbound rules to your Azure AD Connect server AWS security group to allow outbound traffic on HTTPS (port 443) and HTTP (port 80).
Follow these steps to configure AWS security group rules:
- In the navigation pane of the Amazon EC2 console, choose Security Groups.
- In the list, select the security group for the Azure AD Connect server, and then choose Actions, Edit outbound rules.
- Choose Add Rule. Choose HTTPS for Type and Anywhere for Destination. Choose Save rules.
- Next, choose Add Rule. Choose HTTP for Type and Anywhere for Destination. Choose Save rules.
Step 3: Install and configure Azure AD Connect Pass-through Authentication with AWS Managed Microsoft AD
Follow the outlined steps to install Azure AD Connect Pass-through Authentication on the Azure AD Connect server. The Azure AD Connect server synchronizes your users from AWS Managed Microsoft AD to Azure AD and manages password validation against your AWS Managed Microsoft AD directory.
Perform the following steps after signing in to the Azure AD Connect server using the admin user account for the AWS Managed Microsoft AD directory:
- Download and initiate the installation of Azure AD Connect on the Azure AD Connect server.
- On the Welcome page of the Microsoft Azure Active Directory Connect wizard, accept the license terms and privacy notice, and then select Continue.
- On the Express Settings page, at the bottom of the page, select Customize.
- On the Install required components page, select Install.
- On the User sign-in page, select Pass-through authentication, and then select Next.
- On the Connect to Azure AD page, enter your Office 365 global administrator account credentials, and then select Next.
- On the Connect your directories page, for DIRECTORY TYPE, select Active Directory, and for FOREST, select your AWS Managed Microsoft AD Forest, and then select Add Directory.

Figure 2: Select a directory to add
- In the AD forest account screen, select Use existing AD account, enter your AD DS Connector account (AADConnectSvc) credentials, and then select OK.

Figure 3: Add an AD forest account
- Now that you’ve added your AWS Managed Microsoft AD directory, on the Connect your directories screen, select Next.
- On the Azure AD sign-in configuration page, select userPrincipalName in the USER PRINCIPAL NAME field, and then select Next.

Figure 4: Select the USER PRINCIPAL NAME
Note: If you don’t have a matching UPN suffix for your Azure AD domain in AWS Managed Microsoft AD UPN suffix. You can add a new UPN suffix to AWS Managed Microsoft AD. After adding the new UPN suffix to AWS Managed Microsoft AD, you can update your users UPN by following the steps below. The UPN attribute format combines the user’s login name and the UPN suffix. The UPN suffix is your AWS Managed Microsoft AD domain name.
In the following example from the Account tab of the AWS User Properties in the Active Directory Users and Computers tool, the user’s UPN is awsuser@awsexample.com. The UPN is created by combining the User logon name, awsuser, and the UPN suffix, @awsexample.com.

Figure 5: Example user properties
- On the Domain and OU filtering page, select Sync selected domains and OUs, choose the Users OU under your NetBIOS OU, and then choose Next.
Note: AWS Managed Microsoft AD stores your users and computers under a dedicated OU with your domain’s NetBIOS name.

Figure 6: Domain and OU filtering
- On the Uniquely identifying your users page, select Next.
- On the Filter users and devices page, select Next.
- On the Optional features page, select Next.
- On the Ready to configure page, select Start the synchronization process when configuration completes, and then select Install.
- Select Exit. Your Azure AD Connect installation is complete.
Note: By default, the Azure AD Connect sync scheduler runs every 30 minutes to synchronize your AWS Managed Microsoft AD identities to Azure AD. You can change this schedule using PowerShell. For more information, read Azure AD Connect sync: Scheduler.
Tip: If you need to synchronize a change immediately, you can manually start a sync cycle outside the scheduled sync cycle from the Azure AD Connect sync instance. Open a Windows PowerShell session as an administrator and run the following Windows PowerShell commands:
Step 4: Use an AWS Managed Microsoft AD user account to sign in to Office 365
The following steps explain how to assign a license to an AWS Managed Microsoft AD user account, and then use that account to sign in to Office 365 with the AWS Managed Microsoft AD user account UPN.
- Use a web browser to access the Office 365 admin center using your global administrator account.
- Assign a license to a user you created in your AWS Managed Microsoft AD directory.
- Sign in with the AWS Managed Microsoft AD user account at https://portal.office.com.
You’ve successfully configured and used Azure AD Pass-through and used it to sign in to Office 365 with your AWS Managed Microsoft AD user account!
Note: You can configure Azure AD smart lock out to compliment your AWS Managed Microsoft AD password policies.
Summary
In this post, we showed you how to use Azure AD Connect to synchronize user names from your Active Directory in AWS into Azure AD so that Office 365 can use those identities. You enabled Azure AD Pass-through Authentication to authenticate the identities against your AWS Managed Microsoft AD directory with no passwords synchronized or stored in Azure AD or Office 365.
If you have feedback about this post, submit comments in the Comments section below. If you have questions about this post, start a new thread on the AWS Directory Service forum or contact AWS Support.
Want more AWS Security how-to content, news, and feature announcements? Follow us on Twitter.