AWS for SAP
How to setup SAP Netweaver on Windows MSCS for SAP ASCS/ERS on AWS using Amazon FSx
Organizations are migrating business-critical applications like SAP to AWS. SAP systems run mission and business critical workloads for most companies around the world. SAP high availability (HA) is one of the top priority for companies when it comes to their SAP systems. As part of the Service Level Management process, it is critical to clearly understand their high availability requirements and implement the right strategy.
As part of AWS Professional Services, customers often ask for help with their SAP HA set up for a wide range of SAP systems including Windows based SAP systems. In this blog, we will describe how to set up the SAP ABAP Central Services (ASCS) and Enqueue Replication Server(ERS) using Microsoft Window Server Failover Clustering(WSFC) and Amazon FSx filesystem.
A shared filesystem is mandatory and required by SAP to be used in the Windows cluster configuration for SAP. Amazon FSx will be used as a shared filesystem.
About Amazon FSx:
Amazon FSx filesystems are Windows native file systems (NFS) that are fully managed by AWS. They provide cost-efficient capacity with high levels of reliability, and integrates with a broad portfolio of AWS services to enable faster innovation.
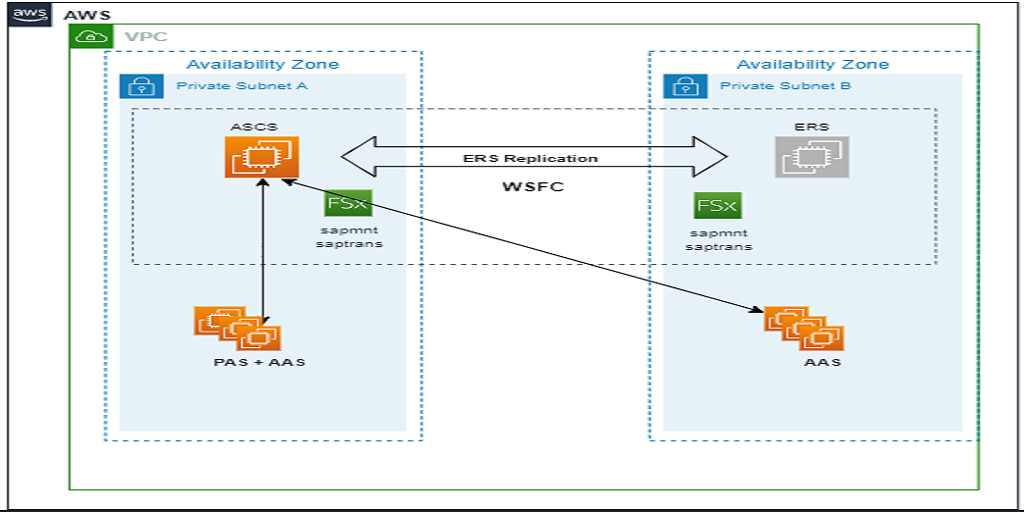
Architecture Considerations:
Availability Zones: using multiple availability zones (AZ), allow placing independent infrastructure in physically separates locations. A Multi-AZ deployment provides high availability and fault tolerance.
Subnets: In this blog, we will create three subnets for Multi-AZ deployment.
Windows Domain Controller: Domain controller should be placed in two AZ’s to provide high availability, low latency access to Active Directory Domain Services (AD DS) in the AWS cloud. Windows Domain Controller (DC)’s should not be internet facing servers and so must be placed in private subnet. DC1 will be placed in AZ1 and DC2 will placed in AZ2
Solution Requirements:
- Create Multi-AZ Amazon FSx File Windows File Share
- Enable custom DNS for FSx
- Reserve additional IPs addresses for Windows Cluster and SAP Role Cluster
- Create windows cluster
- Configure Cluster Time To Live and Register All Providers IP parameters
- Install SAP ABAP SAP Central Services
- Install SAP Enqueue replication server
- Install SAP Primary and Additional Application Servers
- Disable SAP internal cache for host names and services names
How to create an FSx file system:
Open the Amazon FSx console at https://console.aws.amazon.com/fsx/.
- On the dashboard, choose Create file system to start the file system creation wizard.
- On the Select file system type page, choose Amazon FSx for Windows File Server, and then choose Next. The Create file system page appears.
- In the File system details section, provide a name for your file system.For Deployment type choose Multi-AZ. By choosing Multi-AZ a fault tolerant file system will be deployed and support Availability Zone unavailability.
- For Deployment type choose Multi-AZ. By choosing Multi-AZ a fault tolerant file system will be deployed and support Availability Zone unavailability.

- In the Network & security section, choose the Amazon VPC that you want to associate with your file system. Choose the same Amazon VPC that you chose for your Microsoft Active Directory and your Amazon EC2 instances.
- If you have a Multi-AZ deployment, choose a Preferred subnet value for the primary file server and a Standby subnet value for the standby file server. A Multi-AZ deployment has a primary and a standby file server, each in its own Availability Zone and subnet.

- For Windows authentication, you have either AWS Managed Microsoft Active Directory or Self-managed Microsoft Active Directory. Select Self-managed Microsoft Active Directory.
- For Encryption, keep the default Encryption key setting of aws/fsx (default) or choose a custom KMS key.
- For Access (optional), you have to enable access to Amazon FSx from DNS names other than the default DNS name that Amazon FSx creates. See create a custom DNS section.

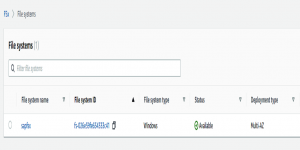
- Review the file system configuration shown on the Create file system page. Choose Create file system. Then wait for the File System creation.
- After the Amazon FSx creation, you can visualize it at Amazon FSx console dashboard. At Status column you can see the Amazon FSx Windows File Share is ready to be used.
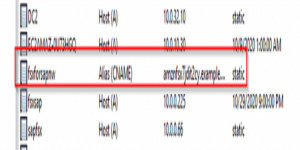
Create a custom DNS name for FSx Windows File Share
SAP only supports 13 characters for physical and virtual hostname naming convention. It means physical and virtual hostnames longer than 13 characters are not supported and Software Provisioning Manager will not let you proceed with the SAP installation. Refer to the SAP note 2718300 – Physical and Virtual hostname length limitations for more information.
When an FSx file system is created, its DNS name contains 15 characters by default.
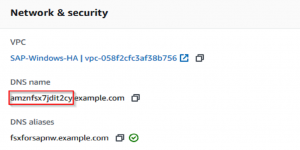
The same rule applies to SAPGLOBALHOST, therefore an Amazon FSx custom DNS will be required to overcome this limitation. During a SAP system installation the SAPGLOBALHOST will be required and you have to provide a 13 character long custom DNS.
Therefore, it is mandatory you create a custom DNS at your DNS manager. For this blog, Microsoft Domain Controller DNS manager is used, and then the custom DNS name was created at the Domain Controller.
SAP High-Availability System Installation
Make sure the following overall requirements are completed before proceeding with First and Additional Cluster Nodes installation.
- Add secondary private IPs for each Windows Microsoft Cluster nodes (except for Windows File Share Witness). In addition of the private IPs already attached to the instances, 4 additional IP addresses are required:
- 2 for Microsoft Windows Cluster
- 2 for SAP Role

- Configure Security Groups properly
- Join Windows instances to AD
- Have a domain admin account/permission to perform SAP installation
First Cluster Node Installation
Before starting the SAP Installation, you have to create a DNS Type A record for SAP Virtual Instance Host at DNS Server.
After configuring the previously mentioned step, proceed with SAP First Cluster node installation. Log on as domain admin user at the first Windows Cluster instance and run the SAP Installation through sapinst.
You will perform a regular SAP Windows Cluster installation. For more information regarding SAP installation on Microsoft Windows Failover Cluster, please refer to official SAP documentation here.
During the step Cluster Share Configuration at SWPM you will have to choose the option File Share Cluster.

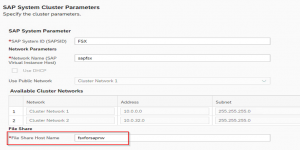
At SAP System Cluster Parameters screen provide information for the following fields:
- SAP System ID (SAPSID)
- Network Name (SAP Virtual Instance Host) – Virtual Hostname created at your DNS Manager
- File Share Hostname – the name of custom DNS created at your DNS Manager

Then proceed with other regular SWPM information required. Review the information provide and let SWPM runs the installation process for the first cluster node. Await until the process completes successfully.
Additional Cluster Node Installation
There is no special requirement or adjustment in order to proceed with the Additional Cluster Node installation.
However, before proceeding with SAP Additional Cluster node installation, it is recommended to adjust some Microsoft Windows Cluster Parameters:
- HostRecordTTL from 1200 to 15 seconds
- RegisterAllProvidersIP to 0
After completing the cluster parameter configuration, you can proceed with SAP Additional Cluster Node installation. Afterwards, you can validate it at Windows Failover Cluster Manager. You will find the resources created for the installation.
Also, in the SAP Management Console, you can monitor and visualize the SAP process created by the installation.

Primary Application Server and Additional Application Server Installation
The Primary Application Server and Additional Application Server installation process is not covered in this blog. For more information regarding SAP installation on Windows, please refer to official SAP documentation here.
After installing the PAS and AAS, it is advisable you deactivate the internal cache for host names and services names. Please refer to SAP note 1425520 – Disable NI cache for host and service names.
Conclusion:
In this blog, we have shown how to configure Amazon FSx Windows File Share and integrate with Windows High Available Cluster for ABAP SAP Central Services and Enqueue Replication Server.
Let us know if you have any comments or questions—we value your feedback.