AWS Storage Blog
Seamless streaming to Amazon S3 Tables with StreamNative Ursa Engine
Organizations are modernizing data platforms to use generative AI by centralizing data from various sources and streaming real-time data into data lakes. A strong data foundation, such as scalable storage, reliable ingestion pipelines, and interoperable formats, is critical for businesses to discover, explore, and consume data. As organizations modernize their platforms, they often turn to connector-based pipelines for quick integration with popular data sources. Although these pipelines offer a fast way to stream data into data lakes without custom code, they still need users to manage compute resources. Moreover, current architectures often need to publish data to multiple locations, leading to access management overhead and further complexity as the data lake scales, especially in larger environments.
StreamNative Ursa is a high-performance data streaming and storage engine that enables organizations to stream data into open table formats such as Apache Iceberg. Ursa efficiently streams user data and makes it available for you to discover and analyze, while reducing operational complexity and intermittent storage costs. With Kafka compatible APIs, StreamNative allows organizations to run Kafka on a fully managed Apache Pulsar cluster without code changes. Kafka on StreamNative (KSN) uses Pulsar’s unified messaging, tiered storage, and multi-tenancy, while maintaining full compatibility with Kafka clients and tools. StreamNative Ursa integrates natively with Amazon S3 Tables to offer a cost-effective streaming data ingestion service that allows you to store data once and use it across different applications according to your business needs. S3 Tables continuously optimizes storage to maximize query performance and minimize costs. This makes it an excellent choice for businesses looking to streamline their data lake operations without further infrastructure setup.
In this post, we explain how organizations can use the integration between StreamNative Ursa and S3 Tables to build a data lake to store streaming data. We ingest data through a StreamNative cluster and query the ingested data through services such as Amazon Athena for analytics and reporting.
Solution overview: How StreamNative works with S3 Tables
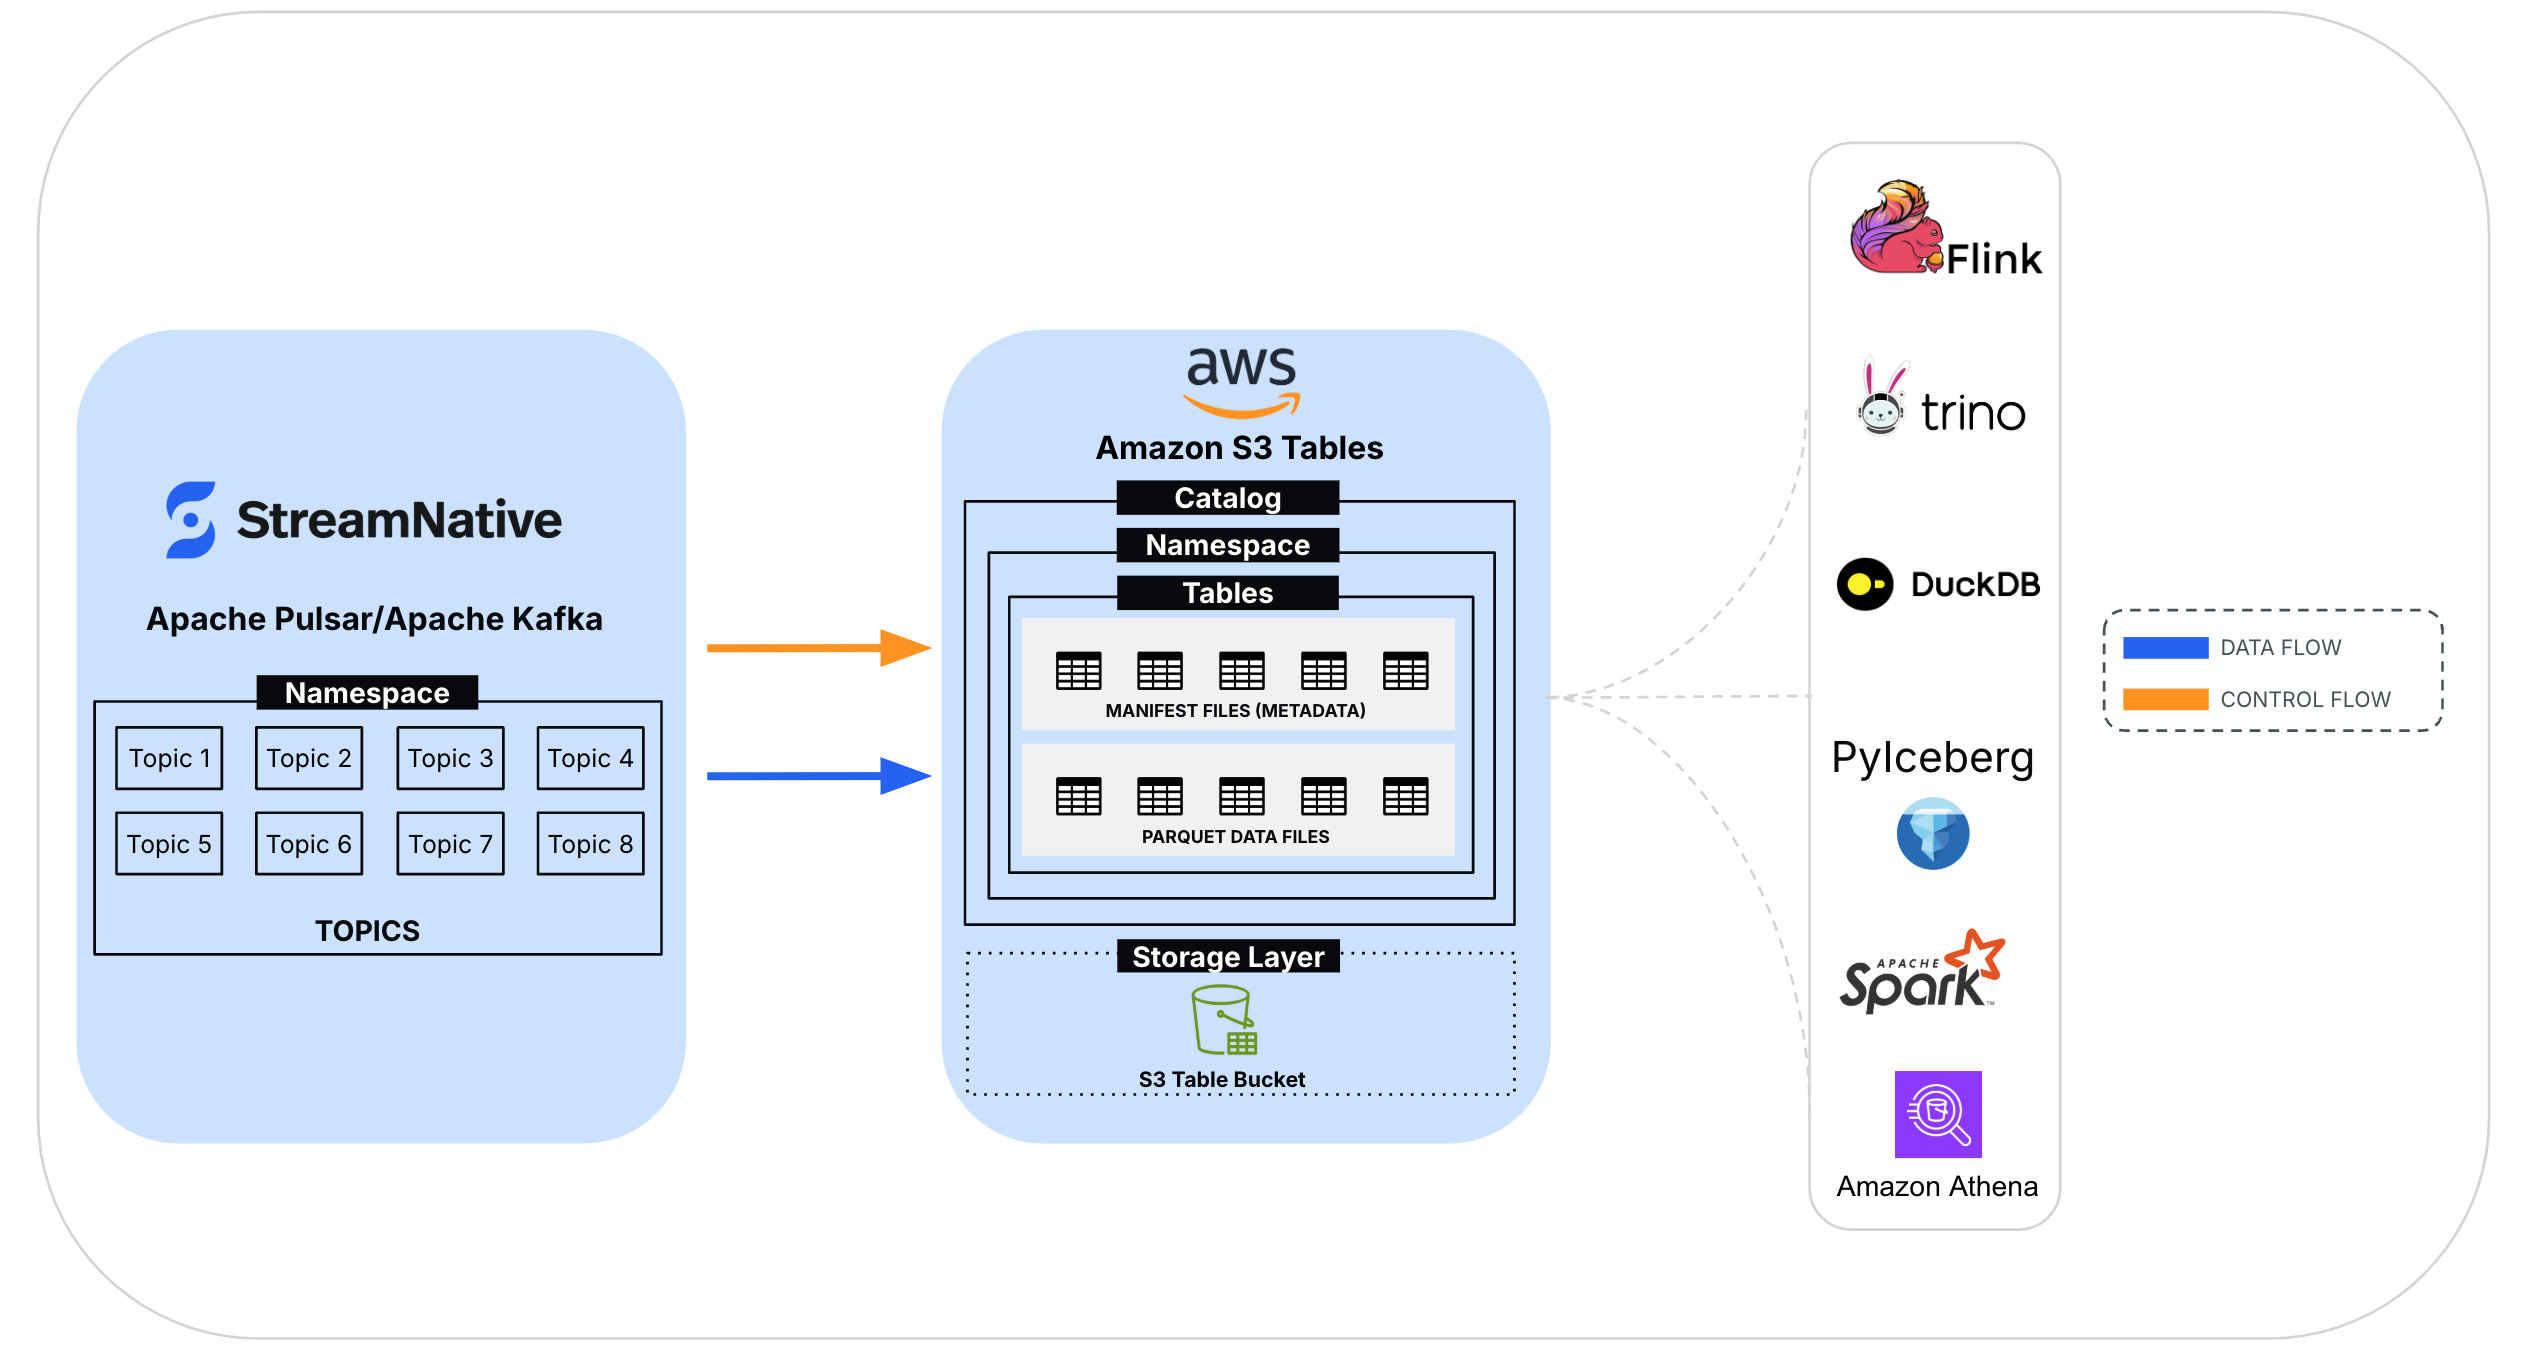
StreamNative integrates with S3 Tables using Iceberg REST Catalog specification to stream and store data into Iceberg tables within an Amazon S3 table bucket. This integration involves three key steps:
- Table creation: StreamNative uses Iceberg libraries and REST APIs to create Iceberg tables for each topic in the StreamNative cluster.
- Data ingestion: StreamNative’s Ursa engine augments the Iceberg tables with streaming updates. Ursa engine includes the Ursa Stream storage, a stream storage implementation over object storage that incorporates row-based write ahead log (WAL) files for fast appends and columnar Parquet files for efficient storage.
- Data consumption: Data can be accessed using AWS analytics services such as Athena and open source engines that support Iceberg REST Catalog specification, enabling seamless querying and analytics.
StreamNative Ursa treats tables stored in S3 Tables as “External Tables” where Ursa is responsible for data ingestion, while S3 Tables maintain the Iceberg tables. For each topic, the Ursa cluster creates a corresponding Iceberg table and organizes them under namespaces within the table bucket in this format: pulsar_<StreamNative_Tenant>_<StreamNative_Namespace>. This standardized naming convention allows for the clear organization and identification of tables associated with each topic and namespace within the Ursa cluster.
The following example shows how topics in a StreamNative cluster map to Iceberg tables within a table bucket.
| StreamNative Ursa Cluster | Amazon S3 Table Bucket | |||
| Tenant | Namespace | Topic Name | Namespace | Iceberg Table Name |
| SALES | NA | ORDERS | pulsar_SALES_NA | ORDERS |
| SALES | EMEA | ORDERS | pulsar_SALES_EMEA | ORDERS |
| SALES | APAC | ORDERS | pulsar_SALES_APAC | ORDERS |
Prerequisites
To follow along, you must have an AWS account with access to the following AWS services:
- Amazon S3
- AWS Identity and Access Management (IAM)
- Amazon Athena
- Amazon SageMaker Lakehouse
- AWS Lake Formation
Create a Bring Your Own Cloud (BYOC) infrastructure pool by taking the following steps:
- Grant StreamNative vendor access to manage clusters in your AWS account.
- Create a cloud connection for StreamNative to provision your environment.
- Create Cloud Environment to provision Pool Members in your designated cloud region.
- Watch this video for a detailed explanation.
Walkthrough
This integration walkthrough demonstrates how to build an ingestion pipeline for streaming data by setting up the necessary infrastructure and managing permissions. You create a table bucket, set up a StreamNative cluster to ingest data into the table bucket, and analyze the data available using Athena.
1. Create an S3 table bucket and integrate with AWS analytics services
Navigate to S3 in the AWS Management Console. From the left navigation menu, choose Table buckets. Choose Create table bucket. Specify a name for your table bucket and choose Enable integration if the integration with AWS analytics services isn’t already enabled, as shown in the following figure. This integration allows users to discover all the tables created in this AWS Region and this account in SageMaker Lakehouse and Lake Formation, and access them through AWS services such as Athena, Amazon Redshift, and Amazon EMR. To learn more about this integration, refer to Using Amazon S3 with analytics services.

Next, record the table bucket Amazon Resource Name (ARN) to use when provisioning a StreamNative Ursa cluster in the next step, as shown in the following figure.

2. Create StreamNative BYOC Ursa cluster
Ursa cluster is responsible for streaming data into a table bucket over Kafka compatible APIs. StreamNative supports different types of clusters, and we focus on a BYOC cluster in this post. To begin, you create an instance, set up storage configuration, define cluster size, and complete the set up with cluster deployment. Before you begin, make sure to complete the steps listed in the prerequisites section for BYOC infrastructure setup.
2.1. Create an instance
An instance in StreamNative Cloud refers to a provisioned deployment of a StreamNative cluster that runs within the cloud environment. To create a new instance, visit the StreamNative console, and choose +New to create a new instance name, as shown in the following figure.

Before you create a new instance, you have to choose the deployment type for your instance. Deployment type represents the cluster type. Choose the Deploy BYOC option, as shown in the following figure.

Enter the Instance Name, and choose the Cloud Connection from the drop down, as shown in the following figure. This is the same Cloud Connection you created while following the steps listed in the prerequisites section. Next, choose URSA Engine as the choice of compute, and choose Cluster Location.
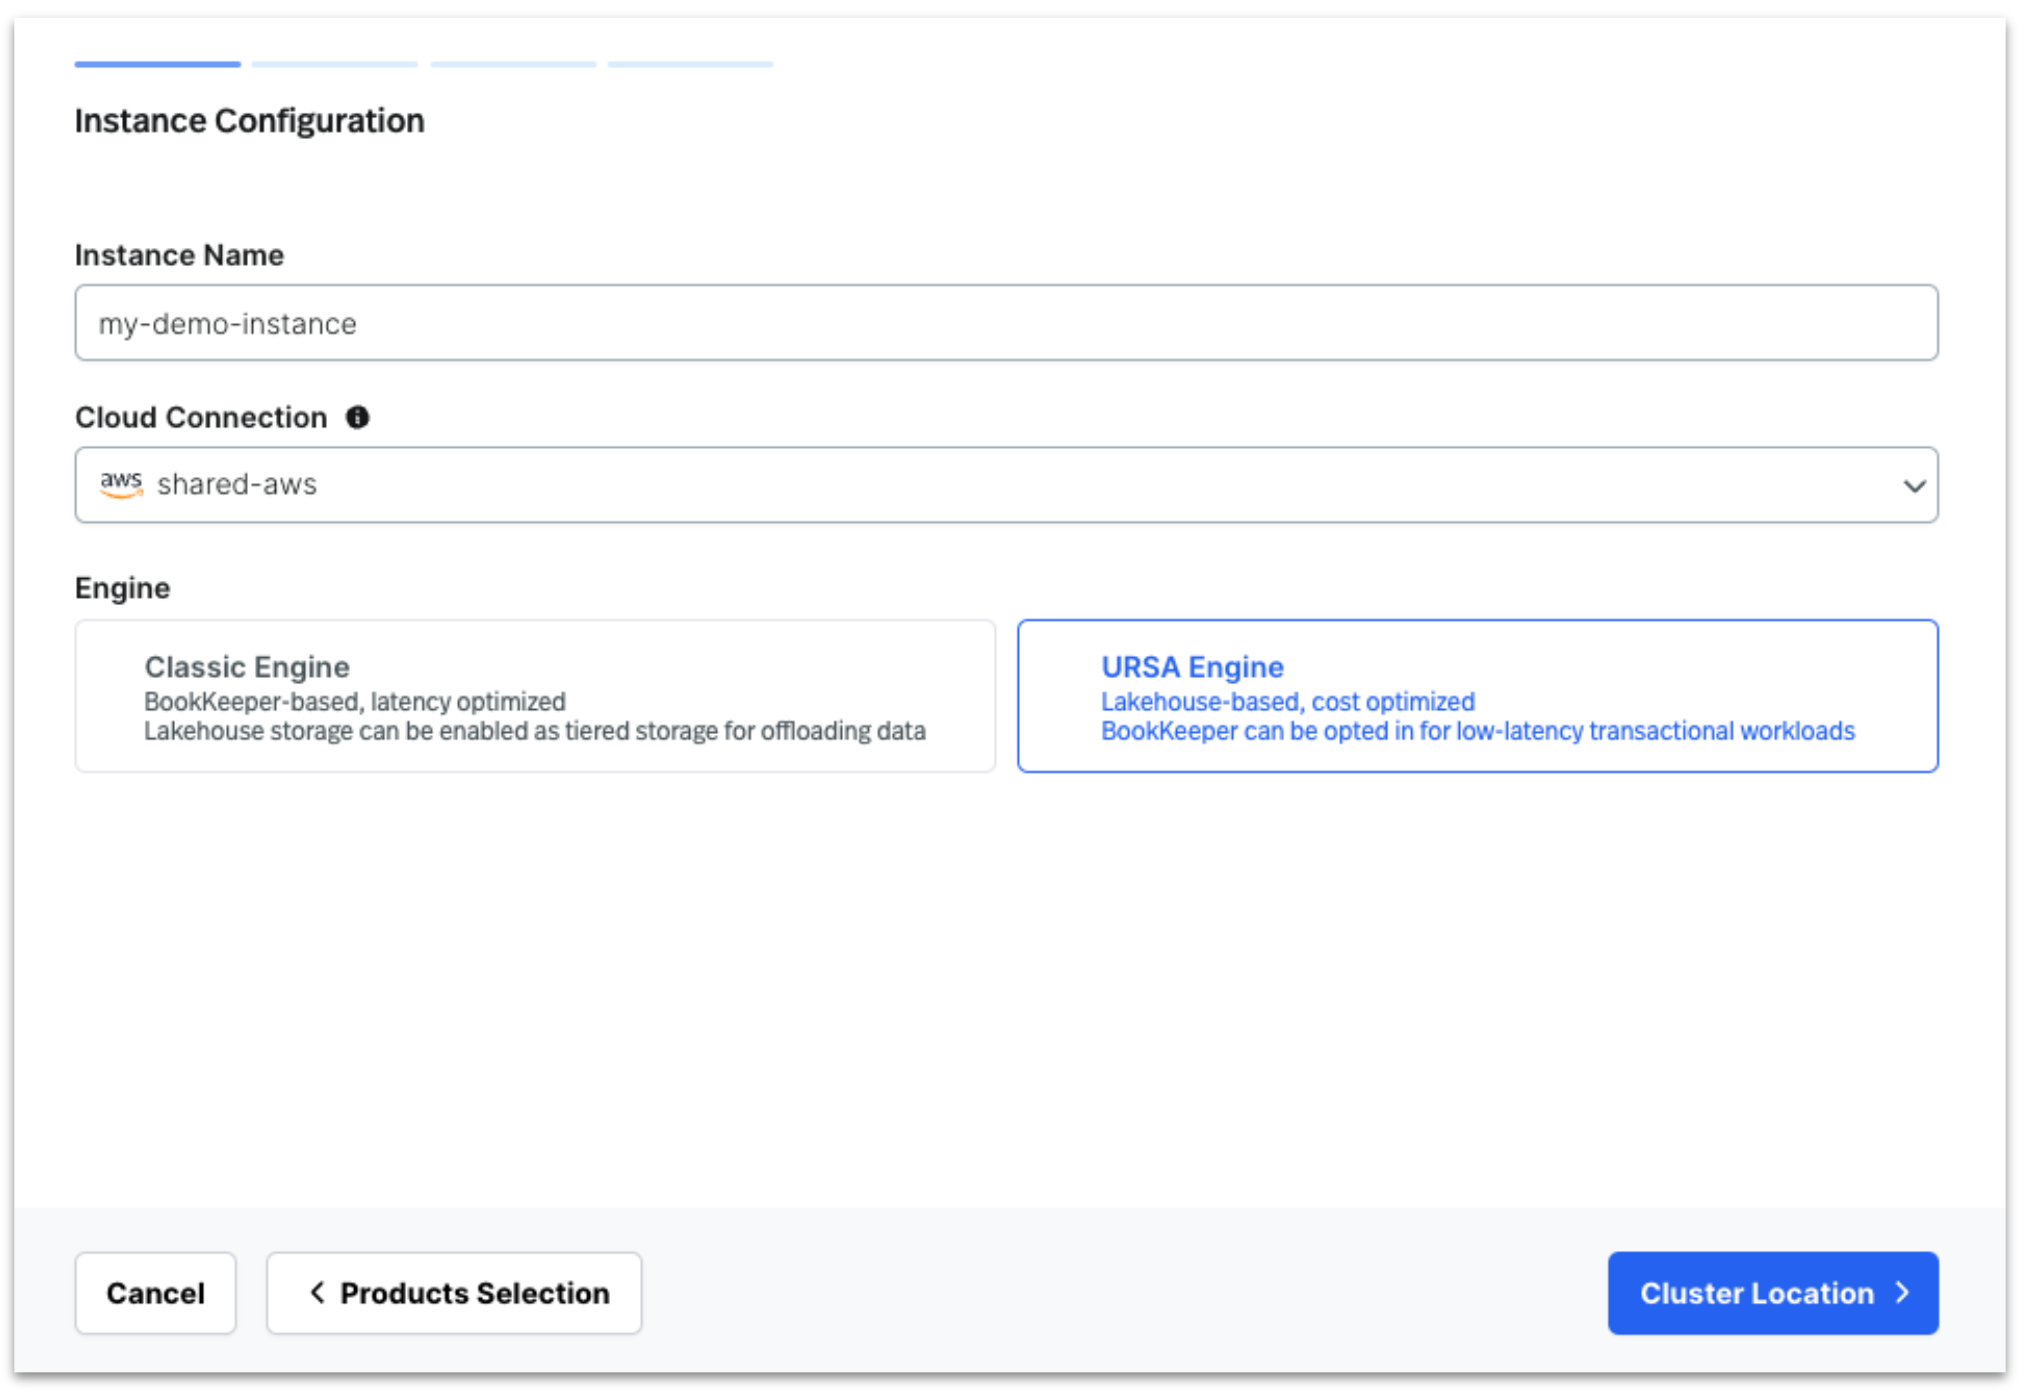
Choosing Cluster Location navigates you to the next screen, where you enter the cluster details.
2.2. Add Cluster Location
Provide a Name for your cluster, choose the Cloud Environment that was created in the prerequisites section, and choose the Availability Zone, as shown in the following figure. Proceed to Lakehouse Storage Configuration to set up the storage details for the cluster.

2.3. Add Lakehouse Storage Configuration
Lakehouse Storage Configuration (LSC) allows you to configure a StreamNative Cluster to stream topic data as Iceberg tables into a designated table bucket. You specify the table bucket ARN under S3 Table Bucket. This post assumes that you choose the Use Existing Bucket option, as shown in the following figure, which doesn’t need further steps to grant permissions to the bucket. However, if you choose the Use Your Own Bucket option, you must run a Terraform module to grant access. Instructions for running the Terraform module to configure access for a user-provided bucket can be found in this document.

2.4. Define cluster size and deploy it
Allocate resources to the cluster by adjusting the slider, then choose Finish to initiate the deployment. You can size the cluster by choosing between Basic and Advanced configurations depending on their performance and cost needs. For the purpose of this post, choose the Basic setting as shown in the following figure.

When the cluster is deployed, the integration between StreamNative and S3 Tables is established and active. As part of the deployment, StreamNative creates an IAM role in the user’s account that grants permissions for StreamNative to assume this role when ingesting data into the table bucket. The following figure shows the permission policy that is attached to this IAM role.
You are ready to stream data into the table bucket.
3. Stream data into S3 Tables
3.1. Create a topic
In this post, you create a topic, kafkatopic1, in the default tenant, public and the default namespace, default. When data is streamed into a table bucket, you should find an Iceberg table named kafkatopic1 under the namespace pulsar_public_default within the table bucket.
To create a topic, choose the default tenant, public, and default namespace, default, as shown in the following figure and create a topic kafkatopic1.

When the topic is created it shows up as in the following figure.

In the next step, you populate data into this topic by creating a Kafka client.
3.2 Create a Kafka client
To create a Kafka Client, navigate to the Kafka Clients page as shown in the following figure.

Follow the steps described in the next section to generate a sample code to connect to the StreamNative cluster and populate data into a topic. Watch this video for a more detailed explanation of the steps.
3.2.1. Choose your client libraries for your programming language
Although StreamNative Cloud allows you to choose different types of programming languages to write Kafka clients, for this post you choose Java as a programming language.
Choose Java, and choose Next as shown in the following figure.

3.2.2. Select service account
Create a service account as shown in the following figure.

3.2.3. Choose authentication type
StreamNative Cloud supports OAuth2 and API key based authentication. For this post, you generate an API key and copy it to use later in the Kafka Client code.
Choose Create API Key to generate the key, as shown in the following figure.

Enter key Name, choose Instance, and choose Confirm, as shown in the following figure.

Copy the API key as shown in the following figure.

3.2.4. Choose the service endpoint
Although StreamNative Cloud allows you to create multiple endpoints for a cluster, you choose the default service endpoint in this example. Choose the endpoint as shown in the following figure and then choose Next.

3.2.5. Choose Kafka Schema Registry
In this step, you choose Schema Registry to generate a sample code based on schemas, as shown in the following figure. By default, the sample code is generated for AVRO schemas.

After selecting Schema Registry, choose Next.
3.2.6. Install client libraries
In this step, you generate the dependencies for the client libraries for the sample code. You can copy and paste this code in the pom.xml file of your Java project. In this post, you copy the dependencies for a Maven project, as shown in the following figure.

Choose Next to proceed to the final step.
3.2.7. Generate producer code
In this step, you choose Tenant, Namespace, and Topic to generate the sample producer code, as shown in the following figure. This Java code can be used to populate sample data into the StreamNative Cluster, within the kafkatopic1 topic.

3.2.8. Stream data
In the next step, you run the Java code to populate data kafkatopic1 in the StreamNative cluster. In the following example, the producer Java code is being run inside an IDE. When the Java program runs, it successfully produces a message into StreamNative cluster’s topic.

You can find the Kafka clients running as producers inside the StreamNative Cloud console as shown in the following figure.

Data arrives into kafkatopic1 inside the StreamNative cluster and it is streamed to an Iceberg table named kafkatopic1 in the table bucket. To review, go to the S3 console and choose the table bucket: streamnatives3tablebucket to view all tables within it, as shown in the following figure.

4. Configure permissions to read data (optional)
If you have users other than the role/user that enabled integration with AWS analytics services on the S3 console, you must exclusively grant these users permissions to read and write to the tables within your table buckets. You can see instructions to add permissions in the S3 Tables documentation guide. In this post, you enabled the table bucket integration with AWS analytics services during bucket creation, thus you can assume that the same user is accessing the table through Athena and has the necessary access.
5. Explore and analyze data
Navigate to S3 Tables and choose the table bucket: streamnatives3tablebucket. Choose kafkatopic1 table from the table, and choose Query table with Athena, as shown in the following figure. This takes you to the Athena console, where you can query the topics data in the table. As long as data is being streamed from the Ursa cluster, you should continue to see the new rows added to this table, confirming successful data ingestion.

Cleaning up
To avoid future charges, delete the resources you created in S3 Tables and StreamNative.
Conclusion
In this post, we discussed how organizations can build a seamless, cost-effective, and scalable data streaming pipeline to ingest real-time data into a data lake using StreamNative Ursa and Amazon S3 Tables. We used StreamNative BYOC cluster setup to stream data into the S3 table bucket, and used Amazon Athena to analyze the ingested data. With StreamNative’s Ursa engine, organizations can confidently modernize their architecture and accelerate time to insights, eliminating the need for complex connector-based pipelines and reducing operational overhead. To get started sign up for a free trial and book a demo with StreamNative Cloud.