AWS Architecture Blog
Field Notes: Optimize your Java application for AWS Lambda with Quarkus
This blog post is a continuation of an existing article about optimizing your Java application for Amazon ECS with Quarkus. In this blog post, we examine the benefits of Quarkus in the context of AWS Lambda. Quarkus is a framework that uses the Open Java Development Kit (OpenJDK) with GraalVM and over 50 libraries like RESTEasy, Vertx, Hibernate, and Netty. This blog post shows you an effective approach for implementing a Java-based application and compiling it into a native-image through Quarkus. You can find the demo application code on GitHub.
Getting started
To build and deploy this application, you will need the AWS CLI, the AWS Serverless Application Model (AWS SAM), Git, Maven, OpenJDK 11, and Docker. AWS Cloud9 makes the setup easy. AWS Cloud9 is a cloud-based integrated development environment (IDE) that lets you write, run, and debug your code with just a browser. It comes with the AWS tools, Git, and Docker installed.
Create a new AWS Cloud9 EC2 environment based on Amazon Linux. Because the compilation process is very memory intensive, it is recommended to select an instance with at least 8 GiB of RAM (for example, m5.large).
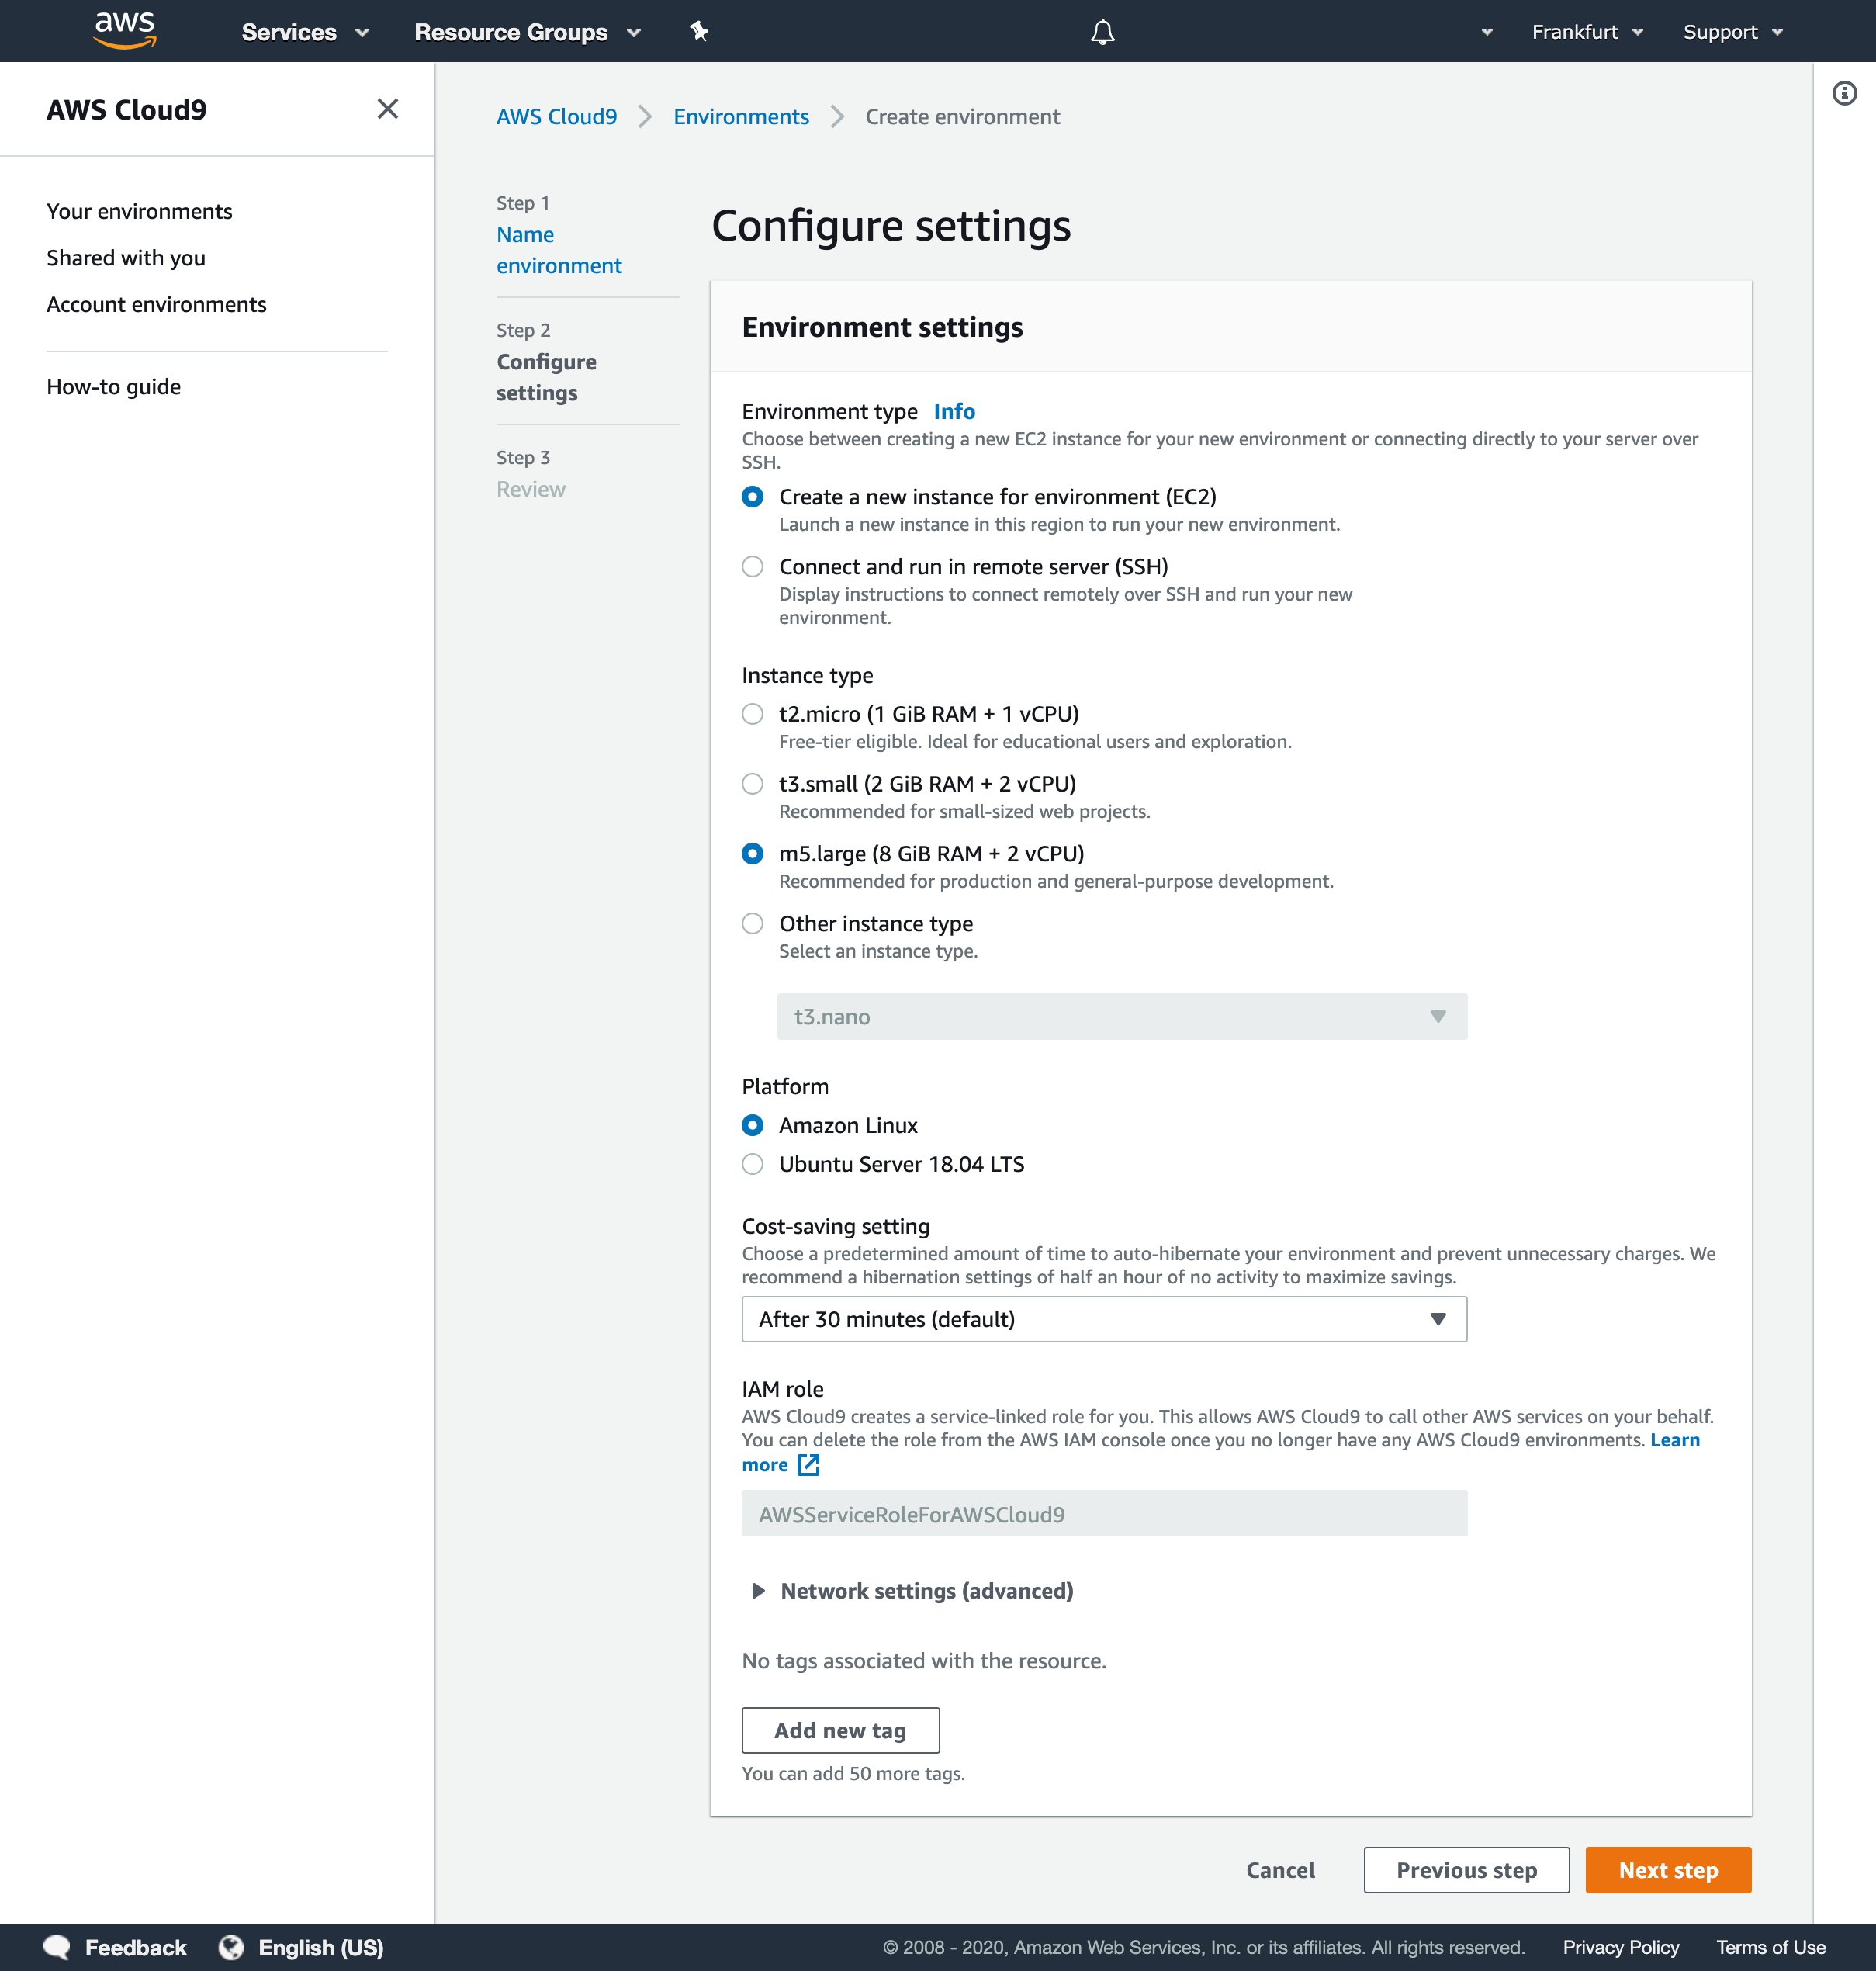
Figure 1 – AWS Cloud9 environment
Launching the AWS Cloud9 environment from the AWS Management Console, you select the instance type. Pick an instance type with at least 8 GiB of RAM.
After creation, you are redirected automatically to your AWS Cloud9 environment’s IDE. You can navigate back to your IDE at any time through the AWS Cloud9 console.
All code blocks in this blog post refer to commands you enter into the terminal provided by the AWS Cloud9 IDE. AWS Cloud9 executes the commands on an underlying EC2 instance. If necessary, you can open a new Terminal in AWS Cloud9 by selecting Window → New Terminal.
Modify the EBS volume of the AWS Cloud9 EC2 instance to at least 20 GB to have enough space for the compilation of your application. Then, reboot the instance using the following command in the AWS Cloud9 IDE terminal, and wait for the AWS Cloud9 IDE to automatically reconnect to your instance.
sudo reboot
To satisfy the OpenJDK 11 requirement, run the following commands in the AWS Cloud9 IDE terminal to install Amazon Corretto 11. Amazon Corretto is a no-cost, multiplatform, production-ready distribution of the OpenJDK.
sudo curl -L -o /etc/yum.repos.d/corretto.repo
https://yum.corretto.aws/corretto.repo
sudo yum install -y java-11-amazon-corretto-devel
You will build this application using Apache Maven. You must install it via the AWS Cloud9 IDE terminal by executing the following code.
sudo wget http://repos.fedorapeople.org/repos/dchen/apache-maven/epel-apache-maven.repo \
-O /etc/yum.repos.d/epel-apache-maven.repo
sudo sed -i s/\$releasever/6/g /etc/yum.repos.d/epel-apache-maven.repo
sudo yum install -y apache-maven
After you clone the demo application code, you can then build the application. Compiling the application to a self-contained JAR is straight forward. Navigate to the aws-quarkus-demo/lambda directory and kick off the Apache Maven build.
git clone https://github.com/aws-samples/aws-quarkus-demo.git
cd aws-quarkus-demo/lambda/
mvn clean install
To compile the application to a native binary, you must add the parameter used by the Apache Maven build to run the necessary steps.
mvn clean install -Dnative-image.docker-build=true
AWS Lambda layers and custom runtimes
Create an AWS Lambda custom runtime from the application. A runtime is a program that runs an AWS Lambda function’s handler method when the function is invoked. Include a runtime in your function’s deployment package as an executable file named bootstrap.
A runtime is responsible for running the function’s setup code, reading the handler name from an environment variable, and reading invocation events from the AWS Lambda runtime API. The runtime passes the event data to the function handler, and posts the response from the handler back to AWS Lambda. Your custom runtime can be a shell script, a script in a language that’s included in Amazon Linux, or a binary executable file that’s compiled in Amazon Linux.
Application architecture
The application architecture is similar to the architecture we described in “Field Notes: Optimize your Java Application for Amazon ECS with Quarkus”.
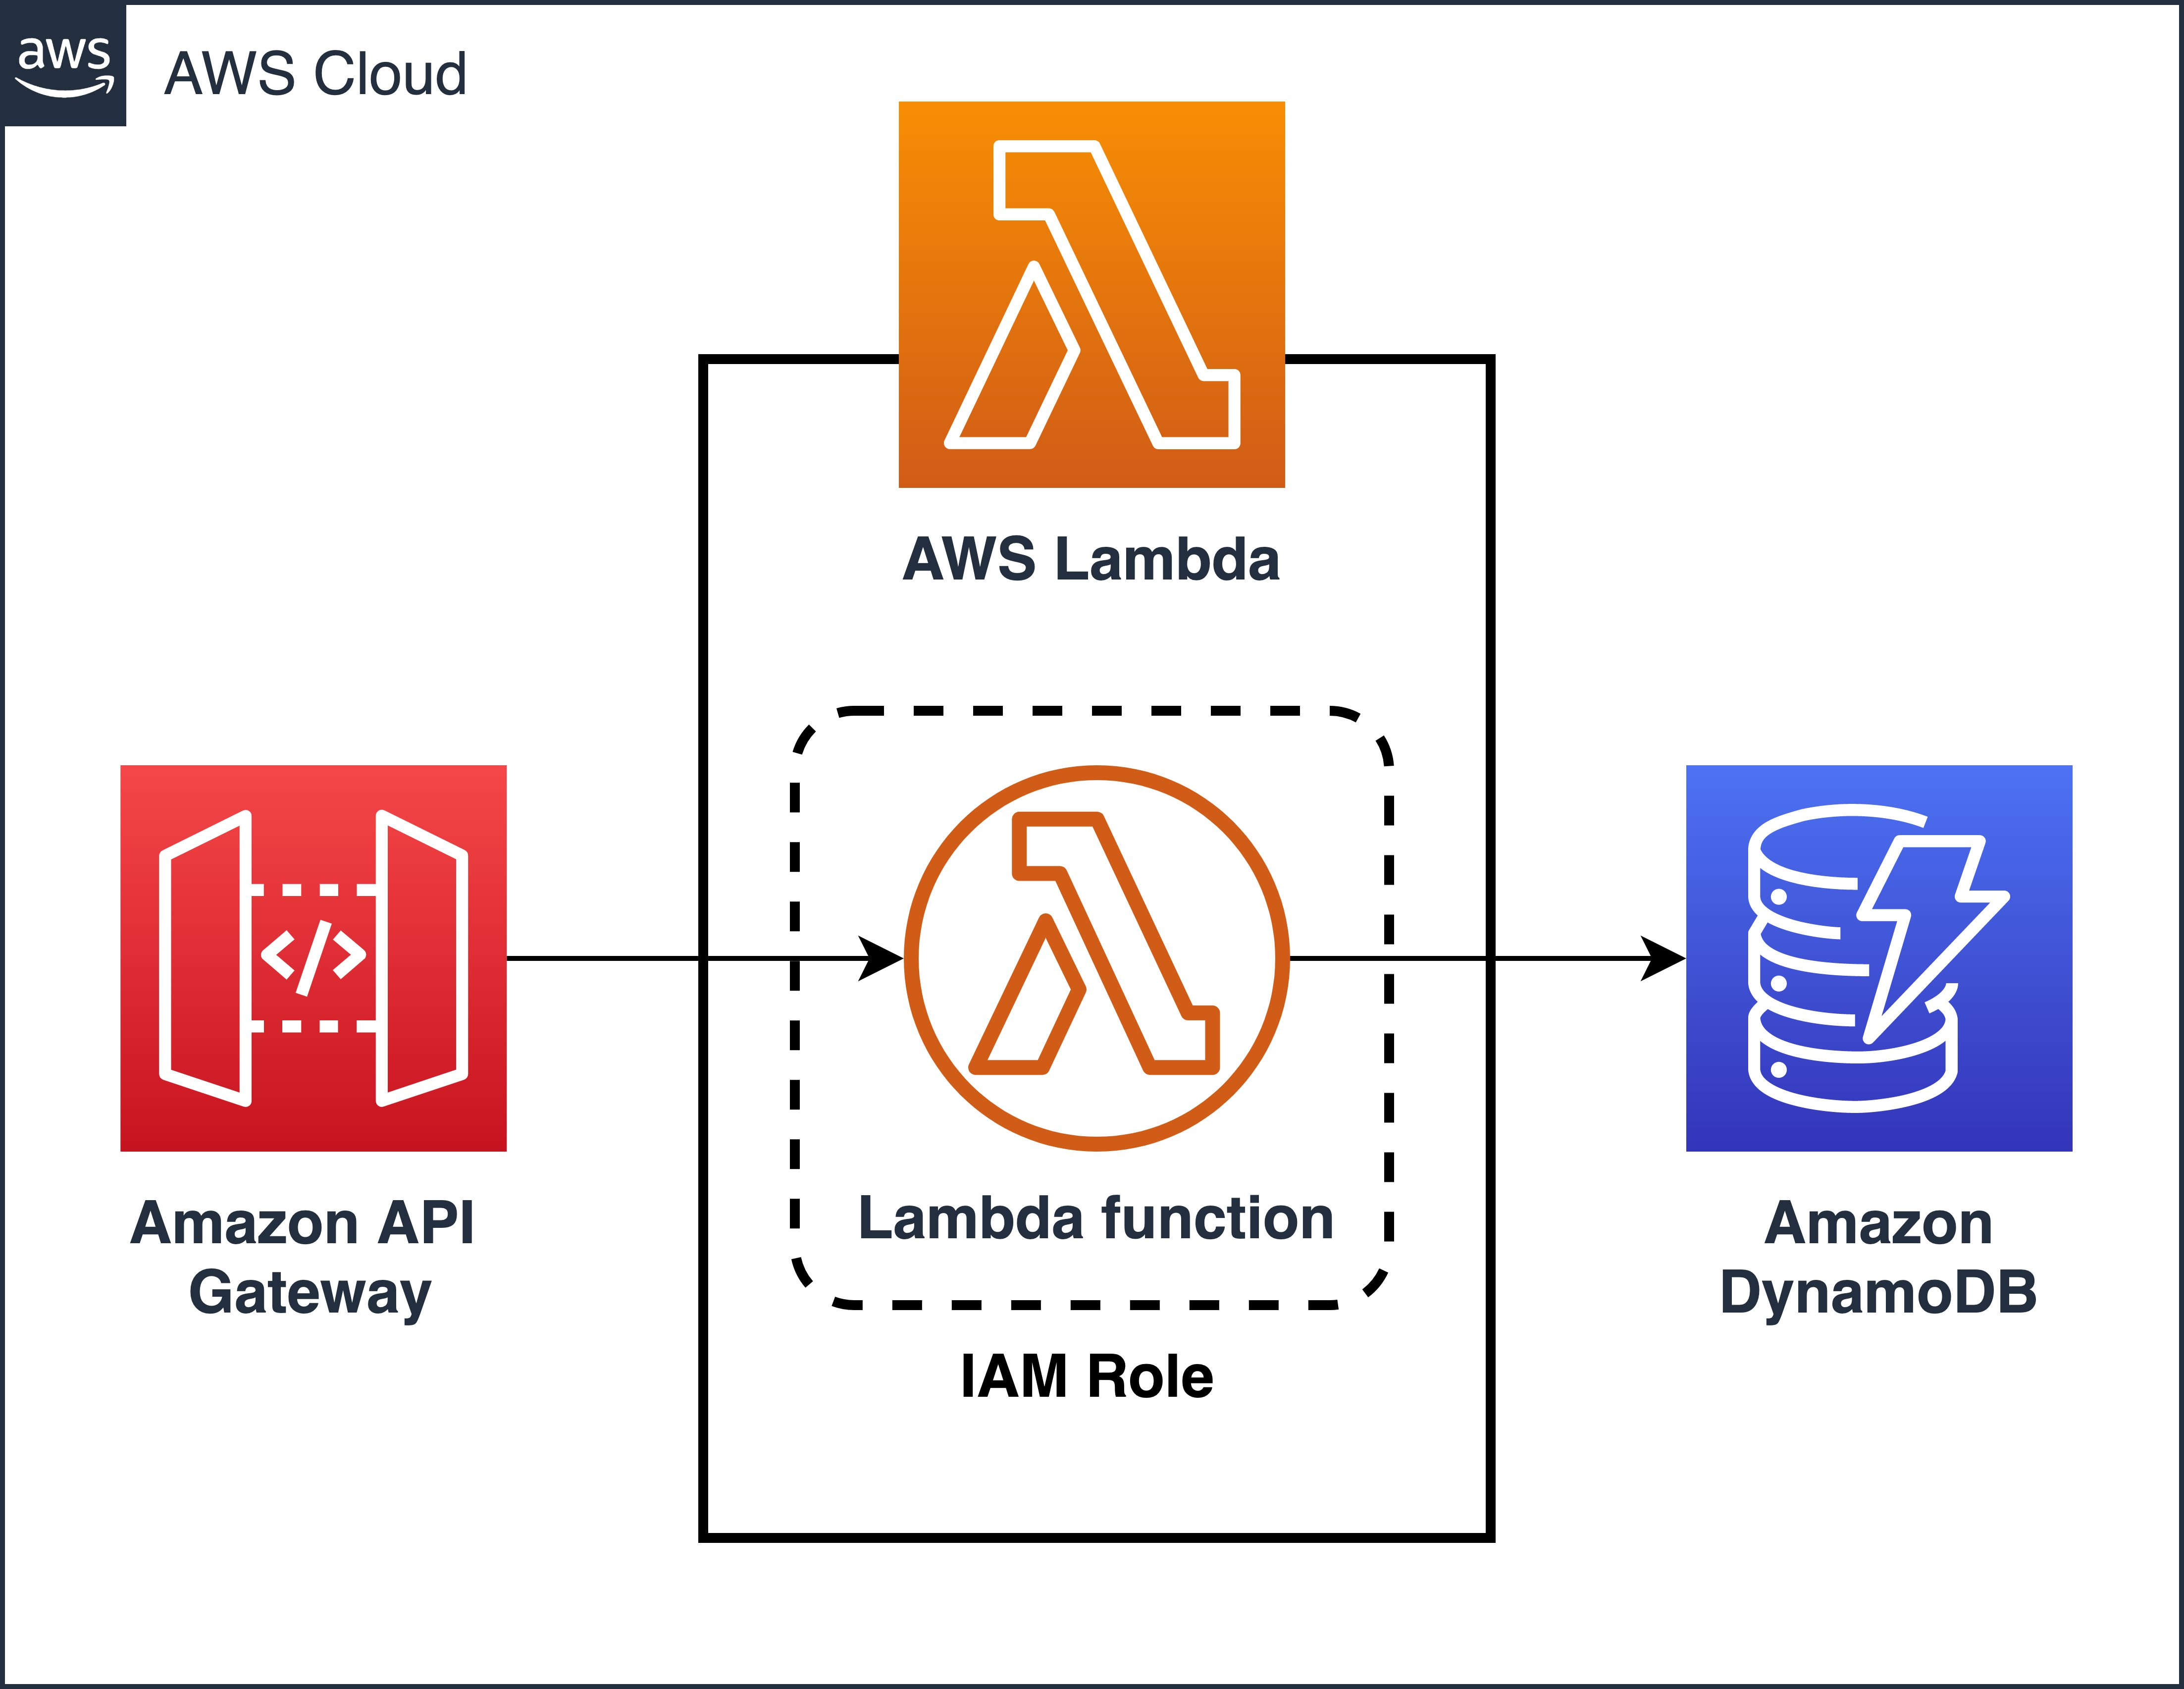
Figure 2 – Architecture of the application
The architecture of the application is simple and consists of a few classes that implement a REST-service that stores all information in an Amazon DynamoDB-table. Quarkus offers an extension for Amazon DynamoDB that is based on the AWS SDK for Java V2.
Setting up the infrastructure
After you build the AWS Lambda function (as a regular build or native build), package your application and deploy it. The command sam deploy creates a zip file of your code and dependencies, uploads it to an Amazon S3 bucket, creates an AWS CloudFormation template, and deploys its resources.
The following command guides you through all necessary steps for packaging and deployment.
sam deploy --template-file sam.jvm.yaml \
--stack-name APIGatewayQuarkusDemo --capabilities
CAPABILITY_IAM --guided
If you want to deploy the native version of the application, you must use a different AWS SAM template.
sam deploy --template-file sam.native.yaml \
--stack-name APIGatewayQuarkusDemo --capabilities
CAPABILITY_IAM --guided
During deployment, the AWS CloudFormation template creates the AWS Lambda function, an Amazon DynamoDB table, an Amazon API Gateway REST-API, and all necessary IAM roles. The output of the AWS CloudFormation stack is the API Gateway’s DNS record.
aws cloudformation describe-stacks \
--stack-name APIGatewayQuarkusDemo \
--query
"Stacks[].Outputs[?OutputKey=='ApiUrl'].OutputValue" \
--output text
A following code is a typical example output.
https://<your-api-gateway-url>/prod/users
Testing the application
After the resources have been created successfully, you can start testing.
1. Create a user:
curl -d '{"userName":"jdoe", "firstName":"John", "lastName":"Doe", "age":"35"}' \
-H "Content-Type: application/json" \
-X POST https://<your-api-gateway-endpoint>/prod/users
2. List all the users that you created:
curl https://<your-api-gateway-url>/prod/users
3. You can get a specific user by userId:
curl -X GET 'https://<your-api-gateway-url>/prod/users/<userId>'
4. If you want to delete the user that you’ve created recently, send a DELETE request to the specific userId:
curl -X DELETE 'https://<your-api-gateway-url>/prod/users/<userId>'
Performance considerations
Let’s investigate the impact of using a native build in comparison to the regular build of our sample Java application. In this benchmark, we focus on the performance of the application. We want to get the AWS services and architecture out of the equation as much as possible, so we measure the duration of the AWS Lambda function executions of a function including its downstream calls to Amazon DynamoDB. This duration is provided in the Amazon CloudWatch Logs of the function.
The following two charts illustrate 40 Create (POST), Read (GET), and Delete (DELETE) call iterations for a user with the execution durations plotted on the vertical axis. The first graph shows the development of the duration over time observing a single JVM instance. In a second graph, exclusively reports on the performance of the iterations each hitting a fresh JVM.
This is an example application to demonstrate the use of a native build. When you start the optimization of your application make sure to read the best practices for working with AWS Lambda Functions first. Verify the effect of all your optimizations.
The “single cold call” -graph starts with a cold call and each consecutive call hits the same AWS Lambda function container and thus the same JVM. This graph shows both the regular build and the native build (denoted with *) of our application as an AWS Lambda function with 256 MB of memory on Java 11. The native build has been compiled with Quarkus version 1.2.1.
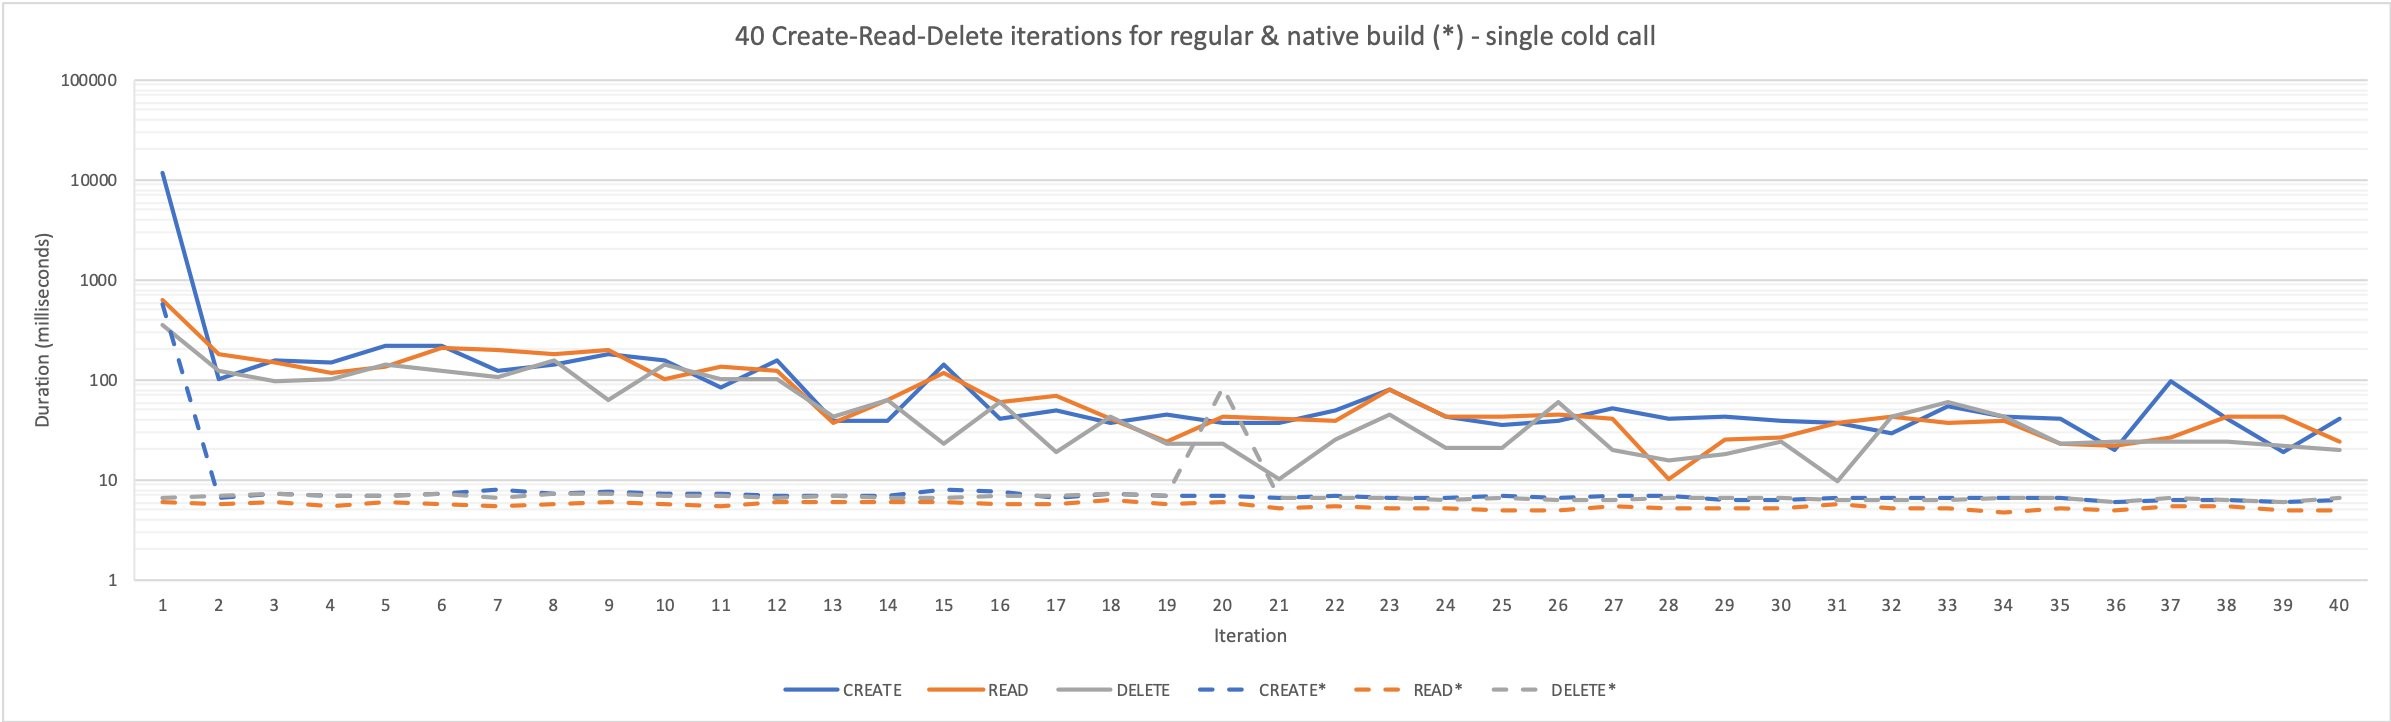
Figure 3 – Single cold call, followed by warm calls only
The first executions of the regular build have long durations (the vertical axis has a logarithmic scale) but quickly drop below 100 ms. Still, you can observe an ongoing fluctuation between 10 and 100 ms. For the native build you can observe a consistent execution duration, except for the first call and one outlier in iteration 20. The first call is slow because it is a cold call. The outlier occurs because the Substrate VM still needs garbage collector pauses. Only the first call is slower than the calls to a warmed up regular build.
Let’s dive deeper into the cold calls of the application and their duration. The following chart shows 40 cold calls for both the regular build and the native build.
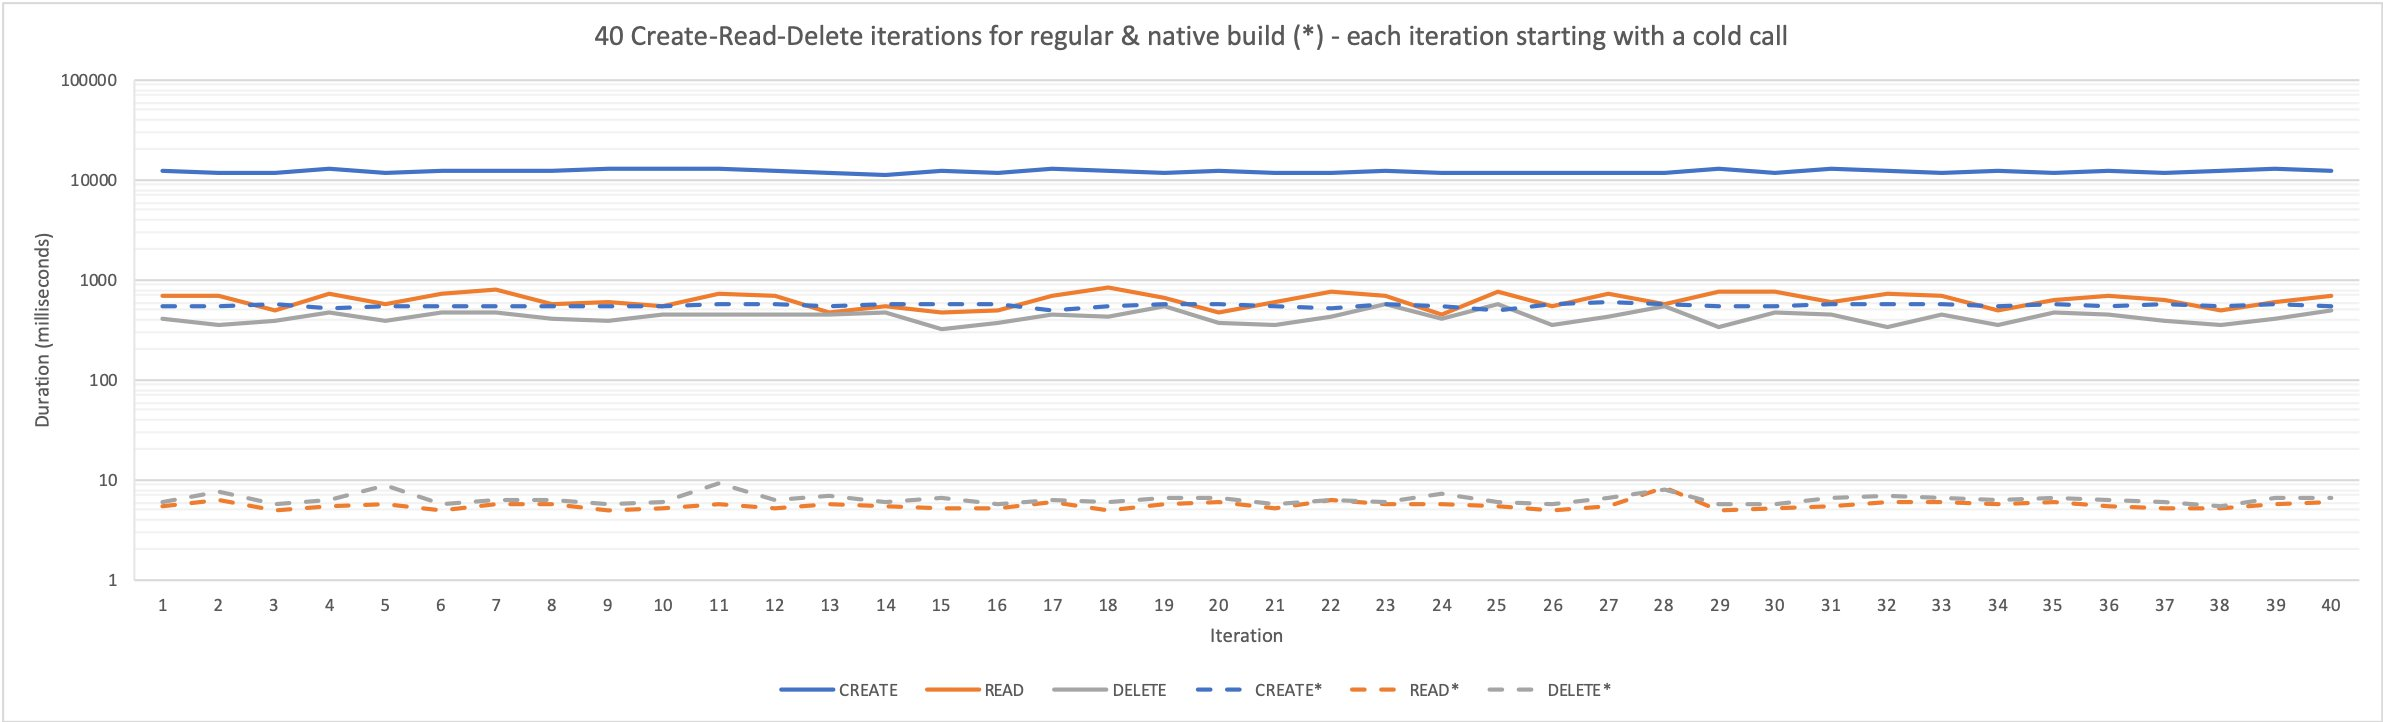
Figure 3 – Each of the 40 Create-Read-Delete iterations start with one cold call
You can observe a consistent and predictable duration of the first calls. In this example, the execution of the AWS Lambda function of the native build takes just 0.6–5% of the duration of the regular build.
Tradeoffs
GraalVM assumes that all code is known at build time of the image, which means that no new code will be loaded at runtime. This means that not all applications can be optimized using GraalVM. If the native image build for your application fails, a fallback image is created that requires a full JVM for execution.
Cleaning up
After you are finished, you can easily destroy all of these resources with a single command to save costs.
aws cloudformation delete-stack --stack-name <your_stack_name>
Also delete your AWS Cloud9 IDE from the AWS Cloud9 console.
Conclusion
In this post, we described how Java applications are compiled to a native image through Quarkus and run using AWS Lambda. Testing the demo application, we’ve seen a performance improvement of more than 95% compared to a regular build. Keep in mind that the potential performance benefits vary depending on your application and its downstream calls to other services. Due to the limitations of GraalVM, your application may not be a candidate for optimization.
We also demonstrated how AWS SAM deploys the native image as an AWS Lambda function with a custom runtime behind an Amazon API Gateway.We hope we’ve given you some ideas on how you can optimize your existing Java application to reduce startup time and memory consumption. Feel free to submit enhancements to the sample application in the source repository.