AWS News Blog
AWS Application Migration Service Major Updates: Global View, Import and Export from Local Disk, and Additional Post-launch Actions

|
AWS Application Migration Service simplifies, expedites, and reduces the cost of migrating your applications to AWS. It allows you to lift and shift many physical, virtual, or cloud servers without compatibility issues, performance disruption, or long cutover windows. You can minimize time-intensive, error-prone manual processes by automating replication and conversion of your source servers from physical, virtual, or cloud infrastructure to run natively on AWS by using Application Migration Service for migration. Earlier this year, we introduced major improvements, such as a server migration metrics dashboard, import and export, and additional post-launch modernization actions.
Today, I’m pleased to announce three major updates to Application Migration Service. Here’s the quick summary for each feature release:
- Global View – You can manage large-scale migrations across multiple accounts. This feature provides you both visibility and the ability to perform specific actions on source servers, apps, and waves in different AWS accounts.
- Import and Export from Local Disk – You can now use Application Migration Service to import your source environment inventory list to the service from a CSV file on your local disk. You can also export your source server inventory list from the service to a CSV file and download it to your local disk. You can continue leveraging the previously launched import and export functionality to and from an S3 bucket.
- Additional Post-launch Actions – In this update, Application Migration Service added four additional predefined post-launch actions. These actions are applied to your migrated applications when you launch them on AWS.
Let me share how you can use these features for your migration.
Global View
Global View provides you the visibility and the ability to perform specific actions on source servers, applications, and waves in different AWS accounts. Global view uses AWS Organizations to structure a management account (which has access to source servers in multiple member accounts) and member accounts (which only have access to their own source servers).
To use this feature, you need to have an AWS account in which AWS Application Migration Service is initialized. This account must be an admin in AWS Organizations or a delegated admin for AWS Application Migration Service. You can view the Global View page on the Application Migration Service page in the AWS Management Console by selecting Global View in the left navigation menu.
You can use the global view feature to see source servers, applications and waves across multiple managed accounts and perform various actions, including:
- Launching test and cutover instances across accounts
- Monitoring migration execution progress across accounts
The main Global View page provides an overview of your account and this information changes depending on whether you have a management account or a member account.
In a management account, you can see the AWS organizations permissions, the count of linked accounts, and the total number of source servers, applications, and waves under Account information. The Linked accounts section displays the relevant information for your linked accounts. It shows all the linked accounts this account has access to, including the account you’re logged into (the management account) and the member accounts that are linked to it. If the management account has access to two additional member accounts, the Linked accounts section will show three accounts. It’s the total number of accounts that are visible through this management account (including itself). For member accounts, this page only displays the account information that includes the AWS organizations permissions and the number of source servers, applications, and waves in the specific account.

In your management account, you can access and review source servers, applications and waves within your account and across all member accounts. As a manager, you can choose between All accounts and My account from the drop-down menu, which allows you to change you view of presented source servers, applications or waves.
Import and Export from Local Disk
A comprehensive data center inventory forms the foundation of any successful migration endeavor. This inventory encompasses a comprehensive list of servers and applications managed by customers on premises. The inventory is categorized into migration waves to facilitate efficient migration planning.
Typically, this inventory is compiled using discovery tools or created manually by IT administrators. Perhaps you maintain your data center inventory in Excel spreadsheets. With Application Migration Service, we offer seamless support for importing your inventory list from a CSV file, which follows a format similar to the one used by Cloud Migration Factory.
In the previous release, Application Migration Service supported the option to import a file from Amazon S3 and export a file to Amazon S3. In this latest release, Application Migration Service supports the option to import a file from local disk and export a file to local disk. This makes it easy for you to manage large scale-migrations and ingest your inventory of source servers, applications and waves, including their attributes such as EC2 instance type, subnet and tags. These attributes are the parameters used to populate the EC2 launch template.

To start using the import feature, you need to identify your servers and application inventory. You can do this manually or using discovery tools. The next thing you need to do is download the import template, which you can access from the console.

After you download the import template, you can start mapping your inventory list onto this template. While mapping your inventory, you can group related servers into applications and waves. You can also perform configurations, such as defining Amazon Elastic Compute Cloud (Amazon EC2) launch template settings and specifying tags for each wave.
The following screenshot is an example of the results of my import template.

On the Application Migration Service page in the AWS Management Console, select Import on the left-side navigation menu (under Import and Export). Under the Import inventory tab, select Import from local disk. Select Choose file and choose the local file containing your inventory list. Select Import, and the inventory file is imported into Application Migration Service. When the import process is complete, the details of the import results appear.
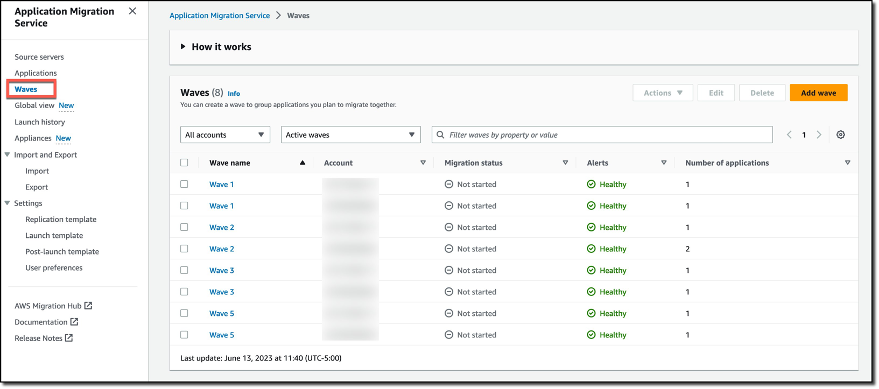
Now, you can view all your inventory inside the Source servers, Applications, and Waves pages on the Application Migration Service console.
To export your inventory to a local file, select Export on the left-side navigation menu of the Application Migration Service page. Under Export inventory tab, choose Export to local disk. Specify the name of the file to download under Destination filename. Choose Export, and the inventory file downloads to your local disk. Application Migration Service uses an S3 bucket within your account for the import and export operations, even when using local disk. You must have the required permissions to perform this action. You can modify the exported inventory file and reimport it to perform bulk configuration updates across your inventory. When the global view feature is activated upon reimport, configuration changes are applied also across accounts.

Additional Post-launch Actions
Post-launch actions allow you to control and automate actions performed after your servers have been launched in AWS. You can use predefined or custom post-launch actions.
Application Migration Service now has four additional predefined post-launch actions to run in your Amazon EC2 instances on top of the existing predefined post-launch actions. These additional post-launch actions provide you with flexibility to maximize your migration experience.

The new four additional predefined post-launch actions are as follows:
- Configure Time Sync – You can use the Time Sync feature to set the time for your Linux instance using ATSS.
- Validate disk space – You can use the disk space validation feature to obtain visibility into the disk space and to ensure that you have enough available disk space on your target server.
- Verify HTTP(S) response – You can use the Verify HTTP(S) response feature to conduct HTTP(S) connectivity checks to a predefined list of URLs. The feature verifies the connectivity to the launched target instance.
- Enable Amazon Inspector – The Enable Amazon Inspector feature allows you to run security scans on your Amazon EC2 resources, including the target instances launched by Application Migration Service. The Amazon Inspector service is enabled at the account level. This action uses the
Enable,BatchGetAccountStatus,andCreateServiceLinkedRoleAPIs.
Now Available
The Global View, Import and Export Feature from Local, and Additional Post-launch Actions are available now, and you can start using them today in all Regions where AWS Application Migration Service is supported. Visit the Application Migration Service User Guide to dive deeper into these exciting features and you can refer to the Getting started with AWS Application Migration Service to kickstart your workload migration to AWS.
—Irshad