AWS Compute Blog
Hosting ASP.NET Core applications in Amazon ECS using AWS Fargate
This post courtesy of Sundararajan Narasiman, AWS Partner Solutions Architect
There is an increasing amount of customer interest in hosting microservices-based applications using Amazon Elastic Container Service (ECS), largely due to the benefits offered by AWS Fargate.
AWS Fargate is a compute engine for containers that allows you to run containers without needing to provision, manage, or scale any Amazon EC2 compute infrastructure. Fargate works with Amazon ECS and can run microservices developed in many programming languages or application frameworks. This includes Java, .NET Core, Python, Node.js, Go, or Ruby on Rails. Nowadays, enterprises that are building microservices applications using .NET are using .NET core because of the cross-platform support (the ability to run in Linux).
In this post, I cover how to host a cross-platform ASP.NET core application using AWS Fargate.
Reference architecture
A good reference architecture for AWS Fargate application deployment should cover the VPC, Subnets, Load Balancer, Internet Gateway, Elastic Network Interface (ENI), AWS Fargate Task, Network ACLs, and Security Groups. The architectural choices for VPC Networking, Load Balancing, and Container Networking are also important.
There are a couple of networking approaches for deploying containers in Amazon ECS:
- Deploy containers in the public VPC Subnet with direct Internet access
- Deploy containers in the private VPC Subnet without direct Internet access
Because the ASP.NET Core application is going to serve traffic from the Internet, we will deploy containers in the Public VPC Subnet with direct Internet access.
When it comes to sending traffic to containers through the Load Balancer, the following options are available:
- A public Load Balancer that accepts traffic from the Internet and route it to container through the AWS Fargate Task’s Elastic Network Interface (ENI).
- A private, Internal Load Balancer that only accepts traffic from other containers in the cluster
Because the ASP.NET Core application container lives in the web tier, go with a public Load Balancer. The public Load Balancer accepts traffic from the Internet and routes it to the container through the AWS Fargate Task’s Elastic Network Interface (ENI).
Based on these considerations, the reference architecture for deploying to AWS Fargate should look like this diagram:
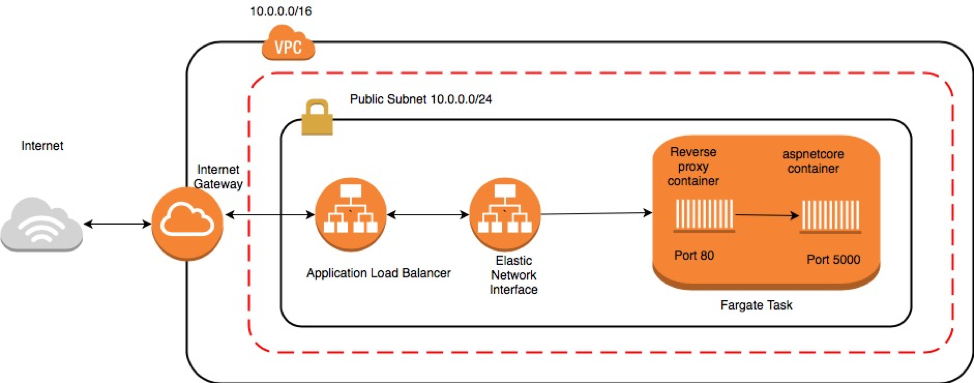
This solution deploys containers in a public Subnet (inside a VPC). The AWS Fargate Task and the two containers are hosted with direct access to the internet. They are also accessible to clients, using the public Load Balancer.
Walkthrough
To implement this architecture, we will do the following:
- Containerize the ASP.NET core application.
- Configure the reverse-proxy server.
- Containerize the NGINX reverse-proxy server.
- Create the Docker Compose file.
- Push container images to Amazon ECR.
- Create the ECS cluster.
- Create an Application Load Balancer.
- Create an AWS Fargate Task definition.
- Create the Amazon ECS service.
Code examples
The code examples, Dockerfile definition, Docker Compose file, and ECS task definition for this solution are available in the amazon-ecs-fargate-aspnetcore GitHub repository.
Pre-requisites
The development environment needs to have the following pre-requisites :-
- Mac OS latest version (or) Windows 10 with latest updates (or) Ubuntu 16.0.4 or higher
- .NET core 2.0 or higher
- Docker latest version
- aws cli
- aws-ecs cli
Containerize the ASP.NET Core application
The first step in this journey is to containerize the ASP.NET Core application.
If you are using Visual Studio 2017 or later with the latest updates in Windows, you can add container support to the solution. Open the context (right-click) menu for the existing project and add Docker support.
If you are developing in Linux or Mac OS, you must explicitly add a Dockerfile.
The Dockerfile definition should look like the following, irrespective of the operating system used for development.
This Dockerfile definition creates an application container based on the microsoft/aspnetcore:2.0 base image. It publishes the contents of the bin/Release folder to a specified work directory, starts the default Kestrel web server and listens on port 5000 to serve web traffic.
By default, ASP.NET core uses Kestrel as the web server. Kestrel is a lightweight HTTP server and is great for serving dynamic content from ASP.NET core. However, for capabilities such as serving static content, caching requests, compressing requests, and terminating SSL from the HTTP server, a dedicated reverse-proxy server like NGINX is required.
Configure the reverse-proxy server
NGINX can act as both the HTTP and reverse-proxy server. NGINX is highly adopted because of its asynchronous, event-driven architecture that allows it to serve thousands of concurrent requests with a low-memory footprint.
In this solution, deploy a NGINX (reverse-proxy server) container in front of the application (ASP.NET core) container, defined in the AWS Fargate Task.
The reverse-proxy configuration file nginx.conf should be defined as follows:
The NGINX container is set to listen on port 80 and it is configured to forward the request to the application container listening on port 5000. The attribute upstream app_server in the nginx.conf file must be set with a value of mymvcweb:5000 in the local development environment.
Containerize the NGINX reverse-proxy server
Create a Dockerfile definition like the following to containerize the NGINX reverse-proxy server. It should look like the following:
Create the Docker Compose file
Next, use docker-compose to define these two containers as a microservices in the local development environment. The Docker Compose file should look like the following:
These two containers can be built and tested by issuing the following docker-compose commands:
docker-compose build
docker-compose up
Open http://localhost:80 in the browser and it should render the default view of ‘index. cshtml’. Whenever there is a change to the application code or container definition, the docker-compose cache should be cleaned to affect the latest changes. To do this, run the following docker-compose commands:
docker-compose stop
docker-compose rm
docker-compose rmi ‘containerimageid’
Push container images to Amazon ECR
Next, push the container images from the local environment to Amazon Elastic Container Registry (ECR) so that the container images are available in Amazon ECR before the creation of AWS Fargate cluster.
Before you deploy this application to ECS, the upstream app_server attribute in the nginx.conf file must be set with the value of 127.0.0.1:5000. This enables the communication with the upstream application container listening on port 5000.
The first step to push the container images to ECR is to fetch the docker login command with the required security tokens. Run the following command:
aws ecr get-login --no-include-email --region us-east-1
It should return you a Docker login command with a security token. Copy the command and tokens and run it.
The second step is to tag the local container image with the remote ECR repository. Run the following command:
docker tag aspnetcorefargate_mymvcweb:latest <yourawsaccountnumber>.dkr.ecr.us-east-1.amazonaws.com/mymvcweb:latest
The third step is to push the tagged image to the remote ECR registry. Run the following command:
docker push <yourawsaccountnumber>.dkr.ecr.us-east-1.amazonaws.com/mywebmvc:latest
The above steps are repeated for the NGINX container as well. Now you have the container images available in ECR.
Create the Amazon ECS cluster
The Amazon ECS cluster is a logical grouping for AWS Fargate and Amazon ECS tasks. The cluster remains an administrative boundary for running every application.
In the AWS Management Console, Navigate to Create Cluster and select Networking only.
Since we’re going to create and host the Amazon ECS Service with AWS Fargate as the launch type, the notion of the Amazon ECS Cluster becomes a logical boundary. We need not create ECS instances while creating Amazon ECS Cluster, when the launch type is Fargate. Hence, we can create the Fargate cluster with required networking constructs such as VPC and Subnets.
Name the cluster and select Creation of new VPC for this cluster.
Leave the rest of the fields as their default values. You now have a VPC with two public subnets.
Create an Application Load Balancer
Next, create an Application Load Balancer, as defined in the reference architecture. The Application Load Balancer is required to load balance across multiple AWS Fargate tasks.
In the EC2 console, navigate to Create Load Balancer. Name your Load Balancer as aspnetcorefargatealb.
For Scheme, select internet-facing. For IP address type, choose ipv4. The Load Balancer listens on port 80 (HTTP). The Load Balancer’s Security Group should also allow traffic on port 80 (HTTP) from the internet.
While configuring the routing for the Load Balancer, for Target type, choose ip. For Protocol, choose HTTP. For Path, enter / (forward slash).
For more information, see Creating an Application Load Balancer.
Create an AWS Fargate Task definition
The AWS Fargate Task definition is an important resource, acts as a blueprint for the AWS Fargate task. The Task definition defines parameters such as:
- Container image URL
- CPU
- Memory
- IAM execution role
- Host port
- Container port
- Log configurations
- Container networking mode
- Task type
- Mount point
- Volume
A Fargate Task is the running instance of Task definition. Each Task represents a microservice. Tasks can be managed and independently scaled using AWS Fargate Service, which is explained in the upcoming sections.
In the console, choose Task Definitions, Create new Task Definition. For more information, see Creating a Task Definition.
Use the following AWS Fargate Task definition, which based on the reference architecture defined for this walkthrough. Replace <awsaccount> with your own account.
{
  "executionRoleArn": "arn:aws:iam::<awsaccount>:role/ecsTaskExecutionRole",
  "containerDefinitions": [
    {
      "dnsSearchDomains": null,
      "logConfiguration": {
        "logDriver": "awslogs",
        "options": {
          "awslogs-group": "/ecs/aspnetcorefargatetask",
          "awslogs-region": "us-east-1",
          "awslogs-stream-prefix": "ecs"
        }
      },
      "entryPoint": null,
      "portMappings": [
        {
          "hostPort": 80,
          "protocol": "tcp",
          "containerPort": 80
        }
      ],
      "command": null,
      "linuxParameters": null,
      "cpu": 0,
      "environment": [],
      "ulimits": null,
      "dnsServers": null,
      "mountPoints": [],
      "workingDirectory": null,
      "dockerSecurityOptions": null,
      "memory": null,
      "memoryReservation": 1024,
      "volumesFrom": [],
      "image": "<awsaccount>.dkr.ecr.us-east-1.amazonaws.com/reverseproxy: latest",
      "disableNetworking": null,
      "healthCheck": null,
      "essential": true,
      "links": null,
      "hostname": null,
      "extraHosts": null,
      "user": null,
      "readonlyRootFilesystem": null,
      "dockerLabels": null,
      "privileged": null,
      "name": "reverseproxy"
    },
    {
      "dnsSearchDomains": null,
      "logConfiguration": {
        "logDriver": "awslogs",
        "options": {
          "awslogs-group": "/ecs/aspnetcorefargatetask",
          "awslogs-region": "us-east-1",
          "awslogs-stream-prefix": "ecs"
        }
      },
      "entryPoint": null,
      "portMappings": [
        {
          "hostPort": 5000,
          "protocol": "tcp",
          "containerPort": 5000
        }
      ],
      "command": null,
      "linuxParameters": null,
      "cpu": 0,
      "environment": [],
      "ulimits": null,
      "dnsServers": null,
      "mountPoints": [],
      "workingDirectory": null,
      "dockerSecurityOptions": null,
      "memory": null,
      "memoryReservation": 1024,
      "volumesFrom": [],
      "image": "<awsaccount>.dkr.ecr.us-east-1.amazonaws.com/mymvcweb:latest",
      "disableNetworking": null,
      "healthCheck": null,
      "essential": true,
      "links": null,
      "hostname": null,
      "extraHosts": null,
      "user": null,
      "readonlyRootFilesystem": null,
      "dockerLabels": null,
      "privileged": null,
      "name": "mymvcweb"
    }
  ],
  "placementConstraints": [],
  "memory": "2048",
  "taskRoleArn": "arn:aws:iam::<awsaccount>:role/aspnetecstaskroles",
  "compatibilities": [
    "EC2",
    "FARGATE"
  ],
  "taskDefinitionArn": "arn:aws:ecs:us-east-1:<awsaccount>:task-definition/aspnetcorefargatetask:1",
  "family": "aspnetcorefargatetask",
  "requiresAttributes": [
    {
      "targetId": null,
      "targetType": null,
      "value": null,
      "name": "ecs.capability.execution-role-ecr-pull"
    },
    {
      "targetId": null,
      "targetType": null,
      "value": null,
      "name": "com.amazonaws.ecs.capability.docker-remote-api.1.18"
    },
    {
      "targetId": null,
      "targetType": null,
      "value": null,
      "name": "ecs.capability.task-eni"
    },
    {
      "targetId": null,
      "targetType": null,
      "value": null,
      "name": "com.amazonaws.ecs.capability.ecr-auth"
    },
    {
      "targetId": null,
      "targetType": null,
      "value": null,
      "name": "com.amazonaws.ecs.capability.task-iam-role"
    },
    {
      "targetId": null,
      "targetType": null,
      "value": null,
      "name": "ecs.capability.execution-role-awslogs"
    },
    {
      "targetId": null,
      "targetType": null,
      "value": null,
      "name": "com.amazonaws.ecs.capability.logging-driver.awslogs"
    },
    {
      "targetId": null,
      "targetType": null,
      "value": null,
      "name": "com.amazonaws.ecs.capability.docker-remote-api.1.21"
    },
    {
      "targetId": null,
      "targetType": null,
      "value": null,
      "name": "com.amazonaws.ecs.capability.docker-remote-api.1.19"
    }
  ],
  "requiresCompatibilities": [
    "FARGATE"
  ],
  "networkMode": "awsvpc",
  "cpu": "1024",
  "revision": 1,
  "status": "ACTIVE",
  "volumes": []
}
The above Task definition contains two containers, the ASP.NET core and the NGINX reverse-proxy server. Currently, awsvpc is the only networking mode supported for AWS Fargate Tasks. When an AWS Fargate Task is launched, the ECS container network plugin assigns a dedicated Elastic Network Interface (ENI) for the Tasks. This ENI does not share the global default network namespace with ECS instances.
You also specify the subnets for placing tasks across ECS instances. This means that the Subnet Security Group is also applicable to the ENI for the respective Tasks. This enables communication between two AWS Fargate Tasks, or other resources within the VPC. Because of the awsvpc network mode, calls from AWS Fargate Tasks do not go through the eth0 Docker bridge.
Create the Amazon ECS service
The AWS Fargate service is a managed AWS Fargate task. The desired state of the application can be defined using the AWS Fargate service. For more information, see Create a service.
In the console, choose Task Definitions and select the task definition that you just created.
On the Task Definition [name] page, select the revision of the task definition from which to create your service.
Review the task definition, and choose Actions, Create Service. For Launch type, choose FARGATE. Enter values for the rest of the fields:
- Platform version: LATEST
- Cluster:
aspcorefargatecluster(or the cluster name you chose) - Service name:
aspcorefargatesvc(or another name of your choice) - Number of tasks: 2
- Minimum healthy percent: 50
- Maximum percent: 200
On the Configure networking page, select the required VPC and subnets required for running the tasks.
Register the Application Load Balancer (ALB) that you created. The ECS scheduler has built-in intelligence, which makes it seamless to work with Application Load Balancer (ALB).
Then, configure Service Auto Scaling. Even though this is an optional feature, I recommend to enable service-level scaling. It addresses the key tenets of how a microservice should behave at runtime. For more information, see (Optional) Configuring Your Service to Use Service Auto Scaling.
I’m defining minimum number of tasks as 2, desired tasks as 2 and maximum tasks as 3.

Complete the Amazon ECS Service creation.
When the Amazon ECS Task gets placed, the ECS scheduler registers the Task as a target for the Load Balancer.
When the Task is healthy and passes the Load Balancer health checks, it is reflected in the healthy host count.

Access the DNS ‘A’ record of the Load Balancer in the browser. The ASP.NET core application should render successfully.

Conclusion
In this post, we took an existing ASP.NET core application, containerized it, and hosted it in Amazon ECS as a microservice using the AWS Fargate compute engine. AWS Fargate gives you a way to run containers directly without managing any EC2 instances and giving you full control over how the task is defined, including task networking and resources.
If you have questions or suggestions, please comment below.