AWS Compute Blog
How To Migrate Multi-Tier Environments Using The AWS Server Migration Service
This post courtesy of Shane Baldacchino, Solutions Architect at Amazon Web Services.
Many customers ask for guidance on migrating end-to-end solutions running on virtual machines over to AWS. This post provides an overview of moving a common WordPress blog running on a virtualized platform to AWS, including re-pointing the DNS records associated to with the website.
AWS Server Migration Service (AWS SMS) is an agentless service that makes it easier and faster for you to migrate thousands of on-premises workloads to AWS. AWS SMS allows you to automate, schedule, and track incremental replications of live server volumes, making it easier for you to coordinate large-scale server migrations.
Walkthrough
The key elements of this migration process include the following steps:
- Establish your AWS environment.
- Replicate your database.
- Download the SMS Connector from the AWS Management Console.
- Configure AWS SMS and Hypervisor permissions.
- Install and configure the SMS Connector appliance.
- Import your virtual machine inventory and create a replication job.
- Launch your Amazon EC2 instance.
- Change your DNS records to resolve the WordPress blog to your EC2 instance.
Before you start, ensure that your source systems OS and hypervisor version are supported by AWS. For more information, see the Server Migration Service FAQ.
Establish your AWS environment
For this walkthrough, your WordPress blog is currently running as a two-tier LAMP stack in a corporate data center. You have a frontend running Apache and PHP, plus a backend database running on MySQL. All systems are hosted on a virtualized platform.
First, establish your AWS environment. If your organization is new to AWS, this may include account or subaccount creation, a new virtual private cloud (VPC), and associated subnets, route tables, internet gateways, and so on. Think of this phase as setting up your software-defined data center. For more information, see Getting Started with Amazon EC2.
The blog is a two-tier stack, so go with two private subnets. Because you want it to be highly available, use multiple Availability Zones. A zone resides within an AWS Region. Each zone is isolated, but the zones within a region are connected through low-latency links. This allows architects and solution designers to build highly available solutions.

Replicate your database
WordPress uses a MySQL relational database. You could continue to manage MySQL and the associated EC2 instances associated with maintaining and scaling a database. For this walkthrough, use this opportunity to migrate to an RDS instance of Amazon Aurora, as it is a MySQL compliant database. Not only is Amazon Aurora a high-performant database engine but it frees you up to focus on application development by managing time-consuming database administration tasks, including backups, software patching, monitoring, scaling, and replication.

Use AWS Database Migration Service to migrate your MySQL database to Amazon Aurora easily and securely. After a database migration instance has been instantiated, configure the source and destination endpoints and create a replication task.

By attaching to the MySQL binlog, you can seed in the current data in the database and also capture all future state changes in near real time. For more information, see Migrating a MySQL-Compatible Database to Amazon Aurora.
Finally, the task shows that you are replicating current data in your WordPress blog database and future changes from MySQL into Amazon Aurora.

Download the SMS Connector from the AWS Management Console
Now, use AWS SMS to migrate your Apache PHP frontend to EC2. AWS SMS is delivered as an appliance for your hypervisor.

To download the SMS Connector, log in to the console and choose Server Migration Service, Connectors, SMS Connector setup guide.

Configure AWS SMS
Your hypervisor and AWS SMS will need an appropriate user with sufficient privileges to perform migrations.
- AWS SMS – Use the AWS CLI or the IAM console to create an IAM user with the ServerMigrationConnector policy attached.
- Hypervisor – Follow the specific instructions for your hypervisor in the Getting Started with AWS Server Migration Service.
Install and configure the SMS Connector appliance
Launch a new VM based on the SMS Connector that you downloaded. To configure the connector, connect to it via HTTPS. You can obtain the SMS Connector IP address from your hypervisor.

Connect to the SMS Connector via HTTPS. In the example above, the connector IP address is 10.0.0.31. In your browser, enter https://10.0.0.31.
Configure the connector with the IAM and hypervisor credentials that you created earlier.

After it’s configured, and the associated connectivity and authentication checks have passed, return to the console and view your connector in AWS SMS.
Import your virtual machine inventory and create a replication job
After validating that the SMS Connector is in a “HEALTHY” state, import your server catalog to AWS SMS. This process can take up to a minute.

Select the server to migrate and choose Create replication job. The console guides you through the process. The time that the initial replication task takes to complete is dependent on the available bandwidth and the size of your VM. After the initial seed replication, network bandwidth is minimized as AWS SMS replicates only incremental changes occurring on the VM.

Launch your EC2 instance
When your replication task is complete, the artifact created by AWS SMS is a custom AMI that you can use to deploy an EC2 instance. Follow the usual process to launch your EC2 instance, noting that you may need to replace any host-based firewalls with security groups and NACLs.

When you create an EC2 instance, ensure that you pick the most suitable EC2 instance type and size to match your performance requirements while optimizing for cost.
While your new EC2 instance is a replica of your on-premises VM, you should always validate that applications are functioning. How you do this differs on an application-by-application basis. You can use a combination of approaches, such as editing a local host file and testing your application, SSH, or Telnet.

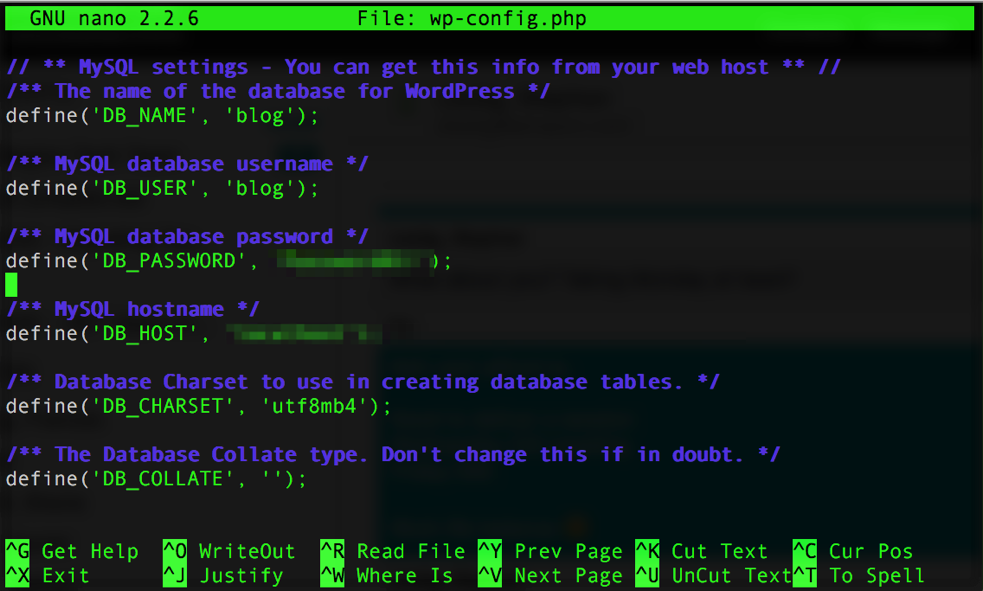
From the RDS console, get your connection string details and update your WordPress configuration file to point to the Amazon Aurora database. As WordPress is expecting a MySQL database and Amazon Aurora is MySQL-compliant, this change of database engine is transparent to WordPress.
Change your DNS records to resolve the WordPress blog to your EC2 instance
You have validated that your WordPress application is running correctly, as you are still receiving changes from your on-premises data center via AWS DMS into your Amazon Aurora database.

You can now update your DNS zone file using Amazon Route 53. Route 53 can be driven by multiple methods: console, SDK, or AWS CLI.
For this walkthrough, update your DNS zone file via the AWS CLI. The JSON example shows upserting the A record in your zone to resolve to your EC2 instance.
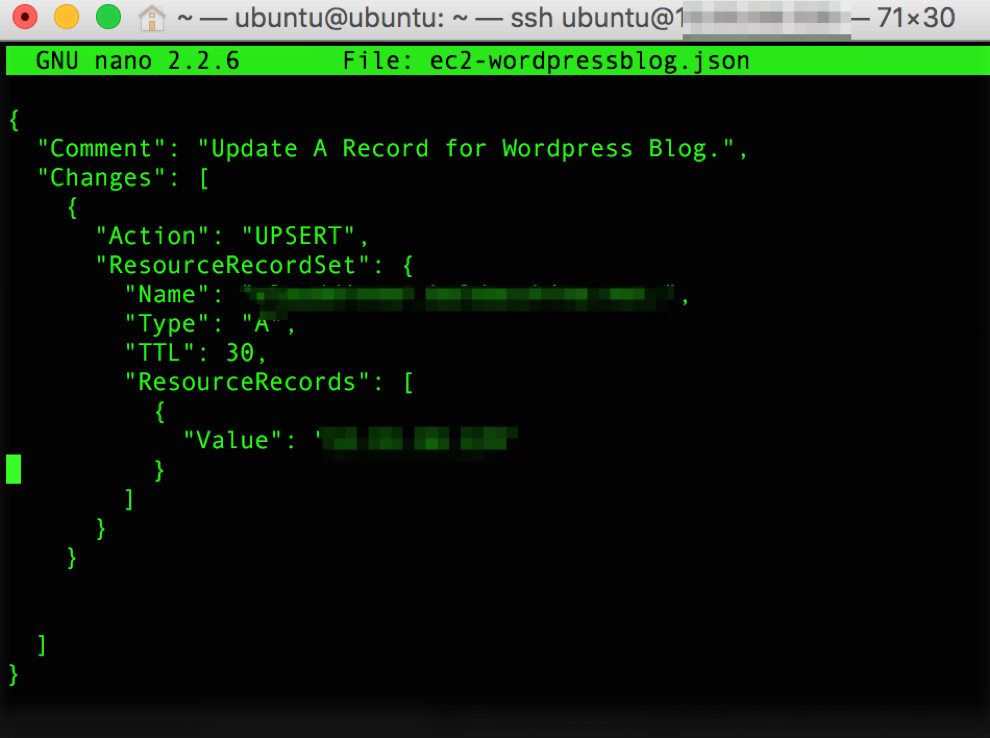
Use the AWS CLI to execute the request and update the record in your zone file. The cut-over period between the original off-cloud location and AWS is defined by the TTL in the SOA (statement of authority) in your DNS zone. During this period, any requests resolving to your off-cloud server that result in database writes are automatically replicated to your Amazon Aurora instance via AWS DMS.

You have now successfully migrated your WordPress blog to AWS. Based on the TTL of your DNS zone file, end users slowly resolve the WordPress blog to AWS.
After you have validated your successful migration, be sure to delete your AWS DMS task and your AWS SMS replication job.
Summary
In this post, you moved a WordPress blog to AWS, using AWS SMS and AWS DMS to re-point the associated DNS records.
Many architectures can be extended to use many of the inherent benefits of AWS, with little effort. For example, by using Amazon CloudWatch metrics to drive Auto Scaling policies, you can use an Application Load Balancer as your frontend. This removes the single point of failure for a single Amazon EC2 instance and ensures that your deployed capacity closely follows customer demand. Think big and get building!