Containers
Increasing pod density for Windows nodes on Amazon EKS
Introduction
Today, Amazon Web Services (AWS) announced the support of prefix delegation mode for Windows nodes running in Amazon Elastic Kubernetes Service (Amazon EKS). This feature increases the number of available IP addresses per node, thereby allowing customers to run more pods per Windows node on AWS Nitro based Amazon Elastic Cloud Compute (Amazon EC2) instance types. This leads to significant reduction in the cost of running Windows containers on Amazon EKS. When using prefix delegation mode for Windows on Amazon EKS, customers can run the suggested Kubernetes upstream limits of 110 pods per node, with a maximum of up to 250 pods per node depending upon the chosen instance type.
In this post, we offer a technical overview of the feature to help the readers understand the high-level workflow. This post also provides a step-by-step guide to enable and configure prefix delegation mode for Windows nodes in Amazon EKS.
Benefits of using prefix delegation mode for Windows nodes in Amazon EKS
Amazon EC2 allows assigning prefixes to your network interfaces. By assigning prefixes instead of individual secondary IP addresses, the number of IP addresses on the Elastic Network Interface (ENI) are increased substantially. Moreover, it simplifies the networking in Kubernetes scenario wherein pods can reuse the IP address released by previously deleted pod without having to call the Amazon EC2 API for allocation of a new IP address.
Before the launch of prefix delegation support for Windows nodes running in Amazon EKS, the maximum number of available IP addresses on a Windows node was equal to the (Number of private IPv4 addresses per interface on the node – 1) (one IP address is used as the primary IP address of the ENI, and therefore cannot be allocated to the pods). So, even if the node had sufficient resources to support more pods, the number of individual secondary IPv4 addresses that could be assigned to the ENI were limited. This restricted the number of pods customers can run on an Amazon EKS Windows node. For example, a t3.2xlarge instance type can support 15 private IPv4 addresses per interface. This meant that the maximum number of Windows pods, which could run on such a node, would be 14 based on the IP address limits.
With prefix delegation mode, we leverage the Amazon EC2 feature to assign /28 IPv4 address prefixes, which equates to 16 IPv4 addresses, instead of assigning individual secondary IP addresses to the ENI. This means that the available IP addresses on the node would be equal to (Number of private IPv4 addresses per interface on the node – 1) * 16. Taking the above example, a similar t3.2xlarge node can support 14 * 16 = 224 IP addresses, hence unblocking customers to run up to 224 pods on a single Amazon EKS node within the resource limits.

Figure 1: Cost comparison of running 80 Windows pods on Amazon EKS per month
How the feature works
Pods are the smallest deployable units of computing that can be created and managed in Kubernetes. A Pod is a group of one or more containers with shared storage and network resources, and a specification for how to run the containers. Every pod in a cluster gets its own unique cluster-wide IP address. For Windows nodes running in Amazon EKS, VPC Resource Controller, which runs in Amazon EKS Control plane, handles the IPv4 address management. The VPC Resource Controller integrates directly with Amazon EC2 networking to provide high performance, low latency container networking for Windows workloads in Kubernetes clusters running in AWS. Each IPv4 address assigned to a pod is a private IPv4 address, which is routable within the Amazon Virtual Private Cloud (VPC) of the Amazon EKS cluster. Due to a single ENI being supported for Windows nodes, the total number of pods, which can run on that node is constrained by the total number of secondary IPv4 address that can be assigned to a single interface on the node.
By default, VPC Resource Controller assigns secondary IPv4 addresses to the primary ENI of the Amazon EC2 instance, which are then assigned to the pods running on that node. With prefix delegation mode, users can configure VPC Resource Controller to assign /28 prefixes (16 IPv4 addresses) instead of secondary IPv4 addresses. This increases the number of available IPs for the pods, consequently boosting the pod density on nodes with available resources.
Solution overview
The end-to-end workflow for Windows on Amazon EKS is shown in the following diagram.

Figure 2: Workflow when a new node is added
Workflow when a new Windows node is added to an Amazon EKS cluster:
- VPC Resource Controller watches for node events from the Kube API server.
- User adds a Windows node to the cluster, which has the Kubernetes node label
kubernetes.io/os: windows. - Assuming Windows IPAM and prefix delegation is enabled, VPC Resource Controller starts managing an IPv4 address warmpool for the Windows node. It invokes Amazon EC2 APIs on behalf of the user to allocate /28 prefixes to the primary ENI. Internally, it would deconstruct the prefix into IPv4 addresses and the pods are later assigned one of the IPv4 addresses from the prefix range. To reduce latency after pod creation, VPC Resource Controller warms up the prefixes beforehand either using default settings or using the configurations specified by the user as documented here.
- VPC Resource Controller updates the resource capacity on this node to vpc.amazonaws.com/PrivateIPv4Address: # (Number of private IPv4 addresses per interface on the node – 1) * 16. This limits the Number of Windows pods that can be scheduled on a Windows Node based on the number of available IPv4 addresses.
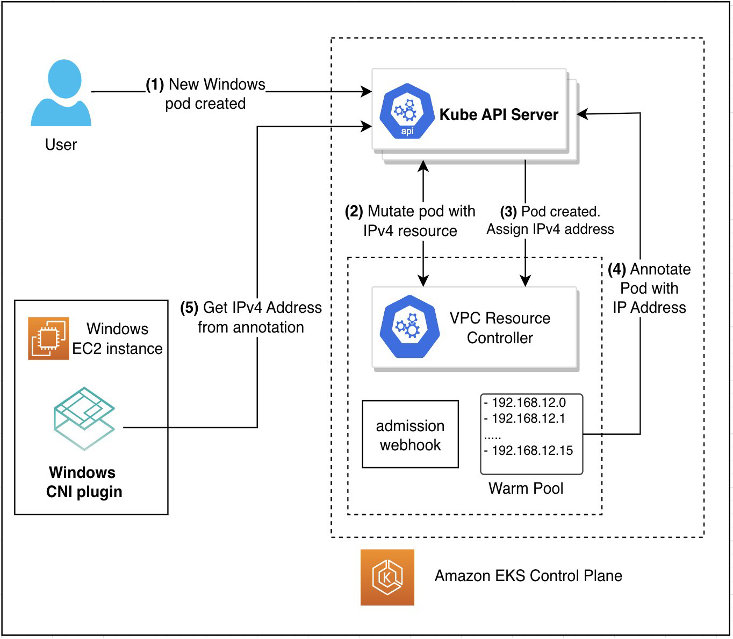
Figure 3: Workflow when a new pod is created
Workflow when a new Windows pod is created:
- User creates a new Windows pod with the nodeSelector kubernetes.io/os: windows.
- An admission webhook mutates the Create Pod request by adding the following resource limit and capacity vpc.amazonaws.com/PrivateIPv4Address: 1. This tells the scheduler that the pod has to be scheduled on a node with 1 available IPv4 address.
- VPC Resource Controller receives the Pod Create event and allocates an IPv4 address from the Prefix warm pool. The IPv4 address assigned to the pod is in the range of one of the prefixes assigned to the primary ENI on the node.
- VPC Resource Controller annotates the pod with vpc.amazonaws.com/PrivateIPv4Address: IPv4 Address.
- Container Networking Interface (CNI) Plugin on the Windows node queries the IPv4 address present in the annotation from the Kube API Server and sets up the networking for the pod on the node.
When the pods are terminated, the IP addresses are released back into the warmpool. If the available IP addresses in the warmpool are greater than the required number, then VPC Resource Controller releases the free prefixes to the Amazon EC2 pool.
Key considerations
- Prefix delegation feature for Windows is available on Amazon EKS versions 1.25 and later. The supported platform version with this feature for different Amazon EKS versions can be found here.
- To enable prefix delegation feature for Windows, add an entry enable-windows-prefix-delegation: “true” in the amazon-vpc-cni config map.
- Subnet in which Amazon EKS Windows nodes run should have sufficient contiguous /28 CIDR blocks. To avoid failures due to subnet fragmentation (IPs scattered throughout the subnet CIDR), we recommend:
- Using Subnet CIDR Reservation so that even if IP addresses within the reserved ranges are still in use, upon release of the same, the IP addresses will not be reassigned. This ensures that prefixes are available for allocation with prefix delegation mode.
- Use new subnets that are specifically used for running the workloads with prefix delegation enabled. Since Linux already supports it, both Windows and Linux workloads can run in the same subnet with prefix delegation enabled.
- When transitioning from secondary IP mode to prefix delegation mode, we recommend you create new node groups to increase the number of available IP addresses rather than doing rolling replacement of existing worker nodes. During transition, running pods in both secondary IP mode and prefix delegation mode on the same node can lead to inconsistency in the advertised IP address capacity, which impacts the future workloads on the node. For the recommended way of performing the transition, visit the documentation here.
- To avoid errors due to resource quotas or over subscription, specify requests and limits for the pods. In secondary IP mode, IP addresses are one of the primary limiting factors for Windows. With prefix delegation mode, IP address won’t be a limiting factor and can lead to oversubscription of the resources on a node due to more pods. By specifying requests and/or limits, the appropriate number of pods are scheduled on a node.
- When running a mix of AWS Nitro and non-Nitro based EC2 instances with prefix delegation enabled, non-Nitro EC2 instances will fall back to using secondary IP mode.
- By default, the value of max-pods is set as 110 for Windows nodes. If you need to run more than 110 pods, then specify –max-pods=<NEW_VALUE> using the KubeletExtraArgs argument during the bootstrap as specified here.
- In order to run Windows pods in Amazon EKS cluster, Windows support must be enabled. This is irrespective of the steps to enable prefix delegation feature for Windows nodes.
Walkthrough
In this section, we walk you through the steps for enabling prefix delegation in your Amazon EKS cluster and run sample Windows workloads. We’ll complete the following tasks:
- Validate the Windows worker nodes are up and running
- Enable prefix delegation mode for Windows nodes in your cluster
- Check that /28 IPv4 prefix has been assigned on your Windows nodes
- Run Windows pods in your Amazon EKS cluster
- [Optional] Tune the configuration options for pre-scaling and dynamic scaling
- Clean up your resources
Prerequisites
Prerequisites and assumptions:
- Your Amazon EKS cluster (1.25 or newer) is up and running. See this step by step
- You have launched Amazon EKS Windows worker nodes. To follow along in this walkthrough, use a single 2xlarge instance type Windows Server 2019 node. See this step by step guide.
- You have enabled Windows support for your Amazon EKS cluster. See this step by step
- You have properly installed and configured Amazon Command Line Interface (AWS CLI), eksctl, and kubectl.
Step 1. Validate the Windows worker nodes are up and running
To follow along in this tutorial, you must have an existing Amazon EKS cluster with Windows nodes running in it. To check that Windows worker nodes are ready, run the following command.
You can expect the following output:

As you can see, we have one Windows Server 2019 node based on Amazon EKS version 1.26.
Step 2. Enable prefix delegation mode for Windows nodes in your cluster
To enable prefix delegation feature for your Windows nodes, add enable-windows-prefix-delegation: “true” entry in amazon-vpc-cni config map. Run the following command:
Add the following entry in the config map:
The config map should look like:
Save and close the editor. You can verify that the config map has been updated with the required values with the following command:
The expected output should be similar to the following:
Step 3. Check that /28 IPv4 prefix has been assigned on your Windows nodes
Once the prefix delegation feature has been enabled, VPC Resource Controller should start allocating /28 IPv4 prefixes to your Windows nodes instead of individual secondary IPv4 addresses. Run the following command:
The output should be similar to the following:
As you can observe, a single IPv4 prefix (192.168.236.80/28) has been allocated to the primary ENI of the Amazon EC2 instance.
Step 4. Run Windows pods in your Amazon EKS cluster
Now, we can deploy Windows pods on the nodes, which are allocated IP addresses from the prefix range. Run the following command:
This launches 20 Windows pods in your cluster. With secondary IP mode, this node (t3.2xlarge instance type) would have accommodated only 14 pods. We can now check the pods using the following command:
The output should be similar to the following:

All 20 pods will be running on the same node. If you describe your node, then you’ll see that an additional prefix was allocated that has been used during assignment of IPv4 addresses to the pods. The IP address assigned to the pods are from the 192.168.236.80/28 and 192.168.197.112/28 prefixes. Run the following command:
The output should be similar to the following:
Step 5. [Optional] Tune the configuration options for pre-scaling and dynamic scaling
We provide multiple configurations to fine tune the pre-scaling and dynamic scaling behavior. The following keys can be set in the amazon-vpc-cni config map:
warm-ip-target: The number of IP addresses to be allocated in excess of current need. When used with prefix delegation, the VPC Resource Controller allocates a new prefix to the ENI if the number of free IP addresses from the existing prefixes is less than this value on the node.
For example, consider that we set warm-ip-target to 15. Initially when the node starts, the ENI has one prefix (i.e., 16 IP addresses allocated to it). When we launch two pods, then the number of available IP addresses becomes 14 and therefore, a new prefix is allocated to the ENI, which brings the total count of available IP addresses to 30.
warm-prefix-target: The number of prefixes to be allocated in excess of current need.
For example, consider that we set warm-prefix-target to two. Initially when the node starts, 2 prefixes are allocated to the ENI. Since there won’t be any running pods, the current need would be 0 and therefore, both the prefixes would be unused. If we run even a single pod, then the current need would be one IP address, which would come from one prefix. Therefore, only one prefix is in excess of the current need. This would lead to one additional prefix allocated to the ENI, which brings the total count of prefixes on the ENI to three.
minimum-ip-target: The minimum number of IP addresses to be available at any time. This behaves identically to warm-ip-target, except that instead of setting a target number of free IP addresses to keep available at all times, it sets a target number for a floor on how many total IP addresses are allocated.
For example, consider that we set minimum-ip-target to 20. This means that the total number of IP addresses (i.e., free and allocated to pods) should be at least 20. Therefore, even before the pods are scheduled, there should be at least 20 IP addresses available. Since one prefix has 16 IP addresses, the VPC Resource Controller would allocate two prefixes, which brings the total count of available IP address on the node to 32 and is greater than the set value of 20.
Note that minimum-ip-target is for pre-scaling, whereas warm-ip-target is for dynamic scaling. When set, warm-ip-target and/or minimum-ip-target will take precedence over warm-prefix-target. For more information about the configuration options, visit our documentation here.
Run the following command to edit the amazon-vpc-cni config map:
Add the following entries to the config map:
The config map should look like:
Save and close the editor. You can verify that the config map has been updated with the required values with the following command:
The expected output should be similar to the following:
Verify that the nodes have now been assigned two prefixes instead of one. Run the following command:
The output should be similar to the following:
As you can observe here, two IPv4 prefixes have been allocated for pre-scaling. It is worthwhile to note that the VPC Resource Controller assigns the IP addresses to the pods such that the prefix with the fewest remaining IP addresses are consumed first. This means that if there are two prefixes on the node such that 10 IP addresses from the second prefix are yet to be allocated and 5 from the first, then newer pods are allocated the IP addresses from the first prefix while it has unassigned IP addresses.
Clean up your resources
When you have finished the tutorial in this post, clean up the resources associated to avoid incurring charges for resources that you are not using:
- Delete the Windows node groups which you created as a pre-requisite to this walkthrough.
- Delete the Amazon EKS cluster created for this walkthrough.
Conclusion
Limited IPv4 addresses available per Windows node with Amazon EKS resulted in low pod density for Windows workloads. This pain point for the customers, who paid for a larger number of Windows nodes, led to higher cost when running Windows workloads on scale in Amazon EKS. In this post, we discussed the prefix delegation mode for Windows along with a walkthrough for enabling and configuring the feature in your Amazon EKS cluster. We also highlighted the various considerations as well as the configuration options that can be used with prefix delegation mode on Windows. For more information about the prefix delegation feature, you can visit our Amazon EKS documentation, Amazon EKS Best Practices Guide, and the VPC Resource Controller Github repository.
We are learning from your use of this feature and will make enhancements in the future for any suggestions. You can track the feature requests on AWS containers roadmap.