Containers
Introducing security groups for pods
Security groups, acting as instance level network firewalls, are among the most important and commonly used building blocks in any AWS cloud deployment. It came as no surprise to us that integrating security groups with Kubernetes pods emerged as one of the most highly requested Amazon Elastic Kubernetes Service (Amazon EKS) features, as seen on our public roadmap. Today, we are excited to introduce the ability to assign specific EC2 security groups directly to pods running in Amazon EKS clusters.
In this post, we cover use cases addressed by assigning security groups to pods, look under the hood to see how the feature is implemented, and finish with an example tutorial.
Securing applications at the network layer
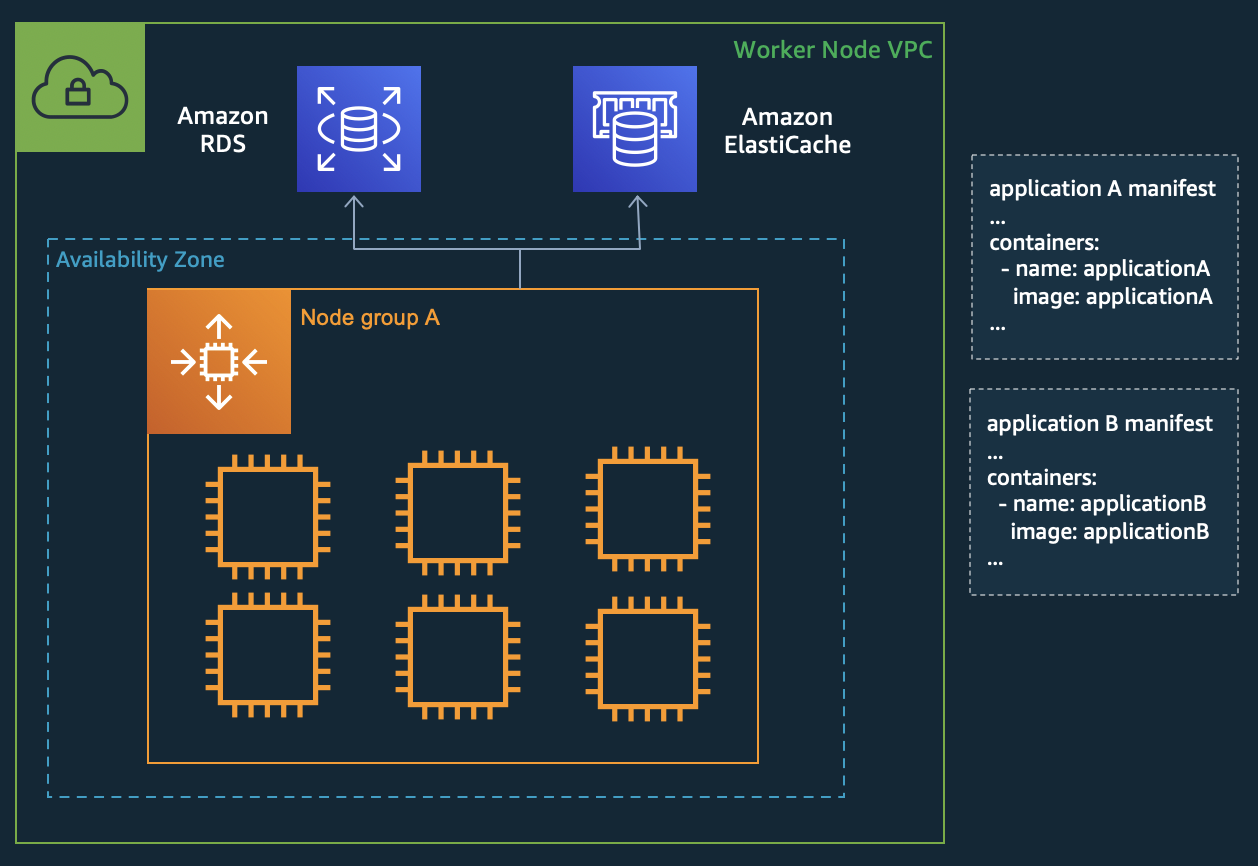
Containerized applications frequently require access to other services running within the cluster as well as external AWS services, such as Amazon Relational Database Service (Amazon RDS) or Amazon ElastiCache. On AWS, controlling network level access between services is often accomplished via EC2 security groups. Before today, you could only assign security groups at the node level, and every pod on a node shared the same security groups. To work around this limitation, you had to spin up separate node groups per application and configure complicated taint and affinity rules to schedule pods onto the right nodes. This inefficient process is difficult to manage at scale and can result in underutilized nodes as shown below.

IAM roles for service accounts solve this pod level security challenge at the authentication layer, but many organizations’ compliance requirements also mandate network segmentation as an additional defense in depth step. Kubernetes network policies provide an option for controlling network traffic within the cluster, but do not support controlling access to AWS resources outside the cluster. Additionally, for organizations undergoing application modernization efforts by migrating virtual machine-based services to containers on Kubernetes, it can be simpler to re-use operational knowledge, tooling, and experience around existing security group policies rather than reimplementing rules as Kubernetes network policies. This holds especially true if your security team has built compliance programs around security groups.
Security groups for pods make it easy to achieve network security compliance by running applications with varying network security requirements on shared compute resources. Network security rules that span pod to pod and pod to external AWS service traffic can be defined in a single place with EC2 security groups, and applied to applications with Kubernetes native APIs. After applying security groups at the pod level, your application and node group architecture can be simplified as shown below.
How it works
As part of this launch, Amazon EKS clusters have two new components running on the Kubernetes control plane: a mutating webhook and resource controller for the Amazon Virtual Private Cloud (Amazon VPC) associated with your cluster. The webhook is responsible for adding limits and requests to pods requiring security groups. The controller is responsible for managing network interfaces associated with those pods. To facilitate this feature, each worker node will be associated with a single trunk network interface, and multiple branch network interfaces. The trunk interface acts as a standard network interface attached to the instance. The VPC resource controller then associates branch interfaces to the trunk interface. This increases the number of network interfaces that can be attached per instance. Since security groups are specified with network interfaces, we are now able to schedule pods requiring specific security groups onto these additional network interfaces allocated to worker nodes. Let’s break down how this feature works in more detail into 3 phases below.
Phase 1: Node initialization and advertising branch interface limits

Once enabled with a configuration variable on the Amazon VPC CNI plugin, the IP address management daemon (ipamd) will add a Kubernetes label to supported instance types. The VPC resource controller will then advertise branch network interfaces as extended resources on these nodes in your cluster. Branch interface capacity is additive to existing instance type limits for secondary IP addresses. For example, a c5.4xlarge can continue to have up to 234 secondary IP addresses assigned to standard network interfaces and up to 54 branch network interfaces. ENI trunking/branching is available on most AWS Nitro based instance families, including m5, m6g, c5, c6g, r5, r6g, g4, and p3. If your workloads are not required to be isolated using specific security groups, no changes are required for you to continue to run them using secondary IP addresses on shared ENIs.
Phase 2: Scheduling pods to nodes
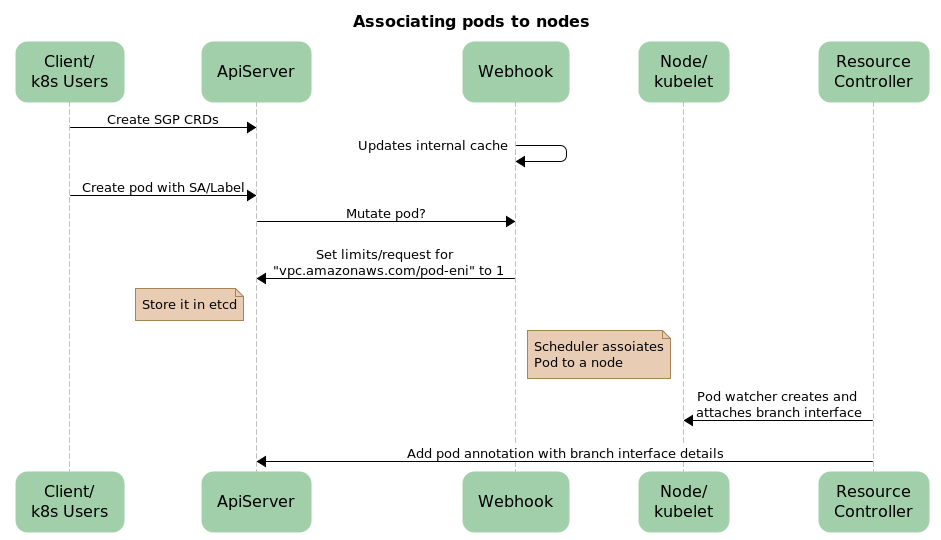
For workloads that do require specific security groups, we took a Kubernetes native approach and added a new Custom Resource Definition (CRD). Cluster administrators can specify which security groups to assign to pods through the SecurityGroupPolicy CRD. Within a namespace, you can select pods based on pod labels, or based on labels of the service account associated with a pod. For any matching pods, you also define the security group IDs to be applied.
The webhook watches SecurityGroupPolicy custom resources for any changes, and automatically injects matching pods with the extended resource request required for the pod to be scheduled onto a node with available branch network interface capacity. Once the pod is scheduled, the resource controller will create and attach a branch interface to the trunk interface. Upon successful attachment, the controller adds an annotation to the pod object with the branch interface details.
The VPC resource controller requires EC2 permissions to modify VPC resources as required by pods in your cluster. To make this simpler, we have a created an AWS managed policy: AmazonEKSVPCResourceController. Given that the controller runs on the Kubernetes control plane, you need to attach this policy to the IAM role associated with your cluster in order to take advantage of applying security groups to pods.
Phase 3: Setting up the pod network

During this phase, the VPC CNI plugin sets up the network for the pod. The plugin queries ipamd to read the branch network interface details, and then queries Kubernetes API server to read the pod annotation. Once the pod annotation is available, CNI will create a virtual LAN (vlan) device from the trunk interface. This device is used only by this branch interface pod and not shared with any other pods on the host. The CNI will then create a route table with default routes using the vlan device and associate a host virtual ethernet device (veth) end of the pod to this interface. Finally, the CNI plugin adds iptables rules so that all traffic flowing into this host veth and vlan will use this route table.
Getting started
In the following tutorial, we walk through a typical use case where assigning security groups directly to pods comes in handy, allowing only certain pods scheduled onto the same node to access an Amazon RDS database. In this example, we combine IAM roles for service accounts with pod level security groups for a defense in depth strategy.
Create an EKS cluster
Use eksctl to create a cluster. Make sure you are using at least version 0.27.0 to follow this example. Copy the following configuration and save it to a file called cluster.yaml:
apiVersion: eksctl.io/v1alpha5
kind: ClusterConfig

metadata:
  name: sgp-cluster
  region: us-west-2

iam:
  withOIDC: true

managedNodeGroups:
  - name: sample-ng
    instanceType: m5.xlarge
    desiredCapacity: 1
    privateNetworking: true
eksctl create cluster -f cluster.ymlRetrieve the VPC ID created by eksctl along with your cluster.
VPCID=$(aws eks describe-cluster --name sgp-cluster \
--query "cluster.resourcesVpcConfig.vpcId" \
--output text)
echo $VPCID
Create a Postgres database using Amazon RDS
Before creating the database, let’s create a security group that will be used by applications that require database access.
RDSSG=$(aws ec2 create-security-group --group-name RDSDbAccessSG \
   --description "Security group to apply to apps that need access to RDS" --vpc-id $VPCID \
   --query "GroupId" \ --output text)

# Allow outbound traffic from the security group
aws ec2 authorize-security-group-egress --group-id $RDSSG \
   --cidr 0.0.0.0/0

echo $RDSSG
Next, follow the RDS instructions to provide network access to your database by creating another security group. When you get to step 7 for inbound rules, specify the source as the security group created in the previous step.
Now, follow the RDS instructions for creating a PostgreSQL database (make sure to specify the same VPC as your cluster). Use the security group that you just created as the security group for your database instance when you create it. Enable the IAM authentication option and make sure to create a database account that uses IAM authentication.
Enable pods to receive their own network interfaces
You need to be using version 1.7.0 or higher of the Amazon VPC CNI plugin to enable security groups for pods, although we recommend upgrading to at least version 1.7.7. The Amazon EKS documentation contains instructions on how to check your version and upgrade if necessary. Once you’ve confirmed your cluster has the required VPC CNI version, run the following command to enable pod ENIs:
kubectl set env daemonset -n kube-system aws-node ENABLE_POD_ENI=trueNote: If are you using liveness or readiness probes, you also need to disable TCP early demux, so that the kubelet can connect to pods on branch network interfaces via TCP. To do this run the following command:
kubectl edit daemonset aws-node -n kube-systemUnder the initContainer section, change the value for DISABLE_TCP_EARLY_DEMUX from false to true, and save the file.
Create a service account for pods that need access to RDS
Copy the following configuration and replace the sample policy ARN with the one created during RDS database setup. Save this to a file called serviceaccount.yaml:
apiVersion: eksctl.io/v1alpha5
kind: ClusterConfig

metadata:
  name: sgp-cluster
  region: us-west-2

iam:
  withOIDC: true
  serviceAccounts:
  - metadata:
      name: rds-db-access
      namespace: default
      labels: {role: "backend"}
    attachPolicyARNs:
    - "arn:aws:iam::123456789012:policy/my-policy"
eksctl create iamserviceaccount --config-file=serviceaccount.yamlApply a SecurityGroupPolicy to the cluster
Let’s print out the two security group IDs that we’ll add to our SecurityGroupPolicy. The first security group we want to apply is the EKS cluster security group, which enables the matched pods launched onto branch network interfaces to communicate with other pods in the cluster such as CoreDNS. The second security group is the previously created one for applications that require access to our RDS database.
CLUSTERSG=$(aws eks describe-cluster --name sgp-cluster \
   --query "cluster.resourcesVpcConfig.clusterSecurityGroupId" \
   --output text)
# print security group IDs
echo $CLUSTERSG $RDSSG
Copy the following configuration, replace the security group IDs with the values from above, and save it to a file called sgp-policy.yaml:
apiVersion: vpcresources.k8s.aws/v1beta1
kind: SecurityGroupPolicy
metadata:
  name: my-sg-policy
spec:
  serviceAccountSelector:
    matchLabels:
      role: backend
  securityGroups:
    groupIds:
      - sg-yyyyyy
      - sg-zzzzzz
kubectl apply -f sgp-policy.yamlSecurityGroupPolicy is a namespaced scoped CustomResourceDefinition. Here, we created a policy that assigns the specified security groups to any pods in the default namespace associated with a service account containing a label key equal to role and value equal to backend. Note that SecurityGroupPolicies only apply to newly scheduled pods, and do not affect running pods.
Build a sample application to connect to RDS
Next, we containerize a simple Python application that connects to our Postgres database and prints the version if successful, or an error message. This example is modeled from the RDS documentation. Save the following as postgres_test_iam.py.
import os

import boto3
import psycopg2

HOST = os.getenv('HOST')
PORT = "5432"
USER = os.getenv('USER')
REGION = "us-west-2"
DBNAME = os.getenv('DATABASE')

session = boto3.Session()
client = boto3.client('rds', region_name=REGION)

token = client.generate_db_auth_token(DBHostname=HOST, Port=PORT, DBUsername=USER, Region=REGION)

conn = None
try:
    conn = psycopg2.connect(host=HOST, port=PORT, database=DBNAME, user=USER, password=token, connect_timeout=3)
    cur = conn.cursor()
    cur.execute("""SELECT version()""")
    query_results = cur.fetchone()
    print(query_results)
    cur.close()
except Exception as e:
    print("Database connection failed due to {}".format(e))
finally:
    if conn is not None:
        conn.close()
Save the following as Dockerfile.
FROM python:3.8.5-slim-buster
ADD postgres_test_iam.py /
RUN pip install psycopg2-binary boto3
CMD [ "python", "-u", "./postgres_test_iam.py" ]
Now let’s build our container and push it to Amazon ECR. Make sure to use your account ID in the example commands.
docker build -t postgres-test .
aws ecr create-repository --repository-name postgres-test-demo
aws ecr get-login-password | docker login --username AWS —password-stdin 123456789012.dkr.ecr.us-west-2.amazonaws.com
docker tag postgres-test 123456789012.dkr.ecr.us-west-2.amazonaws.com/postgres-test-demo:latest
docker push
Deploy a sample application
Now let’s deploy our application and test that only the desired pods can access our RDS database. Save the following as postgres-test.yaml. Replace the HOST, DATABASE, and USER environment variables with the values from the step above where you created the RDS database.
apiVersion: v1
kind: Pod
metadata:
  name: postgres-test
spec:
  serviceAccountName: rds-db-access
  containers:
  - name: postgres-test
    image: 123456789012.dkr.ecr.us-west-2.amazonaws.com/postgres-test-demo:latest
    env:
    - name: HOST
      value: "REPLACE_DATABASE_HOSTNAME"
    - name: DATABASE
      value: "REPLACE_DATABASE_NAME"
    - name: USER
      value: "REPLACE_USER"
kubectl apply -f postgres-test.yamlLet’s check the logs to confirm that this pod can indeed access our RDS database.
kubectl logs postgres-test
('PostgreSQL 12.3 on x86_64-pc-linux-gnu, compiled by gcc (GCC) 4.8.5 20150623 (Red Hat 4.8.5-11), 64-bit',)
Success! Now for a thorough test, let’s modify our pod configuration slightly to remove the service account. This pod will no longer be matched by our security group policy, and should not be able to access the database. Keep in mind that we created our cluster with a single node, so this pod will be scheduled to the same node as the previous pod. Save the following as postgres-test-no-sa.yaml.
apiVersion: v1
kind: Pod
metadata:
  name: postgres-test-no-sa
spec:
  containers:
  - name: postgres-test
    image: 123456789012.dkr.ecr.us-west-2.amazonaws.com/postgres-test-demo:latest
    env:
    - name: HOST
      value: "REPLACE_DATABASE_HOSTNAME"
    - name: DATABASE
      value: "REPLACE_DATABASE_NAME"
    - name: USER
      value: "REPLACE_USER"
kubectl apply -f postgres-test-no-sa.yaml kubectl logs postgres-test-no-sa
Database connection failed due to timeout expiredAnd that’s it! Two pods on the same node, but only one can access our database.
Conclusion
There are many things to consider when it comes to running a secure Kubernetes cluster. Every organization has their own security and compliance policies, some of which are tightly coupled to security groups. If you fall in this category, assigning security groups directly to pods can simplify existing application deployment patterns, and ease the path of migrating EC2 based workloads to Amazon EKS.
In this post, we showed you how pod security groups can be combined with IAM roles for service accounts to provide a pod level defense in depth security strategy at both the networking and authentication layers. Security groups for pods is available today with newly created Amazon EKS clusters running Kubernetes version 1.17. Support for existing clusters will be rolled out over the coming weeks. Learn more in the Amazon EKS documentation.