Containers
Maximizing GPU utilization with NVIDIA’s Multi-Instance GPU (MIG) on Amazon EKS: Running more pods per GPU for enhanced performance
With the Generative Artificial intelligence (GenAI) and machine learning (ML) surge, GPU-intensive tasks such as machine learning, graphics rendering, and high-performance computing are becoming increasingly prevalent. However, many of these tasks do not always require the full performance and resources of a high-end GPU. This underutilization of GPU resources leads to inefficiencies, increased costs, and unpredictable performance. There is an imperative demand for a solution that facilitates the flexible allocation of GPU resources to accommodate diverse workloads, ensuring optimal utilization, cost efficiency, and consistent performance for every user and application. This need shows how important tools like NVIDIA’s Multi-Instance GPU (MIG) are. They help solve these problems and make GPUs work better in different situations.
In 2020, NVIDIA launched a feature called Multi-Instance GPU (MIG). The feature lets you split a GPU into several smaller, separate parts. It’s great for tasks that don’t use up all the GPU’s power. With MIG, you can have many tasks running at the same time on one GPU, making the most of its capabilities.
In this blog post, we dive deep into optimizing GPU performance using NVIDIA’s Multi-Instance GPU (MIG) on Amazon Elastic Kubernetes Service (Amazon EKS). Our focus is on amplifying performance by running more pods per GPU, especially for intensive tasks like AI and high-performance computing (HPC). We walk you through a detailed guide on setting up, configuring, and mastering NVIDIA MIG on Amazon EKS. Through real-world case studies, we’ll showcase the remarkable boosts in performance and cost-efficiency achieved with this method. By the conclusion of this piece, you’ll be well-equipped to harness the full potential of your GPU resources on Amazon EKS using NVIDIA MIG.
Introduction to Multi-Instance GPU
NVIDIA’s Multi-Instance GPU (MIG) is a feature introduced with the NVIDIA A100 Tensor Core GPU. It allows a single A100 GPU to be partitioned into multiple GPU instances, each with its own dedicated resources like GPU memory, compute, and cache. MIG provides strict isolation, allowing multiple workloads to run on a single GPU without interfering with each other, ensuring predictable performance.
MIG allows you to precisely adjust the GPU resources allocated to your tasks. With this feature, you’re assured a consistent quality of service, ensuring stable response times and performance. This ensures that tasks can share GPU resources smoothly, without any disruptions.
MIG offers the following benefits:
- Resource efficiency:
- Maximizes GPU utilization by allowing multiple workloads to share a single GPU.
- Predictable performance:
- Each GPU instance operates in isolation, ensuring consistent performance for each workload.
- Flexibility:
- MIG can be configured to create GPU instances of various sizes to match workload requirements.
- Cost-efficiency:
- For businesses, it can lead to cost savings as they can get more out of their existing GPU infrastructure.
- Enhanced security:
- Each MIG partition gets it’s own dedicated memory and compute cores, ensuring different workloads do not interfere with each other thereby reducing the attack surface.
Multi-Instance GPU (MIG) on Amazon EKS offers a transformative approach to handling diverse workloads. It empowers users to run multi-tenant clusters efficiently, allowing both smaller models to be colocated with larger ones, optimizing resource utilization. By deploying models on the same instance, network latency is significantly reduced, ensuring faster data processing and real-time insights. Furthermore, ML scientists can take advantage of these capabilities to run their notebooks more efficiently, streamlining their research and development processes
MIG for Kubernetes
A significant number of customers prefer Kubernetes for managing their ML tasks. Kubernetes offers a robust and scalable system for scheduling, making it simpler to coordinate workloads across a cluster of virtual machines. Additionally, the active Kubernetes community has developed tools like Kubeflow, streamlining the process of constructing, deploying, and overseeing ML pipelines.
However, the integration of MIG within Kubernetes remains under-explored, largely due to its complex nature. The challenge is amplified when considering the prerequisites for MIG on Kubernetes, which include the installation of the NVIDIA driver, NVIDIA container runtime, and specific device plugins.

Solution overview
The starting point of the solution is an EKS cluster. We’ll create a cluster with one P4d.24xlarge instance.
We’ll use NVIDIA GPU operator to automatically partition A100 GPUs in a P4d.24xlarge instance.
NVIDIA GPU Operator is a tool that eases the process of deploying, configuring, and monitoring GPU resources within Kubernetes. It eliminates the complexities associated with setting up MIG on Kubernetes by automating essential tasks. Its based on the operator framework within Kubernetes.
After deploying the GPU Operator on Amazon EKS, you can label the nodes to define specific partition strategies for Multi-Instance GPU (MIG) usage. Labeling nodes is a way to tag them with specific attributes or characteristics. By doing so, you can create custom partitioning strategies tailored to your application needs. For instance, you might label nodes to allocate a specific portion of the GPU for lightweight tasks and another portion for more intensive computations. This labeling process provides fine-grained control over GPU resource allocation, allowing users to optimize for specific workloads, whether it’s ML training, inference, or any other GPU-intensive task. In essence, with the GPU Operator and node labeling, Amazon EKS users can harness the full potential of NVIDIA GPUs, ensuring that they get the best performance and efficiency out of their GPU-enabled clusters.“
Prerequisites
Solution walkthrough
Create an EKS cluster using eksctl
Install GPU Operator on Amazon EKS using Helm (Package manager for kubernetes)
The provided Helm command is designed to upgrade a deployment named gpuo using the nvidia/gpu-operator chart.
Let’s decipher the specific parameters set within the command:
- driver.enabled=true
- This enables the NVIDIA GPU driver. The driver is essential as it allows the operating system to communicate with the NVIDIA GPU hardware.
- namespace=kube-system
- Specifies that the GPU operator should be deployed in the kube-system namespace. This namespace is generally reserved for core services and components that run at the cluster level in Kubernetes.
- mig.strategy=mixed
- Sets the Multi-Instance GPU (MIG) strategy to “mixed.” This means that the GPU can be partitioned into multiple instances with varying sizes, allowing different workloads to run concurrently on the same GPU.
- deviceplugin.enabled=true
- Enables the NVIDIA device plugin for Kubernetes. This plugin allows the Kubernetes scheduler to be aware of GPU resources, ensuring that GPU-intensive workloads are scheduled on nodes with available GPU resources.
- migmanager.enabled=true
- Enables the MIG manager, a component responsible for managing and configuring MIG on NVIDIA GPUs.
- migmanager.with_reboot=true
- Indicates that the MIG manager can reboot the node if required. This is sometimes necessary when changing MIG configurations.
- toolkit.version=v1.13.1-centos7
- Specifies the version of the NVIDIA GPU Operator toolkit to be used, which in this case is version v1.13.1 optimized for CentOS 7.
- For use of Bottlerocket, use this link: Bottlerocket GPU-optimized AMI
- defaultRuntime=containerd
- Sets the default container runtime for the GPU Operator to containerd. Container runtimes are responsible for running containers, and containerd is one of the popular choices alongside Docker.
- gfd.version=v0.8.1
- Specifies the version of the GPU Feature Discovery (GFD) to be used. GFD is a tool that allows you to discover NVIDIA GPU features and capabilities on nodes in a Kubernetes cluster.
- deviceplugin.version=v0.14.0
- Sets the version of the NVIDIA device plugin for Kubernetes to v0.14.0.
- migmanager.default=all-balanced
- Sets the default MIG configuration to “all-balanced.” This means that the GPU will be partitioned into instances of balanced sizes, ensuring an even distribution of GPU resources.
View resources created by GPU operator
Output:

GPU Feature Discovery adds labels to the node that help Kubernetes schedule workloads that require a GPU. You can see the label by describing the node:
Setting Up MIG partitions in Kubernetes
NVIDIA offers two distinct approaches to showcase MIG-partitioned devices within a Kubernetes node. The first, known as the “single strategy,” displays only one kind of MIG device across all GPUs on a node. On the other hand, the “mixed strategy” permits the creation of various MIG devices of different sizes across all the GPUs present on a node.

With the MIG single strategy, you can create MIG devices of the same size. For instance, on a P4d.24XL, the options include creating 56 slices of 1g.5gb, 24 slices of 2g.10gb, 16 slices of 3g.20gb, or a single slice of either 4g.40gb or 7g.40gb.
Suppose we have several teams working on simulations and deep learning. With the MIG single strategy, you can give each team the GPU power they need, making the most of the P4d.24XL. This approach is great when all tasks need the same amount of GPU and when tasks can run at the same time.
On the other hand, the mixed strategy offers more flexibility. It lets you combine different-sized slices, such as a few 1g.5gb slices with some 2g.10gb and 3g.20gb slices. This approach is particularly beneficial when your cluster handles tasks with diverse GPU needs.
The mixed strategy is beneficial when managing a range of workloads with distinct GPU demands. This approach is especially valuable when tasks necessitate adaptable GPU resource distribution.
Consider an AI startup comprising three specialized teams. Using the mixed strategy, the startup can customize GPU allocations to precisely match each team’s requirements. For example, the image recognition team might be assigned two 1g.5gb slices, the natural language processing team could use two 2g.10gb slices, while the video analytics team benefits from three 3g.20gb slices — all operating concurrently on a singular GPU.
Create MIG devices with a single strategy
Let’s dive into setting up a single strategy and integrating it with Kubernetes. With the NVIDIA GPU Operator, setting up MIG partitions is easy. The process is straightforward: Simply label the node, and the rest is taken care of. The MIG manager operates as a daemonset across all nodes. Once it identifies node labels, it gets to work creating MIG devices.
To set up 1g.5gb MIG devices on all GPUs, label a node as follows (ensure to replace $NODE with your cluster’s specific node):
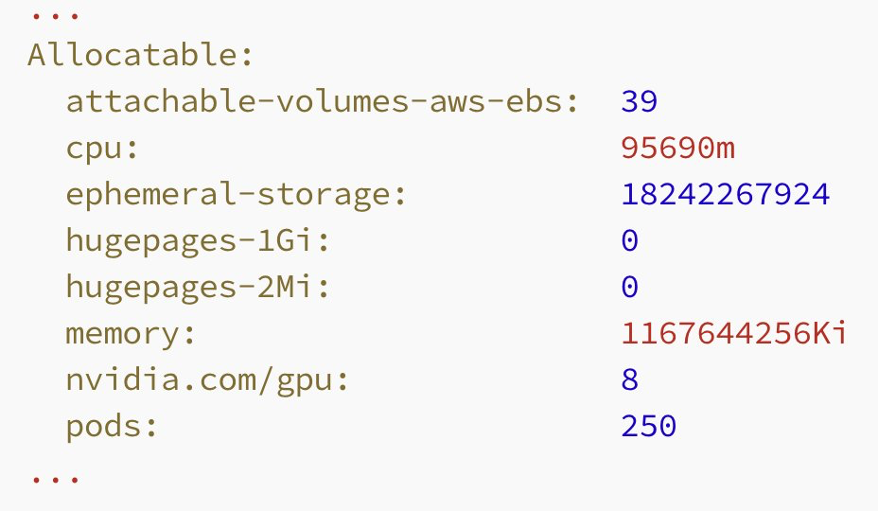
When you label the node like this, two changes occur. First, the node won’t show any full GPUs, and the nvidia.com/gpu label will read “0”. Second, the node will display 56 MIG devices of size 1g.5gb.
Output:
NOTE: Keep in mind that the changes might not be immediate; they could take a short while to apply. During this transition, the node will carry the label nvidia.com/mig.config.state=pending. After the MIG manager finishes the partitioning process, this label will change to nvidia.com/mig.config.state=success.
Create a deployment that uses MIG devices
The pod should go into running state, and it should consume 1x 1g.5gb MIG device.
Output:

If we try to scale the deployment to 100 replicas, only 56 pods will actually be running. This is because the node has the capacity for just 56 MIG devices of 1g.5gb size, given that it has eight GPUs with seven MIG slices each.
Scale the deployment

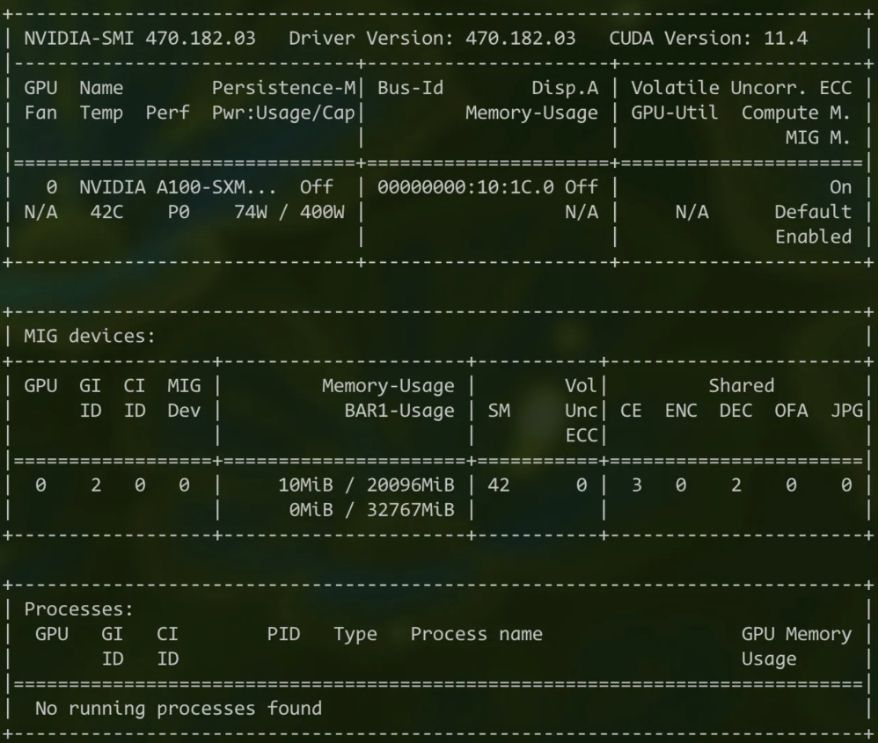
Exec into one of the containers and run nvidia-smi to view allocated GPU resources.

As you can see, this pod has only 5GB GPU memory.
Let’s scale the deployment down to 0:
MIG devices with mixed strategy
In the single strategy, every MIG device was set at 1g.5gb. Now, let’s adjust the GPUs so that each node can handle various MIG device setups. The MIG manager relies on a configmap to keep track of the MIG settings. When we labeled the node as all-1g.5gb, the MIG partition editor referred to this configmap to decide on the partition layout.
Output:
The configmap also features profiles such as all-balanced. Using the all-balanced profile, each GPU is partitioned into two units of 1g.10gb, one unit of 2g.20gb, and one unit of 3g.40gb MIG devices. If you have specific needs, you can even craft your own profile by tweaking the configmap.
all-balanced MIG profile:
Label the node to use all-balanced MIG profile:
After the node displays the label nvidia.com/mig.config.state=success, if you inspect the node’s details, you’ll notice several MIG devices listed within it.
Using the all-balanced profile, the P4d.24XL node has the capacity to operate 16 pods of 1g.5gb, 8 pods of 2g.20gb, and 8 pods of 3g.20gb.
To verify this, let’s initiate two more deployments. The first will consist of pods utilizing a 2g.10gb MIG device, and the second will employ a 3g.10gb MIG device.
Create the deployments
After the pods from these deployments are active, increase the count for all three deployments to 20 replicas each.
Lets see how many replicas start running

Let’s examine the amount of GPU memory allocated to a pod with 3g.20gb:
As anticipated, the pod is allocated 20GB of GPU memory.
Clean up
Delete the cluster and the node group:
Conclusion
This blog explains how to set up GPUs with NVIDIA’s Multi-Instance GPU (MIG) for use on Amazon EKS. While setting up MIG on Kubernetes might seem a bit tricky, the NVIDIA GPU Operator makes it much easier by handling the setup and organization. Thanks to MIG and the tools NVIDIA provides, those in machine learning can make better use of their GPUs. They can run more tasks on each GPU and use their resources more efficiently. This means they can handle bigger ML projects and get better results. In short, using NVIDIA’s MIG lets you get the most out of your GPUs for your machine learning needs.
Resources
- Multi-Instance GPU — NVIDIA Cloud Native Technologies documentation
- NVIDIA Multi-Instance GPU User Guide :: NVIDIA Tesla Documentation
- NVIDIA GPU Operator Overview — NVIDIA Cloud Native Technologies documentation
- GPU Operator with MIG — NVIDIA Cloud Native Technologies documentation
- Supporting MIG in Kubernetes
- Challenges Supporting MIG in Kubernetes
- Steps to Enable MIG Support in Kubernetes