Containers
Use shared VPC subnets in Amazon EKS
Introduction
In the ever-changing landscape of cloud computing, organizations continue to face the challenge of effectively managing their virtual network environments. To address this challenge, many organizations have embraced shared Amazon virtual private clouds (VPCs) as a means to streamline network administration, and reduce costs. Shared VPCs not only provide these advantages but also enable organizations to seamlessly align with their existing organizational structures. Ultimately, this allows networking teams to take ownership of network topologies through the creation of centrally managed VPCs.
Within the shared VPC model, the account responsible for the centralized VPC (i.e., owner) can share one or more subnets with other accounts (i.e., participants) under the same organization via AWS Organizations. Once a subnet is shared, then participants gain the ability to view, create, modify, and delete their application resources, such as Amazon Elastic Compute Cloud (Amazon EC2) instances, Amazon Relational Database Service (Amazon RDS) databases, AWS Lambda, and Amazon Elastic Kubernetes Service (Amazon EKS) clusters, within the shared subnets.
In this post, we’ll illustrate an enterprise IT scenario in which VPCs are overseen by a central network team, including configuration of VPC resources such as IP allocation, route policies, internet gateways, NAT gateways, security groups, peering, and on-premises connectivity. The network account, which serves as the owner of the centralized VPC, shares subnets with a participant application account managed by a platform team, both of which are part of the same organization. In this use case, the platform team owns the management of Amazon EKS cluster. We’ll also cover the key considerations of using shared subnets in Amazon EKS.
Solution overview
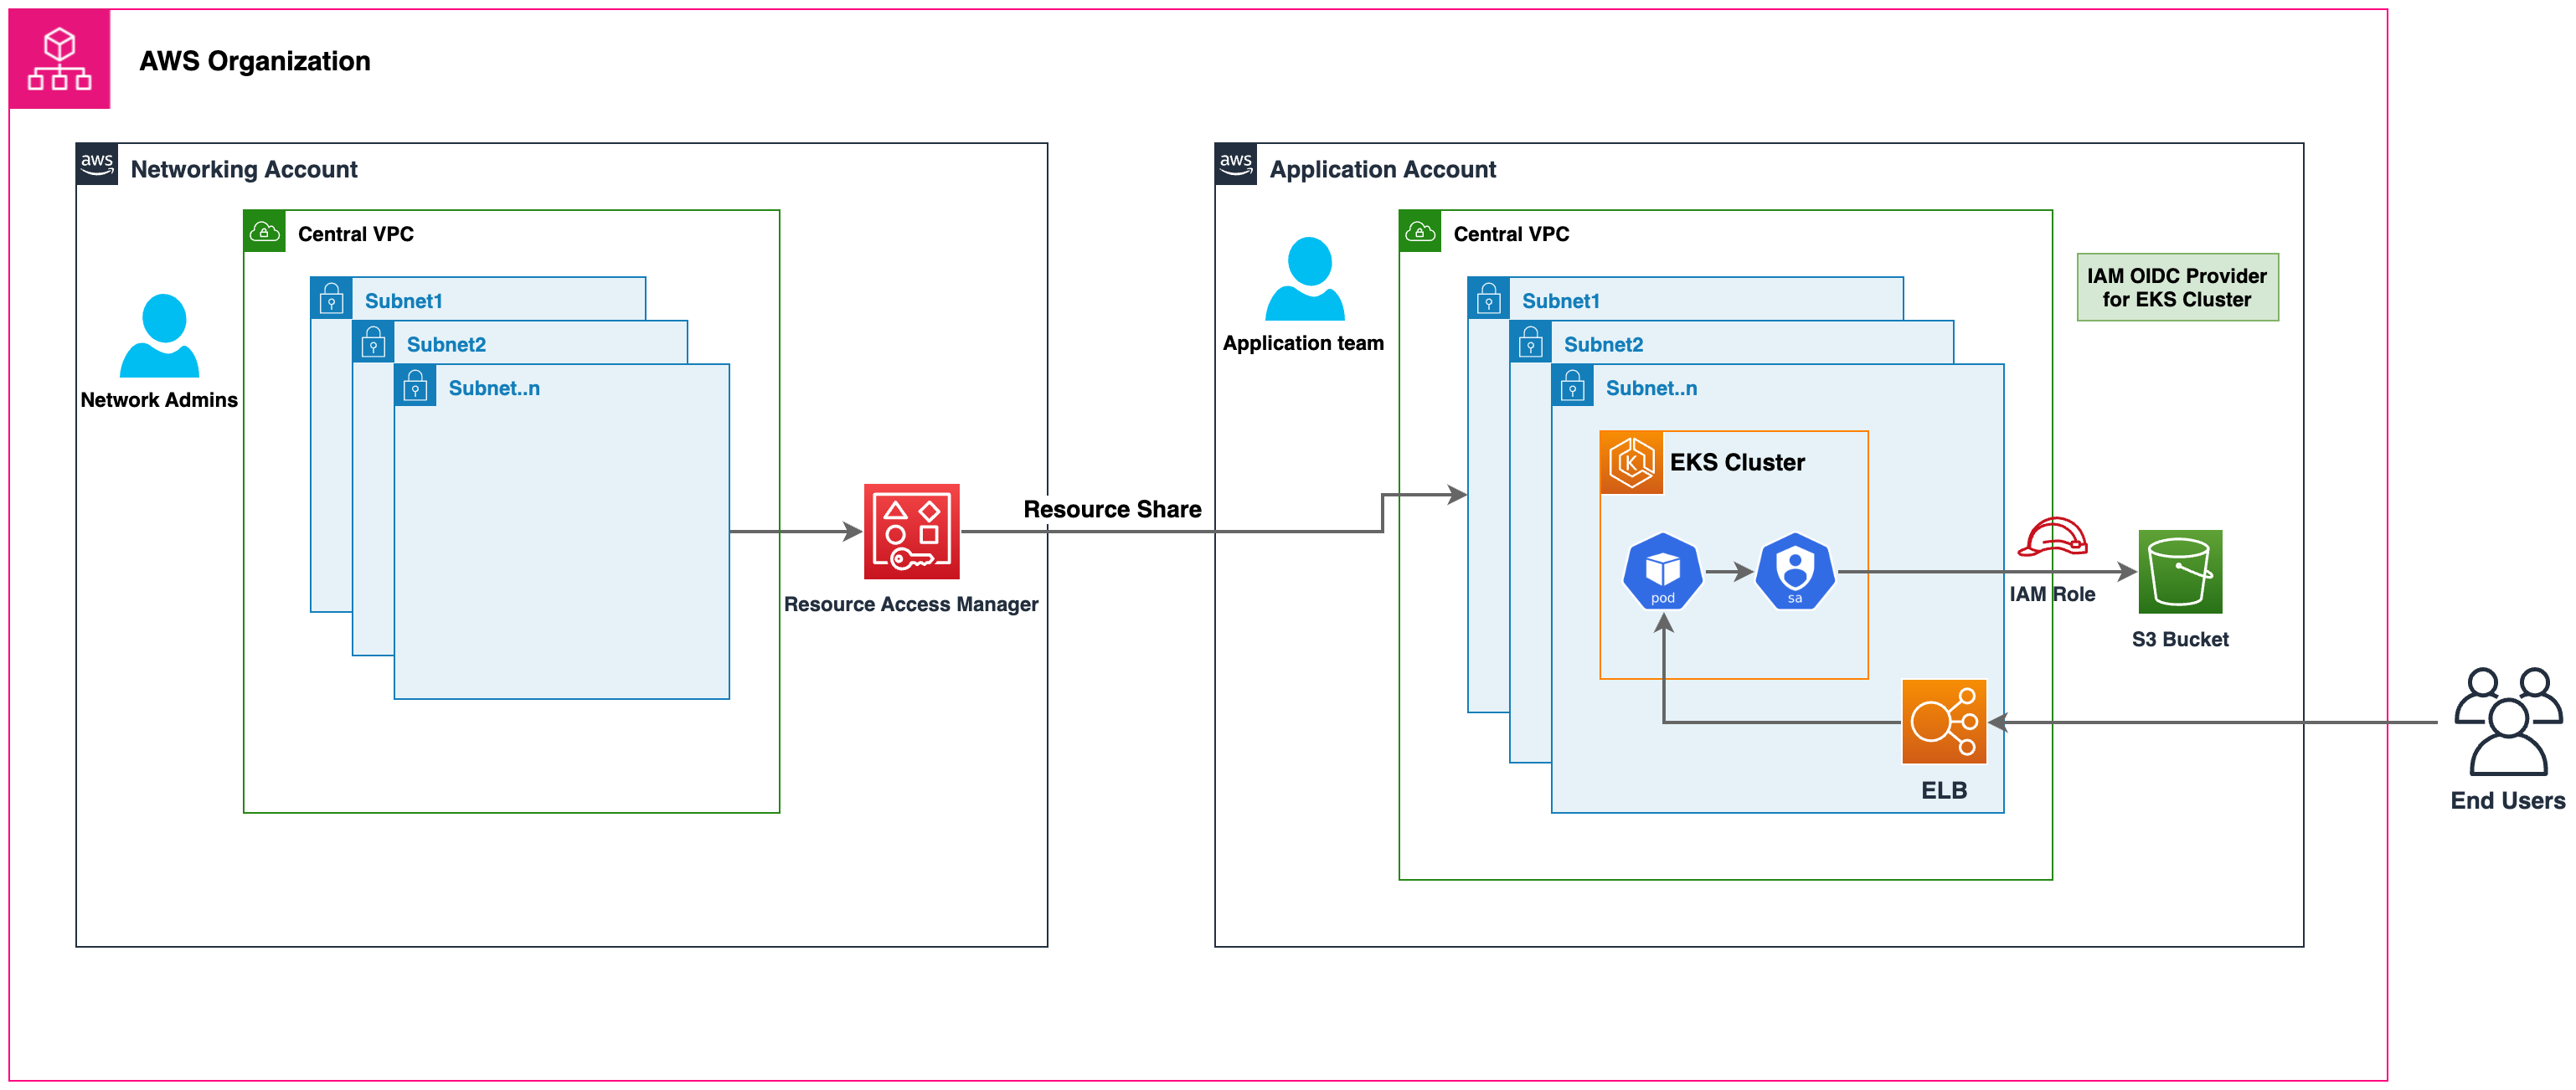
Figure 1: High-level solution architecture
Prerequisites
- An AWS Organization setup with at least two or more AWS accounts. In this example we will use:
- Central network account – To deploy networking resources like Amazon VPC, Subnet, etc.
- Application account – To deploy Amazon EKS and application resources
- AWS Command Line Interface (AWS CLI)
- AWS Credentials for both AWS Accounts, alternatively you can use AWS CloudShell
- eksctl – a simple CLI tool for creating and managing Amazon EKS clusters
Walkthrough
Setup
Networking account setup
Configure the AWS CLI to point to the central networking account and verify the AWS account number by following the following command:
Run the below command to deploy an Amazon VPC with nine subnets spread across three Availability Zones (AZs): three for creating the Amazon EKS cluster control plane, three for launching Amazon EKS worker nodes, and three for launching public-facing resources like Amazon Elastic Load Balancing Application Load Balancers. The AWS CloudFormation template used in this example shares the subnets with the application account using AWS Resource Access Manager.

Figure 2: VPC overview
Verify the subnets are shared with the application account by logging into the application account’s AWS Management Console. You’ll see the VPC and subnets in the VPC console. Notice the account number listed in the VPC overview, which is the Central Networking account number.
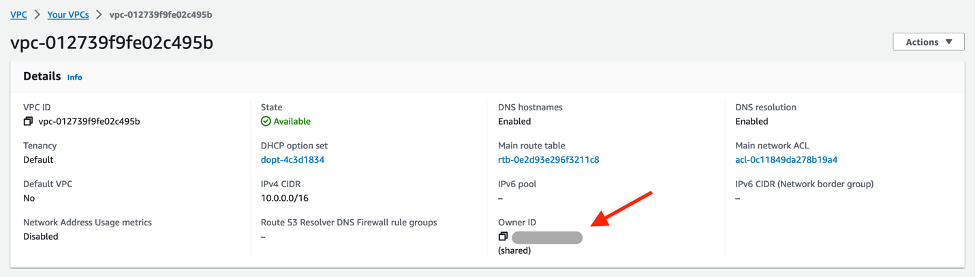
Figure 3: VPC details in application account
This completes the setup in the networking account. Let’s proceed with deploying Amazon EKS resources in the application account.
Note: Amazon maps the physical AZs randomly to the AZ names for each AWS account. This approach helps to distribute resources across the AZs in an AWS Region instead of likely having resources concentrated in AZ a for each region. As a result, the AZ us-west-2a in the central networking account might not represent the same physical location as us-west-2a in the application account. This is an important consideration if you want to enable the custom networking feature of Amazon VPC Container Networking Interface(CNI). You would need to use the physical ID mappings listed in the Central Networking Account to create ENIConfigs when configuring custom networking. Learn how to configure custom networking for pods.

Figure 4: AZ ID mapping between central networking account versus application account
Application account setup
Configure the AWS CLI to point to the application account and verify the AWS account number by the following command:
Create Amazon EKS cluster
Create an AWS Identity and Access Management (AWS IAM) role used by the Amazon EKS cluster.
Create a cluster and manage node group security groups to assign them to the Amazon EKS control plane and data plane, respectively.
Create an Amazon EKS cluster by running the below command:
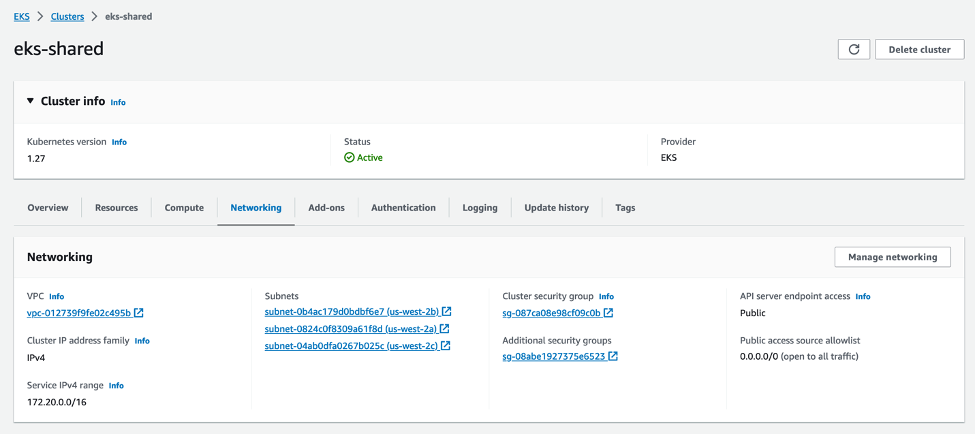
Figure 5: Amazon EKS overview
Create a managed node group to deploy the k8s resources.

Figure 6: Amazon EKS-managed node group overview
Deploy workloads on the cluster
We deploy a sample Python flask application and expose it via the Kubernetes Load Balancer service. It uses an AWS IAM role for service account feature to assume an AWS IAM role to access other AWS resources like Amazon Simple Storage Service (Amazon S3) buckets, Amazon DynamoDB tables, etc. To get started, create an AWS IAM OpenID Connect (OIDC) provider.
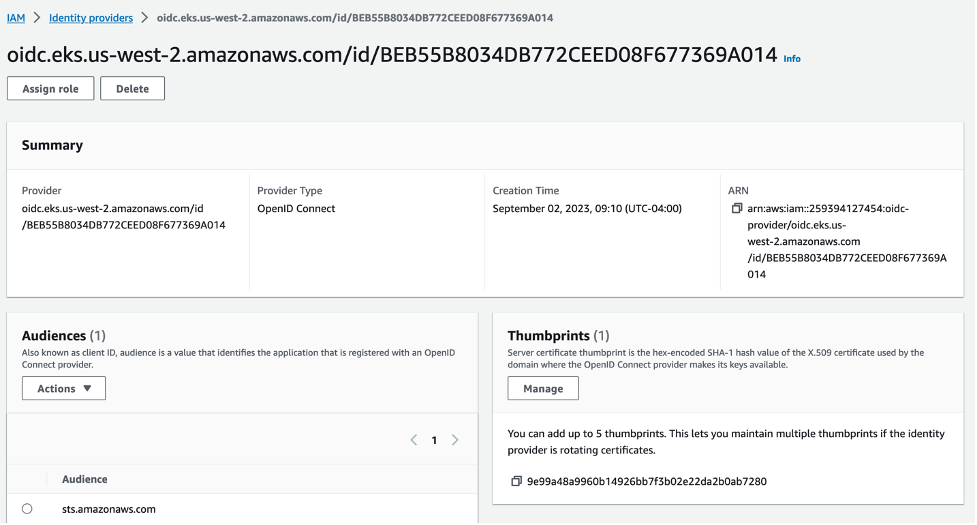
Figure 7: IAM OIDC provider
Create an AWS IAM role for service account so that application pod can assume the role and access Amazon S3 buckets.
Expose the application pod via k8s service type LoadBalancer. The default in-tree controller running in Amazon EKS creates a Network Load Balancer (NLB) in public subnets shared by the Central Networking Account.
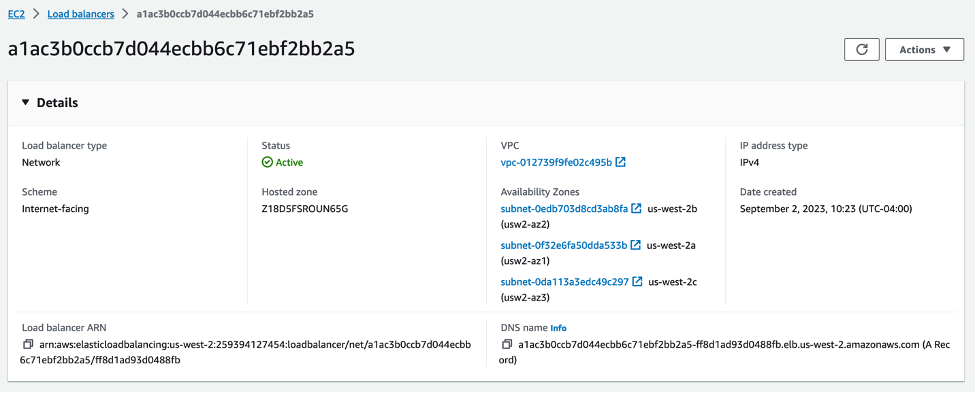
Figure 8: Amazon Network Load Balancer details page
Verify the NLB is up and running. Run the curl command to validate if the pod is able to assume the AWS IAM role to list the Amazon S3 buckets in the Application AWS Account.
Considerations
- Amazon EKS recommends creating Amazon EKS clusters and worker nodes within shared subnets that are all part of the same VPC. Amazon EKS doesn’t support the creation of clusters across multiple VPCs.
- Amazon EKS uses AWS VPC Security Groups (SGs) to control the traffic between the Kubernetes control plane and the cluster’s worker nodes. Security groups are also used to control the traffic between worker nodes, and other VPC resources, and external IP addresses. You must create these security groups in the participant account. Ensure that the security groups you intend to use for your pods are also located in the participant account. You can configure the inbound and outbound rules within your security groups to permit the necessary traffic to and from security groups located in the Central VPC account.
- Create AWS IAM roles and associated policies within the participant account where your Amazon EKS cluster resides. These AWS IAM roles and policies are essential for granting the necessary permissions to Kubernetes clusters managed by Amazon Elastic Kubernetes Service (Amazon EKS), as well as to the nodes and pods running on AWS Fargate. The permissions enable Amazon EKS to make calls to other AWS services on your behalf.
- You can apply following approaches to allow access from Kubernetes pod to AWS resources like Amazon S3 buckets, Amazon DynamoBD tables, etc., from other AWS accounts:
- Resource-based policy approach: If the AWS service supports resource policies, then you can add appropriate resource based policy to allow cross account access to AWS IAM roles assigned to the kubernetes pods. In this scenario, OIDC provider, AWS IAM roles, and permission policies exist in the application account. To find AWS services that support resource-based policies, refer AWS services that work with IAM and look for the services that have Yes in the Resource Based
- OIDC Provider approach: AWS IAM resources like OIDC Provider, AWS IAM roles, permission, and trust policies are created in other participant AWS accounts where the resources exists. These roles are assigned to Kubernetes pods in application account, so that they can access cross account resources. Refer Cross account IAM roles for Kubernetes service accounts post for a complete walkthrough of this approach.
- In this walkthrough, we shared the public subnets with the application account to create Amazon Elastic Load Balancer (ELB) resources. This approach can be effective for certain use cases. Alternatively, you can launch the AWS Load Balancer resources directly in the central networking account without sharing those subnets with the application account. For a comprehensive guide on how to achieve this configuration and expose Amazon EKS pods through a cross-account load balancer, please refer to the Expose Amazon EKS Pods Through Cross-Account Load Balancer walkthrough for detailed instructions and best practices. This option offers enhanced flexibility, as it grants the central networking account full control over the security configuration of the Amazon Elastic Load Balancer resources.
Cleaning up
Application account
To avoid ongoing charges, please make sure to delete Amazon EKS cluster resources created in your application account.
Central networking account
To prevent incurring any costs within your central networking account, it’s essential to delete all Amazon VPC resources, including subnets, as well as any shared resources that have been created under Amazon Resource Access Manager.
Conclusion
In this post, we showed you how to use shared VPCs with Amazon EKS clusters. We have shared instructions on the process of sharing subnets between an owner and a participant account and detailed the steps to create an Amazon EKS cluster within a participant account. Additionally, we listed the essential best practices to keep in mind when creating Amazon EKS clusters within shared VPCs. By following these guidelines, you can harness the full potential of shared VPCs to enhance the management and scalability of your Amazon EKS clusters. This approach not only opens the possibilities of efficient, secure, and collaborative cloud networking within your organization, but it also fits seamlessly with your organization’s structural requirements.
We encourage you to review the sample AWS CloudFormation templates available in this GitHub repository, to help automate the creation of Amazon VPC resources, AWS accounts, AWS organization configurations, and shared subnets. This repository is a collaborative effort, and we welcome contributions from the community. Your feedback is valuable to us, so feel free to share your insights by leaving a comment or opening an issue. If you are new to the concept of shared VPCs, then we recommend referring to the Amazon VPC user guide for comprehensive guidance and best practices on how to implement preventive and detective guardrails effectively around shared VPCs. Additionally, when considering the deployment of Amazon EKS clusters within shared VPCs, we recommend reviewing VPC and subnet requirements to ensure a smooth and successful cluster setup.