Containers
Using Amazon FSx for Windows File Server as persistent storage on Windows Containers
This post has been updated due a recent launch.
Designed for simplicity from the start, Amazon ECS delivers an AWS-opinionated solution for running containers at scale. Previously, customers had to implement a lengthy workaround (detailed in the original blog post below) in order to use an Amazon FSx for Windows File Server as persistent storage for Windows containers running on Amazon Elastic Container Service (ECS). Today, Amazon ECS launched a managed feature on EC2 launch type allowing you to use Amazon FSx for Windows File Server natively within ECS task definitions removing a lot of the undifferentiated heavy lifting from your workflows.
Before we look at the new feature details, here are some prerequisites :
- You have an ECS cluster setup with container instances using Windows Server 2019 full and core, 1909 core, 2004 core Amazon Machine Images and ECS Agent version 1.47.0 or later. Official documentation.
- The ECS container instance must be joined to the same Active Directory as the Amazon FSx for Windows Server filesystem. Official documentation.
- You have an Amazon FSx for Windows File Server deployed.
- You have stored the AD credentials in Secret Manger or SSM parameter store, you will need to reference the Secret/SSM Parameter as part for the volume definition. Official documentation.
So how do you use this feature?:
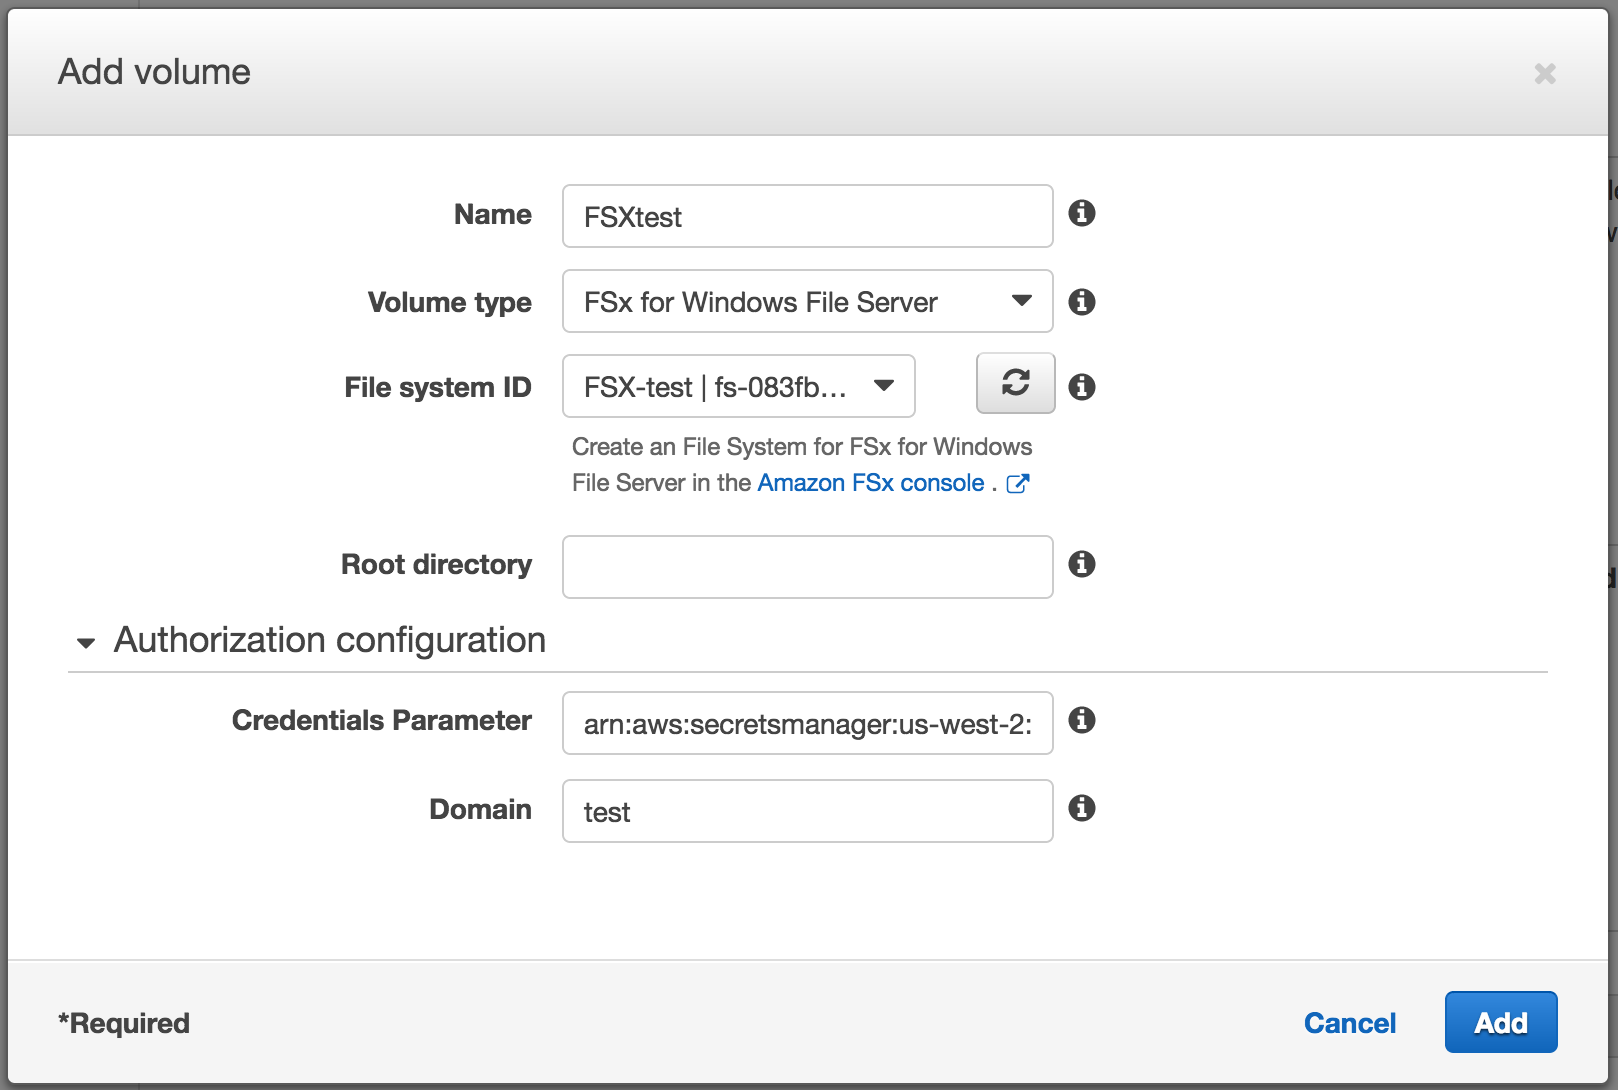
In the ECS console, you can define a FSx for Windows File Server as the volumeType in the ECS task definition. You need to provide the filesystemID of your existing FSx filesystem and the rootDirectory within FSx for Windows File Server to mount on to the ECS Instance. You can pass the Active Directory Credentials to access the filesystem for FSx for Windows File Server using the SSM Parameter or Secret Manager Arn as part of the task definition.
The AD credentials need to be valid AD credential pair, like below:
Here is a sample volume definition for an FSx for Windows file server using the AWS Management Console:
You can now create an ECS service/standalone tasks for your containers that use the Amazon FSx for Windows File Server as the persistent, shared storage with ECS managing the task’s volume’s lifecycle and mounting the filesystem directory into the container, enabling the following use cases:
- Stateful tasks to run workloads that require file system persistence
- Multiple tasks that access a shared file system for parallel computation
As always, we welcome your feedback on our public Github Roadmap
Original post
In this blog post, we are going to walk through a step-by-step process on how to use Amazon FSx for Windows File Server as persistent storage for Windows Containers running on Amazon Elastic Container Service (ECS). We will achieve this using an AWS System Manager Document to automate the file share mapping on the container instance and configure an ECS task definition to present a Docker volume into the container.
Please note, we are currently working on officially supporting persistent storage for Windows Containers through Amazon FSx File Share. The managed feature aims to remove some of the undifferentiated heavy lifting necessary for the work-around highlighted below.
How are we going to achieve this?
We will leverage an existing feature in the SMB protocol called “SMB Global Mapping” on Windows Server version 1709 (Windows Server 2016 “Semi-Annual Channel”). Using SMB Global Mapping, it is possible to mount an SMB share on the host, then pass directories on that share into a container. The container doesn’t need to be configured with a specific server, share, user name, or password, that is all handled by the host instead. The container works the same as if it had local storage.
Prerequisites and Assumptions:
- You have properly installed and configured the AWS CLI and AWS Tools for PowerShell on your computer.
- You have an ECS cluster setup with Windows Server 2019 Amazon Machine Images as ECS container instances. Official Documentation.
- The ECS container instance is an Active Directory domain member.
- This blog post talks about AWS Directory Services as Managed Microsoft AD, but it also works with other Active Directory scenarios as long as the ECS container instance can join the domain.
- You have an Amazon FSx for Windows File Server deployed.
- This blog post applies to Windows container instances on Amazon ECS only.
In this blog we will do the following:
- Create two parameters on System Manager Parameter Store for the user name and password.
- Create a System Manager Document to set up SMB Global Mapping on the ECS Container Instance.
- Attach the KMS and SSM policy to the existing ECS Role.
- Run the System Manager Document to set up SMB Global Mapping on the ECS Container Instance.
- Create a task definition to launch a container and see the results.
1. Create two parameters on System Manager Parameter Store for the username and password.
From the PowerShell console, create two SSM parameters, which I choose the name “domainUserName” to store the Active Directory user account information and “domainUserPassword” to store the password encrypted by the AWS KMS. The -Value must be an existing user account and password that you designed to be used in the share authentication/authorization phase between the ECS Container Instance and the File Share provided by Amazon FSx for Windows File Server.
Write-SSMParameter -Name 'domainUserName' -Value 'DOMAIN\USERNAME' -Type String
Write-SSMParameter -Name 'domainUserPassword' -Value 'PASSWORD' -Type SecureString -KeyId "KMSKeyId"

In the above command if you don't specify the KeyId parameter by default SSM uses the following key-id: *key/alias/aws/ssm*
2. Create a System Manager Document to set up SMB Global Mappings on the ECS Container Instance.
Create a JSON file (filename.json) locally with the following content and make the changes suggested below.
- In the New-SMBGlobalMapping command, replace the “FSx DNS NAME” with your Amazon FSx for Windows File Server DNS Name and “Directory” with an existing directory you created inside the Share to use with Docker container volumes. Also replace the -LocalPath parameter value with your preferred drive letter instead of G: if needed.
{
    "schemaVersion": "2.2",
    "description": "Map SMB Share using SMBGlobalMappings for Windows Containers",
    "mainSteps": [
        {
            "action": "aws:runPowerShellScript",
            "name": "runPowerShellWithSecureString",
            "precondition": {
                "StringEquals": [
                    "platformType",
                    "Windows"
                ]
            },
            "inputs": {
                "runCommand": [
                    "$username = (Get-SSMParameterValue -Name domainUserName).Parameters[0].Value",
                    "$password = (Get-SSMParameterValue -Name domainUserPassword -WithDecryption $True).Parameters[0].Value | ConvertTo-SecureString -asPlainText -Force",
                    "$credential = New-Object System.Management.Automation.PSCredential($username,$password)",
                    "New-SmbGlobalMapping -RemotePath '\\\\FSxDNSNAME\\share\\Directory' -Credential $credential -LocalPath G: -RequirePrivacy $true -ErrorAction Stop"
                ]
            }
        }
    ]
}
The above JSON script creates a new SMB global mapping and maps the path “\\Share\\Directory’” from Fsx Windows Share to a local drive “G:” on ECS Container Instance using the ‘domainUserName' and 'domainUserPassword' SSM parameters created during step-1
2.1 With the file created in your local machine, let’s create an SSM Document. From the PowerShell Console:
$json = Get-Content C:\filename.json | Out-String
New-SSMDocument -DocumentType Command -Name document name -Content $json
[Optional] 2.2 As a security best practice, you may want to Disable Inheritance on the designated directory in which you are going to use as your main Docker Volume Storage and remove Authenticated Users since the directory contains all the data presented to the Docker container as volume (eg: app sources, databases, confidential files). After that, Add the existing user account you have select as the user account to authenticate the SMB File Share. Select Modify Permission.

3. Attach the KMS and SSM Policy to the existing ECS Role.
In order to enable KMS and System Manager usage from an ECS container instance, we need to be sure that the correct IAM Policies are attached to the ECS Instance Role created when you built your ECS Windows Cluster. Normally the container instance IAM role created by ECS is called ecsInstanceRole.
The first step is to create and attach a new policy on the ecsInstanceRole. This policy gives the instance permissions to call the kms:Decrypt API used by SSM parameter with secure string value. Which means the Password Parameter we have created in the step 1. Create a JSON file and save it in your computer using the example below:
- Replace the region:account to the region and account ID where your ECS Environment was launched.
- Replace key-id with the ID of your key used while creating “domainUserPassword” SSM parameter. By default SSM uses the following key-id: key/alias/aws/ssm
{"Version":"2012-10-17",
   "Statement":[
      {"Effect":"Allow",
         "Action":[
            "kms:Decrypt"
         ],
         "Resource":[
            "arn:aws:kms:region:account-id:key/key-id"
         ]
      }
   ]
}
3.1 Now, it’s time to create and attach the policy on the ecsInstanceRole. From the PowerShell console, run:
*Replace ACCOUNT-ID with the Account ID number.*
New-IAMPolicy -PolicyName "SSMSecureString" -policyDocument (Get-Content -Raw MySamplePolicy.json)
Register-IAMRolePolicy -RoleName ecsInstanceRole -PolicyArn arn:aws:iam::ACCOUNT-ID:policy/SSMSecureString
3.2 Attach the IAM Managed Policy AmazonEC2RoleforSSM on the ecsInstanceRole.
Register-IAMRolePolicy -RoleName ecsInstanceRole -PolicyArn arn:aws:iam::aws:policy/service-role/AmazonEC2RoleforSSM4. Run the System Manager Document to set up SMB Global Mapping on the ECS Container Instance.
Finally, let’s see the result! Run the command below from the PowerShell console to invoke the SSMCommand in order to run the document created on step 2.
Send-SSMCommand -InstanceId instance-id -DocumentName SMBGlobalMappings Note: If your ECS cluster has multiple ECS Windows container instances then you might have to execute the above command on all of them. To do this in one step, specify their instance IDs up to a maximum count of 50 with the -InstanceId parameter.
You will probably receive an output like mine! If you pay attention on the Status, you are going to see: Pending, since the SSM is executing the command into the Amazon EC2 Instance.
CloudWatchOutputConfig : Amazon.SimpleSystemsManagement.Model.CloudWatchOutputConfig
CommandId : 71d161be-e200-48c3-bd2d-a9ffe1dcc94b
Comment :
CompletedCount : 0
DeliveryTimedOutCount : 0
DocumentName : SMBGlobalMappings
DocumentVersion :
ErrorCount : 0
ExpiresAfter : 1/29/2020 12:27:00 AM
InstanceIds : {i-0e176f3c47e4fcb59}
MaxConcurrency : 50
MaxErrors : 0
NotificationConfig : Amazon.SimpleSystemsManagement.Model.NotificationConfig
OutputS3BucketName :
OutputS3KeyPrefix :
OutputS3Region :
Parameters : {}
RequestedDateTime : 1/28/2020 10:27:00 PM
ServiceRole :
Status : Pending
StatusDetails : Pending
TargetCount : 1
Targets : {}
4.1 Verify that the SSM document ran successfully by running the above command using its command Id as shown below.
Get-SSMCommandInvocation -CommandId "commandId" The above command is expected to return following similar output with Status “Success.”
CommandId : dc383f39-8f8b-4cd1-987a-84c82ab1dd9c
CommandPlugins : {}
Comment :
DocumentName : CreateSMBGlobalMappingsFsxBlog
InstanceId : i-034ffa7bf391dcc80
InstanceName :
NotificationConfig : Amazon.SimpleSystemsManagement.Model.NotificationConfig
RequestedDateTime : 2/18/2020 8:45:56 PM
ServiceRole :
StandardErrorUrl :
StandardOutputUrl :
Status : Success
StatusDetails : Success
TraceOutput :
4.2 That is it! You have a SMB Share mounted on your ECS Container Instance’s. Access your ECS Container Instance through a RDP Session or System Manager Session Manager and run the following command via PowerShell Console:
Get-SMBGlobalMappingsYou should see a result with something like this. (In the below output persistent storage is the directory used for this blog, but in your case this will be the ‘Directory’ used in Step-2 with New-SmbGlobalMapping command.

5. Create a task definition to launch a container and see the results.
In order to present a directory as a volume from the G:\ drive to the container, you need to configure the Volumes option in the task definition.

5.1 Click, Add Volume
As you can see, I selected the Volume type as Bind Mount. When you use a bind mount, a file or directory on the Amazon EC2 instance is mounted into a container. The file or directory is referenced by its full or relative path on the host machine. The feature called “SMB Global Mapping” makes it possible to mount an SMB share on the host, then pass directories on that share into a container. The container doesn’t need to be configured with a specific server, share, user name, or password, that is all handled on the host instead. The container will work the same as if it had local storage.
The source path for the specific Task Definition must be a directory in the share where all the data is going to be exposed to the container.
Name of the Mount Point as app-state
Volume Type: Bind Mount
Source Path: G:\Directory\app-state
G:\ is the Drive Letter selected to be the mount point for the SMB Share in the step 2.
Container1 is the directory inside the share, which I created to be used in this task definition.
app-state is the directory that is going to be exposed into the container.

5.2 The Volume was configured in the Task Definition Level. Now, you need to inform in the Container Definition (Inside Task Definition) the mount point for the container (Container Path) mapping to the Volume that you have just created in step 5.1.

You need to make sure the container image already have the Container Path you want to override. Otherwise it will fail. Check the Docker documentation.
If you dig in the mount configuration you just did through the Task Definition and Container Definition, it is the same as:
docker container run -v G:\Container1\app-state:C:\dotnetapp\app-state
Conclusion
That is it! You have just configured your Amazon Container Service (ECS) to mount a container volume through an SMB share hosted in Amazon FSx for Windows File Server. The approach of data persistence into a container isn’t ideal for new Cloud Native apps, but for legacy application, this is a must-have. An example that fits very well is legacy ASP.NET applications, where it is possible to redirect the application directory without any code change and achieve high availability and disaster recovery using Amazon FSx for Windows File Server on Multi-AZ deployment.