Desktop and Application Streaming
Integrating Okta MFA with Amazon WorkSpaces
Update (September 7, 2022) – This blog post is no longer up to date. Refer to Okta’s documentation for the latest configuration steps.
Amazon WorkSpaces is a managed, secure cloud desktop service. You can use Amazon WorkSpaces to provision either Windows or Linux desktops in just a few minutes and quickly scale to provide thousands of desktops to workers across the globe.
Multifactor authentication (MFA) is a security system that requires more than one method of authentication from independent categories of credentials to verify the user’s identity for a login or other transaction. Okta Multi-Factor Authentication is a popular MFA solution and this blog post provides instructions on integrating it with WorkSpaces.
For this blog, we will be leveraging the following technologies:
– Microsoft Active Directory
– Amazon AD Connector Directory Service
– Okta RADIUS Agent Manager
– Okta AD Agent Manager
– Okta account with Administrative privileges
– “Amazon WorkSpaces” Okta App
– Amazon WorkSpaces
Prerequisites
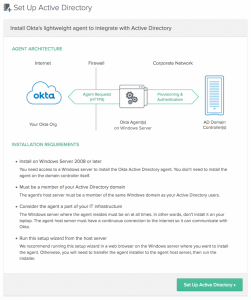
There are several options for providing the Active Directory (AD) component for the solution, including
- Standalone customer-managed cloud-based domain controllers
- AWS Managed AD service
- Extending the on-premise AD with remote domain controllers in AWS
For the purpose of this walkthrough, we will use a remote domain controller built on an Amazon Elastic Compute Cloud (EC2) instance (“InstanceRDC”). We will then use the Okta AD Agent to synchronize the users into the Okta cloud via its “Add Directory” function.
You should also create an Okta Account and your unique site domain at www.Okta.com .
Architecture
The following is a logical diagram of the solution outlining the components relevant to the topic
 Configuration
In this example, we have created a remote domain controller in AWS and named it “InstanceRDC”. A domain controller within the same AWS region as the workspaces can, in many cases, provide an improved end user experience versus traversing a VPN or Direct Connect connection. We have also created a second EC2 instance, “InstanceOkta”, to house the Okta RADIUS Agent and the Okta AD Agent.
Ensure that the Security Group for the domain controller (InstanceRDC) has inbound rules enabling UDP/TCP ports 53 (DNS), 88 (Kerberos), and 389 (LDAP) from the AD Connector and “InstanceOkta”. One technique is to apply a common security group to the AD Connectors and InstanceOkta, then apply rules to the security group of InstanceRDC allowing the appropriate protocols from the security group just referenced.
Visit https://docs.aws.amazon.com/directoryservice/latest/admin-guide/prereq_connector.html to review all requirements for AD Connector setup.
Installing the Okta RADIUS Server Agent on InstanceOkta
After creating InstanceOkta (Windows Server 2012 R2 or 2016), open a web browser to connect to your Okta Account.
- From InstanceOkta, open a web browser to connect to your Okta account
Given the default security configuration of EC2 instances, it may be necessary to modify the IE Enhanced Security Configuration to allow connection to external web sites. Use Server Manager to modify this settings as appropriate. - Go to the Okta Admin console > Settings > Downloads and download the Okta RADIUS Server Agent
Note: Click here for general documentation about Okta RADIUS Agent
- Install the Agent
– Enter a shared secret. ex: BigSecret
Enter the standard RADIUS port number 1812. This must match the port number you will specify in the AWS AD Connector configuration. You should also adjust the security group inbound rules of InstanceOkta to allow this RADIUS communication from the AD Connector.
Notes:
- When creating an AD Connector, the system automatically creates a security group named [directory-id_controllers].
- Create inbound rules in the security group of InstanceOkta for TCP and UDP port 1812 with the source = [Security Group ID of the AD Connector].
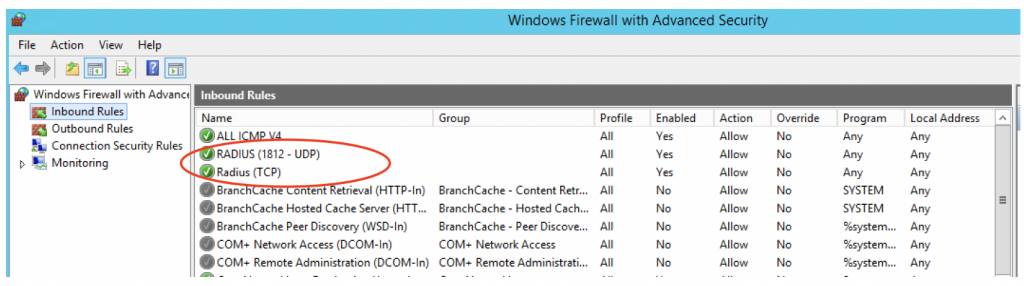
IMPORTANT: You may also need to add similar Inbound rules in the Windows Firewall utility on InstanceOkta:
Configure the Amazon WorkSpaces App in Okta
Log in to your Okta account as an Admin
Go to Applications > Add application

Search for Amazon Workspaces app and click on Add:

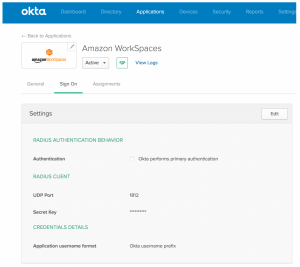
- In the configuration view
– add port: 1812
– secret key = shared secret used in Okta RADIUS agent. ex: BigSecret
– application username format: this depends on your AWS WorkSpace username format. We used Okta username prefix in the example.
– make sure that ‘Okta performs primary authentication’ remains unchecked
Update the AWS directory service (AD Connector) configuration and enable MFA
- In the AWS WorkSpaces console, select Directories, check the box next to your AD Connector and choose Actions > Update Details
- Select enable Multi-Factor Authentication
- RADIUS server IP = the private IP address of InstanceOkta
- Port: 1812
- Shared secret: the one you used in Okta RADIUS agent. ex: BigSecret
- Protocol: PAP
- You should see something similar to the following:
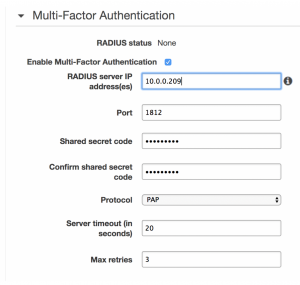
AD Connector config
If your configuration is ok (including Windows firewall settings and AWS security group inbound rules) you should see RADIUS status = completed (typically in less than a minute).
Configure Okta MFA factors and policies for MFA enrollment
In your Okta admin console, you must now configure which authentication tools (factors) you want the end users to be able to use, and when you want them to enroll them.
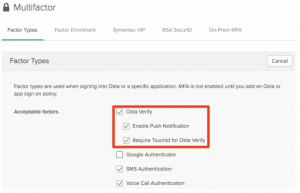
Go to Security > Multifactor:
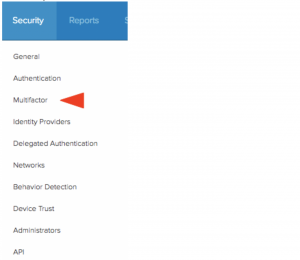
In the Factor Types tab, select which factors you want to make available. Select Okta Verify Push factor:
Then go to Factor Enrollment tab, and click on the Add Multifactor Policy button:
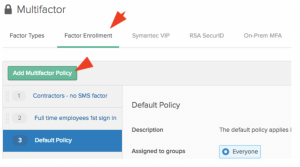
- In the Add Multifactor Policy view, enter a Policy name (ex: ‘Full time employees’)
- Select the groups assigned to that policy (ex: Everyone. Note: you can also select Okta groups or groups imported from Active Directory. See Okta + AD integration), and select the permissible factors. In this example, we will select “Okta Verify – Required’.
- Click on ‘Create Policy’ when you’re done:

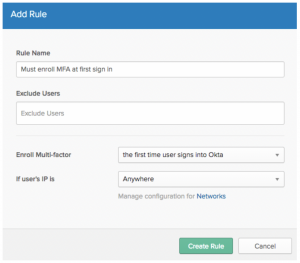
After you have created a policy, you are asked to create a rule. Enter as name “Must enroll MFA at first sign in” and select Enroll Multi-factor “the first time user signs into Okta”. Click on Create Rule to add the rule:
Once created, your policy should look similar to this:

Note: if you already have other policies, you can re-order them using drag&drop:
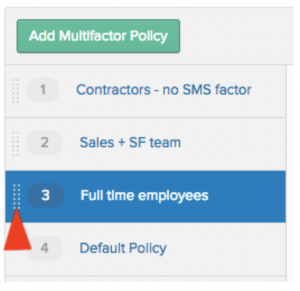
Okta will evaluate policies and rules starting from the 1st position, and stop when a rule matches the user’s context
Provision a test user in Okta
Optional: Use this procedure to add a test user into Okta before integrating Active Directory users
In Okta admin console, go to Directory > People:
Click on “Add Person”:
Enter the information about your new user (Note: you can use a Secondary email to cc your inbox for testing and receive the activation email). Click ‘Save’:

User provisioning from Active Directory
Since your Amazon WorkSpaces users are already managed in Active Directory, you should now configure Okta to import users from AD.
Go to Directory > Directory Integrations. Click on Add Directory and follow the wizard to integrate with AD:
Note: see Okta + AD integration guide
When AD is integrated with Okta, end users can sign into Okta using their AD credentials.
User Experience: Okta MFA enrollment
Once imported, users must be Assigned to the Okta WorkSpaces application and Activated.
Assigning users to the WorkSpaces Application:
In the Okta Admin portal, go to Applications / WorkSpaces and click “Assign” to assign users to the application:
Activating users
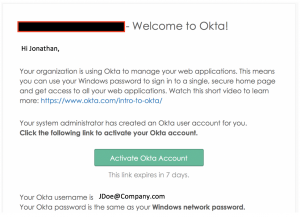
In order to Invite AD users to enroll in Okta MFA, you must “Activate” them within Okta
Go to Directory > People
You should see a list of users from Active Directory. Click on “Activate” for each user or group you want to invite to enroll in Okta.
End users receive an activation link in the inbox similar to this:
Note: you can fully customize the email template from the Okta admin console. Click here for details.
When a user clicks on the activation link, they are presented with an onboarding screen:
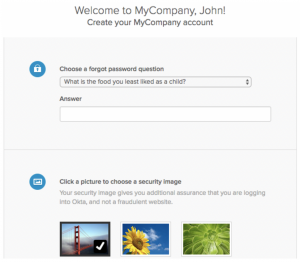
Note: Security question and security image can be turned on/off by Okta admins.
The user is then redirected to the MFA enrollment screen:
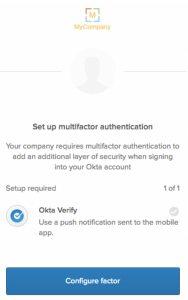
User can click on Configure factor and select a mobile OS:
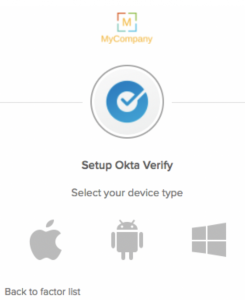
The user downloads the Okta Verify app onto his/her mobile phone, opens the app and scans the barcode displayed on the screen

Okta Verify self-enrollment is complete. The user clicks on Finish.
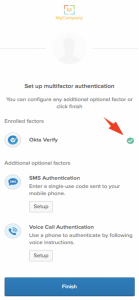
The user is then redirected to the Okta dashboard.
(Optional) Admins can configure an Amazon WorkSpaces bookmark app assigned to users that would redirect them to the Workspaces Web Access portal:

User Experience: AWS WorkSpaces + Okta MFA
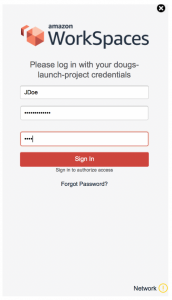
Once Okta MFA is configured in the Directory Service (AD Connector in this case), the MFA Code field is presented at login. After successfully completing the enrollment process, users can login using two methods:
- The user enters the appropriate 6-digit One-Time-Passcode as displayed by the Okta Verify app
- The user keys in “push” as the MFA Code and he receives a push notification on the mobile device where he can authorize or reject the sign-in attempt.
So there you have it. You have successfully integrated Okta Multi-factor Authentication with Amazon WorkSpaces!
– Doug Martin, Sr. End-user Computing Customer Success Manager