Desktop and Application Streaming
Use Microsoft Entra MFA and Microsoft Network Policy Server (NPS) for multi-factor authentication with Amazon WorkSpaces
April 21, 2024: This blog post was originally written by Justin Stokes. It has been substantially updated by Michael Spence to reflect changes in Microsoft services.
Amazon WorkSpaces offers several options to secure access to your WorkSpaces. This includes working with your RADIUS infrastructure to provide multi-factor authentication (MFA). With the deprecation of Azure MFA server, customers that wish to use Entra (formerly Azure AD) MFA now need to deploy a Network Policy Server (NPS). The types of tokens in use, the configuration for NPS, and your AWS Directory Service may all differ.
Overview
While authentication methods such as SMS (text) and phone call are still supported, many organizations disable these authentication methods in favor of the Microsoft Authenticator App. This authentication method makes use of a push token. There are two options for WorkSpaces multi-factor configuration using the AWS Directory Service AD Connector with the NPS extension for Entra MFA (PAP or MS-CHAPv2). The choice of protocols will dictate the authentication behavior with the WorkSpaces client. Figure 1 illustrates the basic architecture on the AWS Cloud.
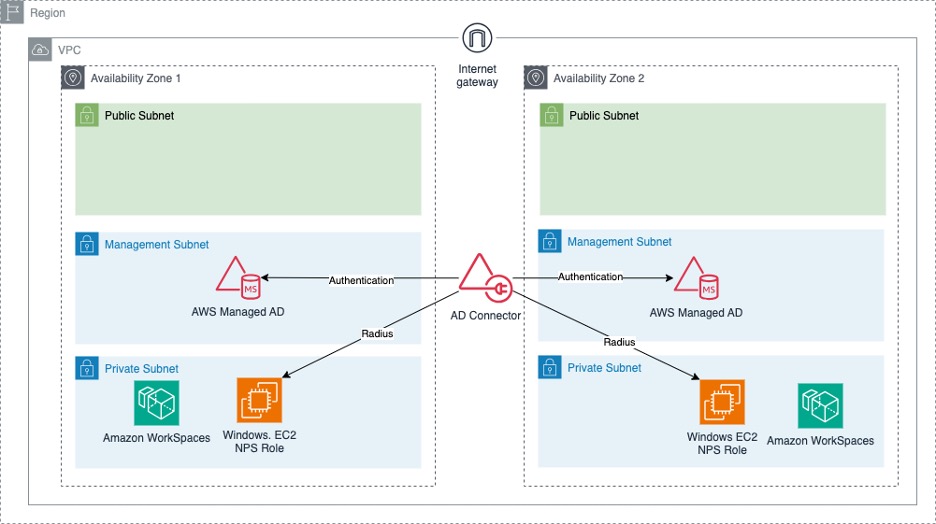
Figure 1 – Architecture Overview
Prerequisites
To complete the steps in the post, you need the following:
- An AWS environment with WorkSpaces configured.
- A Windows Server with the Network Policy and Access Services role installed.
- An AWS Directory Service AD Connector.
- An AD group that contains your WorkSpaces users. This group will be used to allow access to NPS and in your Azure console to assign an MFA license to the user.
- An Azure account with Microsoft Entra ID.
- Microsoft Entra Connect deployed and configured.
- Microsoft Entra ID P1 and Premium P2 or Enterprise Mobility + Security licenses assigned to your users.
- The latest version of the NPS Extension for Entra MFA.
- The Microsoft Authenticator mobile app or physical MFA tokens for your users. SMS based codes are not supported at this time.
In this post, I assume NPS has been configured to work with Azure using the NPS Extension. If you have not yet configured this, more information about NPS configuration with Entra multi-factor authentication can be found the Microsoft Entra ID documentation.
Walkthrough
Step 1: Gather Active Directory Connector details
- Browse to the WorkSpaces console.
- Select Directories on the left menu.
- Click the Directory ID you are configuring for Entra MFA.
- Make note of the directory IP addresses.
- Make note of the Directory ID.
Step 2: Configure NPS clients
Now, configure two RADIUS clients in NPS corresponding to the two endpoints for your AWS Directory (Figure 2).
- Create NPS shared secret and store it securely.
- Connect to your NPS Server and open the Network Policy Server app from the Start Menu.
- Expand RADIUS Clients and Servers.
- Open the context menu (right-click) for RADIUS Clients and select New.
- Provide a friendly name.
- Enter the first IP address from Step 1: item 4.
- Select the Manual radio dialog, enter the shared secret created earlier and select OK.
- Repeat Steps 4 through 6 to create a second RADIUS client.
- Provide the second IP from Step 1: item 4.
- Enter the same shared secret.
- Make note of the IP address of your NPS server.
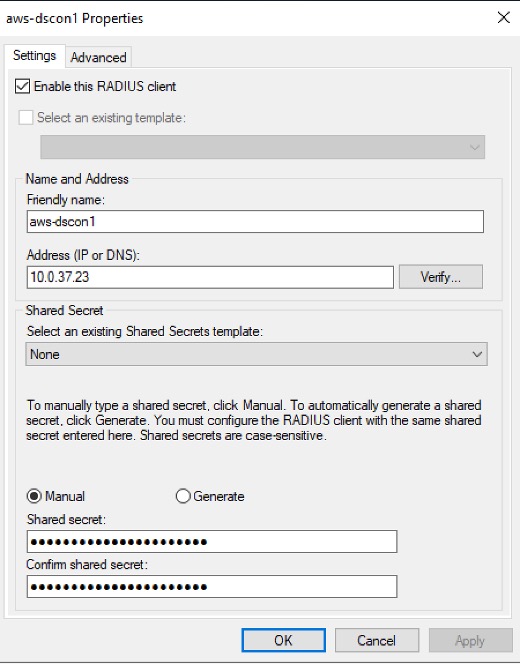
Figure 2 – New RADIUS client
When finished, you will have two clients (Figure 3), one for each endpoint of your AD Connector.
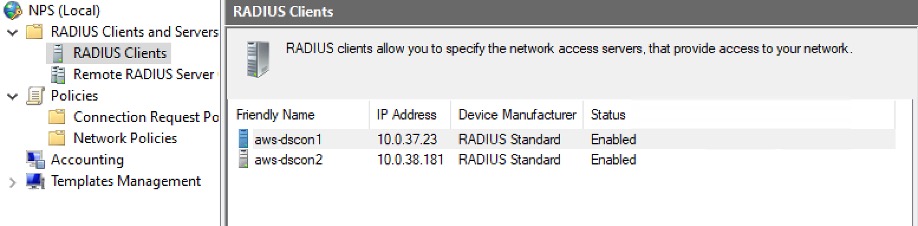
Figure 3 – WorkSpaces RADIUS clients
Step 3: Configure NPS Connection Request Policy
It is important to note that the PAP Protocol is not encrypted. Enabling PAP in NPS results in a warning to inform you it is insecure. For this reason, when using PAP, configure NPS to validate only the RADIUS request. This prevents users’ passwords from being sent insecurely.
The Entra MFA NPS Extension supports the PAP protocol with all authentication methods and CHAPV2 with Phone Calls and Mobile App Verification.
To create the NPS connection request policy, perform the following:
-
- Open the NPS management console.
- Open the context menu (right-click) for Policies and select New.
- Provide a policy name, select Next, and Add.
- Select Client IPv4 Address.
- Enter a pattern that will match both the IPv4 addresses from Step 1 (Figure 4).
For example:(^10\.0\.37\.23)|(^10\.0\.38\.181) - Select Next, and select Accept users without validating credentials.
- Select Next, Next, and Finish.
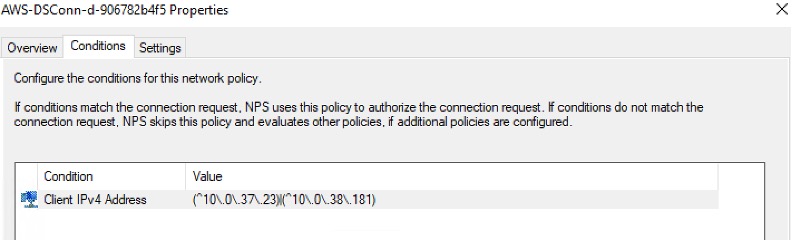
Figure 4 – Network request policy conditions
Step 4: Create a Network Policy
In this step, create a network policy to limit specific users to use the NPS server. You will use the AD group created in the prerequisites. See your NPS administrator for the proper authentication method to choose for your organization.
- In the NPS Console, open the context (right-click) menu for Network Policies.
- Select Next and then Add.
- Select New and give the policy a name.
- Select Next and then Add.
- Select User Groups and then Add.
- Select Add Groups, select any groups you want to allow access, and select OK.
- Select OK and then Next.
- Ensure Access Granted is selected and select Next.
- In the Configure Authentication Methods select either MS-CHAP-v2 or PAP (Figure 5).
- Select Next through the remaining pages and select Finish.
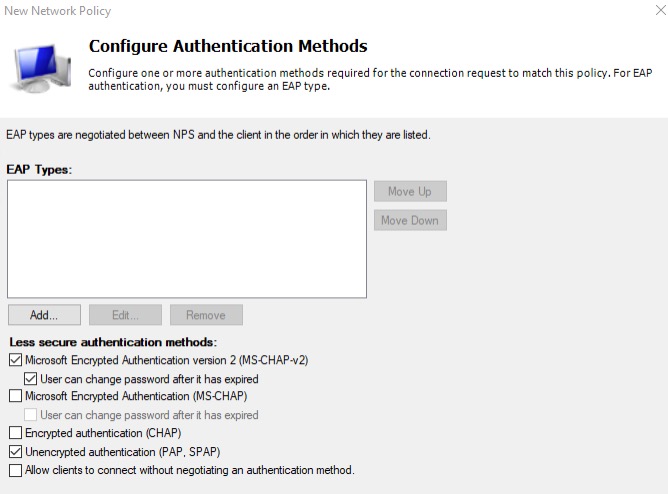
Figure 5 – Configure authentication methods
Step 5: Configure your AD Connector
Now that the NPS configuration is completed, configure the AD Connector to use it as a RADIUS server.
- Go to the WorkSpaces console.
- On the left menu, choose Directories and select the directory you are configuring.
- Select the Actions button and Update Details.
- Expand Multi-Factor Authentication.
- Enter the RADIUS server IPv4 Address from Step 2: item 11.
- Enter the shared secret from Step 2: part 1.
- Enter the shared secret a second time to confirm.
- Set the protocol to PAP or MS-CHAPv2.
- Set the server timeout for 30 seconds (maximum 50).
- Set the Max RADIUS request retries to 3 (maximum 10).
- Select Submit.
After selecting Submit, the status for multi-factor will change to Creating. Once successfully configured, the status will change to Completed.
Choosing the authentication protocol
Beginning May 8, 2023, Microsoft enabled number matching for all authenticator push notifications. This is typically seen in a browser-based authentication challenge where a number is displayed on the web page. The user will see a notification in the authenticator app and asked to verify the number shown on the screen. This type of number matching is not currently supported with the WorkSpaces client. In this post, I will discuss the changes required on the NPS server to support either an Approve/Deny push notification or a time-based one-time password (TOTP) to provide MFA for WorkSpaces.
More information about number matching and the impact to the NPS extension can be found in the Microsoft Entra ID documentation.
If you choose the PAP protocol, the following changes are required.
- On the NPS server, open the Registry Editor.
- Navigate to
HKLM\SOFTWARE\Microsoft\AzureMfa. - Create the following String/Value pair:
- Name:
OVERRIDE_NUMBER_MATCHING_WITH_OTP - Value:
TRUE
- Name:
- Restart the NPS service.
In this configuration, WorkSpaces users will enter their username, their password and in the MFA Code field enter the six-digit TOTP displayed in their authenticator application for their Microsoft Entra ID (Figure 6).
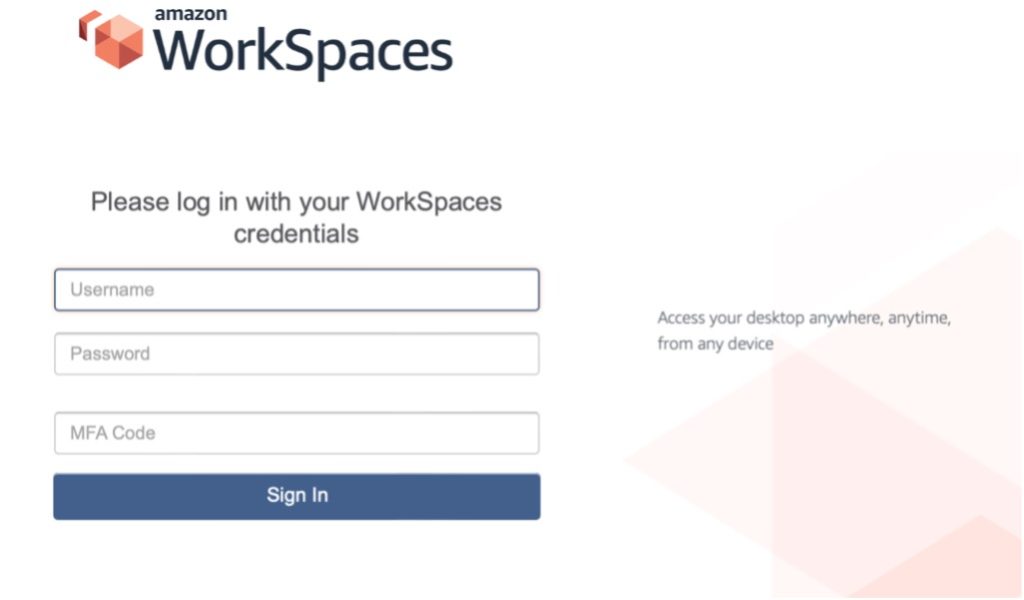
Figure 6 – WorkSpaces client
If you choose the MS-CHAPv2 protocol, the following changes are required.
- On the NPS server, open the Registry Editor.
- Navigate to
HKLM\SOFTWARE\Microsoft\AzureMfa. - Create the following String/Value pair:
- Name:
OVERRIDE_NUMBER_MATCHING_WITH_OTP - Value:
FALSE
- Name:
- Restart the NPS service.
In this configuration, the WorkSpaces user will enter their username, their password, and in the MFA Code field enter their password a second time (Figure 6). This will result in an Approve/Deny push notification.
Cleanup
To avoid ongoing charges to your AWS account, please delete any resources created in following this post.
Conclusion
With your Network Policy Server configured as described, you can now use Entra MFA to provide an additional factor for your Workspace users. With MFA, your organization’s security is enhanced by requiring identification beyond just a username and password.
 |
Michael is a Senior Solutions Architect based out of Tennessee. He has extensive experience in enterprise cloud migrations. He is currently working with AWS partners in the WWPS focused on migrations. He has a Master of Science degree in Software Engineering from East Tenn. State University and believes in quote: “The most damaging phrase in the language is ‘We’ve always done it this way’.” – Adm. Grace Hopper |