AWS Developer Tools Blog
Announcing the AWS Tools for Microsoft Visual Studio Team Services
Today Amazon Web Services announced the AWS Tools for Microsoft Visual Studio Team Services (VSTS). The tools are free to use and are distributed in the Visual Studio Marketplace. You can use these tasks in build and release pipelines hosted within VSTS and Team Foundation Server to interact with AWS services. For example, you can use tasks to copy content to and from Amazon S3 buckets, or add tasks into your pipelines to deploy build outputs to AWS Elastic Beanstalk, AWS CodeDeploy and AWS Lambda. The tools are also open source and can be found on GitHub.
In this post, we are going to take a look at how to install the tools, provide an overview of the tasks they contain, and then walk through a simple scenario to validate setup and show how easy they are to use. In subsequent posts we will dive deeper into the tasks and how you might use them in your VSTS pipelines.
Installation
Installing the AWS Tools for Microsoft Visual Studio Team Services is quick and easy! First visit the Visual Studio Marketplace. As shown below, you have two options for installing the tools. You can install them into your online VSTS account, or download the tools and install them into an on-premises Team Foundation Server instance.

That’s all there is to it! The tasks in the extension are now available for use in your account or on-premises instance, so let’s do a quick review of the tasks provided in this initial release. As mentioned earlier, subsequent posts will take a deeper dive into some of these tasks.
- AWS CloudFormation Create/Update Stack. This task enables you to create or update a stack in AWS CloudFormation by using a template file and an optional parameters file. The task switches automatically between updating an existing stack or creating a new stack, depending on whether the stack already exists. You don’t need to select a “mode”, which makes this task convenient to use in pipelines. In addition to choosing the template and parameters file, you can elect to use a change set to create or update the stack, with the added option to automatically execute the change set (if it validates successfully). Or you can use the Execute Change Set task to execute the validated change set at a later time.
- AWS CloudFormation Delete Stack. This task deletes a stack identified by name or ID. You might use it to clean up development or test environment stacks after a new, fresh deployment in a tear-down-and-rebuild scenario.
- AWS CloudFormation Execute Change Set. As we said earlier, the Create/Update Stack task gives you the option to perform changes using a change set and, if the set validates, to execute the changes immediately or by using this task at a later time. You provide the name of the change set and the associated stack and the task does the rest, waiting for the stack to reach create or update complete status.
- AWS Elastic Beanstalk Deployment. With this task you can deploy traditional ASP.NET applications using WebDeploy archives or deploy ASP.NET Core applications.
- AWS Lambda .NET Core Deployment. This task enables deployment of standalone functions or serverless applications to AWS Lambda. The task uses the same dotnet CLI extensions as the AWS Visual Studio Toolkit, so you have the full customization capabilities of the command line tool switches available within the task.
- AWS Lambda Invoke Function. In addition to deploying to AWS Lambda, you use this task to trigger Lambda functions to run from within your pipeline. The results of the function can be emitted into a variable for subsequent tasks in your pipeline to consume.
- AWS S3 Download. Using a combination of bucket name and optional key prefix, this task uses a set of one or more globbing patterns to enable the download of content from an Amazon S3 bucket into your pipeline’s working folders. For example, you can use this to inject custom static content into a build.
- AWS S3 Upload. Similarly to the S3 download task, this task takes a bucket name and set of globbing patterns to be run in a source folder to upload content from the pipeline’s working folders to a bucket.
- AWS Tools for Windows PowerShell Script. This task enables you to run scripts that use cmdlets from the Tools for Windows PowerShell (AWSPowerShell) module, optionally installing the module before the script runs.
- AWS CLI. This task enables you to run individual AWS CLI commands. However, you must have already installed the AWS CLI into the build host.
Configuring and Using a Task
Now that you know a little about the tasks contained in the release, let’s quickly walk through how you might use the AWS S3 Upload task in a pipeline. This also enables you to validate setup of the tools and show how credentials are handled for the tasks.
For this walkthrough, note that we assume you have an existing build or release definition that fetches artifacts to build and/or deploy. We’re simply adding the new task to the end of the pipeline, and configuring it to upload the built or deployable artifacts to an S3 bucket. Go ahead and select the build definition you want to use, or create a new one. When you’ve chosen the definition or created one, select the option to edit the definition.
In the following example screenshot, we’ve chosen to create a new build definition for an ASP.NET Core project. The tasks listed are the assigned defaults.

1. Add the S3 Upload Task to the pipeline
For this walkthrough, we want to capture the build output produced by the Publish task and upload it to Amazon S3. Therefore, we insert our new task between the existing Publish task and Publish Artifacts task. To do this, choose Add Task. In the panel on the right, scroll through the available tasks until you see the AWS tasks, specifically AWS S3 Upload. Choose Add to add it to our build definition.

If the new task isn’t added immediately after the Publish task, drag it into position. Then we can start to configure it.

2. Configure Task Credentials
Tasks that make requests of AWS services such as Amazon S3 need to have credentials configured. In Team Systems terminology, these are known as service endpoints. The AWS tasks provide a service endpoint type named AWS to enable you to provide credentials. To quickly add credentials for this task, click the “+” icon to the right of the AWS Credentials box.

Clicking the gear icon opens a new browser page in a tab, where you can manage all your service endpoints (including the new AWS type). You might do this if you want to set up multiple sets of AWS credentials for your tasks to use.
Having clicked the “+” icon, a pop-up window appears in which we can enter our AWS keys.

If you’re accustomed to using any of the AWS SDKs or tools, such as the AWS CLI or AWS modules for PowerShell, the options here might look familiar. Just as in those SDKs and tools, we are essentially constructing an AWS credential profile. Profiles have names, in this case the value entered for Connection name, which we use to refer to this set of credentials in our task configuration. Go ahead and enter the access key and secret keys for the credentials you want to use, assign a name that you will remember, and then click OK to save them. The pop-up will close and return us to the S3 Upload task configuration with our new credentials preselected.

You can reuse the credentials you entered in other tasks. Simply select the name you used to identify the credentials in the AWS Credentials list for the task you are configuring.
Note
We do not recommend that you use your account’s root credentials. Instead, create one or more IAM users, and then use those credentials. For more information, see Best Practices for Managing AWS Access Keys.
3. Configure Task Options
With credentials configured and selected, we can now complete the task configuration.
- Set the region in which the bucket exists (or will be created in), for example, us-east-1, us-west-2, etc.
- Enter the name of the bucket (bucket names must be globally unique).
- The Source Folder points to a folder in your build area that contains the content to upload. Team Services provides several variables, detailed here, that you can use to avoid hard-coded paths. For this walkthrough, we choose to use the variable Build.ArtifactStagingDirectory, which is defined as …the local path on the agent where artifacts are copied to before being pushed to their destination. Perfect!
- Filename Patterns can contain one or more globbing patterns used to select files under the Source Folder for upload. The default value shown here selects all files recursively. You can specify multiple patterns, one per line. For this walkthrough, the preceding task (Publish) emits a zip file containing the build. This is the file that will be uploaded.
- Target Folder is the key prefix in the bucket that will be applied to all of the uploaded files. You can think of this like a folder path. If no value is given, the files are uploaded to the root of the bucket. By default, the relative folder hierarchy is preserved.
- Finally, there are additional options you can set:
- Create S3 bucket if it does not exist. The task will fail if the bucket cannot be created.
- Overwrite (in the Advanced section). This is selected by default.
- Flatten folders (in the Advanced section). This removes the path of each file relative to the Source Folder and places all files directly into the Target Folder.
4. Run the Build
With the new task configured, we’re ready to run our build. Choose Save & queue.

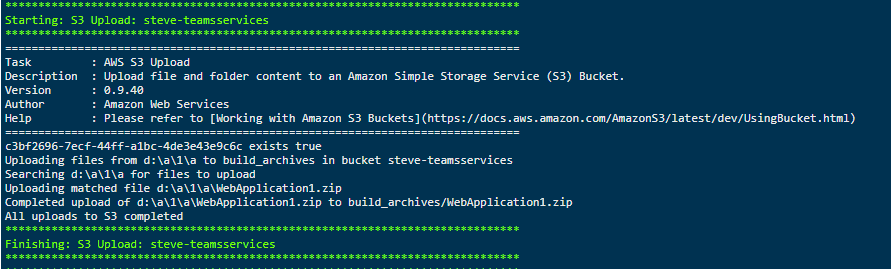
During the build, the task outputs messages to the log.
Wrap
As you can see, using the new tasks is simple. In future posts, we’ll give more details about some of the deployment tasks and how you can use them. We hope you’re as excited as we are by the launch of the new tools, and that you find them useful in your VSTS environments. Be sure to provide feedback in the GitHub repo to guide future development!
Acknowledgements
We’d like to acknowledge the assistance of the Visual Studio ALM Rangers for their help and support in bringing these new tools to the Visual Studio Marketplace.