To test their Windows applications, developers typically need a test environment that closely mimics the target production environment. Aspects common to Windows test environments include a network, an Active Directory deployment, a Microsoft SQL Server deployment, a Microsoft Exchange Server deployment, a Microsoft SharePoint deployment, and other common Microsoft workloads.
While AWS customers can build Microsoft test environments on AWS manually, they can save significant time by using existing Microsoft Quick Starts as nested stacks. That automates much of the deployment and frees developers to work on application development.
| About this blog post |
| Time to read |
10 minutes |
| Time to complete |
25 minutes (not including deployment) |
| Cost to complete |
~ $10
|
| Learning level |
Intermediate (200) |
| AWS services |
Amazon Virtual Private Cloud (Amazon VPC)
AWS CloudFormation
Amazon S3
Amazon EC2
AWS Systems Manager |
Overview of the Microsoft workload solution
AWS Quick Starts include automated deployments of popular Microsoft workloads built by AWS solutions architects. The underlying AWS CloudFormation templates are stored in public GitHub repositories and can be used as AWS CloudFormation submodules. A Windows application developer who wants to deploy a test environment can place a CloudFormation template in a GitHub repository, use the git submodule add command to add the required Quick Start repositories as submodules, and then reference the submodules in their CloudFormation templates.
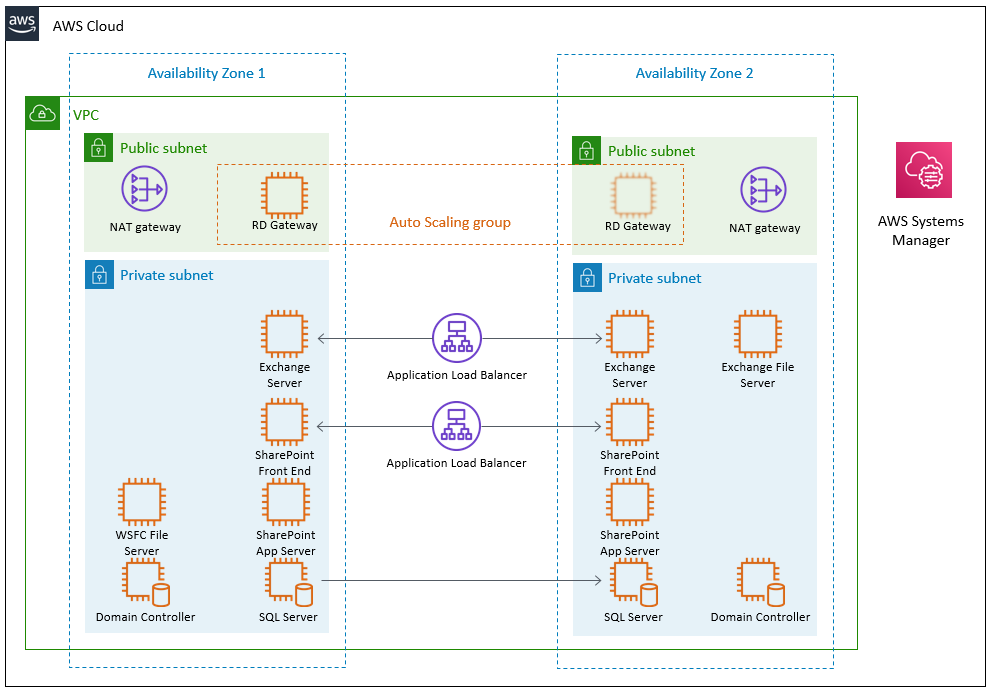
The following diagram shows the AWS resources that are deployed by this CloudFormation template.
Prerequisites
For this walkthrough, you need the following prerequisites:
- An AWS account
- An EC2 key pair
- A GitHub account
- Basic knowledge of common Microsoft workloads
- Basic knowledge of CloudFormation templates
- A copy of the SharePoint 2019 installation media in .ZIP format (optional)
Note: this blog post assumes that the reader is familiar with CloudFormation templates and parameters. For more information, see the AWS documentation for CloudFormation templates, Parameters, ParameterGroup, and ParameterLabel.
Walkthrough for deploying the nested Microsoft workload stacks
This walkthrough describes the steps to deploy a full Windows test stack:
- A VPC with public and private subnets
- A redundant Active Directory environment with two domain controllers
- A redundant SQL environment with an AlwaysOn Availability Group and database replication
- A redundant SharePoint environment that uses the SQL environment for its databases
- A redundant Exchange environment
- An AWS Auto Scaling group with Remote Desktop Gateway for remote access to the environment
When deploying Windows environments on AWS, customers can deploy only those Quick Starts that are relevant to their workloads. (See the AWS CloudFormation documentation to learn how conditions can be used to select only certain submodules during deployment.) The Quick Starts used for this walkthrough have been selected because they are common deployments.
The following steps describe how to deploy this sample Microsoft test environment stack:
- Create a GitHub repository
- Clone the GitHub repository to a development workstation and create
templates and submodules subdirectories.
- Create a template file in the
templates subdirectory.
- Navigate to the
submodules subdirectory and use git submodule add to incorporate the various Microsoft submodules.
- Create parameters, parameter groups, and parameter labels.
- Incorporate the various Microsoft Quick Start submodules as nested stacks.
- Upload all templates and SharePoint 2019 installation media to an S3 bucket.
- Launch the stack.
The Quick Start GitHub repositories can be found at the following links:
You can find the completed version of this walkthrough at https://github.com/aws-quickstart/msft-nested-example.
Step 1: Create a GitHub repository
- Navigate to your GitHub account (https://github.com/<accountname>).
- In the Repositories pane, choose New to create a new repository. For the purpose of this blog post, I use the name
msft-nested-example, but the repository can be named anything within the GitHub guidelines. Make sure to select the check box to Initialize this repository with a README.
Step 2: Clone the GitHub repository to a development workstation and create subdirectories
- Use the Clone or download link to clone the repository to your workstation or other development environment (IDE); e.g., Amazon WorkSpaces.
git clone https://github.com/<accountname>/msft-nested-example.git
- In your IDE, navigate to the cloned repository, and create submodules and templates subdirectories.
cd ./msft-nested-example
mkdir submodules
mkdir templates
Step 3: Create a template file in the templates subdirectory
- Use your IDE to create a new template file (in this example, I call it
msft.template) in the templates subdirectory.
Step 4: Incorporate the Microsoft Quick Start submodules
- Navigate to the
submodules directory.
- Add the VPC, Active Directory, Microsoft SQL, SharePoint, Exchange, and Remote Desktop Gateway submodules.
git submodule add https://github.com/aws-quickstart/quickstart-aws-vpc.git
git submodule add https://github.com/aws-quickstart/quickstart-microsoft-activedirectory.git
git submodule add https://github.com/aws-quickstart/quickstart-microsoft-sql.git
git submodule add https://github.com/aws-quickstart/quickstart-microsoft-sharepoint.git
git submodule add https://github.com/aws-quickstart/quickstart-microsoft-exchange.git
git submodule add https://github.com/aws-quickstart/quickstart-microsoft-rdgateway.git
- Initialize the submodules (download their contents and the contents of their respective submodules).
git submodule update --init --recursive
Step 5: Create parameters
- Open the AWS CloudFormation file in the templates subdirectory that was created in step 3.
- Define following parameter groups and parameters.
AWSTemplateFormatVersion: '2010-09-09'
Description: 'This template is an example of nested Microsoft Quick Starts'
Metadata:
  AWS::CloudFormation::Interface:
    ParameterGroups:
      - Label:
          default: Network configuration
        Parameters:
          - KeyPairName
          - AvailabilityZones
      - Label:
          default: Microsoft Active Directory configuration
        Parameters:
          - DomainAdminUser
          - DomainAdminPassword
          - DomainDNSName
          - DomainNetBIOSName
      - Label:
          default: Microsoft SQL Server configuration
        Parameters:
          - SQLServiceAccount
          - SQLServiceAccountPassword
          - AvailabiltyGroupName
      - Label:
          default: Microsoft SharePoint configuration
        Parameters:
          - SPBinaryBucket
          - SPBinaryKey
          - SPProductKey
      - Label:
          default: Microsoft Exchange configuration
        Parameters:
          - ExchangeNode1PrivateIP1
          - ExchangeNode1PrivateIP2
          - ExchangeNode2PrivateIP1
          - ExchangeNode2PrivateIP2
          - FileServerPrivateIP
      - Label:
          default: Microsoft Remote Desktop Gateway configuration
        Parameters:
          - NumberOfRDGWHosts
          - RDGWCIDR
      - Label:
          default: S3 Bucket Configuration
        Parameters:
          - S3BucketName
          - S3KeyPrefix
This example uses the default values for many parameters, including the Exchange Server version, server hostnames, instance types, and others. To create a more customized environment, you can include these parameters.
- To make the AWS CloudFormation launch page more readable, add parameter labels.
    ParameterLabels:
      AvailabiltyGroupName:
        default: Availability group name
      AvailabilityZones:
        default: Availability Zones
      DomainAdminPassword:
        default: Domain admin password
      DomainAdminUser:
        default: Domain admin user name
      DomainDNSName:
        default: Domain DNS name
      DomainNetBIOSName:
        default: Domain NetBIOS name
      ExchangeNode1PrivateIP1:
        default: Exchange Node 1 private IP address 1
      ExchangeNode1PrivateIP2:
        default: Exchange Node 1 private IP address 2
      ExchangeNode2PrivateIP1:
        default: Exchange Node 2 private IP address 1
      ExchangeNode2PrivateIP2:
        default: Exchange Node 2 private IP address 2
      FileServerPrivateIP:
        default: File Server private IP address
      KeyPairName:
        default: Key pair mame
      NumberOfRDGWHosts:
        default: Number of RD Gateway hosts
      RDGWCIDR:
        default: Allowed RD Gateway external access CIDR
      S3BucketName:
        default: S3 bucket name
      S3KeyPrefix:
        default: S3 key prefix
      SPBinaryBucket:
        default: SharePoint binary bucket
      SPBinaryKey:
        default: SharePoint binary key
      SPProductKey:
        default: SharePoint product key
      SQLServiceAccount:
        default: Service account name
      SQLServiceAccountPassword:
        default: Service account password
- Finally, within the template, describe all of the parameters, including character constraints and default values.
Parameters:
  AvailabiltyGroupName:
    AllowedPattern: '[a-zA-Z0-9\-]+'
    Default: "SQLAG1"
    Description: "NetBIOS name of the SQL database or availability group (up to 15 characters)."
    MaxLength: '15'
    MinLength: '1'
    Type: "String"
  AvailabilityZones:
    Description: 'List of Availability Zones to use for the subnets in the VPC. Only two Availability Zones are used for this deployment, and the logical order is preserved.'
    Type: List<AWS::EC2::AvailabilityZone::Name>
  DomainAdminPassword:
    AllowedPattern: (?=^.{6,255}$)((?=.*\d)(?=.*[A-Z])(?=.*[a-z])|(?=.*\d)(?=.*[^A-Za-z0-9])(?=.*[a-z])|(?=.*[^A-Za-z0-9])(?=.*[A-Z])(?=.*[a-z])|(?=.*\d)(?=.*[A-Z])(?=.*[^A-Za-z0-9]))^.*
    Description: Password for the domain admin user. Must be at least 8 characters
      and contain letters, numbers, and symbols.
    MaxLength: '32'
    MinLength: '8'
    NoEcho: 'true'
    Type: String
  DomainAdminUser:
    AllowedPattern: '[a-zA-Z0-9]*'
    Default: Admin
    Description: User name for the account that will be added as Domain Administrator.
      This is separate from the default Administrator account.
    MaxLength: '25'
    MinLength: '5'
    Type: String
  DomainDNSName:
    AllowedPattern: '[a-zA-Z0-9\-]+\..+'
    Default: example.com
    Description: Fully qualified domain name (FQDN) of the forest root domain.
    MaxLength: '25'
    MinLength: '2'
    Type: String
  DomainNetBIOSName:
    AllowedPattern: '[a-zA-Z0-9]+'
    Default: example
    Description: NetBIOS name of the domain (up to 15 characters) for users of earlier
      versions of Windows.
    MaxLength: '15'
    MinLength: '1'
    Type: String
  ExchangeNode1PrivateIP1:
    AllowedPattern: ^(([0-9]|[1-9][0-9]|1[0-9]{2}|2[0-4][0-9]|25[0-5])\.){3}([0-9]|[1-9][0-9]|1[0-9]{2}|2[0-4][0-9]|25[0-5])$
    Default: 10.0.0.110
    Description: The primary private IP for Exchange node 1.
    Type: String
  ExchangeNode1PrivateIP2:
    AllowedPattern: ^(([0-9]|[1-9][0-9]|1[0-9]{2}|2[0-4][0-9]|25[0-5])\.){3}([0-9]|[1-9][0-9]|1[0-9]{2}|2[0-4][0-9]|25[0-5])$
    Default: 10.0.0.111
    Description: The secondary private IP for Exchange node 1.
    Type: String
  ExchangeNode2PrivateIP1:
    AllowedPattern: ^(([0-9]|[1-9][0-9]|1[0-9]{2}|2[0-4][0-9]|25[0-5])\.){3}([0-9]|[1-9][0-9]|1[0-9]{2}|2[0-4][0-9]|25[0-5])$
    Default: 10.0.32.110
    Description: The primary private IP for Exchange node 2.
    Type: String
  ExchangeNode2PrivateIP2:
    AllowedPattern: ^(([0-9]|[1-9][0-9]|1[0-9]{2}|2[0-4][0-9]|25[0-5])\.){3}([0-9]|[1-9][0-9]|1[0-9]{2}|2[0-4][0-9]|25[0-5])$
    Default: 10.0.32.111
    Description: The secondary private IP for Exchange node 2.
    Type: String
  FileServerPrivateIP:
    AllowedPattern: ^(([0-9]|[1-9][0-9]|1[0-9]{2}|2[0-4][0-9]|25[0-5])\.){3}([0-9]|[1-9][0-9]|1[0-9]{2}|2[0-4][0-9]|25[0-5])$
    Default: 10.0.0.210
    Description: The primary private IP for the file-share witness server.
    Type: String
  KeyPairName:
    Description: Public/private key pair that allows you to securely connect to your instance
      after it launches.
    Type: AWS::EC2::KeyPair::KeyName
  NumberOfRDGWHosts:
    AllowedValues:
      - '1'
      - '2'
      - '3'
      - '4'
    Default: '1'
    Description: The number of RD Gateway hosts to create (up to four).
    Type: String
  RDGWCIDR:
    AllowedPattern: ^(([0-9]|[1-9][0-9]|1[0-9]{2}|2[0-4][0-9]|25[0-5])\.){3}([0-9]|[1-9][0-9]|1[0-9]{2}|2[0-4][0-9]|25[0-5])(\/([0-9]|[1-2][0-9]|3[0-2]))$
    ConstraintDescription: CIDR block parameter must be in the form x.x.x.x/x
    Description: Allowed CIDR block for external access to the RD Gateway hosts.
    Type: String
  S3BucketName:
    AllowedPattern: ^[0-9a-zA-Z]+([0-9a-zA-Z-]*[0-9a-zA-Z])*$
    ConstraintDescription: S3 bucket name can include numbers, lowercase
      letters, uppercase letters, and hyphens (-). It cannot start or end with a hyphen
      (-).
    Description: S3 bucket name for the assets. S3 bucket name
      can include numbers, lowercase letters, uppercase letters, and hyphens (-).
      It cannot start or end with a hyphen (-).
    Type: String
  S3KeyPrefix:
    AllowedPattern: ^[0-9a-zA-Z-/]*$
    ConstraintDescription: S3 key prefix can include numbers, lowercase letters,
      uppercase letters, hyphens (-), and forward slash (/).
    Description: S3 key prefix for the assets. S3 key prefix
      can include numbers, lowercase letters, uppercase letters, hyphens (-), and
      forward slash (/).
    Type: String
  SPBinaryBucket:
    Type: String
    MinLength: 2
    MaxLength: 255
  SPBinaryKey:
    Type: String
    MinLength: 2
    MaxLength: 255
  SPProductKey:
    Type: String
    Description: The product key to use with SharePoint.
    MinLength: 29
    MaxLength: 29
    Default: M692G-8N2JP-GG8B2-2W2P7-YY7J6 # Default SharePoint 2019 Enterprise Trial Key
  SQLServiceAccount:
    AllowedPattern: '[a-zA-Z0-9]*'
    Default: sqlsa
    Description: User name for the SQL Server service account. This account is a Domain
      User.
    MaxLength: '25'
    MinLength: '5'
    Type: String
  SQLServiceAccountPassword:
    AllowedPattern: (?=^.{6,255}$)((?=.*\d)(?=.*[A-Z])(?=.*[a-z])|(?=.*\d)(?=.*[^A-Za-z0-9])(?=.*[a-z])|(?=.*[^A-Za-z0-9])(?=.*[A-Z])(?=.*[a-z])|(?=.*\d)(?=.*[A-Z])(?=.*[^A-Za-z0-9]))^.*
    Description: Password for the SQL Server service account. Must be at least 8 characters
      and contain letters, numbers, and symbols.
    MaxLength: '32'
    MinLength: '8'
    NoEcho: 'true'
    Type: String
Step 6: Incorporate Quick Starts as nested stacks
In the Resources section of the template, you can add the various Quick Start submodules as AWS CloudFormation stacks. The outputs from deployed stacks can be passed as parameters to subsequent stacks. For instance, when launching the Microsoft stacks, the VPCID parameter can be extracted from the output of the VPC stack (VPCStack.Outputs.VPCID).
- Add the VPC stack.
Resources:
  VPCStack:
    Type: AWS::CloudFormation::Stack
    Properties:
      TemplateURL: !Sub https://${S3BucketName}.s3.amazonaws.com/${S3KeyPrefix}submodules/quickstart-aws-vpc/templates/aws-vpc.template
      Parameters:
        AvailabilityZones: !Join
          - ','
          - !Ref 'AvailabilityZones'
        KeyPairName: !Ref 'KeyPairName'
        NumberOfAZs: '2'
- Add the Active Directory stack.By setting the
DependsOn attribute to the VPC stack, you can ensure that the Active Directory stack will not deploy until the VPC stack is complete.
  ADStack:
    Type: AWS::CloudFormation::Stack
    DependsOn: VPCStack
    Properties:
      TemplateURL: !Sub https://${S3BucketName}.s3.amazonaws.com/${S3KeyPrefix}submodules/quickstart-microsoft-activedirectory/templates/ad-1.template
      Parameters:
        DomainAdminPassword: !Ref 'DomainAdminPassword'
        DomainAdminUser: !Ref 'DomainAdminUser'
        DomainDNSName: !Ref 'DomainDNSName'
        DomainNetBIOSName: !Ref 'DomainNetBIOSName'
        KeyPairName: !Ref 'KeyPairName'
        PrivateSubnet1ID: !GetAtt 'VPCStack.Outputs.PrivateSubnet1AID'
        PrivateSubnet2ID: !GetAtt 'VPCStack.Outputs.PrivateSubnet2AID'
        VPCID: !GetAtt 'VPCStack.Outputs.VPCID'
        QSS3BucketName: !Ref 'S3BucketName'
        QSS3KeyPrefix: !Sub '${S3KeyPrefix}submodules/quickstart-microsoft-activedirectory/'
        VPCCIDR: !GetAtt 'VPCStack.Outputs.VPCCIDR'
- Add the SQL Server stack.By setting the
DependsOn attribute to the Active Directory stack, you can ensure that the SQL stack will not deploy until the Active Directory stack is complete.
  SQLStack:
    Type: AWS::CloudFormation::Stack
    DependsOn: ADStack
    Properties:
      TemplateURL: !Sub https://${S3BucketName}.s3.amazonaws.com/${S3KeyPrefix}submodules/quickstart-microsoft-sql/templates/sql.template
      Parameters:
        ADScenarioType: Microsoft AD on Amazon EC2
        DomainAdminPassword: !Ref 'DomainAdminPassword'
        DomainAdminUser: !Ref 'DomainAdminUser'
        DomainDNSName: !Ref 'DomainDNSName'
        DomainMemberSGID: !GetAtt 'ADStack.Outputs.DomainMemberSGID'
        DomainNetBIOSName: !Ref 'DomainNetBIOSName'
        KeyPairName: !Ref 'KeyPairName'
        SQLServiceAccount: !Ref 'SQLServiceAccount'
        SQLServiceAccountPassword: !Ref 'SQLServiceAccountPassword'
        AvailabiltyGroupName: !Ref 'AvailabiltyGroupName'
        PrivateSubnet1ID: !GetAtt 'VPCStack.Outputs.PrivateSubnet1AID'
        PrivateSubnet2ID: !GetAtt 'VPCStack.Outputs.PrivateSubnet2AID'
        QSS3BucketName: !Ref 'S3BucketName'
        QSS3KeyPrefix: !Sub '${S3KeyPrefix}submodules/quickstart-microsoft-sql/'
        VPCID: !GetAtt 'VPCStack.Outputs.VPCID'
- Add the SharePoint stack.By setting the
DependsOn attribute to the SQL Server stack, you can ensure that the SharePoint stack will not deploy until the SQL Server stack is complete.Note: A copy of the SharePoint 2019 installation media (in .ZIP format) is required to deploy SharePoint. If you do not have access to this, omit the SharePoint stack from the template.
  SharePointFarmStack:
    Type: AWS::CloudFormation::Stack
    DependsOn: SQLStack
    Properties:
      TemplateURL: !Sub https://${S3BucketName}.s3.amazonaws.com/${S3KeyPrefix}submodules/quickstart-microsoft-sharepoint/templates/sharepoint-farm.yaml
      Parameters:
        ADAdminPassword: !Ref 'DomainAdminPassword'
        ADAdminUserName: !Ref 'DomainAdminUser'
        DomainDNSName: !Ref 'DomainDNSName'
        DomainNetBIOSName: !Ref 'DomainNetBIOSName'
        ADMemberSecurityGroup: !GetAtt 'ADStack.Outputs.DomainMemberSGID'
        KeyPairName: !Ref 'KeyPairName'
        Subnet1ID: !GetAtt 'VPCStack.Outputs.PrivateSubnet1AID'
        Subnet2ID: !GetAtt 'VPCStack.Outputs.PrivateSubnet2AID'
        SPProductKey: !Ref 'SPProductKey'
        SQLServerAccessSecurityGroup: !GetAtt 'SQLStack.Outputs.SQLServerAccessSecurityGroupID'
        VPCID: !GetAtt 'VPCStack.Outputs.VPCID'
        VPCCIDR: !GetAtt 'VPCStack.Outputs.VPCCIDR'
        SPBinaryBucket: !Ref 'SPBinaryBucket'
        SPBinaryKey: !Ref 'SPBinaryKey'
        SQLAdminUserName: !Ref 'SQLServiceAccount'
        SQLAdminPassword: !Ref 'SQLServiceAccountPassword'
        SPDatabaseName: !Ref 'AvailabiltyGroupName'
- Add the Exchange Server stack.By setting the
DependsOn attribute to the Active Directory stack, you can ensure that the Exchange stack will not deploy until the Active Directory stack is complete.
  ExchangeStack:
    Type: AWS::CloudFormation::Stack
    DependsOn: ADStack
    Properties:
      TemplateURL: !Sub https://${S3BucketName}.s3.amazonaws.com/${S3KeyPrefix}submodules/quickstart-microsoft-exchange/templates/exchange.template
      Parameters:
        DomainAdminPassword: !Ref 'DomainAdminPassword'
        DomainAdminUser: !Ref 'DomainAdminUser'
        DomainDNSName: !Ref 'DomainDNSName'
        DomainMemberSGID: !GetAtt 'ADStack.Outputs.DomainMemberSGID'
        DomainNetBIOSName: !Ref 'DomainNetBIOSName'
        KeyPairName: !Ref 'KeyPairName'
        PrivateSubnet1ID: !GetAtt 'VPCStack.Outputs.PrivateSubnet1AID'
        PrivateSubnet2ID: !GetAtt 'VPCStack.Outputs.PrivateSubnet2AID'
        PublicSubnet1ID: !GetAtt 'VPCStack.Outputs.PublicSubnet1ID'
        PublicSubnet2ID: !GetAtt 'VPCStack.Outputs.PublicSubnet2ID'
        ExchangeNode1PrivateIP1: !Ref 'ExchangeNode1PrivateIP1'
        ExchangeNode1PrivateIP2: !Ref 'ExchangeNode1PrivateIP2'
        ExchangeNode2PrivateIP1: !Ref 'ExchangeNode2PrivateIP1'
        ExchangeNode2PrivateIP2: !Ref 'ExchangeNode2PrivateIP2'
        FileServerPrivateIP: !Ref 'FileServerPrivateIP'
        QSS3BucketName: !Ref 'S3BucketName'
        QSS3KeyPrefix: !Sub '${S3KeyPrefix}submodules/quickstart-microsoft-exchange/'
        VPCID: !GetAtt 'VPCStack.Outputs.VPCID'
        VPCCidrBlock: !GetAtt 'VPCStack.Outputs.VPCCIDR'
- Add the Remote Desktop Gateway stack.By setting the
DependsOn attribute to the Active Directory stack, you can ensure that the Remote Desktop Gateway stack will not deploy until the Active Directory stack is complete.
  RDGWStack:
    Type: AWS::CloudFormation::Stack
    DependsOn: ADStack
    Properties:
      TemplateURL: !Sub https://${S3BucketName}.s3.amazonaws.com/${S3KeyPrefix}submodules/quickstart-microsoft-rdgateway/templates/rdgw-standalone.template
      Parameters:
        AdminPassword: !Ref 'DomainAdminPassword'
        AdminUser: !Ref 'DomainAdminUser'
        DomainDNSName: !Ref 'DomainDNSName'
        KeyPairName: !Ref 'KeyPairName'
        NumberOfRDGWHosts: !Ref 'NumberOfRDGWHosts'
        PublicSubnet1ID: !GetAtt 'VPCStack.Outputs.PublicSubnet1ID'
        PublicSubnet2ID: !GetAtt 'VPCStack.Outputs.PublicSubnet2ID'
        QSS3BucketName: !Ref 'S3BucketName'
        QSS3KeyPrefix: !Sub '${S3KeyPrefix}submodules/quickstart-microsoft-rdgateway/'
        RDGWCIDR: !Ref 'RDGWCIDR'
        VPCID: !GetAtt 'VPCStack.Outputs.VPCID'
Step 7: Upload files to the S3 bucket
- If you do not already have an S3 bucket available, navigate to the AWS Management Console, choose S3, and create an S3 bucket. Ensure that the bucket allows public access.
- Create a directory in the S3 bucket, and upload the entire contents of your local copy of the GitHub repository to this directory. Later, you will enter the directory name as the
S3BucketName parameter.
Step 8: Launch the CloudFormation template
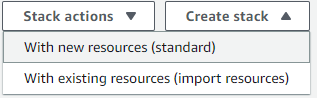
- Navigate to the AWS Management Console, and select CloudFormation.
- Choose Create stack, and select With new resources (standard).
- Enter the S3 location of your template (https://<S3BucketName>.s3.amazonaws.com/≪S3KeyPrefix>templates/msft.template), or upload the template from your local copy of the GitHub repository.
- Fill out the fields that don’t have default values.
- Stack Name. Enter a unique name for the stack.
- Key pair name. Select an EC2 key pair to connect to your instances.
- Availability Zones. Select two Availability Zones for the deployment.
- Domain admin password. This is the password used to administer Active Directory.
- Service account password. This is the password used to run SQL Server.
- SharePoint binary bucket. If you uploaded the SharePoint installation media, enter the bucket name here.
- SharePoint binary key. If you uploaded the SharePoint installation media, enter the S3 key here.
- Allowed RD Gateway external access CIDR. Enter the CIDR that will have access to the Remote Desktop Gateway farm.
- S3 Bucket name. Enter the S3 bucket where you uploaded the GitHub repository contents.
- S3 key prefix. Enter the S3 key prefix where you uploaded the GitHub repository contents. Ensure that the key prefix ends with a forward slash (“/”).
- Choose Next.
- Keep the default stack options, and choose Next.
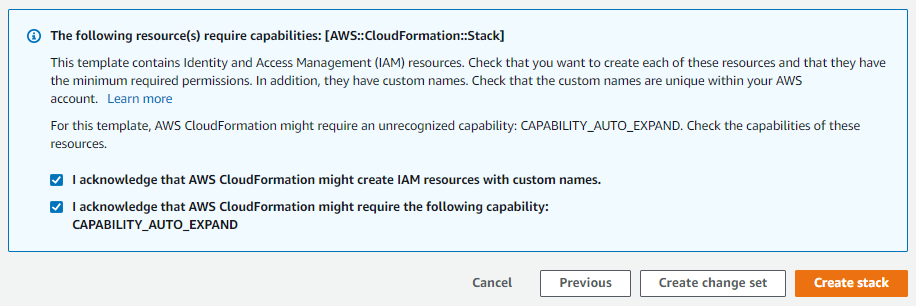
- Select the check boxes for I acknowledge that AWS CloudFormation might create IAM resources with custom names and I acknowledge that AWS CloudFormation might require the following capability: CAPABILITY_AUTO_EXPAND, and choose Create stack.
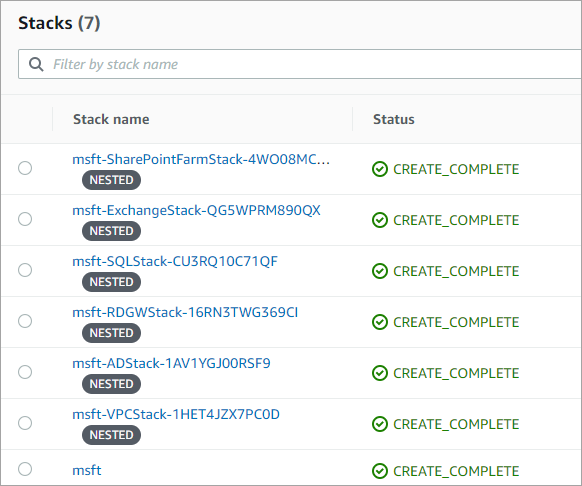
Stack creation should begin. Each nested stack will have its own object in the AWS CloudFormation console.
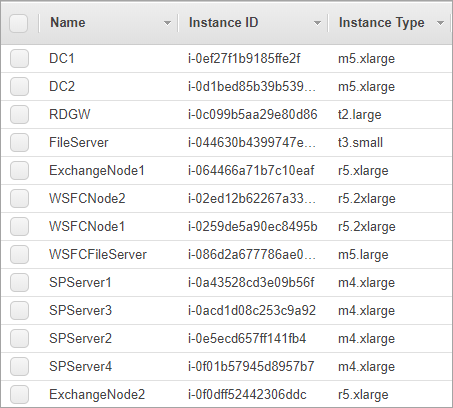
Upon completion, a full Microsoft stack is deployed, including the following resources:
- Two domain controllers
- Two Windows Server failover cluster servers running SQL Server
- A file server to act as the failover cluster witness
- Two Exchange nodes
- A file server to act as the Exchange Server cluster witness
- Four SharePoint servers
- Remote Desktop Gateway in an Auto Scaling group
Deployment takes approximately 4 hours.
Cleaning up
To avoid incurring future charges, delete the resources. In the AWS CloudFormation console, select the main stack that you created, and then choose Delete. All objects that were created during launch, including all of the nested stacks, will be deleted.

Conclusion
In this walkthrough, I showed you how to create a single CloudFormation template that leverages existing Quick Starts as submodules to deploy a full Microsoft stack in an automated fashion. Visit the Microsoft section of the AWS Quick Starts page to view the Microsoft products currently available to use as submodules. View the AWS Quick Start GitHub organization page to find their corresponding Git links to use them as submodules for future Microsoft deployments.