The Internet of Things on AWS – Official Blog
Migrating connected device fleets to AWS with Custom Domains for AWS IoT Core
Introduction
AWS launched Configurable Endpoints with Custom Domains for AWS IoT Core, a new capability that allows customers to customize the behavior of their AWS IoT Core data endpoints with custom domain names. Custom Domains enable customers to register their original custom domain names and associated server certificates to their AWS IoT Core endpoints.
This new capability helps AWS customers comply with their internal or external security and compliance requirements, makes it simpler to migrate IoT devices to AWS IoT, helps them implement a failover strategy for the purpose of disaster recovery, and makes it easy to architect usage scenarios with multiple AWS Regions.
In this blog post, we demonstrate how you can use Configurable Endpoints to simplify and expedite migration of IoT devices to AWS IoT from an existing IoT solution.
Challenges of migrating IoT Devices
Migrating your connected devices fleet to AWS IoT Core is a critical task of your IoT migration journey. Your devices are a central resource in your IoT value chain, as much as your users and your data, and their migration should be just as reliable and fast. Migrating devices to AWS IoT frequently involves updating the firmware and software configurations, such as which IoT endpoint and authentication method to use for connections. However, performing a mass update of a large device fleet (thousands or even millions of devices), distributed across different geographical regions, might pose some of the following challenges:
1. Your IoT devices may not be allowed to connect to *amazonaws.com
Your organization’s strategic decisions for security and compliance may require you to use your own company owned domains and/or server certificates and manage your own Private Key Infrastructure (PKI) and Certification Authority. This means that your IoT application could be exposing an endpoint on your company’ own private or public domain, such as iot.yourcompany.example.com where your devices are expected to connect. This scenario prevents you from using the standard *.amazonaws.com domains without performing a software upgrade on your devices.
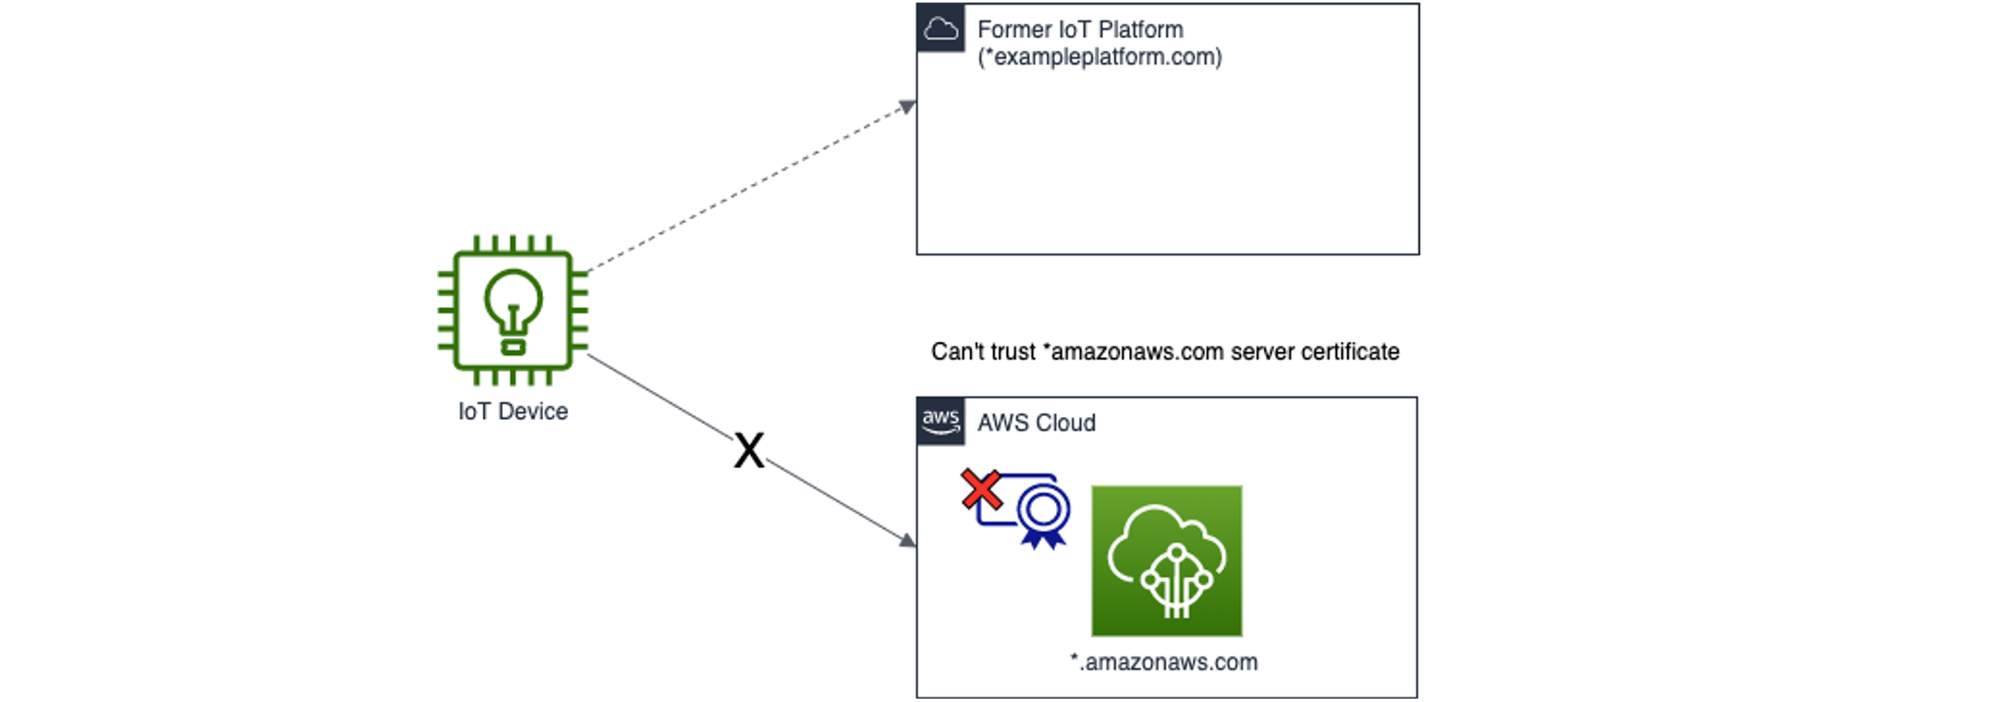
Example 1: IoT device can’t migrate to AWS due to organisation cybersecurity policy
2. You may want to avoid extensive over-the-air upgrades (OTA)
There are situations where you can’t easily perform an extensive over the air upgrade (OTA) to reconfigure your device settings. This can be due to the long timeline for firmware development and validation, or due to the fact that a remote device upgrade may not be reliable due to limited connectivity in certain geographic areas of your fleet.
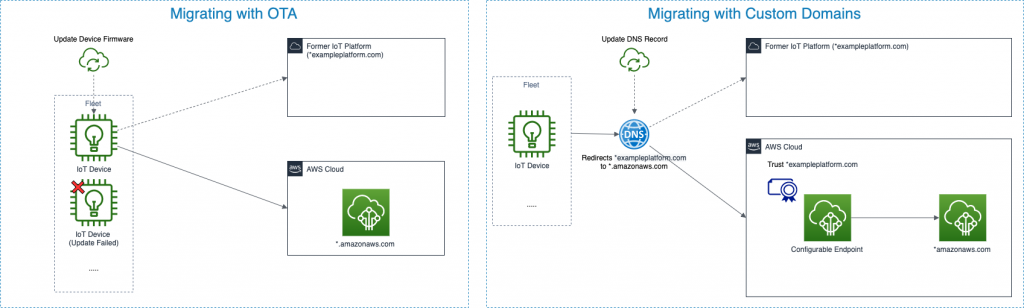
Example 2: Migrating through over-the-air-upgrade (left) versus migrating through DNS record change (right).
Using a custom domain name in the device firmware helps simplify migration operations because instead of performing an OTA upgrade, you can simply update a Canonical Name (CNAME) record in the Domain Name System (DNS; single point modify). This helps you benefit from other advantages of DNS such as weighted routing to perform incremental migrations.
3. You may have different device families to manage
Your fleet might have different device architectures, each one requiring a different trusted endpoint and/or authorisation mechanism. Multiple configurable endpoints are required for each family to enable legacy device support.
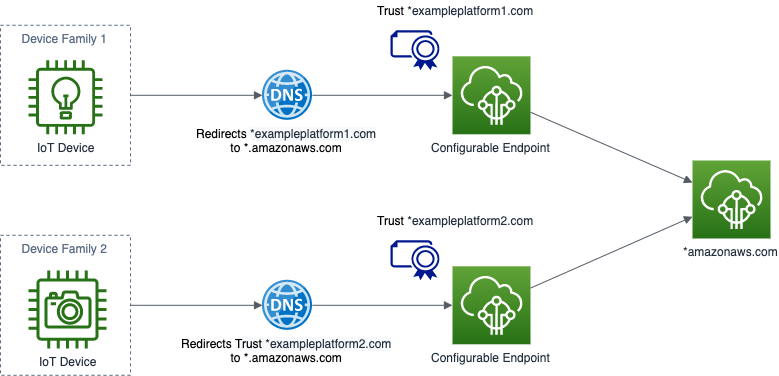
Example 3: Multiple device families converging to the same AWS IoT Core endpoint
Solution overview: migrating IoT devices with custom domains for AWS IoT Core
The following diagram shows how you can use custom domains in AWS IoT Core for an IoT device migration.
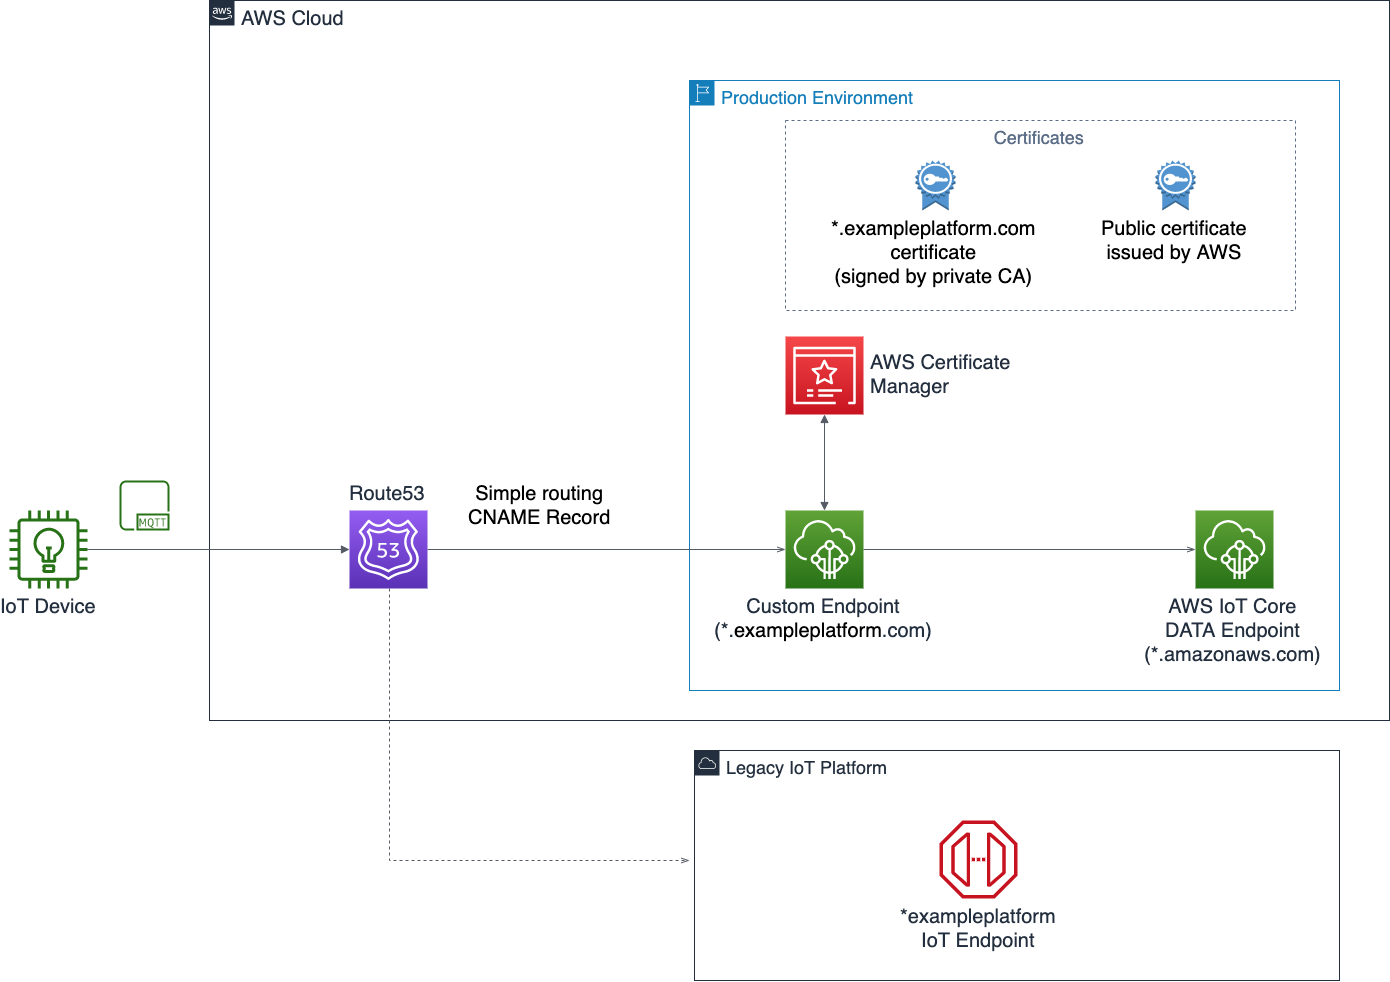
Reference architecture of a migration using custom domains for AWS IoT Core
This solution leverages the following services:
- Route 53 as Domain Name Service (DNS). In this example, we are going to set a simple routing policy to route traffic from the existing IoT Application to AWS.
- AWS Certificate Manager (ACM) as the main server certificate store. In this example we are going to use ACM for storing our server certificate issued by a private Certification Authority (CA) and our public server certificate, used to validate the ownership of our domain.
- AWS IoT Core as the target IoT endpoint of our migration. In this example, we are going to onboard an IoT device in AWS IoT Core, and set up a custom endpoint configuration with an example domain name.
Prerequisites
For the walkthrough, you should have following prerequisites:
- An AWS account.
- AWS Command Line Interface (CLI) See AWS CLI Documentation for instructions on how to install and configure AWS CLI.
- An AWS IAM user with the credentials to create AWS resources through CLI.
- A domain name that you use to set up the custom endpoint. You can use Route 53 for the domains you registered with Route 53 or also with domains that you have registered with other DNS providers.
- A device that you want to migrate to AWS that satisfies the requirements to connect to AWS IoT Core.
- An MQTT client to complete tests. In this walkthrough we use Eclipse Mosquitto MQTT Client.
- (Optional) A server certificate issued by your CA, and its private key to validate ownership of your domain. If you don’t own a server certificate or a private CA, you can request one through AWS. The walkthrough covers both scenarios.
Note on device certificates: in our walkthrough we generate new device certificates to test the behavior of the Custom Domain feature. If you already have your own device certificate you can import it to perform the test.
Implementing the solution in your AWS account
In this example, we simulate a source IoT endpoint for the migration, using AWS IoT Core and Configurable Endpoints, in a different Region of the same AWS account. This post will explain the following steps for implementing this solution:
- Step 1: Configure a hosted zone in Route 53 with the registered domain name.
- Step 2: Configure the target IoT endpoint for migration in the selected AWS Region.
In our example we configure our endpoint in the Ireland (eu-west-1) Region. This involves –- Registering a certificate chain in AWS Certificate Manager (ACM).
- Configuring a custom domain in AWS IoT Core using your server certificate.
- Creating device certificates, and an IoT Policy in AWS IoT Core, or importing your own.
- Step 3: Set up CNAME record in Route 53 to route the traffic and perform tests with an MQTT client.
Step 1: Configure a hosted zone in Route 53
In this example, we create a hosted zone in Route 53 to manage our registered domain name example.com.
- Open the command line terminal window.
- If you register the domain using Route 53, the hosted zone is created automatically. If the domain is registered elsewhere, run the following command to create a hosted zone in Route 53:
aws route53 create-hosted-zone --name example.com --caller-reference 2021-05-04-18:30 - As output of the command, you receive the ID that Route 53 assigned to the hosted zone. You can also query the ID of the hosted zone using the following command:
aws route53 list-hosted-zones - Run the following command to get Name Servers associated with the hosted zone:
aws route53 get-hosted-zone --id <Hosted_Zone_ID>
Response (JSON):... "DelegationSet": { "NameServers": [ "ns-1769.awsdns-29.co.uk", "ns-955.awsdns-55.net", "ns-113.awsdns-14.com", "ns-1256.awsdns-29.org" ] } ... - If you are using a domain provider other than Route 53, configure the Name Servers of your hosted zone in the management console of your domain vendor. This allows you to use Route 53 to manage your domain.
Step 2a: Configure the Target IoT endpoint for the migration – Register a certificate chain in ACM
If you don’t own a server certificate for your custom IoT domain, you can request one through ACM. If you own your own server certificate, check whether your root CA certificate used to sign the certificate is included in Mozilla‘s trusted ca-bundle. If it is included, you can import the certificate chain in ACM. If it is not included, import the certificate chain in ACM and also request a public certificate through ACM.
The following walkthrough provides example for both scenarios:
Scenario i) You don’t own a server certificate for your custom IoT domain
- Run the following command to issue the request:
aws acm request-certificate –-domain-name iot.example.com –-validation-method DNS --region <AWS_Region>
Note down the server certificate ARN from the response:{ "CertificateArn": "arn:aws:acm:eu-west-1:XXXXXXXXXXXXXXXXX:certificate/<certificate_id>" } - Following this, you can describe the certificate domain validation parameters to retrieve the DNS configuration parameters (in bold):
aws acm describe-certificate --certificate-arn arn:aws:acm:eu-west-1:XXXXXXXXXXXXXXXXX:certificate/<certificate_id> --region eu-west-1
Sample response:{ "Certificate": { "CertificateArn": "arn:aws:acm:eu-west-1:<account_id>:certificate/<ceritficate_id>", …… "ValidationStatus": "PENDING_VALIDATION", "ResourceRecord": { "Name": "_XXXXXXXXXXXXXXXXXXXXX.iot.example.com.", "Type": "CNAME", "Value": "_XXXXXXXXXXXXXXXXXXXXX.XXXXXXXXXXX.acm-validations.aws." }, … } - Within 30 minutes, the status changes to SUCCESS from PENDING_VALIDATION. Once the status changes, create a file named records.json with the following syntax, using the retrieved parameters:
{ "Comment": "Create ACM Validation Record", "Changes": [ { "Action": "UPSERT", "ResourceRecordSet": { "Name": "_XXXXXXXXXXXXXXXXXXXXX.iot.example.com.", "Type":"CNAME", "TTL": 300, "ResourceRecords": [ { "Value": "_XXXXXXXXXXXXXXXXXXXXX.XXXXXXXXXXX.acm-validations.aws." } ] } } ] } - Now run the following command to add the record to your hosted zone in Route 53:
aws route53 change-resource-record-sets --hosted-zone-id <your_hosted_zone_id> --change-batch file://records.json
You see the server certificates appear with validation status “success” in ACM on your AWS Management Console.
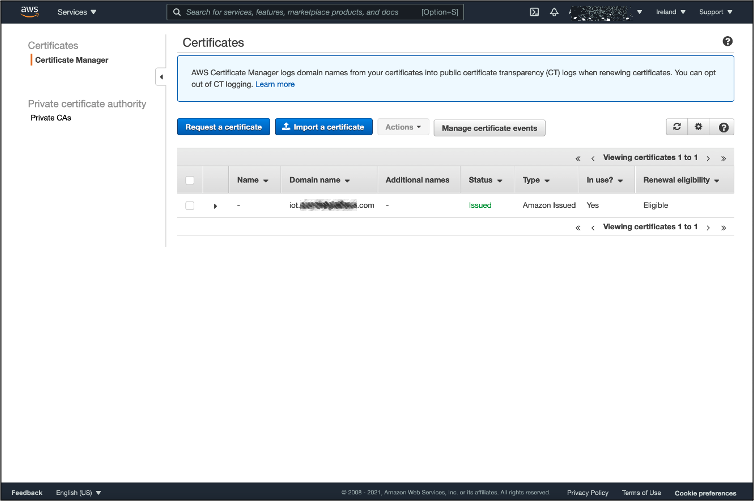
Your public server certificate reporting validated status in ACM
You see also the previously added CNAME record appear in Route 53 on your AWS Management Console at Route 53 > Hosted Zones > <your_hosted_zone_name>
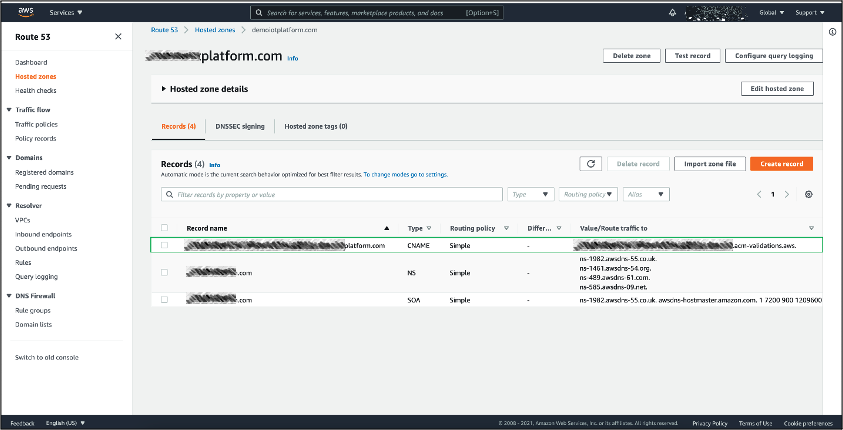
Record for DNS validation in your Route 53 hosted zone
Scenario ii) You own a server certificate for your custom IoT domain which is signed by a Certification Authority included in Mozilla’s ca-bundle
To perform this operation, you need the following resources:
- The PEM-encoded server certificate that is stored in a file named Certificate.pem.
- The PEM-encoded certificate chain that is stored in a file named CertificateChain.pem.
- The PEM-encoded, private key is stored in a file named PrivateKey.pem.
To configure the server certificate chain:
- Open a command line terminal window.
- Run the following command to import your server certificate:
aws acm import-certificate –-certificate fileb://Certificate.pem –-certificate-chain fileb://CertificateChain.pem –-private-key fileb://PrivateKey.pem --region <AWS_Region>
Step 2b: Configure the target IoT endpoint for the migration – Configure a custom domain in AWS IoT Core using your registered server certificate
To perform this operation, you require the registered server certificates ARN and your domain name:
- Open a terminal window.
- Run the following command to query your registered server certificates in ACM and note their “CertificateArn” values:
aws acm list-certificates –region <your_AWS_Region>
Response:{ "CertificateSummaryList": [ { "CertificateArn": "arn:aws:acm:eu-west-1:XXXXXXXXXXXXXXXXX:certificate/<certificate_id>", "DomainName": "iot.example.com" } ] } - Run the following command to register your custom domain in AWS IoT Core:
aws iot create-domain-configuration --domain-configuration-name "TargetTestIoTPlatform" --service-type "DATA" --domain-name "iot.example.com" --server-certificate-arns "arn:aws:acm:eu-west-1:XXXXXXXXXXXXXXXXX:certificate/<certificate_id>"
Now you have a custom domain configuration in AWS IoT Core in your target Region, you can see the configuration appear in your AWS Management Console under AWS IoT > Settings:
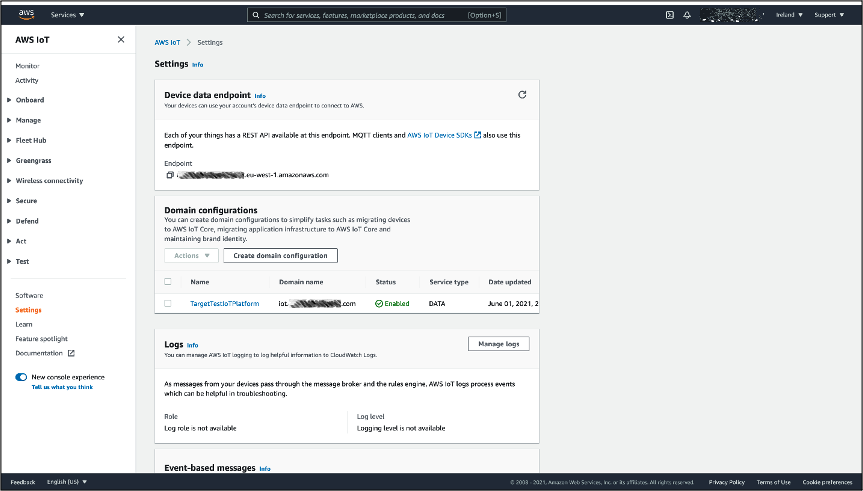
Custom Domain Configuration in AWS IoT Core settings
Step 2c: Configure the target IoT endpoint for the migration – Create device certificates, and an IoT policy in AWS IoT Core
The devices in your fleet require a valid identity and an IoT policy in your target IoT endpoint to connect. As the best practice, your provisioning flow should allow you to avoid sharing private key over the public internet, and it is advised that you embed a provisioning flow as part of your IoT device design.
AWS provides a list of options for device provisioning as part of AWS IoT Core documentation and a whitepaper on “Device Manufacturing and Provisioning with X.509 Certificates in AWS IoT Core” that explains in depth each option in respect to real customer scenarios.
Optional step: bring your own device certificate
You can import your existing device certificates and CA certificate in AWS IoT Core to allow a smooth migration and avoid performing OTAs or having the device to rotate their certificate through an existing PKI. You can also register device certificates signed by a CA that is not registered in AWS IoT Core. For more information, see AWS IoT Core documentation on how to register your CA certificate and register a client certificate manually
Please note that the device certificates you can import should conform to the standards supported by AWS IoT Core. Please see AWS IoT Core Documentation on X.509 certificates for additional details.
In our example, we create a test thing, device certificate, and an IoT policy using the CLI. First, to create an identity for each of your test IoT devices:
- Open a command line terminal window.
- Run the following command to generate a device certificate and a key pair, the files are created in local:
aws iot create-keys-and-certificate \
--certificate-pem-outfile "TestThing.cert.pem" \
--public-key-outfile "TestThing.public.key" \
--private-key-outfile "TestThing.private.key" \
--region <your_AWS_Region>
Response:{ "certificateArn": "arn:aws:iot:eu-west-1:XXXXXXXXXXXXXXXXX:cert/<certificate_id>", "certificateId": "<certificate_id>", "certificatePem": "-----BEGIN CERTIFICATE----- […] -----END CERTIFICATE-----", "keyPair": { "PublicKey": "-----BEGIN PUBLIC KEY----- […] -----END PUBLIC KEY-----", "PrivateKey": "-----BEGIN RSA PRIVATE KEY----- […] -----END RSA PRIVATE KEY-----" } } - Copy your “certificateArn” and “certificateId” from the output of the command.
- Run the following command to create a thing in the device registry:
aws iot create-thing \
--thing-name TestThing \
--region <your_AWS_Region> - Create an IoT policy using thing policy variables to enable least-privilege principle to our connecting IoT devices. As a best practice, policy variables should be used when possible. Create a TestPolicy.json file with the following content:
{ "Version": "2012-10-17", "Statement": [{ "Effect": "Allow", "Action": [ "iot:Publish" ], "Resource": [ "arn:aws:iot:eu-west-1:XXXXXXXXXXXXXXXXX:topic/test/device/${iot:Connection.Thing.ThingName}" ] }, { "Effect": "Allow", "Action": [ "iot:Connect" ], "Resource": [ "arn:aws:iot:eu-west-1:XXXXXXXXXXXXXXXXX:client/${iot:Connection.Thing.ThingName}" ] } ] } - Run the following command to register the policy in AWS IoT Core:
aws iot create-policy \
--policy-name TestPolicy \
--policy-document file://TestPolicy.json \
--region <your_AWS_Region> - Attach the policy to our device certificate, and our device certificate to our IoT thing. Run the following command to attach the IoT policy to our device certificate (you need the certificate ARN):
aws iot attach-policy \
--policy-name TestPolicy \
--target <your__device_certificate_ARN> \
--region <your_AWS_Region> - Finally, run the following command to attach the device certificate to your IoT thing:
aws iot attach-thing-principal \
--thing-name TestThing \
--principal <your_device_certificate_ARN> \
--region <your_AWS_Region>
You see the registered thing, policy, and device certificate in your AWS Account through the AWS IoT Console.
Step 4: Set up CNAME record in Route 53
The last step of the configuration process is to create CNAME records in your DNS to implement the routing from your domain name to the AWS IoT Core endpoint.
As a minimum, you need to create a CNAME record in your hosted zone, with your desired AWS IoT Core endpoint as a target. You can identify your AWS IoT Core endpoint through the following CLI command:
aws iot describe-endpoint --endpoint-type iot:Data-ATS —region <your_AWS_Region>
If you use Route 53, you can use the available routing mechanisms to implement more complex scenarios, such as using Weighted Routing to perform blue/green deployments or to gradually shift traffic from one endpoint to another.
To create a Simple Routing policy using Route 53:
- Open a command line terminal window.
- Create a file named simpleRoutingRecords.json with the following content:
{ "Comment": "Create Simple Routing CNAME records ", "Changes": [{ "Action": "UPSERT", "ResourceRecordSet": { "Name": "iot.example.com.", "Type": "CNAME", "TTL": 300, "ResourceRecords": [{ "Value": "<prefix>-ats.iot.eu-west-1.amazonaws.com" }] } }] } - Run the following command to add the record to your hosted zone in Route 53:
aws route53 change-resource-record-sets --hosted-zone-id <hosted_zone_id> --change-batch file://simpleRoutingRecords.json
Once this is complete, the new record is displayed in the hosted zone in Route 53.
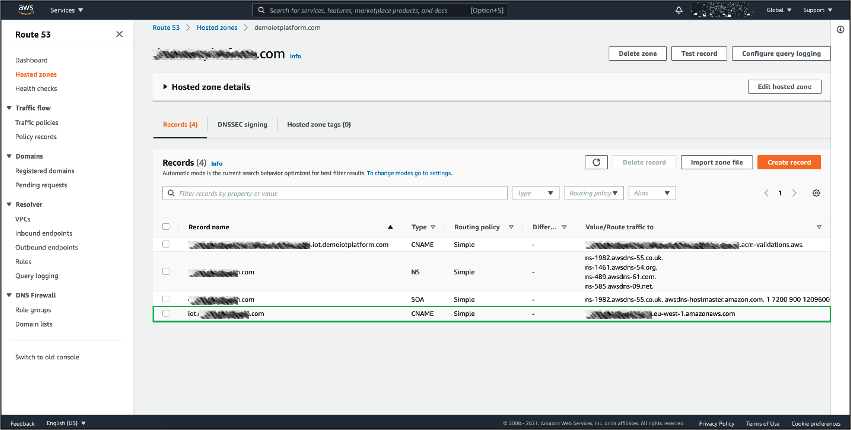
Simple routing CNAME record in Route53
Testing the solution
Next, we send test MQTT messages to the target platform endpoint we registered as iot.example.com using the Eclipse Mosquitto MQTT client downloaded during the prerequisites. This helps ensure the configured routing policy and migration worked as expected.
Requirements to test the solution:
- The PEM encoded device certificate and private key created in Step2c of our walkthrough in “3. Implementing the Solution in your AWS Account” saved as a file. In our example you should have two files: TestThing.cert.pem and TestThing.private.key.
- An AWS IoT Core root CA certificate. In our example, we use RSA 2048 bit key: Amazon Root CA 1.
Procedure to test your solution:
- Open a terminal window in your target folder where your device certificate, private key, and Amazon Root CA files are located.
- Open the AWS IoT console in your AWS account and navigate to the MQTT test client. You can find the test client at Test → MQTT test client.

AWS IoT Core console MQTT test client
- In the Topic Filter box, enter “test/device/TestThing”, select Subscribe and leave the window open.
- In your terminal window, run the following command:
mosquitto_pub -h iot.example.com --cafile AmazonRootCA1.pem --cert TestThing.cert.pem --key TestThing.private.key -p 8883 -q 1 -d -t test/device/TestThing -i TestThing -m "{\"message\": \"helloFromTestThing\"}" - Verify that the messages are visualized in the AWS IoT Core test client console.

Test messages received in the AWS IoT Core console MQTT test client
Cleaning up Resources
To help prevent unwanted charges to your AWS account, delete the AWS resources that you used for this walkthrough. These AWS resources include the AWS IoT Core, AWS Certificate Manager, Route 53. You can use the AWS CLI, AWS Management Console, or the AWS APIs to perform the cleanup. In this section, we refer the AWS CLI approach. If you want to keep these resources, you can ignore this section.
Disabling your DNS configuration:
- Create a file with the following content. In our example, we name the file change-resource-record-sets.json.
{ "Comment": "Delete the CNAME Record Set", "Changes": [ { "Action": "DELETE", "ResourceRecordSet": { "Name": "iot.example.com", "Type": "CNAME", "TTL": 300, "ResourceRecords": [ { "Value": "<prefix>-ats.iot.eu-west-1.amazonaws.com" } ] } }, { "Action": "DELETE", "ResourceRecordSet": { "Name": "_XXXXXXXXXXXXXXXXXXXXX.iot.example.com", "Type": "CNAME", "TTL": 300, "ResourceRecords": [ { "Value": "_XXXXXXXXXXXXXXXXXXXXX.XXXXXXXXXXX.acm-validations.aws." } ] } } ] } - Delete the record using the following CLI command:
aws route53 change-resource-record-sets --hosted-zone-id <your_hosted_zone_id> --change-batch file://change-resource-record-sets.json - Delete the hosted zones using the following CLI command:
aws route53 delete-hosted-zone --id <your_hosted_zone_id>
Cleaning up AWS IoT Core resources
- Detach the Device Certificate from the IoT policy using the following CLI command:
aws iot detach-policy --target "arn:aws:iot:eu-west-1:XXXXXXXXXXXXXXXXX:cert/<certificate_id>" --policy-name "TestPolicy" - Delete the IoT policy using the following CLI command:
aws iot delete-policy --policy-name TestPolicy - Detach the Device Certificate from the test IoT thing using the following CLI command:
aws iot detach-thing-principal --thing-name TestThing --principal arn:aws:iot:eu-west-1:XXXXXXXXXXXXXXXXX:cert/<certificate_id> - Delete the Device Certificate from AWS IoT Core using the following CLI command:
aws iot delete-certificate --certificate-id <certificate_id> - Delete the IoT thing from AWS IoT Core using the following CLI command:
aws iot delete-thing --thing-name TestThing
Disabling your custom domain configuration
- Disable the AWS IoT Core Custom Domain Configuration Status using the following CLI command:
aws iot update-domain-configuration --domain-configuration-name "TargetTestIoTPlatform" --domain-configuration-status "DISABLED" - Delete the AWS IoT Core Custom Domain Configuration using the following CLI command:
aws iot delete-domain-configuration --domain-configuration-name "TargetTestIoTPlatform" - Delete all imported and requested server certificates in ACM using the following CLI command:
aws acm delete-certificate --certificate-arn arn:aws:acm:eu-west-1:XXXXXXXXXXXXXXXXX:certificate/<certificate_id>
Conclusion
In this post, we discussed some of the key challenges customers face when migrating their IoT device fleet to AWS, and how AWS IoT Core Configurable Endpoints can help simplify the process. The architecture and example proposed in this blog provides a solution that you can adopt to enable a seamless migration of an IoT device fleet to AWS, and lays the foundation for a simpler management of future migration needs you might have for your IoT application.
You can use the provided example implementation for testing yourself the capability, and setting up the required resources in AWS IoT Core, Route 53 and AWS Certificate Manager. For more flexibility you can also bring your own Device Certificates and CA Certificates in AWS IoT Core. To learn more about how to use AWS IoT Core Configurable Endpoints, you can refer to the documentation.
Interested in migrating to AWS IoT?
AWS has helped customers like LG, Traeger Grills, Belkin, Centrica Hive, Weissbeerger, and many others quickly and easily migrate from their homegrown or third-party IoT platforms. These customers migrated to take advantage of the security, scalability, reliability, and breadth and depth of AWS IoT services.
Learn more about how AWS can help make your migration quick and easy on our AWS IoT Migrations Solution Page, or contact us, and someone will be in touch to schedule time to walk through your use case.
About the authors

Daniele is a Senior IoT Data Architect with AWS Professional Service. He helps AWS Customers achieve their business goals by architecting and building innovative solutions that leverage AWS IoT services on the AWS Cloud. |

Prateek is a Senior IoT Architect with AWS Professional Service Global Speciality Practice. He helps AWS Customers achieve their business outcomes by architecting and building modern application platforms using AWS IoT and related services. |

Ajinkya Farsole is a Cloud Infrastructure Architect at AWS Professional Services. He helps customers achieve their goals by architecting secure and scalable solutions on the AWS Cloud. When he is not working, Ajinkya enjoys watching physics and history documentaries. |