The Internet of Things on AWS – Official Blog
Protecting Linux-based IoT devices against unintended USB access
Introduction
The Internet of Things (IoT) industry continues to grow at an aggressive pace. As the number of connected devices ramps up, managing security of these devices at scale can be challenging. One of the potential risks that IoT devices face is unintended USB access, which can occur when an unauthorized connection is made through its USB port. For example, if a user gains physical access to a security camera system, there’s a risk they could plugin an unauthorized USB device that provides access to the camera system and its data. This could result in unauthorized access to sensitive data or a disruption in system availability.
Protecting IoT devices from unintended USB access requires a multi-layered security approach that includes both hardware and software solutions. Hardware solutions include implementing an additional layer of security to the USB ports and limiting physical access to devices. Software solutions include implementing firmware and software updates, as well as implementing security protocols that can detect and prevent unintended USB access.
The access level for a device can also be different depending on whether it is in service or in debug mode. When a device is in service, you may want its USB ports to be fully protected. When it is in debug mode, you sometimes need to open up its USB ports to allow a technician to plug in diagnosis software. The control over the device’s mode needs to be securely performed by a security or DevOps team, as shown in Figure 1.
In this blog, you will learn how to protect Linux-based IoT devices and computers against unintended USB access with USBGuard and how to securely change a device from In-Service mode to Debug mode with AWS IoT Device Management.
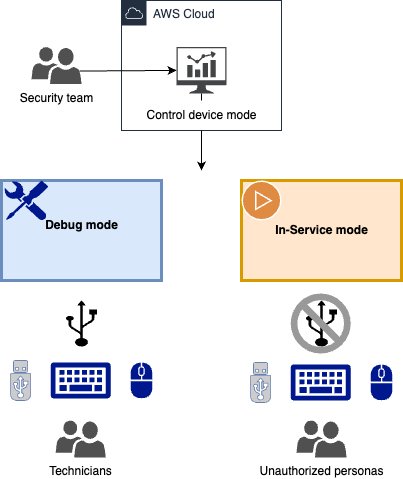
Figure 1: Use case explanation
Prerequisites
- An AWS account. If you do not have an AWS account, you will need to create and activate an AWS account first and set up both AWS IoT Core and AWS IoT Device Management. For getting started instructions, please view the AWS IoT Core getting started guide and the guide for how to manage devices with AWS IoT.
- Turn on AWS IoT Core fleet indexing, which is required for use with Fleet Hub for AWS IoT Device Management.
- Integrated with AWS IoT Core, AWS IoT Device Management helps you register, organize, monitor, and remotely manage IoT devices at scale. With Fleet Hub you can build standalone web applications for monitoring the health of your device fleets.
- A Linux based physical machine with USB ports. Nvidia Jetson Nano is used in this blog.
- Basic understanding of Linux (e.g. create directories, set file permissions) and programming (compiling code)
Walkthrough
The following diagram, Figure 2, shows an architecture of a Linux-based device connecting through AWS IoT Core using MQTT. On the device, the USBGuard service has been installed and enabled. USBGuard is a software framework that offers an allow/deny -listing mechanism for USB-devices. Inspiration for this is drawn from issues like BadUSB. It makes use of a device blocking infrastructure included in the Linux kernel.
The device has a device mode attribute defined. You can set the device mode to either in-service or debug mode through Jobs for AWS IoT. IoT Jobs define a set of remote operations that can be sent to and run on one or more devices connected to AWS IoT. For this use case, there are two jobs defined: set-debug-mode-job and set-in-service-mode-job. You can monitor device mode attributes and perform jobs through AWS IoT Device Management Fleet Hub.
When running the set-in-service-mode-job, the IoT communication client will pick up the job, set a USBGuard policy to restrict USB ports access only to designated USB device, block other devices with a hidden keyboard interface in a USB flash disk, and set the device shadow attribute with in-service mode . On the contrary, when running the set-debug-mode-job, it loosens the rules on the USB ports (e.g. a USBGuard policy to allow all USB ports access), and sets the device shadow attribute with debug mode. This way, a technician can plug in a mouse and a keyboard and run debugging software through USB ports.
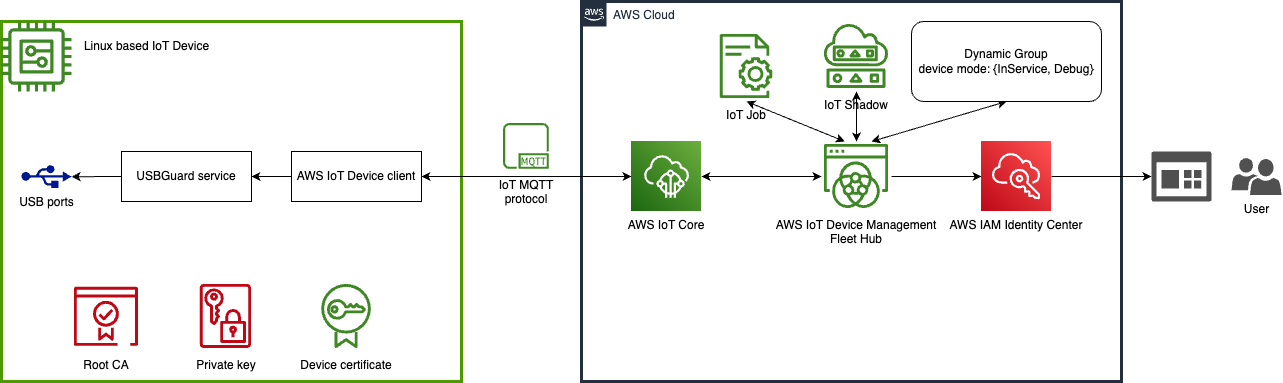
Figure 2: Solution architecture
This can be accomplished through the following procedures:
- Configure AWS IoT Core policy and device attributes
- Provision the device
- Install USBGuard on the device
- Implement the IoT communication client code
- Configure job docs in IoT Jobs
- Create AWS IoT Device Management Fleet Hub application
Steps 1 and 2 can be performed either in AWS IoT Core console or through AWS CLI. We use AWS CLI commands in the walkthrough. Step 3 and 4 are configured on the IoT device. And step 5 and 6 are performed in AWS IoT console.
Step 1: Configure AWS IoT Core policy and device attributes
POLICY_NAME=IoTJobDemo_Policy
THING_TYPE_NAME=DemoDevice

# Create an IoT policy
# NOTE: This policy is for demonstration purpose only! Please do not use in production environment.
# Replace us-east-1:123456789012 with your AWS_REGION:AWS_ACCOUNT_ID
# Replace uniqueThingName with your IoT device thing name
aws iot create-policy --policy-name $POLICY_NAME --policy-document '{
  "Version": "2012-10-17",
  "Statement": [
    {
      "Effect": "Allow",
      "Action": "iot:Connect",
      "Resource": "arn:aws:iot:us-east-1:123456789012:client/uniqueThingName"
    },
    {
      "Effect": "Allow",
      "Action": "iot:Publish",
      "Resource": [
        "arn:aws:iot:us-east-1:123456789012:*"
      ]
    },
    {
      "Effect": "Allow",
      "Action": "iot:Subscribe",
      "Resource": "arn:aws:iot:us-east-1:123456789012:*"
    },
    {
      "Effect": "Allow",
      "Action": "iot:Receive",
      "Resource": [
        "arn:aws:iot:us-east-1:123456789012:topic/test/dc/subtopic",
        "arn:aws:iot:us-east-1:123456789012:topic/$aws/things/uniqueThingName/jobs/*"
      ]
    },
    {
      "Effect": "Allow",
      "Action": [
        "iot:DescribeJobExecution",
        "iot:GetPendingJobExecutions",
        "iot:StartNextPendingJobExecution",
        "iot:UpdateJobExecution"
      ],
      "Resource": "arn:aws:iot:us-east-1:123456789012:topic/$aws/things/uniqueThingName"
    }
  ]
}
'


# Create thing type
aws iot create-thing-type --thing-type-name $THING_TYPE_NAME

# Create dynamic thing groups
aws iot create-dynamic-thing-group --thing-group-name "Debug" --query-string "shadow.name.device-mode.reported.mode:Debug" > /dev/null
aws iot create-dynamic-thing-group --thing-group-name "InService" --query-string "shadow.name.device-mode.reported.mode:InService" > /dev/null
Step 2: Provision the device
THING_NAME="<your device unique identifier>"
THING_PATH="<your work directory>/$THING_NAME"

aws iot create-thing --thing-name $THING_NAME --thing-type-name $THING_TYPE_NAME

# Create keys and certificate
aws iot create-keys-and-certificate --set-as-active \
    --private-key-outfile $THING_PATH/private.key \
--certificate-pem-outfile $THING_PATH/certificate.pem > $THING_PATH/keys_response

# Get Root CA
wget https://www.amazontrust.com/repository/AmazonRootCA1.pem -O $THING_PATH/rootCA.pem

# Parse output for certificate ARN and ID
CERTIFICATE_ARN=$(jq -r ".certificateArn" $THING_PATH/keys_response)
CERTIFICATE_ID=$(jq -r ".certificateId" $THING_PATH/keys_response)
# Attach policy to certificate
aws iot attach-policy --policy-name $POLICY_NAME --target $CERTIFICATE_ARN
# Attach certificate to thing
aws iot attach-thing-principal --thing-name $THING_NAME --principal $CERTIFICATE_ARN
Step 3: Install USBGuard on the device
Follow the public documentation to install USBGuard.
Generate two USBGuard policies, debug-rules.conf and in-service-rules.conf. in-service-rules.conf contains strict rules and will be used in device’s in-service mode. debug-rules.conf loosens the rules on the USB ports and will be used in device’s debug mode.
For example, a debug-rules.conf can be a policy allowing all access to all USB ports:
echo "allow id *:*" > debug-rules.confin-service-rules.conf can contain rules to reject any USB flash disk which implements a keyboard or a network interface.
allow with-interface equals { 08:*:* }
reject with-interface all-of { 08:*:* 03:00:* }
reject with-interface all-of { 08:*:* 03:01:* }
reject with-interface all-of { 08:*:* e0:*:* }
reject with-interface all-of { 08:*:* 02:*:* }
Step 4: Implement the IoT communication client code
On the IoT device itself, create a work directory:
WORKDIR="<your work directory>"
THING_PATH="$WORKDIR/$THING_NAME"
mkdir -p $THING_PATH
Put the certificate.pem, private.key, rootCA.pem from Step 2 under the $THING_PATH.
We use the AWS IoT Device Client on the device. The AWS IoT Device Client is free, open-source, modular software written in C++ that you can compile and install on your Embedded Linux based IoT devices to access AWS IoT Core, AWS IoT Device Management, and AWS IoT Device Defender features by default. To install and configure the client:
# Building
cd $WORKDIR
git clone https://github.com/awslabs/aws-iot-device-client
cd aws-iot-device-client
mkdir build
cd build
cmake ../
cmake --build . --target aws-iot-device-client

# Setup
cd ../
./setup.sh
At this point you’ll need to respond to prompts for information, including paths to your thing certs:
Do you want to interactively generate a configuration file for the AWS IoT Device Client? y/n
y
Specify AWS IoT endpoint to use:
<This is the iot:Data-ATS endpoint. Check out https://docs.aws.amazon.com/iot/latest/developerguide/iot-connect-devices.html>
Specify path to public PEM certificate:
$THING_PATH/certificate.pem
Specify path to private key:
$THING_PATH/private.key
Specify path to ROOT CA certificate:
$THING_PATH/rootCA.pem
Specify thing name (Also used as Client ID):
$THING_NAME
Would you like to configure the logger? y/n
n
Enable Jobs feature? y/n
y
Specify absolute path to Job handler directory:
$WORKDIR/.aws-iot-device-client/jobs
…
Enable Sample Shadow feature? y/n
y
Specify a shadow name for the feature to create or update:
device-mode
Specify the path of a file for the feature to read from:
$WORKDIR/.aws-iot-device-client/device-mode-input.json
Specify a the path of a file for the feature to write shadow document to:
$WORKDIR/.aws-iot-device-client/device-mode-output.json
…
Do you want to install AWS IoT Device Client as a service? y/n
N
In the $WORKDIR/.aws-iot-device-client/jobs, create a usbguard-policy directory and put the debug-rules.conf and in-service-rules.conf generated from step 3 in there.
Create two corresponding job handler scripts in the $WORKDIR/.aws-iot-device-client/jobs to handle set device mode. They will be triggered by IoT Job docs.
The script to set device to debug mode: set-debug-mode.sh
#!/usr/bin/env sh
set -e

BASEDIR=$(dirname $0)
echo '{"mode": "Debug"}' > $BASEDIR/../device-mode-input.json
cat $BASEDIR/usbguard-policy/debug-rules.conf > /etc/usbguard/rules.conf
systemctl restart usbguard.service
The script to set device to in-service mode: set-in-service-mode.sh
#!/usr/bin/env sh
set -e

BASEDIR=$(dirname $0)
echo '{"mode": "InService"}' > $BASEDIR/../device-mode-input.json
cat $BASEDIR/usbguard-policy/in-service-rules.conf > /etc/usbguard/rules.conf
systemctl restart usbguard.service
Now, everything has been configured on the device, we can run the device client by:
cd $WORKDIR/aws-iot-device-client
sudo ./build/aws-iot-device-client
Step 5: Configure job docs in IoT Jobs
Two job docs need to be created in IoT Jobs. set_debug_mode.json and set_in_sevice_mode.json. They will trigger the set-debug-mode.sh and set_in_sevice_mode.sh handlers that we wrote in Step 4 respectfully.
Example of set_debug_mode.json:
{
  "_comment": "This sample JSON file can be used for set debug mode.",
  "version": "1.0",
  "steps": [
    {
      "action": {
        "name": "Set Device Mode to Debug",
        "type": "runHandler",
        "input": {
          "handler": "set-debug-mode.sh"
        },
        "runAsUser": "root"
      }
    }
  ]
}
Create an Amazon S3 bucket and upload the job docs. In AWS IoT Jobs console, configure the Job templates with the two job docs:

Step 6: Create AWS IoT Device Management Fleet Hub application
Follow the blog post Get Started with Fleet Hub for AWS IoT Device Management to set up Fleet Hub. On your Fleet Hub application, you should be able to see your device and its mode.

You can also control to change the mode by run jobs from the dashboard.

On the device, you should be able to observe that access to any USB port is corresponding to the rules you have set for the device mode.
Cleaning up
To avoid incurring future charges, delete all resources that you have created.
The Fleet Hub application can be deleted by first navigating to Fleet Hub in the AWS IoT console and then selecting applications. Select your application and choose delete.
AWS IoT Core Fleet indexing can be turned off by navigating to the AWS IoT Core console, selecting Settings, then navigating to Manage fleet Indexing and then Thing indexing and group indexing.
In the AWS IoT Core console, delete Things, Thing groups and Thing types under All devices. Detach ‘thing’ and IoT policy from registered certificate. Delete device certificate, ‘thing,’ and IoT policy.
Conclusion
In this post, we showed you how to protect Linux-based IoT devices and computers against unintended USB access with USBGuard and securely control USB access based on the device mode. View and control devices’ modes in AWS IoT Device Management Fleet Hub application. The solution is flexible and can be adapted to other use cases. For example, when the device is in debug mode, capture debug logs and send them to the cloud for further examination.
To learn more about how to use AWS IoT Core, you can refer to the documentation.
Author bio

Sharon Li
Sharon Li is a solutions architect at AWS, based in the Boston, MA area. She works with enterprise customers helping them solve difficult problems and build on AWS. Outside of work, she likes to spend time with her family and explore local restaurants.