AWS for M&E Blog
Dynamically configuring job settings with AWS Elemental MediaConvert
Businesses in the media industry often have supply chain systems where their upstream vendors (such as content creators or production companies) receive and ingest large media files. These media files come in a variety of file formats, and the individual file sizes often reach hundreds of gigabytes in size.
After the media files are ingested by the upstream vendors, they typically undergo a quality assurance process. Once the files have passed this quality check, they are then packaged and distributed to the media company’s downstream customers.
During quality assurance, downloading such large files consumes lot of resources (memory, network, CPU) and time. Hence, an important step in their business process is to transcode and reduce the size of media files.
Transcoding is the process of converting an audio or video from one format to another. This enables customers to create digital assets in different formats and supports use cases including:
- Playing media on devices that are not supported before transcoding. For example, converting a Windows Media file to MP4 (MPEG-4 Part 14) for supporting wider compatibility.
- Compressing large media files to a smaller size without compromising the video quality, to make storing and sharing content more efficient.
Given the large volume of media files that needs features such as digital rights management, and transcoding, many media companies use AWS Elemental MediaConvert to handle these requirements.
What is AWS Elemental MediaConvert?
AWS Elemental MediaConvert (MediaConvert) is a file-based video processing service that transcodes content for broadcast and multi-screen delivery at scale. This service provides the following features:
- Scalability and Elasticity: Automatically scaling to handle transcoding workloads, provisioning the necessary compute resources as needed. This facilitates handling peak loads without compromising performance or turnaround time.
- Reliability: Running transcoding jobs on redundant infrastructure across multiple Availability Zones, providing high availability and fault tolerance.
- Ease of Use: An intuitive user interface, as well as comprehensive APIs, make it straightforward to integrate transcoding into existing workflows.
- Optimizing Cost: Pay-as-you-go pricing model and automatic scaling capabilities help you optimize transcoding costs, as you pay for the resources you use.
To transcode media files using AWS Elemental MediaConvert, jobs are configured and submitted with the required encoding settings. We will explore how the job settings in MediaConvert can be dynamically configured. Specifically, we will demonstrate the ability to programmatically configure audio tracks while transcoding the video files.
The video files that have been transcoded using the configured settings are then utilized for various purposes. For example, they can be used for playback on different media devices, and as part of the quality assurance process are integrated into other business workflows.
Another example of dynamically configurable job settings in MediaConvert includes parameters such as bitrate and name modifiers. With MediaConvert, it is possible to programmatically configure any of the available job settings.
Dynamically configure the audio tracks during video file transcoding
Let’s explore how the job settings in AWS Elemental MediaConvert can be dynamically configured. Specifically, we will demonstrate the ability to programmatically configure the audio tracks at the same time transcoding the video files.
The following architecture diagram is an overview of the process.
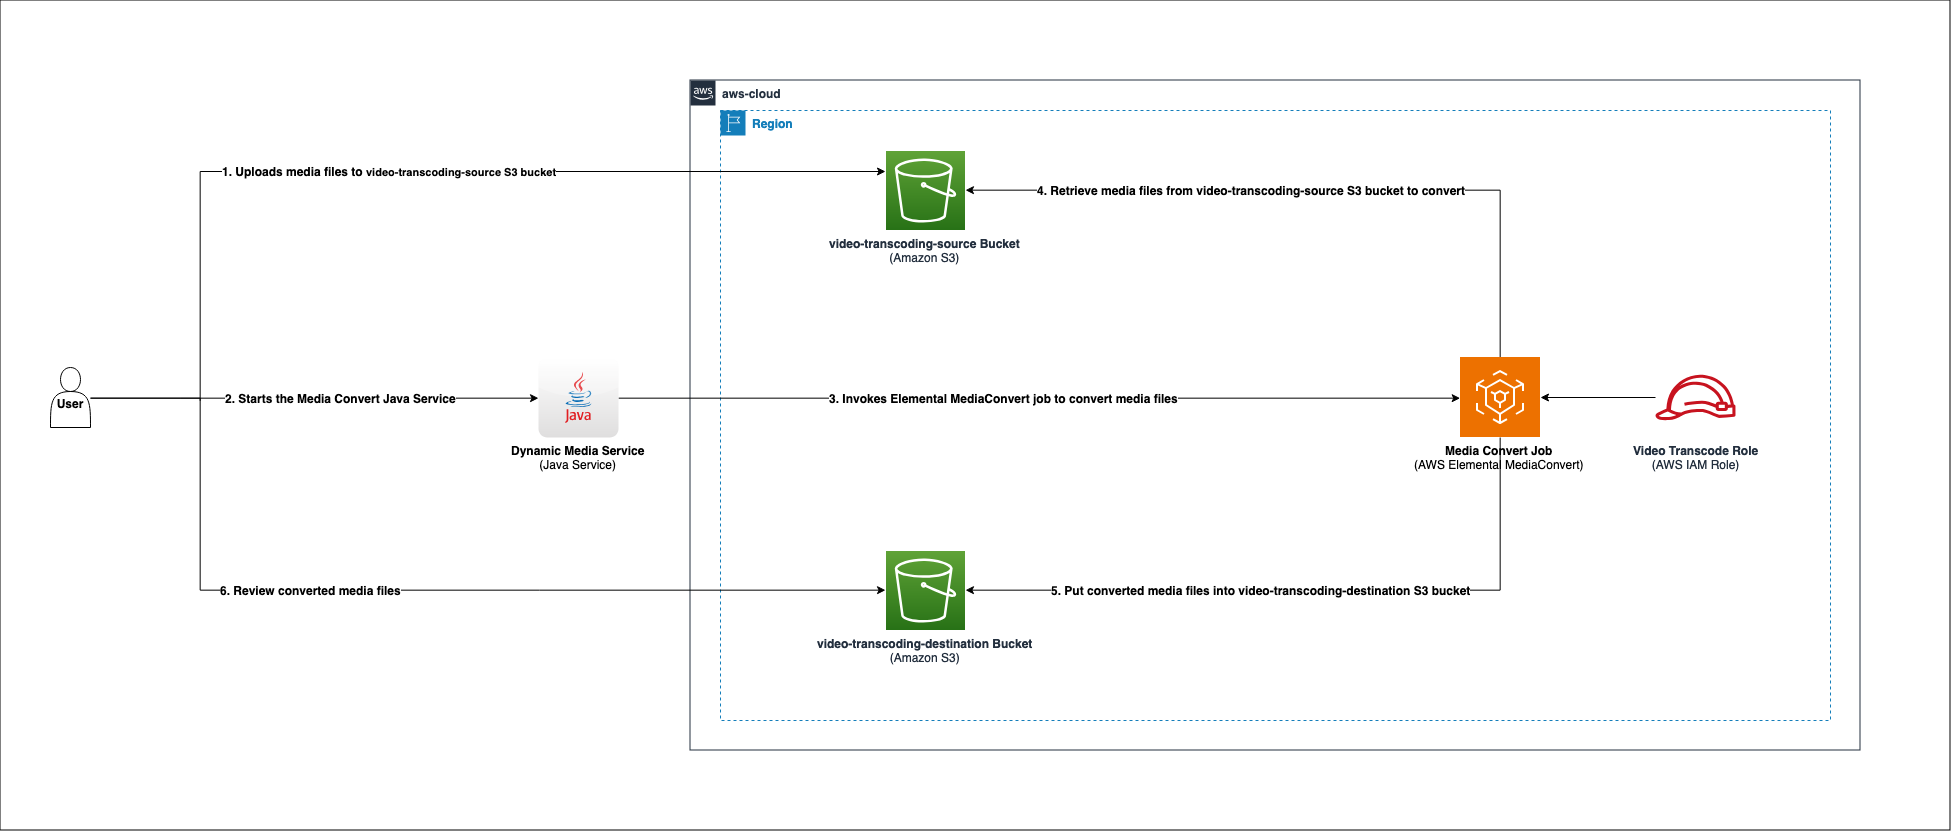
Figure 1: Architectural Diagram – Dynamically Configuring Audio Tracks during Video File Transcoding.
In the proposed architecture, the process involves submitting video files to dynamically configure the audio track settings within the AWS Elemental MediaConvert job. To accomplish this, the user first uploads the video files to the mediaconvertstack-videotranscodingsource Amazon Simple Storage Service (Amazon S3) bucket. Then, a Java application called Dynamic Media Service is initiated, which will invoke the MediaConvert job to transcode the video files using the dynamically configured settings. The transcoded video files are then output to the mediaconvertstack-videotranscodingdestination S3 bucket for further downstream processing or use.
Please use the following steps to setup, deploy and run the test for the Java service MCDynamicAudioTest.
Step 1: Setup the local laptop or desktop
- Clone the GitHub repository
- Complete the prerequisites:
- Validate that you have an AWS account with credentials configured, and js and npm installed
- Install the AWS Cloud Development Kit (AWS CDK) by using the following code:
npm install -g aws-cdk - If AWS CDK Toolkit version is earlier than 2.140.0, then enter the following command to update it to version 2.140.0:
npm install -g aws-cdk@2.140.0 --force
- Install CDK dependencies:
cd cdk
npm install - Export environment variables required for the CDK stack:
export AWS_REGION=<<region>>
export AWS_ACCOUNT=<<account>>
Step 2: Deploy the AWS resources and run the Java service
Deploy the AWS resources using the MediaConvert CDK stack to your AWS account using the following command:
- This step is required for the first time to bootstrap the CDK environment, but is optional for successive deployments:
npx cdk bootstrap - Deploy the AWS resources using the MediaConvert CDK stack to your AWS account:
npx cdk deploy
This will output the following AWS resources:
- mediaconvertstack-videotranscodingsource S3 bucket: Where the video files are uploaded and transcoded.
- mediaconvertstack-videotranscodingdestination S3 bucket: Where the video files are sent after transcoding.
- VideoTranscode Elemental Media Job Queue: Where the Java application submits the MediaConvert job to.
- VideoTranscodeRole IAM Role: The role and AWS Identity and Access Management (IAM) permissions required for the MediaConvert to run the job—required for read and write permissions to the source and destination buckets.

Figure 2: MediaConvert Stack Outputs.
- Download sample video files:
- Respectively, rename sample files to:
- SampleVideo-ZeroAudioTrack.mov
- SampleVideo-MultiAudioTrack.mov
- SampleVideo-SingleAudioTrack.mp4
- Log into your AWS Management Console
- Navigate to Amazon S3 and then Buckets
- Upload the newly renamed sample files to the mediaconvertstack-videotranscodingsource S3 bucket.

Figure 3: Media files in source bucket.
- Update the config.properties file with values for region, mcRoleArn, mcQueueArn, sourceBucket and destinationBucket obtained from the output returned upon deploying the stack in Step 2.

Figure 4: Configuration Properties.
- Run MCDynamicAudioTest class to start transcoding of the files present in the mediaconvertstack-videotranscodingsource S3 bucket. This will engage the Dynamic Media Service to dynamically configure the number of audio tracks through a command line when transcoding the media files.
- Run the following test code to validate that the files have been transcoded properly:
cd ../service
mvn test - Figure 5 represents the expected output when the tests have successfully completed.

Figure 5: MediaConvert Transcoding Job IDs.
Step 3: Validating Transcoded Video File
- Check whether submitted jobs are completed:
- Log into the AWS Management Console.
- Navigate to AWS Elemental MediaConvert and then to Jobs.
- Locate the Job IDs for the files submitted in Figure 5.
- Confirm that the Job IDs all have a status of COMPLETE.

Figure 6: MediaConvert Jobs Completed.
- Once transcoding is done, validate the files are transcoded to the mediaconvertstack-videotranscodingdestination S3 bucket by navigating to Amazon S3 and then to Buckets.

Figure 7: Transcoded media files in destination bucket.
- Validate the number of audio tracks before and after transcoding:
- Navigate to Media Info Online to validate the audio tracks on the transcoding video files.
Note: The transcoded version of the SampleVideo-MultiAudioTrack.mov file will have an additional audio track compared to the input media file. The original file has four tracks, while the transcoded version will have five tracks. This extra track is included to facilitate the quality assurance process. It will allow the validation of each individual track and provide the ability to listen to all the tracks when the video is played back.
-
- Figure 8 validates the audio tracks count for SampleVideo-MultiAudioTrack.mov.

Figure 8: Transcoded media files in destination bucket.
Conclusion
We covered transcoding and the advantages it provides for customers with saving costs thru autoscaling and a Pay-as-you-go pricing model. In addition, we covered how AWS Elemental MediaConvert job settings can be dynamically configured. We then wrapped by walking through an example and illustrating how the solution provides an extra track for quality assurance.
AWS helps customers reduce operational burden so they can spend more time creating. To learn more about purpose-built solutions and services for Content Production, please visit the AWS Media and Entertainment Content Production page.
Contact an AWS Representative to know how we can help accelerate your business.