AWS for M&E Blog
A deep dive into Output Locking in AWS Elemental Live
Introduction
In order to deliver broadcast-grade resilience, it’s essential to have redundant contribution encoders so live event viewing won’t be affected even if one of the encoders fails. However, when you run multiple encoders for redundancy, the outputs from those encoders must be synchronized with frame-level accuracy. Otherwise, viewers experience discontinuity when the encoder is switched over to another one. This post explains how to achieve frame-accurate synchronization using AWS Elemental Live’s Output Locking feature.
What is Output Locking?
Output Locking is an AWS Elemental Live feature that lets you synchronize live events running across multiple encoders based on the input timecode. The outputs from the “locked” events are interchangeable in the following sense:
- The first frame in each group-of-pictures (GOP) is identical
- The first frame in each segment is identical
- The timestamp associated with each frame is identical
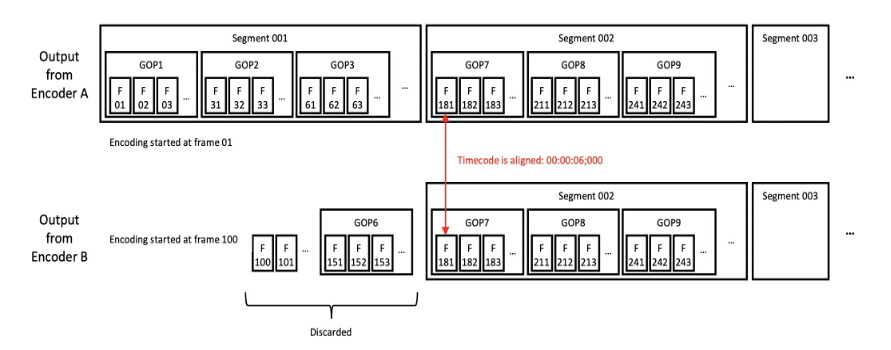
Two streams that are fully interchangeable
In the preceding example, the two streams are aligned across segments and GOP boundaries based on the input timecodes. To achieve this, the encoders communicate with each other over multicast or unicast networks to share the data necessary for synchronization. For more details such as how Output Locking works, typical use cases, input/output requirements, please refer to the Output Locking user guide. This post focuses exclusively on hands-on demos.
Part 1: How to enable Output Locking
Now let’s see how Output Locking produces frame-accurate streams. The first thing you need is a timecode-embedded source. In a production workflow, this is handled by a timecode inserter or contribution encoder. In this demo, however, we set up our own contribution encoder with embedded timecode using AWS Elemental Live. So, all you need is a sample video that can be ingested by AWS Elemental Live as a file input. You don’t need two separate nodes of AWS Elemental Live to follow this demo, although it’s ideal to have two encoders to examine the behavior of Output Locking.
The following is an overview of what we are building in this demo.
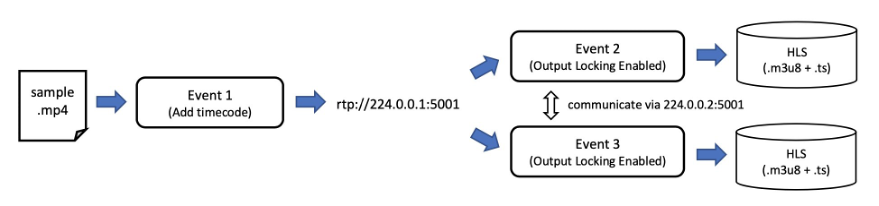
Three live events work together; one event writes a timecode-embedded RTP stream and two events read it and produce identical HLS streams in local storage
We produce a timecode-embedded RTP stream, transcode it into HLS streams in the local storage, and then check if the two outputs are aligned with a frame-level accuracy. Each event can run on a separate node, or you can run all the events on the same node as long as they can communicate via multicast IP address.
Step 1: Prepare timecode-embedded source
As Output Locking requires input timecodes, the source type needs to be one of the following:
- SDI input with embedded timecode
- SDI input + separate LTC input
- Network input (UDP/TS) with AVC/HEVC Picture timing SEI
If you already have one of these, feel free to skip to Step 2. If not, log in to the AWS Elemental Live ’s web UI and follow the instructions.
1. Choose the New Event button
2. For the input type, choose File Input and enter the local path of your video file
3. Select Loop Source check box
4. For Output Groups, choose UDP/TS tab
5. Select a suitable encoding preset from Preset drop-down menu and choose Add Output button
6. For Primary Destination, enter an RTP url with a multicast IP address (for example rtp://224.0.0.1:5001)
7. Expand Advanced- Preprocessors and select the Timecode Insertion check box. This adds Picture Timing SEI to the output AVC stream.
![[Timecode Insertion] check box in the stream settings](https://d2908q01vomqb2.cloudfront.net/fb644351560d8296fe6da332236b1f8d61b2828a/2021/07/07/july73.png)
[Timecode Insertion] check box in the stream settings
8. Choose the Create button and then choose the Start button to start the event.
You now have a timecode-embedded UDP/TS stream that is being sent to the multicast address.
Step 2: Enable Output Locking
With a timecode-embedded source in hand, let’s create two more events (Event2 and Event3 in the preceding workflow diagram) to demonstrate Output Locking.
1. Choose the New Event button
2. For the input type, choose Network Input and enter the URL of the source you just created in Step 1 (If you have your own source with timecode, use it instead)
3. Expand Advanced and make sure that the Timecode Source in Video Selector is set to Embedded. This is where the encoder reads incoming timecodes from.
![[Timecode Source] dropdown in the Video Selector settings](https://d2908q01vomqb2.cloudfront.net/fb644351560d8296fe6da332236b1f8d61b2828a/2021/07/07/July74.png)
[Timecode Source] dropdown in the Video Selector settings
4. Expand Timecode Configuration and configure as follows:
![[Timecode Configuration] settings](https://d2908q01vomqb2.cloudfront.net/fb644351560d8296fe6da332236b1f8d61b2828a/2021/07/07/July75.png)
[Timecode Configuration] settings
- Source: Choose “Embedded” This is the output timecode — the timecode written onto the outgoing frames. *
- Sync Threshold: Leave it blank
- Require Initial Timecode: Check
* If you are using an LTC connected to the SDI card, choose External Reference Connector in the Source settings. Our blog post explains how to generate LTC signals using iOS apps.
5. For Global Processors, turn on [Output Locking] switch and configure as follows:
![[Output Locking] settings](https://d2908q01vomqb2.cloudfront.net/fb644351560d8296fe6da332236b1f8d61b2828a/2021/07/07/July76.png)
[Output Locking] settings
- Epoch Locking: Epoch Locking is a form of output locking. Instead of synchronizing to a remote encoder, an encoder would synchronize itself to a hypothetical encoder that started at 00:00:00, UTC on 1 January 1970 (Epoch time) and has been running ever since. In this way, multiple encoders can produce aligned outputs without communicating with each other. Epoch locking is supported in Microsoft Smooth output groups, in outputs that have integer frame rates (for example, 25 fps and 50 fps). In this demo, though, leave it unchecked.
- Multicast: Check if you use a multicast IP address for communicating with other events. Uncheck if you use unicast IP addresses. Note that the multicast address allows you to lock together any number of events whereas unicast only two events.
- Address/Port/Interface: For multicast, enter the multicast IP address (224.0.0.0 – 239.255.255.255. ) You need to specify the same multicast address in all events you want to lock together. For unicast, enter the sender’s and receiver’s IP addresses. If two events are running on the same node, just use 127.0.0.1 with different port numbers.
6. For Output Groups, choose Apple HLS tab
7. For Destination field, enter a path of the local filesystem whereby all the HLS output files (.m3u8 and .ts files) will be written to the local storage. We examine those files later to see if Output Locking is really working.
8. Select a suitable encoding preset from Preset drop-down menu and choose the Add Output button
9. Expand Advanced-Preprocessors and turn on Timecode burn-in switch. This prints a timecode on each output frame. Choose the large font to make the visual confirmation easier.
![[Timecode burn-in] settings](https://d2908q01vomqb2.cloudfront.net/fb644351560d8296fe6da332236b1f8d61b2828a/2021/07/07/July77.png)
[Timecode burn-in] settings
10. Choose the Create button
You can duplicate this event using Duplicate Event button to create any number of events to be locked together. If you run these events on the same node, make sure that the Destination’s local path is different for each event.
Step 3: Start encoding
Once you have duplicated the events, start one of the events. If you leave it running for a while, you will see an alert: “Not Receiving Output Locking Status Messages,” which is an expected behavior. The event that started earlier waits for the subsequent event to start. The alert disappears once you start the second event.

An alert that indicates the event is not locked with any other events
After running both of the events for a while, stop the events and gather the outputs (.m3u8 file and .ts files) from each encoder’s local storage. We compare the outputs from the both events using VLC player.
Step 4: Verify the outputs
As we configured the output video frame to have timecode burned in, you can see each frame’s timecode as follows:
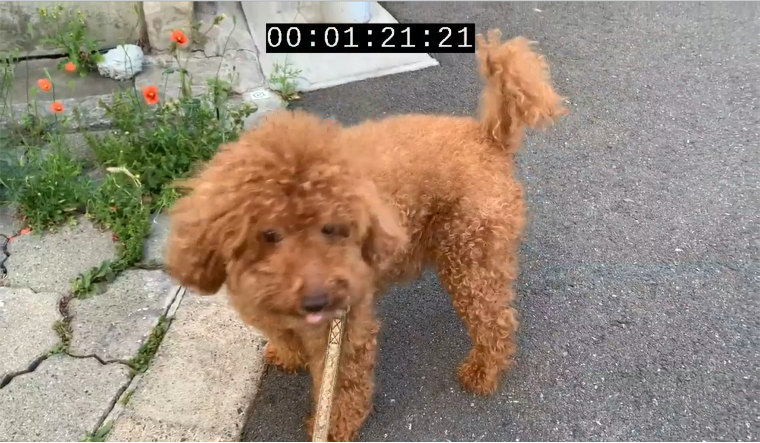
Video frame with timecode burned in
Pick any segment (.ts file) and view all the frames included in the segment. In the VLC player, you can play back the video frame by frame using short-cut key [e]. When you compare the two outputs you can see that the same name of the TS file contains exactly the same frames (this is the state depicted in Fig-1.) The .m3u8 files are identical as well.
Part 2: Failover scenario
Next, we demonstrate how Output Locking can be used to build fault-tolerant workflows. Since the segments produced by two encoders have identical content/timestamp, it doesn’t matter which encoder a client pulls a segment from – the experience is identical either way.
To demonstrate that behavior, we use AWS Elemental MediaPackage’s redundant ingest feature so we can perform an input failover:
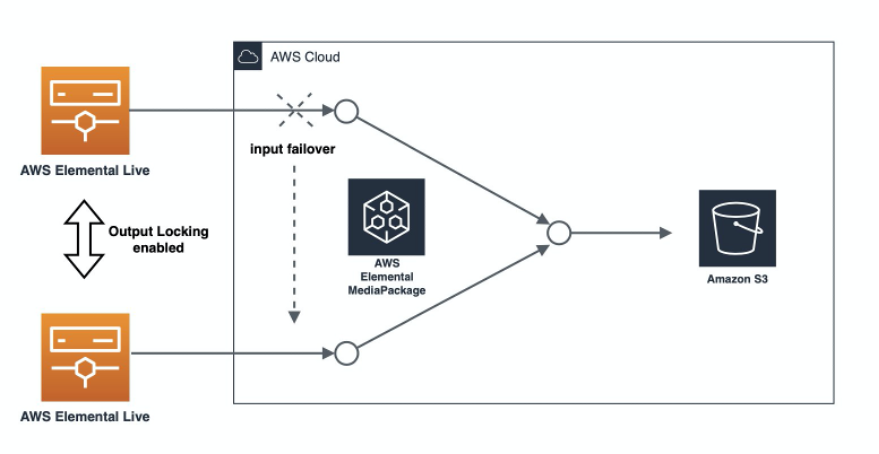
Demo workflow – input failover
Step 1: Create a MediaPackage channel
To set up a MediaPackage channel/endpoint, refer to MediaPackage’s tutorials to create a Live or Live-To-VOD pipeline. Note that MediaPackage supports input redundancy by default; provisioning a channel automatically generates a pair of ingest URLs and WebDAV credentials (username/password) that can be used by upstream encoders (in this case AWS Elemental Live).
Step 2: Modify the previous demo to use MediaPackage
Go back to AWS Elemental Live and update the events you created in the previous demo.
1. Change the Destination of the HLS output from the local path to MediaPackage’s ingest URL. Make sure that each output is ingested into a different destination.
2. Click the lock icon and enter the WebDAV credentials (Username/Password)
3. For HTTP Push Dialect, choose “WebDAV”
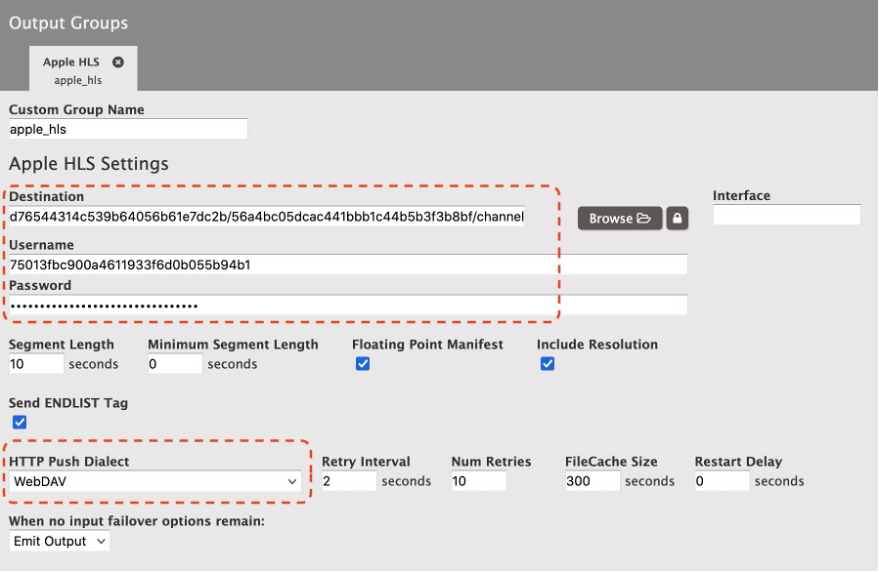
The output destination configured to use MediaPackage
4. Add prefix to Timecode Burn-in settings. This should be different for each event so you can distinguish the source when the input stream is switching over to the other input stream at MediaPackage.
![[Timecode burn-in] settings - prefix](https://d2908q01vomqb2.cloudfront.net/fb644351560d8296fe6da332236b1f8d61b2828a/2021/07/07/July712.png)
[Timecode burn-in] settings – prefix
5. Choose the Update button
Now, AWS Elemental Live’s events are configured to send the outputs to MediaPackage instead of the local storage.
Step 3: Start encoding
Once you modified the events, start them just like the previous demo. The outputs from both the events are ingested by MediaPackage, but only one of them is used at a time, which is called the active stream. You can determine which output is currently active by checking the timecode’s prefix in MediaPackage’s preview playback.
Step 4: Stop one of the outputs to trigger a failover
The next step is to trigger a failover and switch the active stream. In order to simulate an input failure, go back to AWS Elemental Live’s Web UI.
1. Choose the event that sends the active stream you’ve identified in Step 3
2. Choose Controls button to pause the stream

Pause button on the output stream
In a matter of time, MediaPackage stops receiving content from the active stream and switches over to the other input stream. Watch MediaPackage’s preview carefully and you can see the change in the prefix of the timecode. Or, play back the harvested asset frame by frame using VLC player just like you did in the first demo. You can see the exact moment when the input stream is switching over to the other stream without any discontinuity in the frames.

 |
Stream switching in the middle → |  |
Conclusion
In this post, we learned how to enable Output Locking in AWS Elemental Live to obtain two outputs with interchangeable segments. We also covered how Output Locking can be used to build a fault-tolerant workflow using AWS Elemental MediaPackage. It might sound obvious that two streams created from the same source are identical, but you can see that achieving the same result is difficult without Output Locking. If you want to learn more about how to set up a resilient live workflow using AWS Elemental Live together with AWS Elemental Media Services, please check out our series of blog posts.
AWS helps customers run low-latency broadcast workloads with the most agility, elasticity, scalability, and reliability of any cloud. Explore https://aws.amazon.com/media/broadcast/ to learn more.
If you have questions, feedback, or would like to get involved in discussions with other community members, visit the AWS Developer Forums: Media Services.