AWS for M&E Blog

How to improve user engagement with real-time AR effects using BytePlus Effects and Amazon IVS

This blog post was co-authored by Chen Xiaoyu, ML Solution Director at BytePlus, Hao Chen at AWS, and Tian Shi at AWS.

According to Sandvine’s Global Internet Phenomena Report, video content accounted for more than 65% of all internet traffic in 2022. This number is up 24% from 2021 and is set to increase with the growing number of platforms available to creators to reach audiences through streaming video.

With such a large, diverse, and growing market, it can be challenging to differentiate your user-generated content (UGC) platform. One way some platforms have found success is by adding features like augmented reality (AR).

BytePlus Effects, an SDK that features an extensive library of AR engagement tools, provides one example of how developers can quickly incorporate these features. The SDK is available offline, meaning that all the effects are created on the user’s device without sending any personal data to the cloud. While there are several advantages to this approach, increased performance and user data privacy are paramount in creating a positive experience that establishes trust with users.

BytePlus Effects can also integrate with your live streaming UGC platform. In this blog post, we explore how to use the library to create an iOS application that broadcasts to Amazon Interactive Video Service (Amazon IVS).

Prerequisites

To get started, set up a few prerequisites:

Once you have created a streaming channel, note the following pieces of information provided by Amazon IVS:

  1. The Ingest Server URL
  2. The Stream Key
  3. The Playback URL

For a complete guide to Amazon IVS Channels, please refer to the Getting Started with Amazon IVS guide.

SDK installation

For easy SDK installation and integration, we recommend integrating the SDK via CocoaPods. Both Amazon IVS and BytePlus support CocoaPods. For more information, please refer to the Amazon IVS Broadcast SDK (iOS) Installation Guide and BytePlus Effect SDK (iOS) Installation Guide.

Integration steps

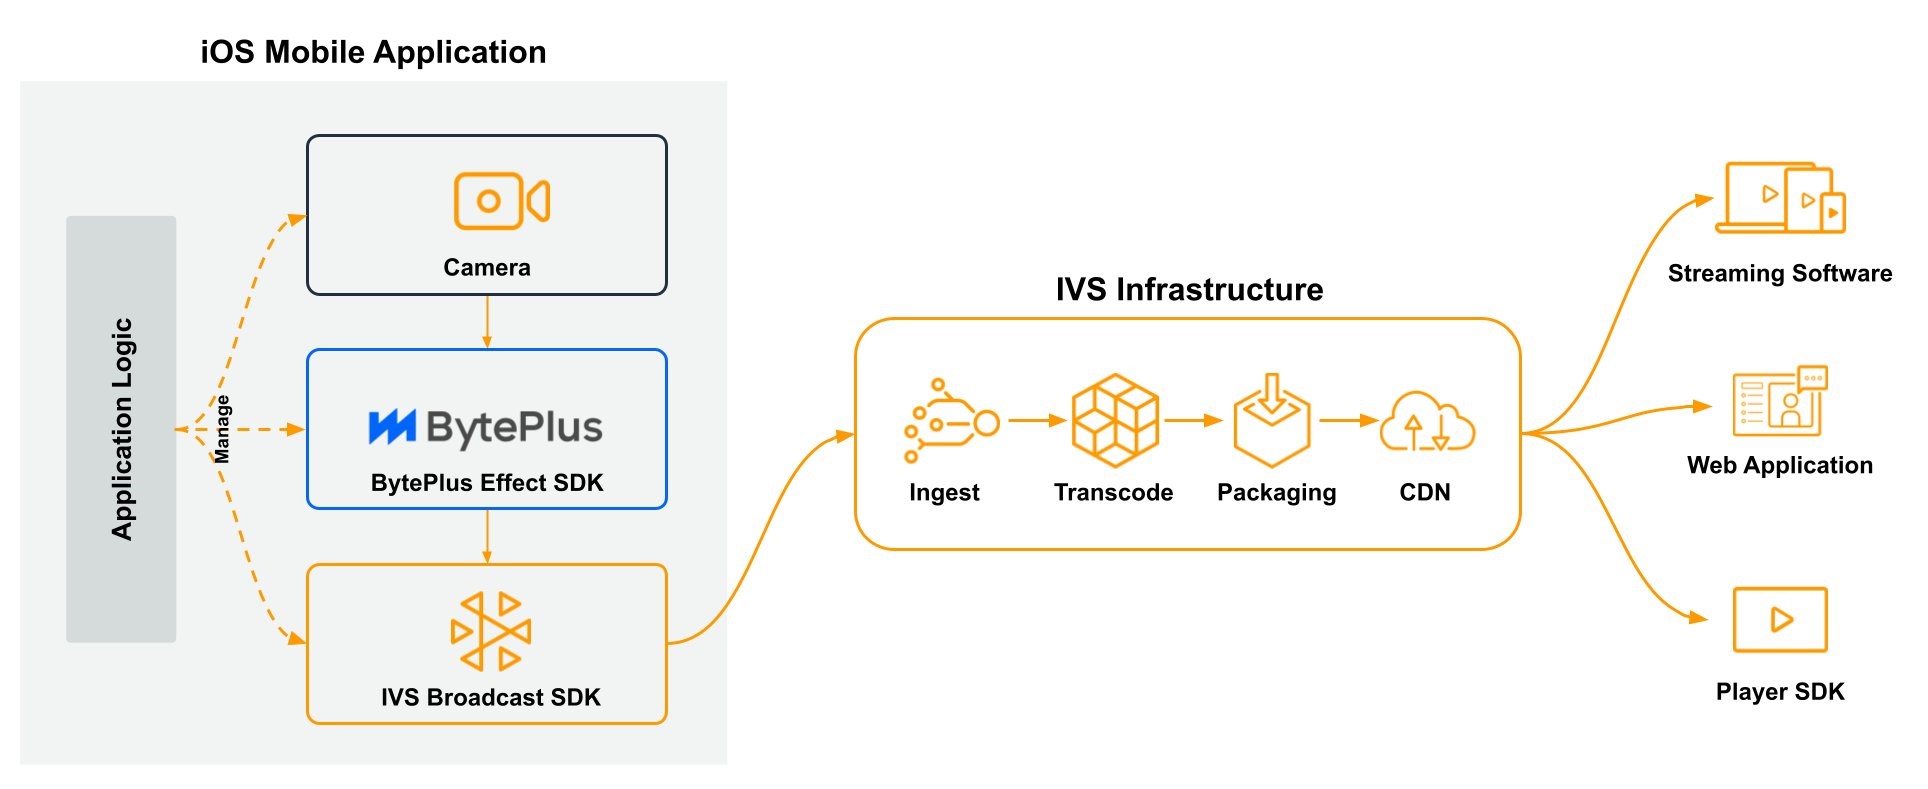
By default, the Amazon IVS iOS broadcast SDK provides an API to control and capture device camera images for streaming. In order to integrate with the BytePlus Effect SDK, we will give application logic to control the device camera and use the BytePlus Effect SDK to process the image, then pass the processed image to the IVS Broadcast SDK via CustomImageSource for streaming. In this blog post, we demonstrate interaction steps using Object-C code, which is compatible between Amazon IVS iOS broadcast SDK and BytePlus Effect SDK.

Diagram showing how the device camera image works with the BytePlus Effects SDK and the Amazon IVS Broadcast SDK

  1. Setup Broadcast Session
  2. Setup CustomImageSource configuration
  3. Setup Video Capture
  4. In this example, we will let the BytePlus Effect SDK access cameras via BEVideoCapture. However, application developers are free to use other input sources of their choice.
  5. Process Captured Image using the BytePlus Effect SDK
  6. Send Processed Image Buffer to CustomImageSource
  7. Start Broadcast

Setup broadcast session

Detailed SDK instructions can be found on the Amazon IVS Documentation page and the sample application available on GitHub.

Setup CustomImageSource with broadcast configuration

CustomImageSource is an advanced feature of the Amazon IVS Broadcast SDK. It allows application developers to submit image buffers from custom input sources for streaming.

Broadcast configuration

Using CustomImageSource as the input source for the broadcast session, we first need to set up broadcast configuration. In this example, we use preset configuration standardPortrait.

// Create Broadcast Configuration
IVSBroadcastConfiguration *config = [[IVSPresets configurations] 
standardPortrait];

Mixer slot configuration

In order to use CustomImageSource as input source, we use the mixer feature in the Broadcast SDK to create a custom Mixer Configuration. The mixer is a video processing unit that takes multiple input sources (slots) and generates a single output for ingestion. For demonstration purposes, this example uses a single slot.

// Set up Mixer Slot Configuration
IVSMixerSlotConfiguration *customSlot = [IVSMixerSlotConfiguration new];
customSlot.size = config.video.size;
customSlot.position = CGPointMake(0.0, 0.0);
customSlot.preferredAudioInput = IVSDeviceTypeUserAudio;
customSlot.preferredVideoInput = IVSDeviceTypeUserImage;
NSError *customSlotError = nil;
NSString * const customSlotName = @"custom-slot";
[customSlot setName:customSlotName error:customSlotError];

// Set this slot to Broadcast configuration we have created above
config.mixer.slots = @[customSlot];

Broadcast session

Finally, we will set up the Broadcast session with the previous configurations.

NSError *broadcastSessionError = nil;
// providing nil to the camera descriptor parameter to let application logic to take control of the camera device
IVSBroadcastSession *broadcastSession = [[IVSBroadcastSession alloc] initWithConfiguration:config descriptors:nil delegate:nil error:&broadcastSessionError];

// Attach custom audio input source
id customAudioSource = [broadcastSession createAudioSourceWithName:@"custom-audio"];
[broadcastSession attachDevice:customAudioSource toSlotWithName:customSlotName onComplete:nil]; // <connect to your onComplete callback function>
self.customAudioSource = customAudioSource;

// Attach custom image input source
id customImageSource = [broadcastSession createImageSourceWithName:@"custom-image"];
[broadcastSession attachDevice:customImageSource toSlotWithName:customSlotName onComplete:nil]; // <connect to your onComplete callback function>
self.customImageSource = customImageSource;

self.broadcastSession = broadcastSession;

Setup video capture

For demo purposes, we use the BytePlus Effect SDK’s API BEVideoCapture to set up video capture.

BytePlus Effect SDK initialization

self.imageUtils = [[BEImageUtils alloc] init];
self.manager = [[BEEffectManager alloc] initWithResourceProvider:[BEEffectResourceHelper new] licenseProvider:[BELicenseHelper shareInstance]];
// SDK initialization
int ret = [self.manager initTask];

Capture video image from device camera

BEVideoCapture *capture = [[BEVideoCapture alloc] init];
capture.outputFormat = kCVPixelFormatType_32BGRA;
// code that sets up initial configuration for BEVideoCapture removed for brevity
[capture startRunning];

Process captured image using BytePlus Effect SDK

The following videoCapture proxy method provided by BEVideoCapture passes captured CMSampleBufferRef from the device camera for processing.

// BEVideoCapture delegate callback
- (void)videoCapture:(id<BEVideoSourceProtocol>)source didOutputSampleBuffer:(CMSampleBufferRef)sampleBuffer withRotation:(int)rotation {

// code that provides GLContext check removed for brevity

    CVPixelBufferRef pixelBuffer = CMSampleBufferGetImageBuffer(sampleBuffer);
    CMTime sampleTime = CMSampleBufferGetPresentationTimeStamp(sampleBuffer);
    double timeStamp = (double)sampleTime.value/sampleTime.timescale;
    
// code that provides lock on BytePlus Effect SDK for thread safety removed for brevity e.g. NSRecursiveLock
    [self processWithCVPixelBuffer:pixelBuffer rotation:rotation timeStamp:timeStamp];
}

Processed buffer from camera using BytePlus Effect SDK

The actual image processing happens in the processWithCVPixelBuffer function that follows.

Set up input and output image buffer

- (void)processWithCVPixelBuffer:(CVPixelBufferRef)pixelBuffer rotation:(int)rotation timeStamp:(double)timeStamp {

    BEPixelBufferInfo *pixelBufferInfo = [self.imageUtils getCVPixelBufferInfo:pixelBuffer];

    // The BytePlus Effect SDK requires BGRA format
    if (pixelBufferInfo.format != BE_BGRA) {
        pixelBuffer = [self.imageUtils transforCVPixelBufferToCVPixelBuffer:pixelBuffer outputFormat:BE_BGRA];
    }
    if (rotation != 0) {
        // The texture received by the BytePlus Effect SDK must be positive, so before calling the SDK, you need to rotate it first
        pixelBuffer = [self.imageUtils rotateCVPixelBuffer:pixelBuffer rotation:rotation];
    }
    
    // Set up input buffer
    id<BEGLTexture> texture = [self.imageUtils transforCVPixelBufferToTexture:pixelBuffer];
    // Set up output buffer
    id<BEGLTexture> outTexture = nil;
    outTexture = [self.imageUtils getOutputPixelBufferGLTextureWithWidth:texture.width height:texture.height format:BE_BGRA];

Process the image

We use self.manager which is the BEEffectManager object we set up earlier during the BytePlus Effect SDK initialization.

    // self.manager is the BEEffectManager during the BytePlus Effect SDK Initialization
    // For demonstration purposes we will fix the rotation of the image.
    int ret = [self.manager processTexture:texture.texture outputTexture:outTexture.texture width:texture.width height:texture.height rotate:BEF_AI_CLOCKWISE_ROTATE_0
timeStamp:timeStamp];
    if (ret != BEF_RESULT_SUC) {
        // Log successful image processing
    } else {
        // Log unsuccessful image processing
    }
    outTexture = texture;

Send processed image buffer to CustomImageSource

Once the processed image buffer is ready, we send it to CustomImageSource in the Broadcast Session set up in the previous steps.

if (self.broadcastSession != nil) {
        // obtain CVPixelBufferRef
        CVPixelBufferRef outputPixelBuffer = [(BEPixelBufferGLTexture *)outTexture pixelBuffer];

        CMVideoFormatDescriptionRef formatDescription;
        CMVideoFormatDescriptionCreateForImageBuffer(kCFAllocatorDefault, outputPixelBuffer, &formatDescription);

        
        CMSampleTimingInfo timing = { kCMTimeInvalid, kCMTimeInvalid, kCMTimeInvalid };
        CMSampleBufferRef sampleBuffer;
    
        // Convert to CMSampleBufferRef
CMSampleBufferCreateReadyWithImageBuffer(kCFAllocatorDefault,
                                              outputPixelBuffer,
                                              formatDescription,
                                              &timing,
                                              &sampleBuffer);


        // submitted CMSampleBufferRef to customImageSource
        [self.customImageSource onSampleBuffer:sampleBuffer];
    }    
// code that sets up preview window in the UI removed for brevity
}

Start video broadcasting

if (self.broadcastSession != nil) {
    
        NSURL *myURL = [NSURL URLWithString:@"<INGEST_URL>"];
        NSString *myKey = @"<STREAM_KEY>";
        
        [self.broadcastSession startWithURL:myURL streamKey:myKey error:nil];
    }

Integration result

Face shaping demo

Facing shaping demo. Left: source iPhone application; right: HLS output from Amazon IVS channel

Image filtering demo

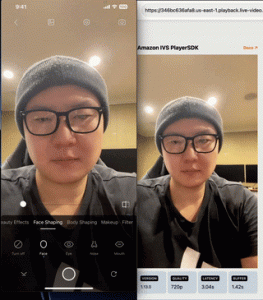
Image filtering demo. Left: source iPhone application; right: HLS output from Amazon IVS channel

This integration can be customized further. The BytePlus Effect SDK offers versatile integration options to process a variety of image sources such as BEImageCapture or BELocalVideoCapture

Application architecture

To conclude, we integrated both the Amazon IVS Broadcast SDK and the BytePlus Effect SDK into an iOS mobile application. Using the BytePlus Effect SDK, we processed video images from the device camera and submitted them to the IVS Broadcast SDK for streaming.

Application architecture diagram

About BytePlus

Born from ByteDance technology, BytePlus helps clients maximize growth through a wide range of intelligent technology solutions. A dedicated team of specialists work hand-in-hand with customers to help create better products, yield better experiences, and realize business growth.

Hao Chen

Hao Chen

Hao is a Customer Success Engineer on the Amazon IVS team. He helps AWS customers build innovative live streaming solutions using Amazon IVS.

Tian Shi

Tian Shi

Tian Shi is a Senior Solutions Architect at AWS. His focus area is data analytics, machine learning and serverless. He is passionate about helping customers design and build reliable and scalable solutions in the cloud. In his spare time, he enjoys swimming and reading.