AWS Messaging Blog
Template Personalization using Amazon Pinpoint
Note: This post was written by Ryan Lowe, an AWS Solution Architect and Chelsea Graf, a Senior PM for Amazon Pinpoint.
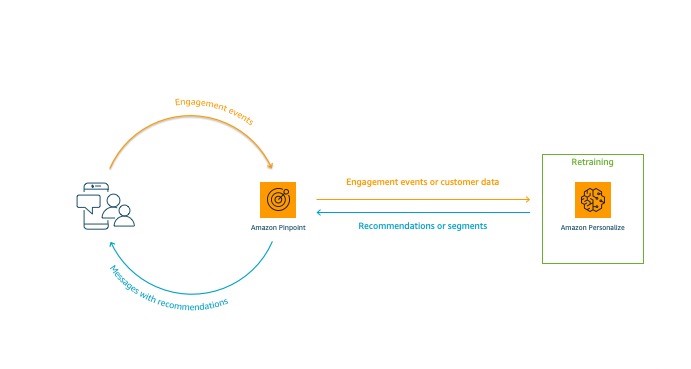
Today’s customer expects a high level of personalization in order to continue engaging with an enterprise. Using curated messaging, rather than a “one-size-fits-all” marketing campaign, an enterprise can lower churn rates, increase customer interaction, and drive higher conversion rates. Many enterprises are turning to machine learning to deliver personalized product recommendations or promotions at scale. With the growth of AI and ML tools such as Amazon Personalize, the barrier to create a machine learning model is lowering. However, training a model is only the first step toward personalized messaging. Once trained, a model must be integrated with a messaging service in order to get recommendations to customers. Then it is critical to use customers’ behavioral data to continue training and optimizing a model to ensure relevancy.
In this two-part post, we walk you through how to add personalized content to your Amazon Pinpoint templates using an Amazon Personalize campaign, and then how to use behavioral events, such as email opens, to retrain the campaign. In the first post, you will learn how to configure an integration between your Amazon Pinpoint account and your Amazon Personalize campaign. You will then learn how to populate dynamic attributes in your Amazon Pinpoint messaging templates with the recommendations returned by Amazon Personalize. In the second post, you learn how to use custom Amazon Pinpoint events to retrain your Amazon Personalize campaigns.
Template personalization using machine learning models
Using Amazon Pinpoint, you can now create a configuration connecting a recommender model you created in Amazon Personalize with your Amazon Pinpoint account. A recommender model is an ML model that’s designed to answer the question, “what may a user like or be interested in?” The recommender model uses customer demographics and behavioral data to predict a particular customer’s preferences from a given set of products or items. In return, it provides that information as a set of recommendations. By using recommender models with Amazon Pinpoint, you can send personalized recommendations to message recipients based on each recipient’s attributes and behavior.
To get started personalizing your messaging using machine learning, Amazon Personalize guides you through the process of creating and training a recommender model. It then guides you on preparing and deploying the model as an Amazon Personalize campaign. To create a model that can integrate with Amazon Pinpoint, create a solution using a USER_PERSONALIZATION recipe, then deploy your campaign. Be sure that you train your model using either an Amazon Pinpoint endpoint id (Id) or user id (EndpointUser.UserId). You need this identifier to retrieve recommendations during campaign execution.
Next, you define the configuration you want to use to call to your Amazon Personalize campaign and fetch recommendations for each of your customers. In the console, Amazon Pinpoint walks you through the process of defining your configuration. To start, be sure to provide a clear name and description of your model to allow you to differentiate this configuration from others when creating a template. You can then select the Amazon Personalize campaign you want to use, the IAM role that permits Amazon Pinpoint to call your Amazon Personalize campaign, and the identifier that Amazon Pinpoint is to pass to Amazon Personalize to retrieve the recommendation. To get the correct recommendations, it is critical that you select the identifier you used to train your Amazon Personalize campaign. As part of your configuration you also select how many items or products you would like to get back from your Amazon Personalize campaign. For example, if you are sending an email that you want to show three items to be recommended, you would set the Number of Recommendations per Message to three. Finally, you select how you want to process the recommendations you get back from Amazon Personalize.
An Amazon Personalize campaign returns a string based on the data you used to create your model. This can include a simple product ID, URL, or even an HTML blurb. You have two options for processing this string; using the value returned by the model or using an AWS Lambda function. If Amazon Personalize returns an HTML blurb, you may opt to just add that string to your Amazon Pinpoint template and send a message. All you would do is set the friendly name of your attribute and save your configuration. When using a product ID, you may want to make additional attributes available such as product name, price, or image. Then you would select Using a Lambda function and select the Lambda you want to pass the string to. The Lambda function accepts the Identifier and returns Amazon Pinpoint additional attributes. In the console, you can define up to 10 custom attributes for each item returned by your Amazon Personalize campaign. You can find an example Lambda function in the Amazon Pinpoint Developer Guide.
Once you have saved your configuration, it is accessible directly from the Attribute finder in the Amazon Pinpoint template editor. To add dynamic attributes to a template, start by creating or editing a template. In the Attribute Finder, select Recommended attributes and choose connect model. After selecting your model, you see a list of attributes that you can copy and paste directly into your template. If you opted to have more than one item returned per customer, you see a list of recommendations. These correspond to the order the items were returned from Amazon Personalize. Now you can click to copy an attribute and paste it into your message. Once you have added your desired attributes, be sure to also add default values to your message. To specify a default value for a message variable, expand the Default attribute values section of your template. Then, in the list of variables, enter the default value that you want to use for the variable. We recommend that you do this for each variable in the template. Once you have entered your defaults, you can create a new template, save a new version, or update an existing version of an existing template.
The final step is to create an Amazon Pinpoint campaign using your template and begin sending messages populated using machine learning.