Front-End Web & Mobile
Share code between Next.js apps with Nx on AWS Amplify Hosting
In this post, we will explore the capabilities of AWS Amplify Hosting to interface with monorepos, specifically Nx, and deploy the frontend applications that reside in them. We’ll learn the benefits of using a monorepo through an example of multiple banking websites that use the same mortgage calculator made up of libraries and components that can be branded to a bank’s specifications. In our example scenario, let’s imagine we work for a large financial institution that owns several brands of banks. We’ll call this institution BankCorp and the example banks underneath the brand will simply be BankA and BankB.
Nx is an open-source build system for managing standalone projects or a monorepo of multiple backend, frontend and shared libraries projects.
If you have a monorepo – a single repository containing multiple frontend applications and shared libraries – you need a tool to help manage the complexity. Traditionally, developers have used package managers like npm, Yarn, or pnpm to install dependencies and build their monorepos. However, these tools were not designed specifically for monorepos and can be cumbersome to use at scale.
Nx was built to address these complexities and offer consistency across all of the packages and applications it manages.
Note: A repo containing the complete source code of this project is located here.
Build the monorepo of apps, libraries and components
First we need to generate the monorepo where our applications and shared libraries and components will live. Nx offers a command line utility to create what it calls a “workspace” to house the monorepo.
Run the following command to create the new workspace per the Integrated Monorepo | Nx documentation
npx create-nx-workspace@latest banking-web-apps --preset=ts
Choose “No” when prompted for “Enable distributed caching to make your CI faster”.
Now with the workspace in place we can begin to assemble the shared libraries and components and build the banking web applications.
Why use Nx for monorepo management?
Monorepos, or single repositories that contain multiple packages or components, help simplify the deployment process for libraries and components. Without a monorepo, you have to deploy each package individually, keep track of package versions and dependencies across packages, and ensure version compatibility. This can become exponentially more complex as the number of packages grows. With a monorepo, all packages and dependencies are contained within a single repository. You can make changes across packages atomically and deploy them together. Package versions are kept in sync automatically, and you only have to run a single set of tests to verify changes across packages. Deploying a new version is as simple as deploying the latest commit on the main branch. Monorepos remove a huge amount of complexity around versioning, testing, and deploying libraries and components separately.
Our requirements have us sharing a mortgage calculator between the two banking apps. This separation serves to centralize functionality, reduce duplication and this architecture can be beneficial for large companies or teams which have different teams or developers producing various pieces of the underlying applications.
Monorepos are perfect for housing functionality such as this where sharing libraries and components between apps is key. Nx provides several conveniences to generate a workspace, library, package and application and connect them through it’s packaging layer with customizable imports. Generators are abundant and can be found for Next.js, React, Angular, and Nuxt frontend frameworks and Express backend frameworks.
Generate a mortgage calculator library with Nx
We need a function to calculate the monthly payment for a mortgage given the loan options of home price, down payment, interest rate and the term of the loan.
Run the following command to generate the scaffolding for where we place our mortgage calculation code:
$ nx generate @nx/js:library mortgage-lib
Choose vitest when prompted for a test runner and tsc will be selected for the bundler since our workspace is configured for TypeScript.
>  NX  Generating @nx/js:library

✔ Which unit test runner would you like to use? · vitest
✔ Which bundler would you like to use to build the library? · tsc
The following directories and files are generate for us under the `packages` directory.
packages
└── mortgage-lib
    ├── README.md
    ├── package.json
    ├── project.json
    ├── src
    │   ├── index.ts
    │   └── lib
    │       ├── mortgage-lib.spec.ts
    │       └── mortgage-lib.ts
    ├── tsconfig.json
    ├── tsconfig.lib.json
    ├── tsconfig.spec.json
    └── vite.config.ts
We can place our caclulateMortgage function inside mortgage-lib.ts
// packages/mortgage-lib/src/lib/mortgage-lib.ts
type LoanOptions = {
  homePrice: number;
  downPayment: number;
  interestRate: number;
  loanTerm: number;
  currency: string;
};

export function calculateMortgage({
  homePrice,
  downPayment,
  interestRate,
  loanTerm,
  currency,
}: LoanOptions): string {
  // Mortgage formula: M = P * (r(1 + r)^n) / ((1 + r)^n - 1)
  // M = Monthly payment
  // P = Principal loan amount
  // r = Monthly interest rate (i.e. annual rate / 12)
  // n = Number of payments (loan term * 12)

  const principal = homePrice - downPayment;
  const monthlyRate = interestRate / 100 / 12;
  const payments = loanTerm * 12;

  const payment =
    (principal * (monthlyRate * Math.pow(1 + monthlyRate, payments))) /
    (Math.pow(1 + monthlyRate, payments) - 1);

  return `${payment.toFixed(2)} ${currency}`;
}
Since we have integrated unit testing with Vitest, we can place any tests in mortgage-lib.spec.ts to verify our calculations are correct.
// packages/mortgage-lib/src/lib/mortgage-lib.spec.ts

import { calculateMortgage } from './mortgage-lib';

describe('mortgageLib', () => {
  it('calculate the monthly mortgage price for a property in USD', () => {
    const mortgage = calculateMortgage({
      homePrice: 100000,
      downPayment: 500,
      interestRate: 2.5,
      loanTerm: 30,
      currency: 'USD',
    });

    expect(mortgage).toEqual('393.15 USD');
  });
});
When the test is run via Nx tooling, we can see that it passes.
➜  banking-web-apps git:(main) ✗ nx run mortgage-lib:test

> nx run mortgage-lib:test

 RUN  v0.31.4 /Users/kevold/work/banking-web-apps/packages/mortgage-lib
 ✓ src/lib/mortgage-lib.spec.ts  (1 test) 2ms
 Test Files  1 passed (1)
      Tests  1 passed (1)
   Start at  13:17:25
   Duration  1.18s (transform 60ms, setup 0ms, collect 46ms, tests 2ms, environment 449ms, prepare 104ms)

 ———————————————————————————————————————————————————————————————————————————————————————————————————————————

 >  NX   Successfully ran target test for project mortgage-lib (9s)
Generate a mortgage calculator component with Nx
Let’s generate a shared UI library to house our mortgage calculator styled with the AWS Amplify UI library.
Run the following command to install @nx/react so that we can generate a shared React UI library via the Nx tooling:
npm install --save-dev @nx/react
Next, we need to generate a shared UI library by running the following command and choose the following options
$ nx generate @nx/react:library shared/ui

>  NX  Generating @nx/react:library

✔ Which stylesheet format would you like to use? · none
✔ What unit test runner should be used? · vitest
✔ Which bundler would you like to use to build the library? · vite
Under packages will be a shared/ui folder with the scaffolding for any React components we would like to share between applications.
packages/shared
└── ui
    ├── README.md
    ├── package.json
    ├── project.json
    ├── src
    │   ├── index.ts
    │   └── lib
    │       ├── shared-ui.spec.tsx
    │       └── shared-ui.tsx
    ├── tsconfig.json
    ├── tsconfig.lib.json
    ├── tsconfig.spec.json
    └── vite.config.ts
Rename packages/shared/ui/src/lib/shared-ui.tsx to packages/shared/ui/src/lib/mortgageCalc.tsx and packages/shared/ui/src/lib/shared-ui.spec.tsx to packages/shared/ui/src/lib/mortgageCalc.spec.tsx and adjust the import in packages/shared/ui/src/index.ts so that the packages/shared/ui/src looks like below.
packages/shared
└── ui
    ├── README.md
    ├── package.json
    ├── project.json
    ├── src
    │   ├── index.ts
    │   └── lib
    │       ├── mortgageCalc.spec.tsx
    │       └── mortgageCalc.tsx
    ├── tsconfig.json
    ├── tsconfig.lib.json
    ├── tsconfig.spec.json
    └── vite.config.ts
Since our component will be installed with Amplify UI, we need to install the AWS Amplify UI and AWS Amplify JS libraries by running the following command from the root of the workspace.
npm install @aws-amplify/ui-react aws-amplify
Now, let’s create the mortgage calculator React component MortgageCalculator that uses our shared library function calculateMortgage.
// packages/shared/ui/src/lib/mortgageCalc.tsx
import { Button, Heading, TextField } from '@aws-amplify/ui-react';
import '@aws-amplify/ui-react/styles.css';
import { calculateMortgage } from '@banking-web-apps/mortgage-lib';
import { useState } from 'react';

export const MortgageCalculator = () => {
  const [homePrice, setHomePrice] = useState(0);
  const [downPayment, setDownPayment] = useState(0);
  const [interestRate, setInterestRate] = useState(0);
  const [loanTerm, setLoanTerm] = useState(0);
  const [currency, setCurrency] = useState('USD');
  const [monthlyPayment, setMonthlyPayment] = useState('');

  const calculate = () => {
    const payment = calculateMortgage({
      homePrice,
      downPayment,
      interestRate,
      loanTerm,
      currency,
    });
    setMonthlyPayment(payment);
  };

  return (
    <div>
      <Heading width="30vw" level={3}>
        Mortgage Calculator
      </Heading>
      <br />
      <br />
      <TextField
        label="Home price"
        type="number"
        value={homePrice}
        onChange={(e) => setHomePrice(e.target.value)}
      />
      <TextField
        label="Down payment"
        type="number"
        value={downPayment}
        onChange={(e) => setDownPayment(e.target.value)}
      />
      <TextField
        label="Interest rate"
        type="number"
        value={interestRate}
        onChange={(e) => setInterestRate(e.target.value)}
      />
      <TextField
        label="Loan term (years)"
        type="number"
        value={loanTerm}
        onChange={(e) => setLoanTerm(e.target.value)}
      />
      <br />
      <br />
      <Button onClick={calculate}>Calculate</Button>
      <br />
      <br />
      {monthlyPayment && (
        <Heading width="30vw" level={5}>
          Monthly payment: ${monthlyPayment}
        </Heading>
      )}
    </div>
  );
};
Since we have integrated component testing with React Testing Library, we can place any tests in mortgageCalc.spec.ts to verify our calculations are correct. This simple test will ensured that our dependencies are installed correctly and the component can be rendered by calling applications. It is beyond the scope of this post, but additional tests should be added to ensure the form responds to the customer as expected and the calculation generated displays correctly.
// packages/shared/ui/src/lib/mortgageCalc.spec.tsx

import { render } from '@testing-library/react';

import MortgageCalc from './mortgageCalc';

describe('MortgageCalc', () => {
  it('should render successfully', () => {
    const { baseElement } = render(<MortgageCalc />);
    expect(baseElement).toBeTruthy();
  });
});
When the test is run via Nx tooling, we can see that it passes.
$ nx run shared-ui:test

> nx run shared-ui:test

 RUN  v0.31.4 /Users/kevold/work/banking-web-apps/packages/shared/ui
 ✓ src/lib/mortgageCalc.spec.tsx  (1 test) 99ms
 Test Files  1 passed (1)
      Tests  1 passed (1)
   Start at  11:02:13
   Duration  5.28s (transform 81ms, setup 0ms, collect 2.94s, tests 99ms, environment 845ms, prepare 466ms)

 ————————————————————————————————————————————————————————————————————————————————————————————————————————————————

 >  NX   Successfully ran target test for project shared-ui (16s)
Generating Next.js applications with Nx
Now that our reusable mortgage calculation function and mortgage calculator component are properly structured in the Nx monorepo we now turn our attention to creating the multiple Next.js apps for BankA and BankB for our example corporation BankCorp.
First we need the @nx/next package from npm so we can generate Next.js applications. Install it by running the following command
npm install --save-dev @nx/next
Run the command below and choose the options listed to generate the bankA-app
$ nx generate @nx/next:application bankA-app

>  NX  Generating @nx/next:application

✔ Which stylesheet format would you like to use? · css
✔ Would you like to use the App Router (recommended)? (Y/n) · false
We can run the same command for BankB and our result when listing the packages directory is below. Nx generates an “e2e” directory for our end-to-end tests with Cypress, but we will only focus on the Next.js apps in bank-a-app and bank-b-app in this post.
packages
├── bank-a-app
├── bank-a-app-e2e
├── bank-b-app
├── bank-b-app-e2e
├── mortgage-lib
└── shared
With our Next.js applications generated we are ready to build our web apps with integrated MortgageCaclulator component.
Using shared components and libraries in multiple Next.js apps
Our Next.js apps are using the Pages Router configuration, for both bank-a-app and bank-b-app apps we will open pages/index.tsx and replace the contents with the following updating the header to read “BankA” or “BankB” accordingly
// packages/bank-a-app/pages/index.tsx
import { MortgageCalculator } from '@banking-web-apps/shared/ui';
import styles from './index.module.css';
export function Index() {
return (
<div className={styles.page}>
<div className="wrapper">
<div className="container">
<div id="welcome">
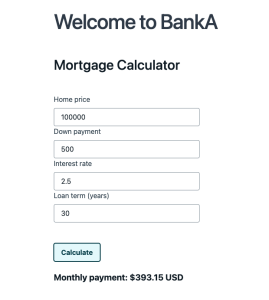
<h1>Welcome to BankA</h1>
</div>
<div id="middle-content">
<MortgageCalculator />
</div>
</div>
</div>
</div>
);
}
export default Index;We can run the app(s) using the following command
$ nx run bank-a-app:serve

> nx run bank-a-app:serve:development

- ready started server on 0.0.0.0:4200, url: http://localhost:4200
Once we load the url of the development server we can see our calculator renders properly and calculates the correct monthly payment.
Using the shared library in Next.js API routes
As we build our application, additional requirements from our PM team are to add an API route, /calculateMortgage to each app so that external developers can leverage the functionality in their apps.
Create an api folder inside the pages directory for packages/bank-a-app and packages/bank-b-app .
Next create a calculateMortgage.ts file inside pages/api and add the code below
// packages/bank-a-app/pages/api/calculateMortgage.ts

import { calculateMortgage } from '@banking-web-apps/mortgage-lib';
import { NextRequest, NextResponse } from 'next/server';

export default function handler(req: NextRequest, res: NextResponse) {
  // @ts-ignore
  const { homePrice, downPayment, interestRate, loanTerm, currency } = req.query;

  if (!homePrice || !downPayment || !interestRate || !loanTerm || !currency) {
    // @ts-ignore
    return res.json({ error: 'Missing parameters' }, { status: 400 });
  }

  const payment = calculateMortgage({
    homePrice: +homePrice,
    downPayment: +downPayment,
    interestRate: +interestRate,
    loanTerm: +loanTerm,
    currency,
  });

  // @ts-ignore
  res.status(200).json({ payment });
}
Launching the app with nx run bank-a-app:serve (if not already running) and performing a GET request
GET /api/calculateMortgage?homePrice=200000&downPayment=50000&interestRate=3.5&loanTerm=30¤cy=USD
Returns the following payload with the payment amount and currency
{"payment":"673.57 USD"}
Deploying the Next.js apps to AWS Amplify Hosting
Now that both the BankA and BankB apps display the mortgage calculator component and have the API endpoint and your app committed to Git, you are ready to deploy to Amplify Hosting.
Amplify Hosting supports apps in generic monorepos as well as apps in monorepos created using npm workspace, pnpm workspace, Yarn workspace, Nx, and Turborepo. When you deploy your app, Amplify automatically detects the monorepo build framework that you are using. Note that pnpm and Turborepo apps require additional configuration. For more information, see Monorepo build settings and Deploying a Next.js app in a monorepo in the Amplify Hosting Documentation.
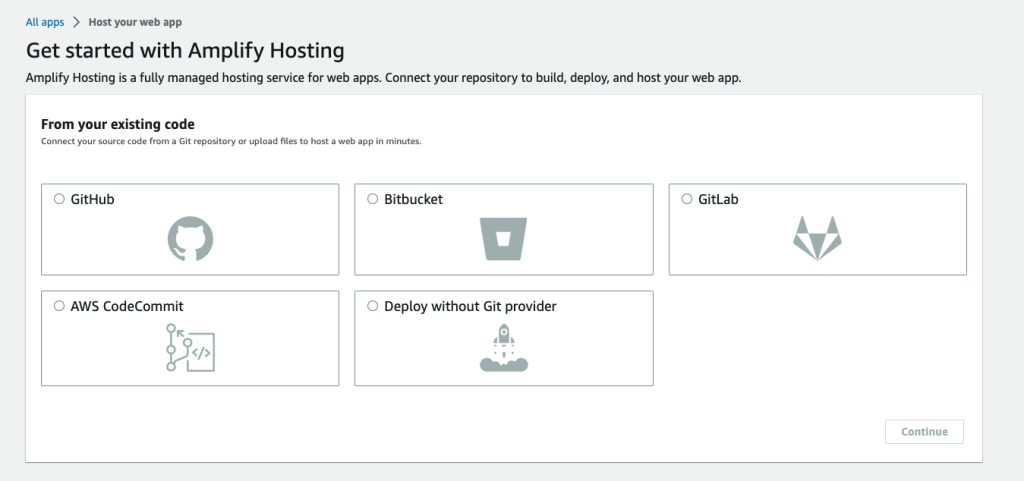
Visit the Amplify Console and navigate to AWS Amplify. On the All apps page, select Host web app from the New app dropdown.
Choose your Git repository hosting provider then select Continue.
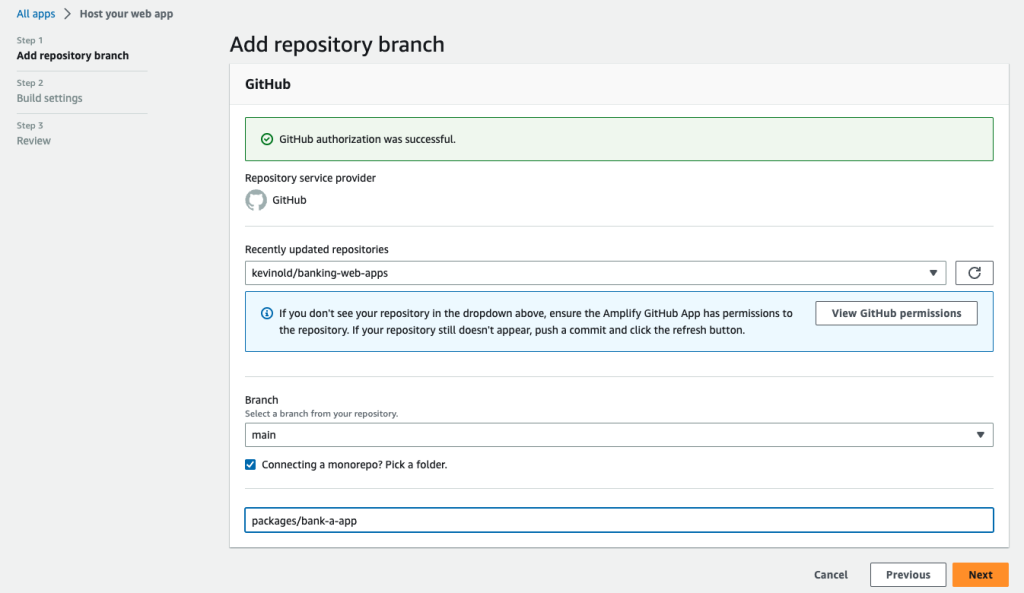
Depending on your Git provider, you will be prompted to allow Amplify Hosting access to your repositories. After a successful authorization, choose the repository for this app from the Recently updated repositories list verify the correct branch is selected under Branch and check the Connecting a monorepo? Pick a folder checkbox and finally populate the app root path field to the path to the application from the root of the repository – in this case packages/bank-a-app – then select Next.
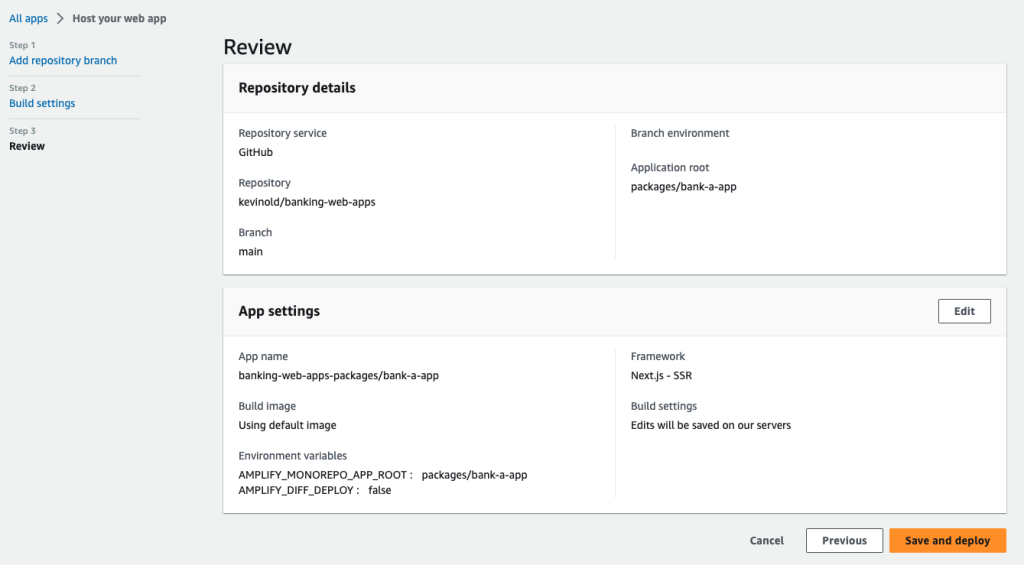
On the Build settings page, in the App build and test settings section click the Edit under the Build and test settings and updated the preBuild command to read npm install then choose Save, then click Next.

On the Review page, select Save and deploy.
Amplify Hosting will provision an isolated build and hosting environment for your project and deploy it. The process will take 3–4 minutes; you can monitor progress by selecting the Provision, Build or Deploy links as shown below.
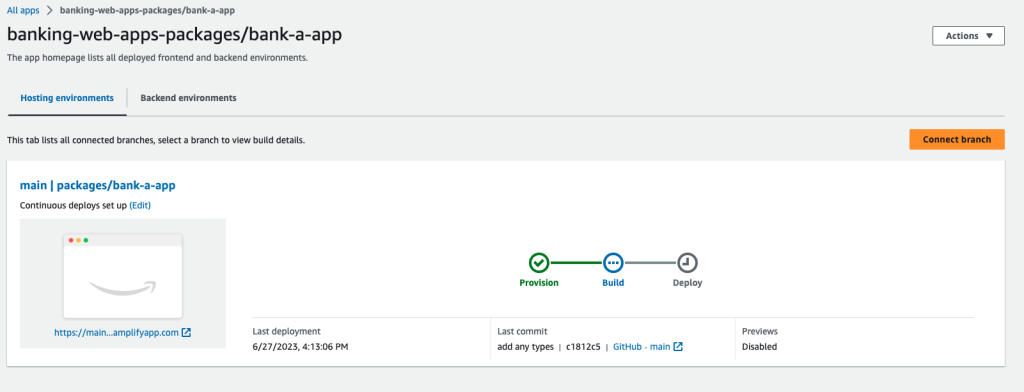
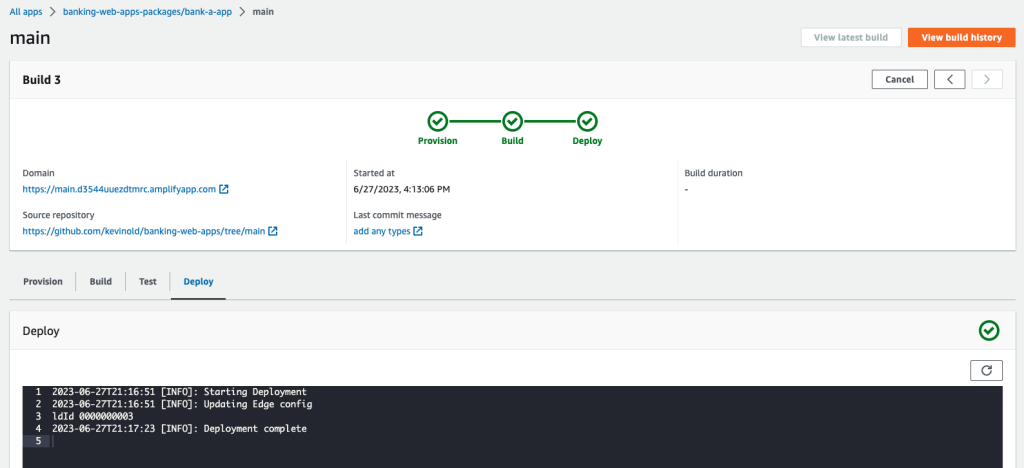
After the deployment has completed, visit the URL shown in the console (like https://<branch-name>.<app-id>.amplifyapp.com).
Perform the steps above to deploy the app for each additional app, like BankB, as a separate app in Amplify Hosting. When code is updated and pushed to GitHub, both apps will be triggered for a new deployment.
What We’ve Built
In this post, we used Nx to manage a repository that contains a shared JavaScript library and React components along with two separate Next.js applications, then deployed the applications to Amplify Hosting. We used the Nx tooling to generate the scaffolding for the monorepo, libraries and Next.js applications. Amplify Hosting fully supports Nx out-of-the-box with no configuration changes required, but we modified the resulting amplify.yml to meet our needs.