AWS Cloud Operations Blog
Automate updating approval cut off dates for Patch Manager Patch Baselines
AWS Systems Manager Patch Manager helps AWS customers manage and automate the process of patching their Linux and Windows managed nodes in AWS and hybrid environments. It provides various options and allows greater control over which patches are approved or rejected during installation using patch baselines.
One parameter of patch baseline approval rules is the Auto Approval cutoff date, which allows customers to only approve patches released prior to the specified date. This helps enable our customers to ensure patches are not immediately approved upon release and ensure that the patches are tested and verified before applying to their managed nodes.
In this post, we walkthrough how you can establish an automated and auditable process to update the auto-approval cutoff date every month. This way, system administrators do not have to update the patch baseline rules with new cut-off date manually, in their various AWS accounts and regions. This process is enabled by Systems Manager Automation, Systems Manager Change Manager and EventBridge.
Solution overview
The following architecture diagram presents an overview of the solution.
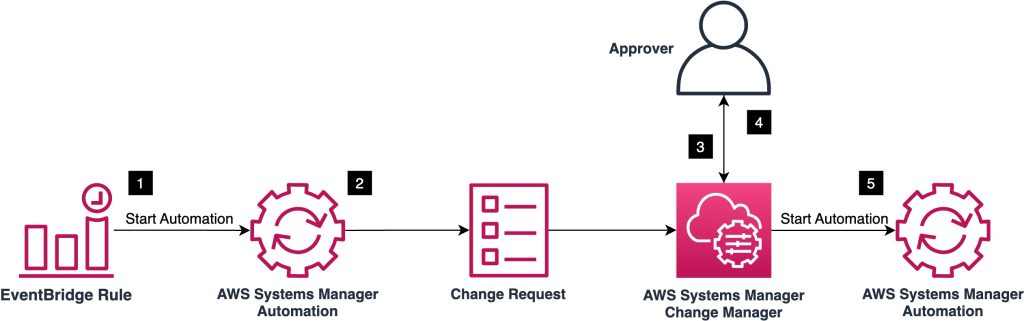
Figure 1: Solution Overview
The resources for the walkthrough are deployed using an AWS CloudFormation stack. The automated process works as follows:
- An Amazon EventBridge rule invokes a custom Systems Manager Automation runbook on the defined schedule.
- The Automation runbook creates a change request in Change Manager.
- A notification is sent to the defined change request approvers to review the change.
- The approver reviews and approves the change request.
- The change request invokes an Automation runbook to update the auto-approval cutoff dates within the specified patch baseline approval rules.
Implement the solution
Prerequisites
There are few prerequisites required for this solution:
- Custom patch baselines with an approval rule with a specified approval cutoff date. If you do not have a custom patch baseline with an approval rule, you can create three custom patch baselines for Amazon Linux, Amazon Linux 2, and Windows using the CloudFormation template here.
- You have configured IAM approvers within Change Manager to approve change requests. If you have not onboarded to Change Manager, you can get started with Setting up Change Manager and Task 1: Configuring Change Manager user identity management and template reviewers.
Deploy resources using CloudFormation
- Download the updatePatchBaselines.yml file.
- In the AWS account and Region where you have your custom patch baselines deployed, navigate to the AWS CloudFormation console.
- In the navigation pane, choose Stacks, choose Create stack, and then choose With new resources (standard).
- On the Create stack page, select Upload a template, select Choose file, choose the updatePatchBaselines.yml file, and then choose Next.
- Provide a Stack name. For example, updatePatchBaselineApprovalDate.
- The CloudFormation stack requires a few parameters, as shown in the following screenshot:
- IAMRoleChangeRequestApprovers: The name of the IAM role which has permissions to approve the change request.
- PatchBaselinesToUpdate: List of patch baseline IDs to update.
- PatchApprovalCutOffDay: The day of the month which will be set as the ApproveUntilDate for the Patch Baselines. For example, if you want the ApproveUntilDate to be set as 1st of the month, enter 1.
- ScheduleExpression: The cron expression for the EventBridge rule to create the Change Manager request to update the approval cut off date. The default cron expression creates a change request on the first day of the month at 08:00 UTC.

Figure 2: Example for the CloudFormation Stack Parameters.
- Review the details of your parameters, and select “I acknowledge that AWS CloudFormation might create IAM resources”. Then select Create stack to start provisioning the resources.
- Once the stack has been created, refer to the Resources section of your stack to see the resources created.
Approve the change template
As the change template is created by the CloudFormation stack in the previous step, the next step is to submit it for review before a change request can be created with this template.
To Submit for Review:
- Open the Systems Manager console and in the navigation pane, choose Change Manager.
- Select the Templates tab and select the template which was created by CloudFormation stack in the previous step.
- Choose Submit for Review.
- The users in your organization or account who have been specified as template reviewers on the Settings tab in Change Manager are notified that a new change template is pending their review.
To approve the review request:
- Login to the account with the IAM user/role who can approve the template.
- Open the Systems Manager console and in the navigation pane, choose Change Manager.
- On the Overview tab, in the Change templates widget, select the number of pending change templates.
- In the Change templates list, select the change template similarly named to updatePatchBaselineApprovalDate-changeRequestUpdatePatchApprovalDate-* and choose View details.
- Note: The name of the change template is prefixed by the name specified when creating the CloudFormation stack previously.
- On the Template details page, review the proposed content of the change template and choose Approve.
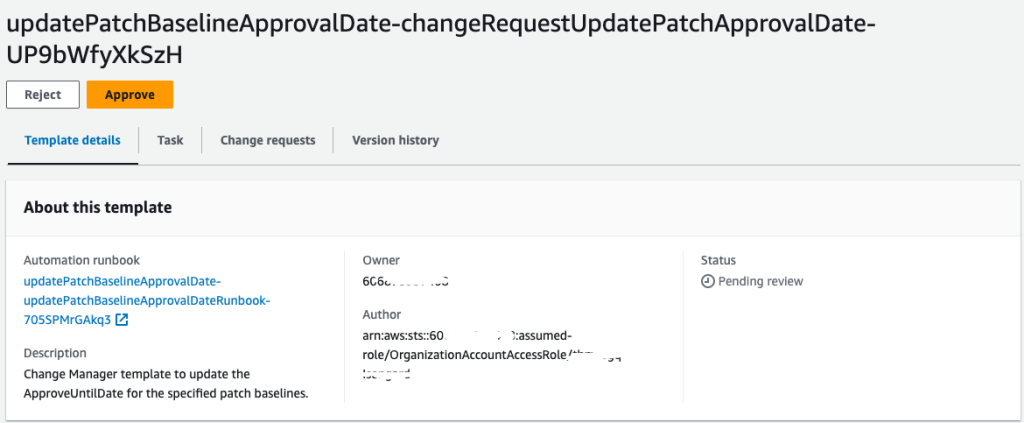
Figure 3: Approving the change template within Change Manager
Working with the change request
When the EventBridge rule is scheduled to run, as specified in the CloudFormation parameter ScheduleExpression, the rule will invoke the Automation runbook which then creates a change request in Change Manager. The change request, once approved, runs an Automation runbook that updates the specified patch baselines in the CloudFormation parameter PatchBaselinesToUpdate. After the change request is created by EventBridge, follow the steps below to view and approve the change request.
View and Approve the change request
- Login to the AWS Account with the IAM role specified in the CloudFormation template parameter IAMRoleChangeRequestApprovers.
- Open the Systems Manager console and in the navigation pane, choose Change Manager.
- Choose the Requests tab.
- In the Change requests section, select the change request created by EventBridge and Automation. The name is prefixed by the name of the CloudFormation template you specified.
- Verify the information included in the change request and choose Approve.
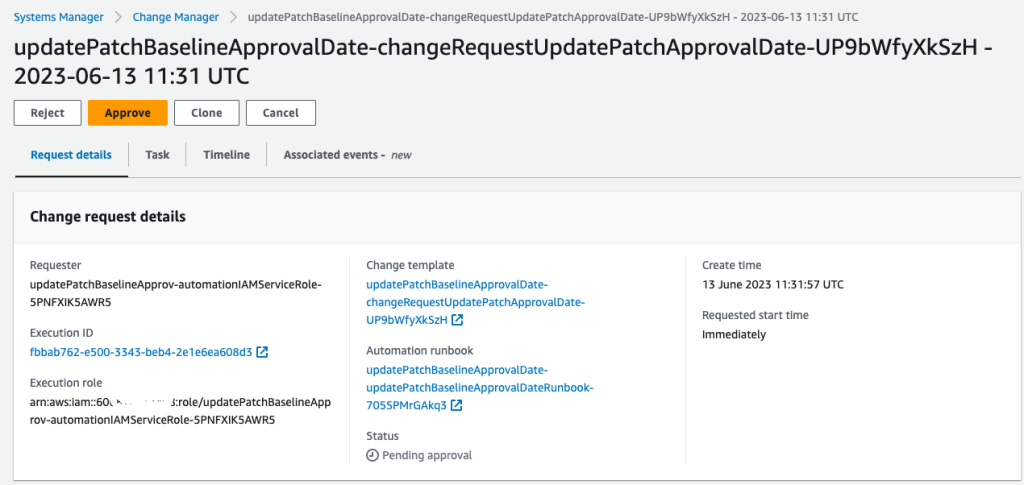
Figure 4: Approving the change request in Change Manager.
Verify the Automation Execution Results
- Open the Systems Manager console and in the navigation pane, choose Change Manager.
- Choose the Requests tab.
- In the Change requests section, select the change request you approved in the previous section.
- Select the Task tab.
- Select the Execution ID. You will be redirected to Automation Execution page.
- Wait for the Automation to complete and review the output.
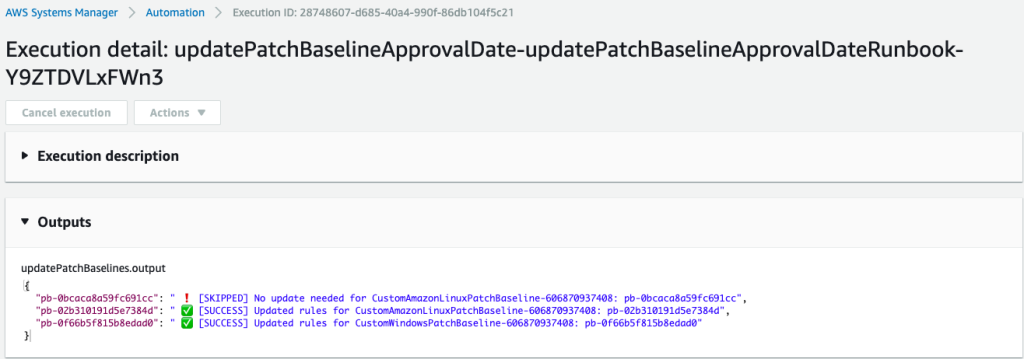
Figure 5: Example Automation execution output for the change request.
As seen in the example figure above, the output of the Automation execution shows a detailed summary for the status of updating the specified patch baselines.
Cleaning up
To delete the resources created, go to the AWS CloudFormation console, choose the stack you created, and then choose Delete.
Conclusion
In this post, we showed you how to automate the process of updating the auto-approval cutoff date within your patch baselines. First, we deployed a CloudFormation template to create an Automation runbook and a Change Manager change template. We then approved the change template and submitted a change request. After approving the change request, we validated that the specified patch baselines were successfully updated to the new approval date.
You can aggregate detailed patching, compliance, and inventory data into a single location by creating a Resource Data Sync. This syncs the data with a centralized S3 bucket of your choosing. For more information, check configuring Resource Data Sync for Inventory.
After creating the Resource Data Sync, you can configure Amazon Athena and Amazon QuickSight to start visualizing patching and inventory-related data. To get hands-on experience, see Report patch compliance across your AWS Organization.
Author: