AWS Cloud Operations Blog
Create canaries in Python and Selenium using Amazon CloudWatch Synthetics
In April 2020, we launched Amazon CloudWatch Synthetics, which developers can use to create canaries that are configurable scripts running on a schedule to monitor endpoints, APIs, and website content. With canaries, your business can discover issues before your customers do, so you can react quickly to fix them. When you’re running scripts on CloudWatch Synthetics, you remove the burden of taking care of the underlying resources of the host system. You also gain a deep level of observability, high availability, logging, and integration with other AWS services. Up to now, the only supported running environment has been Node.js. We’re making a new feature available that we discuss in this blog post.
At AWS, we create features based on feedback we get from our customers. Many of you have asked us to provide an option to create CloudWatch Synthetics canaries in Python using Selenium. Selenium provides multiple open-source tools for automating web applications for testing purposes. One of these tools is Selenium WebDriver, which is used by many developers to create robust, browser-based regression automation suites and tests.
What we’re launching
Today, we’re happy to announce that you can create CloudWatch Synthetics canaries using Selenium in Python. Not only that, but we also provide a seamless and easy way of importing your existing scripts with minimal changes. At the time of writing this blog post, the supported environment is:
- Python 3.8
- Selenium 3.141.0
- Chromium 83.0.4103.0
In the following section, I walk you through a few examples that show how to get started easily and quickly with creating canaries in Python.
Required permissions
In order to be able to work with canaries in CloudWatch Synthetics, you must be signed in as an IAM user that has the right set of IAM permissions. Please refer to the Required roles and permissions for CloudWatch canaries documentation page for more details.
Create canaries using blueprints
AWS provides you with ready-made code snippets to start using CloudWatch Synthetics quickly. To use them, after logging in and navigating to CloudWatch service, choose Synthetics on the left-side menu. Next, choose Create canary, select Use a blueprint, and then choose one of the provided blueprints according to your use case. Finally, you choose the other configurations as needed and create the canary. Make sure to select the runtime version as syn-python-selenium-1.0 (or any other later version that might be shown to you).
Importing a Hello World Selenium script
In this example, we show how to import an existing Selenium script to CloudWatch Synthetics. Let us assume that the script running outside of AWS looks like this:
from selenium import webdriver

def existing_selenium_script():
    browser = webdriver.Chrome()
    browser.get('https://example.com')
    browser.save_screenshot('loaded.png')

existing_selenium_script()
In the first line the script imports the required package. Then there is a function that creates an instance of the Chrome WebDriver, simulates a page navigation to the mentioned URL, and finally saves a screenshot of the page as a PNG image file. In the last line the function gets called.
Now, let’s create a canary in CloudWatch Synthetics using the code previously shown. You’ll introduce two changes only:
- Change the
importstatement shown on line 1 to useseleniumfrom theaws_syntheticsmodule. It should look like this:from aws_synthetics.selenium import synthetics_webdriver as webdriverThe selenium module from
aws_syntheticsenables the canary to emit metrics, logs, generate HAR (HTTP archive) file, and work with other available features on CloudWatch Synthetics. - Create a new function and give it a name of handler. In this additional function, you call your original function. Therefore, the handler function should look like this:
def handler(event, context):
    return existing_selenium_script()
This is how your final canary code should look like:
from aws_synthetics.selenium import synthetics_webdriver as webdriver
def existing_selenium_script():
    browser = webdriver.Chrome()
    browser.get('https://example.com')
    browser.save_screenshot('loaded.png')

def handler(event, context):
    return existing_selenium_script()
Now we move to the steps of creating a canary using the AWS Management Console. After logging in and navigating to CloudWatch service, choose Synthetics on the left-side menu. Next, choose Create canary, and then choose Inline Editor.
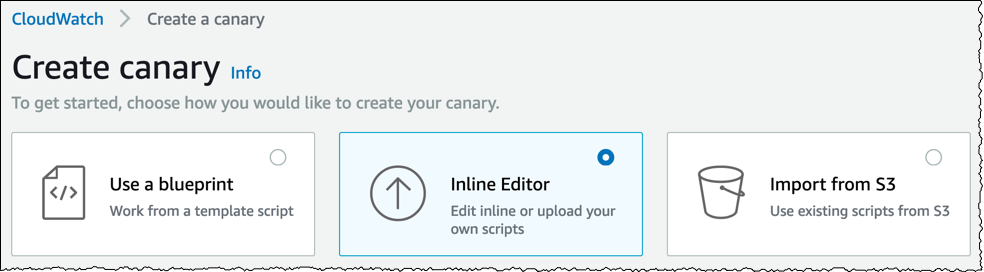
Figure 1: Create canary using inline editor
Give your canary any name you want, such as helloworldinselenium. Then under the runtime version dropdown menu, choose syn-python-selenium-1.0 (or any other later version you might see). Next, in the Lambda handler text box, enter the word handler preceded by the same canary name and a dot. For example: helloworldinselenium.handler.

Figure 2: Canary name, Runtime version, and Lambda handler
After that, paste your code into the text editor. The rest of the configuration should be straight forward, and you can provide the input as required. Finally, choose Create canary, and wait for the creation process to finish. After giving the canary some time to run and emit metrics, you should be able to see that it has passed and you’ll find a screenshot as well.
Importing a more advanced script and taking advantage of execution steps
Another great feature provided for you in CloudWatch Synthetics is execution steps. You can use this feature to run code snippets in individual single steps, wrapping each with start/pass/fail logging, start/pass/fail screenshots, and pass/fail and duration metrics.
For example, let us assume your script involves multiple tests, such as browsing to the home page, locating a form, and entering some details. You want to know where the script is failing. In addition, you want to check a screenshot of the browser window where the issue is happening and inject a logging message with additional information. The execution steps feature helps you to achieve this goal. Let’s examine a script that exists outside of AWS and find how to import it into CloudWatch Synthetics, taking advantage of the execution steps feature.
Existing sample script
For the purpose of this demo, we use as a target the popular AWS bookstore demo application. Note that you do not need to deploy this application, we only use the URL as a target for our canary. The destination URL is shown in the following example:
from selenium import webdriver
from selenium.webdriver.support.ui import WebDriverWait
from selenium.webdriver.support import expected_conditions as EC
from selenium.webdriver.common.by import By
import selenium.common.exceptions

TIMEOUT = 5
url = "https://d2h3ljlsmzojxz.cloudfront.net/"

browser = webdriver.Chrome ()

def navigate_to_home():
    browser.implicitly_wait(TIMEOUT)
    browser.get(url)

def navigate_to_login():
    WebDriverWait(browser, 5).until(EC.presence_of_element_located((By.CSS_SELECTOR, "[href='/login']"))).click()

def provide_inputs():
    browser.find_element_by_id("email").send_keys("test@example.com")
    browser.find_element_by_id("password").send_keys("pass123")
    browser.find_element_by_class_name("btn").click()

navigate_to_home()
navigate_to_login()
provide_inputs()
browser.close()
To summarize what this script is doing, we first navigate to the home page, then choose the Log in anchor link available on the top-right of the demo app. After that, we add sample credentials, and then submit using the Log in button. Finally, we close the browser. You can take the preceding code and test it on any machine with the proper setup, if you want to check the behavior.
Our next goal is to import this script to CloudWatch Synthetics to take advantage of all the benefits we discussed earlier.
Step 1: Import statements
You first take the existing import statements and add three more to be able to use the AWS Synthetics library. Your full import statements will look like this:
from selenium.webdriver.support.ui import WebDriverWait
from selenium.webdriver.support import expected_conditions as EC
from selenium.webdriver.common.by import By
import selenium.common.exceptions
# Change 1: Add the required imports
from aws_synthetics.selenium import synthetics_webdriver as webdriver   # We already saw this in example 1
from aws_synthetics.common import synthetics_logger as logger # To access the logging capabability
from aws_synthetics.common import synthetics_configuration # Configuration parameters
Step 2: Adding a handler function
As you did in the first example, you wrap your code inside a function with a name of your choice. Then add a handler function at the bottom that will call that function:
# Change 2: Wrap your original code inside a function & add a handler that calls this function. We have seen this in example 1
async def main():
    browser = webdriver.Chrome()
    # The rest of the original code goes here. Not added for simplicity

async def handler(event, context):
    return await main()
Notice that you’re using now async/await in Python to take advantage of asynchronous programming.
Optional Step: Using the configuration object
CloudWatch Synthetics provides a configuration object with a few handy settings. For example, you can choose when CloudWatch Synthetics should take the screenshots. You add this call inside the main() function:
#(Optional) add your desired configuration
synthetics_configuration.set_config(
    {
        "screenshot_on_step_start": False,
        "screenshot_on_step_success": True,
        "screenshot_on_step_failure": True
    }
)
Step 3: Remove individual calls to functions and use execute_step() call
Instead of directly calling your functions, we will use the await Python keyword and the execute_step("Arbitrary Step Name", function_to_call) function call. Example:
def navigate_to_home():
    browser.implicitly_wait(TIMEOUT)
    browser.get(url)
# Change 3: Remove the direct calls to the individual functions and use await with execute_step().
# We will repeat the same step for the other function calls
await webdriver.execute_step("Navigate to home", navigate_to_home)
That’s basically all what you must do in your existing code. The full script should look like this:
from selenium.webdriver.support.ui import WebDriverWait
from selenium.webdriver.support import expected_conditions as EC
from selenium.webdriver.common.by import By
import selenium.common.exceptions
from aws_synthetics.selenium import synthetics_webdriver as webdriver
from aws_synthetics.common import synthetics_logger as logger
from aws_synthetics.common import synthetics_configuration

TIMEOUT = 5
url = "https://d2h3ljlsmzojxz.cloudfront.net/"

async def main():
    browser = webdriver.Chrome()

    synthetics_configuration.set_config(
        {
            "screenshot_on_step_start": False,
            "screenshot_on_step_success": True,
            "screenshot_on_step_failure": True
        }
    )

    def navigate_to_home():
        browser.implicitly_wait(TIMEOUT)
        browser.get(url)
    await webdriver.execute_step("Navigate to home", navigate_to_home)

    def navigate_to_login():
        WebDriverWait(browser, 5).until(EC.presence_of_element_located((By.CSS_SELECTOR, "[href='/login']"))).click()
    await webdriver.execute_step("Navigate to Login", navigate_to_login)

    def provide_inputs():
        browser.find_element_by_id("email").send_keys("test@example.com")
        browser.find_element_by_id("password").send_keys("pass123")
        browser.find_element_by_class_name("btn").click()
    await webdriver.execute_step("Provide Credentials", provide_inputs)

    logger.info("---------Finished the execution---------")

async def handler(event, context):
    return await main()
After pasting the full script into the code editor and optionally adjusting any subsequent configuration as per your need, you click on Create canary button. After the canary has been successfully created, you wait until it has completed at least one run. The time needed depends on the schedule you chose when creating the canary. After that you navigate into the canary’s details page, and you should see similar results as follows.
Under the Availability tab on the top of the page, go to the Steps tab in the lower part of the page:
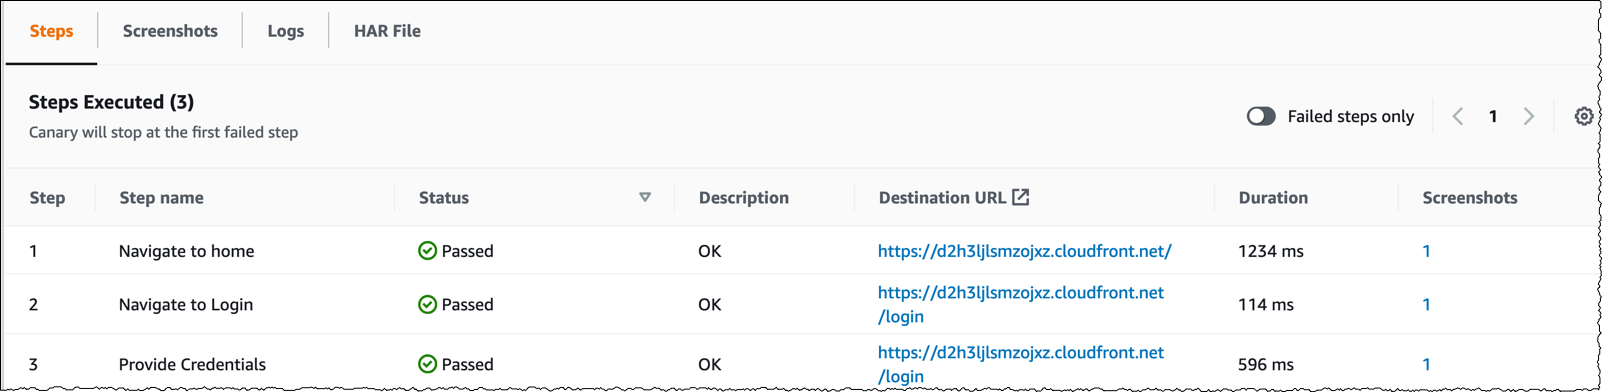
Figure 3: The execution steps tab for the advanced example
Next, choose the Screenshots tab. The third screenshot should look like this:

Figure 4: The generated third screenshot for the advanced example
You can also find useful logging information under the Logs and HAR File tabs. Take your time examining these in more detail, if you want.
Optional step: Simulate a failure
In this example, I show you what it looks like when there is a failure with one of the steps. You start with altering the existing canary: Inside the dashboard webpage of your canaries, choose Actions, then Edit. After that, select the Configuration tab and add inside the main() function the following code snippet:
# Execute custom failing click action
def failing_action():
    button_condition = EC.element_to_be_clickable((By.ID, "does-not-exist"))
    # add custom error message on failure
    WebDriverWait(browser, 2).until(button_condition, message="I could not locate the button!").click()
try:
    await webdriver.execute_step("Imaginary button", failing_action)
except:
    logger.error("--------not found--------")
The preceding code tries to find a button with a CSS ID of does-not-exist, which obviously does not exist. The goal here is to simulate a failing action.
After saving the canary, you should find now a new step and a new screenshot in the bottom:
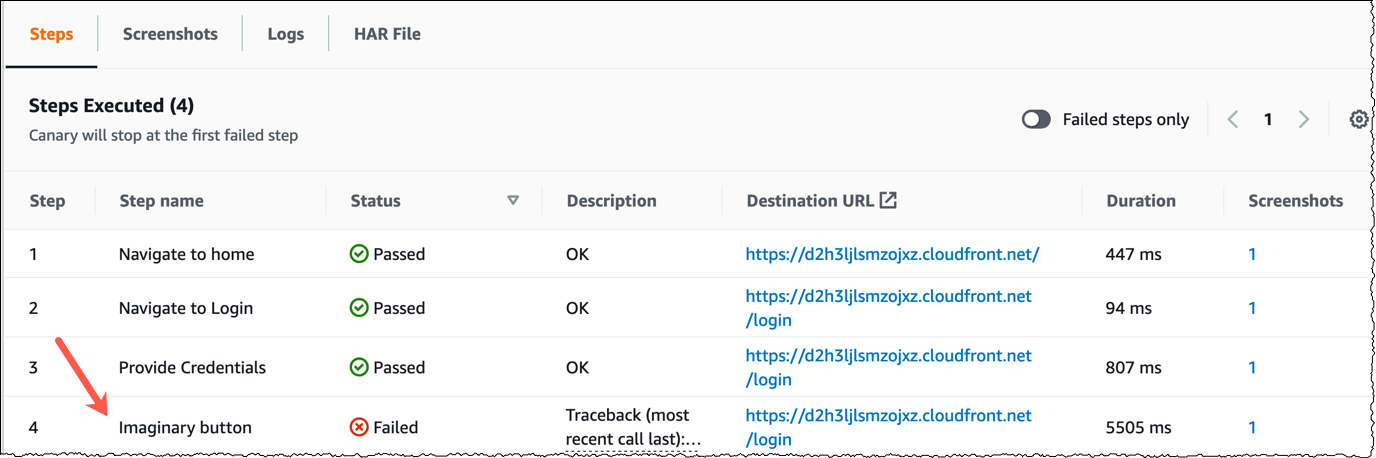
Figure 5: The execution steps tab showing the failing step
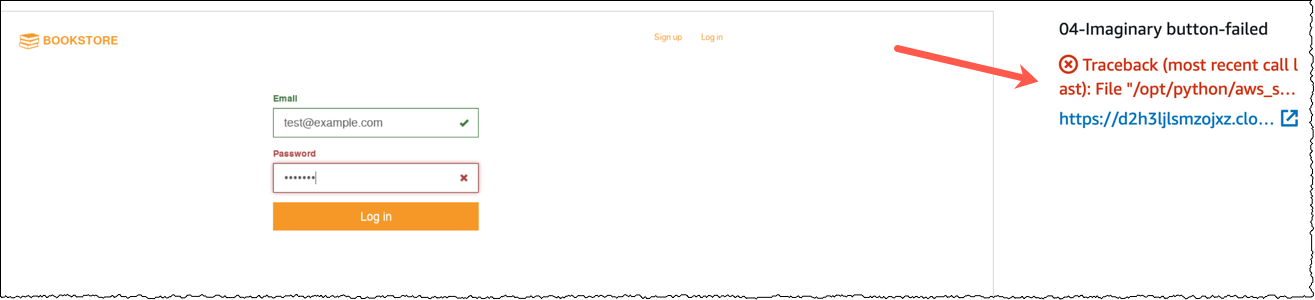
Figure 6: The generated fourth screenshot throwing an error
Cleaning up
After you have finished experimenting, and to avoid incurring extra charges, you might want to delete canaries you created as part of this article. To do so, follow the steps described in the delete canary documentation.
Conclusion
We discussed how to quickly and easily import scripts to CloudWatch Synthetics that are in Python and use the Selenium framework to gain great benefits. These benefits should increase your productivity by enabling you to find issues faster and obtain a higher level of observability into your workloads. CloudWatch Synthetics can be used to monitor internal endpoints in addition to public endpoints. With CloudWatch Synthetics, you can integrate endpoint monitoring in your CI/CD pipelines through support for AWS CloudFormation, AWS SDK, and CloudWatch Synthetics API operations.
For more information, check:
- Sample scripts for Python and Selenium
- Runtime versions using Python and Selenium Webdriver
- What’s new post: Amazon CloudWatch Synthetics now supports canary scripts in Python with Selenium framework
- AWS News blog – Use CloudWatch Synthetics to monitor Sites, API endpoints, web workflows, and more
About the Authors

Mohamad Nabulsi is a Solutions Architect at AWS focusing on observability and monitoring. In addition, he is passionate for machine learning and likes to experiment with it. During his spare time, Mohamad likes jogging as well as walking in the countryside.
 Yesh Ravindra is a Software Development Engineer working on Amazon CloudWatch Synthetics at AWS. He has also worked on Amazon Redshift and is deeply passionate about cloud technologies. He loves to play tennis and is a wanderlust.