AWS Cloud Operations Blog
Enable management of your Amazon EC2 instances in AWS Systems Manager using Default Host Management Configuration
Update 01/2024: In October 2023, AWS Systems Manager announced the ability to enable AWS Systems Manager by default for all EC2 instances in an organization using Systems Manager Quick Setup. You can begin utilizing the benefits of DHMC in just a few clicks from the Quick Setup console. For more information, see Default Host Management for an organization.
Additionally, the CloudFormation template referenced in this post has been updated to create IAM roles in each target Region and the instructions have been modified to reflect this change. The previous version of the template created a single IAM role in the MainRegion.
Previously, customers were required to attach an AWS Identity and Access Management (IAM) instance profile to Amazon Elastic Compute Cloud (EC2) instances in order to register with AWS Systems Manager. To accomplish this, customers may have been required to manually attach an IAM instance profile on a per-instance basis or use automated methods, such as Systems Manager Quick Setup, to attach the IAM instance profile. If an instance did not have an appropriate IAM instance profile attached, the instance would remain unmanaged by Systems Manager which may lead to the instance becoming insecure, inaccessible, or falling out of security and compliance.
Today, we are excited to announce the release of Systems Manager Default Host Management Configuration which enables you to ensure that all EC2 instances are automatically managed by Systems Manager. By enabling Default Host Management Configuration, you no longer are required to attach an IAM instance profile to the EC2 instance in order to register the node with Systems Manager.
Thus, you can easily track and manage your instances without any additional configuration, providing you a better security and compliance posture for your entire EC2 fleet. To get started, you need to perform a one-time configuration in your AWS account and Region which we describe below.
Prerequisites
EC2 instances must have the AWS Systems Manager Agent (SSM Agent) version 3.2.532.0 or later installed. Additionally, EC2 instances must have network connectivity to the public Systems Manager service endpoints or to AWS PrivateLink VPC endpoints for Systems Manager.
Walkthrough
To enable Default Host Management Configuration in a single AWS account and Region, we recommend to use one of the approaches either the AWS Systems Manager Fleet Manager console, or the AWS Command Line Interface (AWS CLI), or one of the AWS SDKs.
To enable Default Host Management Configuration across multiple AWS accounts and Regions within an AWS Organization, we recommend to use AWS CloudFormation StackSets and the sample template provided below or alternatively use the Systems Manager Quick Setup configuration, Default Host Management for an organization.
Follow the steps in the walkthroughs below for your preferred approach.
Default Host Management Configuration in a single AWS account and Region
Using the Fleet Manager Console
- Open the AWS Systems Manager console and in the navigation pane, choose Fleet Manager.
- Choose Default Host Management Configuration under the Account management dropdown.
- Turn on Enable Default Host Management Configuration.
- Choose the IAM role used to enable Systems Manager capabilities for your instances. We recommend using the default role provided by Default Host Management Configuration. It contains the minimum set of permissions necessary to manage your Amazon EC2 instances using Systems Manager.
- Choose Configure to complete setup.
Using the AWS CLI
- Install and configure the AWS Command Line Interface (AWS CLI), if you haven’t already.
For information, see Installing or updating the latest version of the AWS CLI. - Create a few environment variables in your shell to work through the rest of the commands. Substitute your AWS account ID and the AWS Region you are working in for the commands below.
- Create a local JSON file named
trust-policy.jsonon your local machine with the following content for the IAM role trust relationship policy.
- Run the following command to create an IAM service role in your account. The name of the IAM service role is
AWSSystemsManagerDefaultEC2InstanceManagementRole.
- Run the following command to attach the
AmazonSSMManagedEC2InstanceDefaultPolicymanaged policy to your newly created role.
- Run the following command to update the service setting for Default Host Management. There is no output if the command succeeds. Note that you need to repeat this step in every Region where you want to turn on Default Host Management Configuration.
- Run the following command to view the current service settings for Default Host Management Configuration in the current AWS account and AWS Region.
The command returns information similar the following:
After you run the commands above, you can describe EC2 instances registered with Systems Manager using the CLI command describe-instance-information. For example:
Use CloudFormation StackSets to enable Default Host Management Configuration across AWS accounts and Regions
The above processes detail how to enable Default Host Management within a given AWS account and Region. If you manage multiple AWS accounts or have EC2 instances in other AWS Regions, then you can use AWS CloudFormation StackSets to enable Default Host Management in those target locations or alternatively, use the Systems Manager Quick Setup configuration, Default Host Management for an organization.
Make sure that your management and target accounts are set up with the permissions required for these stacks to run. For more information, check the prerequisites for stack set operations in the AWS CloudFormation documentation. If you don’t have this setup or want to avoid using StackSets, then you can use individual CloudFormation stacks in each target account.
Open the following GitHub page and download the enableDefaultHostManagement.yml file.
This template creates the following resources:
- The
AWSSystemsManagerDefaultEC2InstanceManagementRole-${AWS::Region}IAM role for instances with the policyAmazonSSMManagedEC2InstanceDefaultPolicyattached. - An Automation IAM service role scoped to:
-
ssm:UpdateServiceSettingssm:GetServiceSettingiam:PassRolefor the Default Host Management IAM role.
- An Automation runbook to then:
-
- Check the existing setting value for Default Host Management Configuration.
- Branch to the update step if the value does not equal
AWSSystemsManagerDefaultEC2InstanceManagementRole-${AWS::Region}. - Update the service setting value to
AWSSystemsManagerDefaultEC2InstanceManagementRole-${AWS::Region}. - Describe the service setting for confirmation.
- A State Manager association for the Automation runbook to run once.
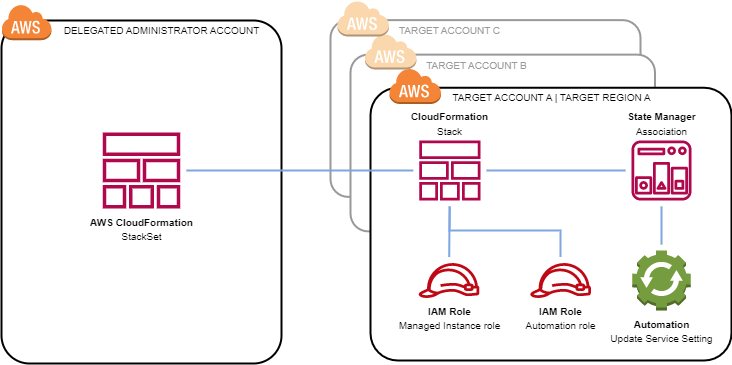
Figure 1. Architecture diagram of resources created by the AWS CloudFormation StackSet in the designated target AWS accounts and Regions.
To get started, proceed through the following steps:
- In the AWS Organizations management account or in the delegated administrator account for CloudFormation, open the AWS CloudFormation console.
- In the navigation pane, choose StackSets and then choose Create StackSet.
- On the Choose a template page, perform the following steps:
- The content of the Permissions section varies, depending on whether you have AWS Organizations enabled:
- If you do not have AWS Organizations enabled, choose Self service permissions, and then choose Next.
- If you have AWS Organizations enabled, you can choose Service managed permissions to apply the StackSets to an organization or OU. For more manual control, you can also choose Self service permissions.
- For Prerequisite – Prepare template, leave the default Template is ready.
- For Specify template, select Upload a template file, select Choose file, choose the
enableDefaultHostManagement.ymlfile, and then choose Next.
- The content of the Permissions section varies, depending on whether you have AWS Organizations enabled:
- On the Specify StackSet details page perform the following steps:
-
- Provide a StackSet name, such as
default-ssm. - Optionally, provide a description.
- Choose Next.
- Provide a StackSet name, such as
- On the Configure StackSet options page, optionally add tags and choose Next.
- On the Set deployment options page, perform the following steps:
-
- For Deployment targets, choose to deploy to the entire AWS organization or choose to deploy to specific AWS organizational units (OUs).
- For Specify regions, select the regions were you have Systems Manager managed nodes.
- Choose Next.
- On the Review page, review the options and parameters selected, choose I acknowledge that AWS CloudFormation might create IAM resources with custom names, and then choose Submit.
After the page is refreshed, you will be able to see your StackSet. The status will change to SUCCEEDED after it’s been created.
Testing
After you’ve turned on Default Host Management Configuration, instances with SSM Agent version 3.2.532.0 or later installed will automatically become managed instances.
Let’s test by launching a t2.medium instance without any attached IAM roles, connect via SSH to install the latest version of SSM agent, and verify that the instance is able to register with Systems Manager. Note: You must create a key pair prior to launching the EC2 instance. For more information see, Create key pairs.
Launch a test Amazon Linux 2 instance
- Retrieve the latest Amazon Linux 2 image ID and store it as an environment variable.
- Launch an instance using the image ID retrieved using the previous step and replace the
key-namewith your own. Note the instance ID of the launched instance, e.g.i-0xxxx0536ae9d1234.
- Connect to the newly launched Amazon Linux 2 instance using SSH. Note: You must replace the key-pair name with your own and the public DNS name with the public DNS entry of your EC2 instance.
- Install the latest version of SSM agent:
- Verify SSM agent is running:
Verify the instance is registered with Systems Manager
Now that we have launch an Amazon Linux 2 instance with the latest version of SSM Agent, our instance will register with Systems Manager. Verify that you are able to see the instance using the describe-instance-information CLI command:
Optionally, connect to the instance using Session Manager. Note: To connect using the AWS CLI, you must first install the Session Manager plugin for the AWS CLI.
Clean up
To terminate the test instance, you can use the Amazon EC2 console or the following AWS CLI command:
To disable Default Host Management Configuration, use the API ResetServiceSetting such as in the following AWS CLI command (Note: You must replace <AWS-REGION> and <ACCOUNT-ID> with your respective values):
To delete the CloudFormation StackSet, go to the AWS CloudFormation console in the management account or delegated administrator account. From the left navigation pane, choose StackSets, and then choose the StackSet that you created. From Actions, choose Delete stacks from StackSet, enter the AWS OU ID, choose Add all regions, choose Next, and choose Submit. Once all of the Stack instances have been deleted, choose Actions and choose Delete StackSet to remove the StackSet.
Conclusion
In this post, we showed you how to enable Default Host Management Configuration in a single AWS account and Region using the Fleet Manager console or the AWS CLI. We also showed you how to enable this feature across your AWS Accounts and Regions within an AWS Organization using CloudFormation StackSets.
This provides a simple way of automatically registering Amazon EC2 instances in an account with AWS Systems Manager. By registering EC2 instances with Systems Manager, you can improve your security and compliance posture as you don’t have to worry about instances that maybe untracked due to misconfiguration.
To verify EC2 instances are registered across your AWS accounts and Regions, you can use Systems Manager Explorer. Systems Manager Explorer is a customizable operations dashboard that reports information about your AWS resources. Explorer displays an aggregated view of operations data (OpsData) for your AWS accounts and across AWS Regions. One widget in Explorer highlights EC2 instances that are managed by Systems Manager and instances that are unmanaged. For more information, see Getting started with Systems Manager Explorer and OpsCenter.