AWS Cloud Operations Blog
Getting Started with Patch Manager and Amazon EC2 Systems Manager
At last year’s re:Invent, AWS launched Amazon EC2 Systems Manager, which helps you automatically apply OS patches within customized maintenance windows, collect software inventory, and configure Windows and Linux operating systems. These capabilities enable automated configuration and ongoing management of systems at scale and help maintain software compliance for instances running in Amazon EC2 or on-premises.
One of the capabilities of Systems Manager is Patch Manager, which can automate the process of patching Windows managed instances at scale. With Patch Manager, you can scan instances for missing patches, or scan and install missing patches to individual instances or large groups of instances by using EC2 tags. Patch Manager can also be used with Systems Manager Maintenance Windows, so you can create a schedule to perform patch operations on your instances within a customized maintenance window.
In this post, I guide you through using Patch Manager to patch your Windows instances. If you run the demo, you are charged for the EC2 resources.
Walkthrough
To get on the fast track of experiencing Patch Manager, these examples use newly created Windows EC2 instances. Here are the steps:
- Launch new Windows instances.
- Create a custom patch baseline.
- Set the patch group for the custom patch baseline.
- Create a maintenance window.
- Register targets for the maintenance window.
- Register a task for the maintenance window.
- Verify the patch compliance report.
Prerequisites
Make sure you have the following roles created before starting the walkthrough:
- Create an IAM role for EC2 instances
Systems Manager requires an IAM role for EC2 instances that will process commands. Follow Task 2 in Configuring Access Using Systems Manager Managed Policies.
- Create an IAM role for Maintenance Windows
For Maintenance Windows to send commands to EC2 instances, you must configure an IAM role. Follow the steps in Configuring Access to Maintenance Windows.
Step 1: Launch new Windows instances
For AWS Windows AMIs, AWS frequently offers fully-patched AMIs. For the details of the patch cycle, see the Keeping Your AMIs Up-to-Date section in AWS Windows AMIs. If you follow the example and choose to use the latest Windows AMI, it may not have any missing patches.
Create Amazon EC2 Windows Instances
- To create new Windows instances, follow the Step 1 in Getting Started with Amazon EC2 Windows Instances. Follow the wizard, click Configure Instance Details after choosing an instance type. For IAM role, choose the IAM role for EC2 created as a prerequisite.

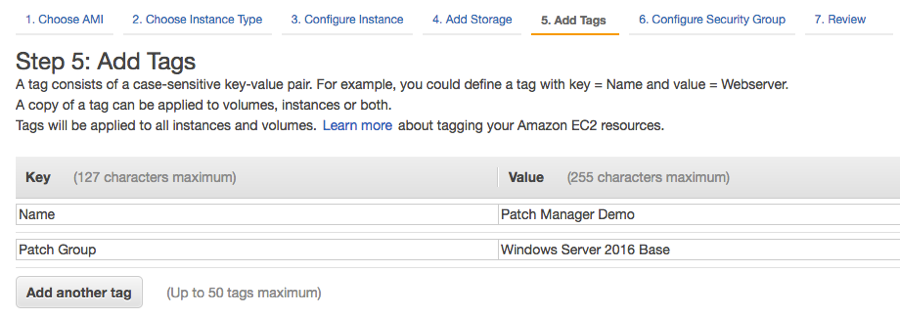
- Choose Next: Add Tags and define EC2 tags as follows:
- First, create a tag called Patch Group (required) and a value, such as Windows Server 2016 Base. A patch group is an optional means of organizing instances for patching. It defines which patch baseline should be used. If this tag is not defined, and you don’t specify your own default patch baseline, an AWS predefined patch baseline is used instead. For more information, see Working with Patch Manager.
- Next, create a tag called Name, which is used later as a filter in the maintenance window configuration. Enter a value such as Patch Manager Demo.
Step 2: Create a custom patch baseline
A patch baseline defines which patches should and shouldn’t be installed on your instances. Systems Manager provides a predefined default patch baseline. You can use the predefined baseline or create your own default to meet your patch compliance requirements. For more information, see Working with Patch Manager.
If you are using the default Patch Baseline or any Patch Baseline that contains a rule that approves patches classified as Security Updates with a severity of Critical, the baseline will approve the Mar. 2017 critical security update for Microsoft Windows SMB Server. Please see the following table for the appropriate patches that need to be installed for different Windows versions.
In this step, you create a custom baseline to use with the patch group defined earlier, and configure it to approve all Critical and Important security updates for WindowsServer2016 three days after they are released.
To create a custom baseline
- In the EC2 console, under Systems Manager Services, choose Patch Baselines, Create Patch Baseline.
- In the Create Patch Baseline page, enter values for the patch filters as follows:
- For Product, enter WindowsServer2016.
- For Classification, enter SecurityUpdates.
- For Severity, enter both Critical and Important.
- For Auto Approval Delay, enter 3 days.
- Choose Create Patch Baseline.

Step 3: Set the patch group for the custom patch baseline
On the Patch Baselines page, you should see the newly created baseline policy called WindowsServer2016.

To modify the patch groups for this custom baseline policy
- On the Patch Baselines page, for the WindowsServer2016 custom baseline, choose Actions, Modify Patch Groups.
- On the Modify Patch Groups page, for Patch Groups, add the previously defined patch group Windows Server 2016 Base.
- Select the tick to save the entry and choose Close.

Only one patch baseline can be used for each patch group, to ensure that there’s a single set of approved patches for the group. You can, however, use a patch baseline for several patch groups.
Step 4: Create a maintenance window
The Maintenance Windows feature defines schedules when you are performing potentially disruptive actions, for example Operation System patching, updating drivers, or installing software. Inside the maintenance window, you register targets, which are EC2 instances to be patched, and register a patching tasks to be run.
To create a maintenance window
- In the EC2 console, under Systems Manager Shared Resources, choose Maintenance Windows, Create maintenance window.
- On the Create maintenance window page, fill in the name of the maintenance window
- Select a schedule to run the tasks. The format of the schedule can be specified in CRON expression or you can use the prepared schedule builder to construct a schedule. In this example, I set up a fast feedback loop for demonstration. For CRON/Rate expression, enter rate(15 minutes). For Duration, enter 1 For Stop initiating tasks, enter 0 for the period before the end of the maintenance window when the system should stop scheduling new tasks to run.
- After filling in the required fields, choose Create maintenance window and return to the maintenance window list.

Step 5: Register targets for the maintenance window
After creating the maintenance window, associate the EC2 instances that will be affected inside the schedule.
To register a target for the maintenance window
- Choose Actions, Register targets for the maintenance window created in the previous step.
- On the Register targets page, for Tag Filters, use the Name tag and Patch Manager Demo value created earlier. If you have a fleet of instances with the same Name tag, but they use different patch baselines, by choosing Name tag you can simplify and consolidate their patch exercise within the same maintenance window.
- Choose Register targets.

Step 6: Register a task for the maintenance window
After the target is registered, register a patch task for the maintenance window.
To register a task
- Choose Actions, Register task for the maintenance window created earlier.

- In the Register Task page, for Document, select AWS-ApplyPatchBaseline for Windows platform. You can narrow down the items by filtering the documents with Name.
- For Task Priority, specify a priority for this task. Digit 1 is the highest priority. Tasks in a maintenance window are scheduled in priority order. Tasks that have the same priority are scheduled in parallel.
- For Targets, select the target created in the previous step.
- For Parameters, choose Install to instruct the task to install the patch onto the instances. Or, you can choose Scan to instruct the task to perform read-only operations.
- Select the role used in the maintenance window created earlier.
- Next, specify how many instances can be patched in parallel, and how many errors are allowed before the patching operation is stopped. For this post, I choose to patch 5 instances in parallel, and stop patching if 1 or more errors occur.
- Choose Register task.

Now Patch Manager is all set. The patches are applied to the instances during the next scheduled maintenance window.
Step 7: Verify the patch compliance report
After the initial maintenance task is completed, you should see the result of the tasks in the maintenance window history.
To see the patch compliance report
- In the EC2 console, under Systems Manager Services, choose Patch Compliance.
- Review the compliance summary by selected individual instances or choose Patch Group to filter instances for the report.

- To drill down into the patches for an instance, select the link of the instance.
- On the Managed Instances page, in the Patch pane, the detailed status of each patch is shown.

Conclusion
In this post, I showed you how to get started using Patch Manager and Maintenance Windows to patch Windows Instances.
If you have questions or suggestions, please comment below.
About the author

Kevin Yung is a Cloud Architect in the Professional Services team in Australia.