AWS Cloud Operations Blog
Migrate VMware virtual machines (VMs) to Amazon EC2 with the AWS Application Migration Service Replication Agent
Introduction
In this blog post, we will walk you through the step-by-step process of completing VMware virtual machine (VM) migrations to Amazon Elastic Compute Cloud (Amazon EC2) using the (Application Migration Service). Moreover, we will show how to apply a custom post-launch action script to remove proprietary VMware tools from the migrated VMs.
Migrating on-premises VMware workloads to Amazon EC2 can provide significant benefits including increased scalability, improved performance, and reduced operational costs. The Application Migration Service simplifies this process by providing a seamless, automated block-level replication solution for migrating VMware VMs to Amazon EC2 instances. Migrated VMs can be tested on Amazon EC2 while replication of the original source server continues. This solution uses the agent-based replication option as it provides continuous data replication and shortens the cutover window.
Solution architecture overview
This solution (Figure 1) follows the guidance in the documentation, Network settings preparations for the Application Migration Service by having a dedicated subnet for the service. It is used by the service as staging area for data replication from your source servers. Test and cutover instances are launched in another dedicated subnet, called: Migrated Resources.
The AWS Replication Agents installed in the respective VMware VMs, initiate the synchronization process and data replication commences in the Staging Area. The replication is handled by replication servers based on the predefined replication settings. When the volumes attached to the source servers are replicated, the server is marked as: Ready for Testing. In regard to the launch settings, the respective test or cutover instances are launched in the Migrated Resources area.
This solution leverages Application Migration Service post-launch actions to install the (AWS SSM) agent on each test or cutover launched instances. The AWS SSM agent allows the execution of custom scripts such as removing the proprietary VMware tools.
This procedure is valid for both VMware Cloud on AWS and VMware on-premises.
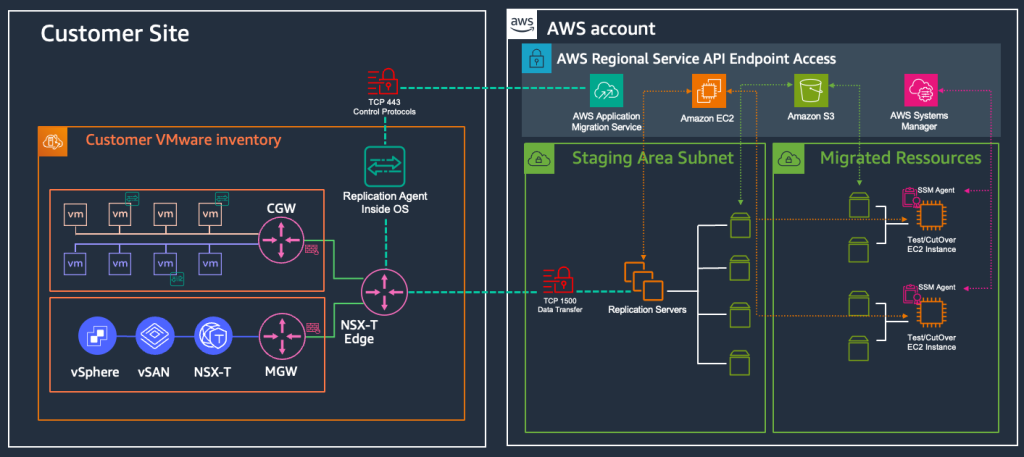
Figure 1 – On the left, the VMware environment with the AWS Replication Agents installed. On the right, the AWS account with its two subnets: Staging Area and Migrated Resources.
For demonstration purposes, this solution uses a Linux (RHEL 9) and Windows Server 2019 set of virtual machines.
Implementation Steps
Step 1 – Prerequisites
For this walkthrough, you will need:
- An AWS user with required permissions, as defined in the Application Migration Service documentation, AWS Application Migration Service initialization and permissions.
- Network settings as defined in, Network setting preparations.
- A supported source server operating system. For more information about supported operating systems, see Supported operating systems.
- Source virtual machine credentials with permissions to download and install the AWS Replication Agent.
- Identify or create an Amazon Virtual Private Cloud (Amazon VPC) subnet to use for your test and cutover instances along with the respective Amazon EC2 security groups.
Step 2 – Create Amazon VPC endpoints
The staging area and migrated area resources can run in a private or public subnet. In this scenario, both subnets are private. With no public access to any HTTPS endpoint, the launch instances cannot connect to the internet and therefore cannot execute the post-launch template. To allow installation of the SSM Agent and the execution of the post launch actions, three endpoint services need to be created:
com.amazonaws.<region>.ssm
com.amazonaws.<region>.ec2messages
com.amazonaws.<region>.ssmmessages
- For each endpoint to create, open the Amazon VPC service in the console and select: Endpoints, then select: Create Endpoint in the top right corner (Figure 2).
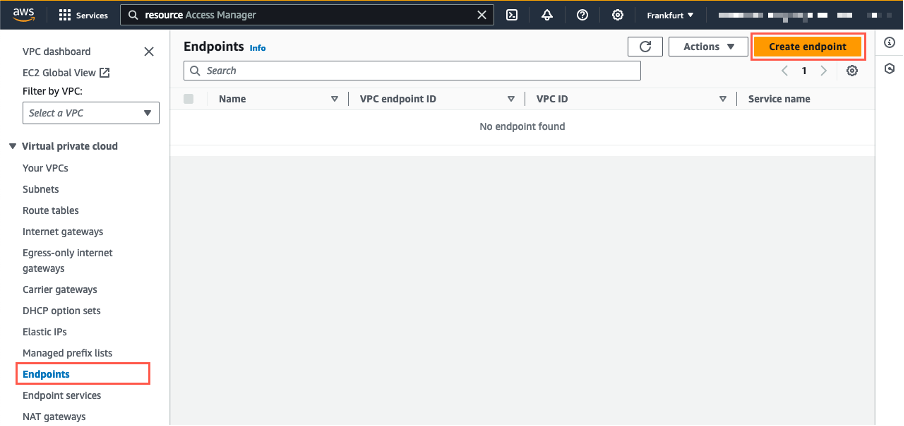
Figure 2 – In Endpoints section of the Amazon VPC service console, select Create endpoint.
- Select AWS services and create the first endpoint (Figure 3) amazonaws.<region>.ssm. Replace <region> with the AWS Region . Select the target VPC and EC2 . The security group attached to the VPC endpoint must allow incoming connections on port 443 from the private subnet of the managed instance. Finally, select Create Endpoint at the end of the page.
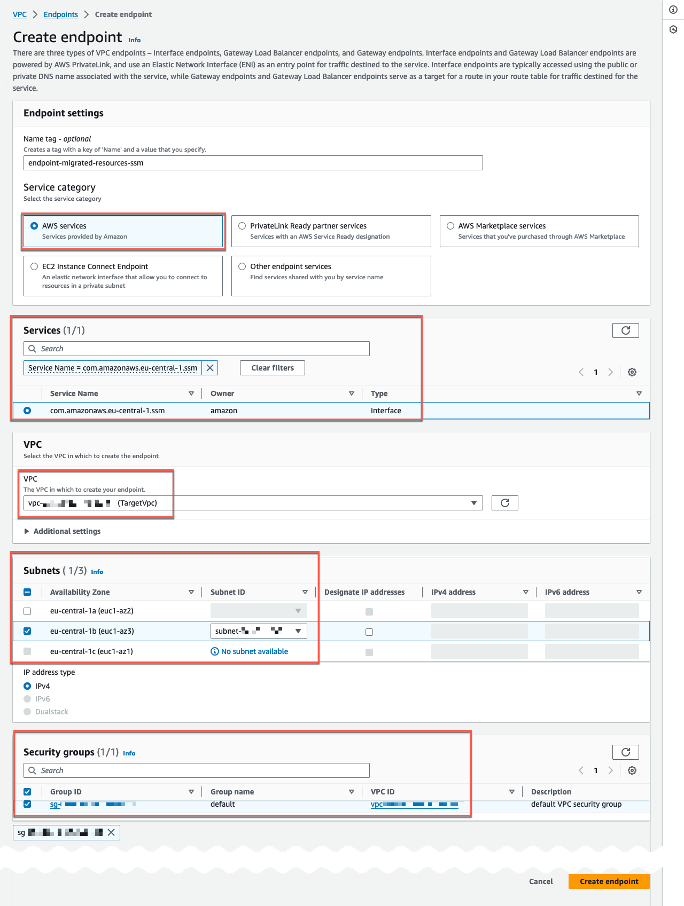
Figure 3 – Create endpoint from the Amazon VPC service console.
- When the three VPC endpoints are created, you will see the following result (Figure 4).
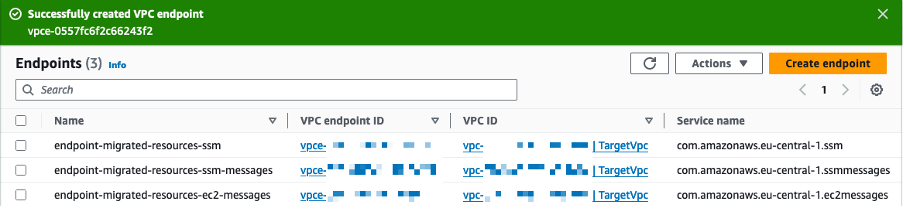
Figure 4 – The three VPC endpoints are successfully created to allow the SSM agent installation.
Step 3 – Post-launch actions to uninstall VMware Tools from Windows and Linux
This section introduces the creation of the custom post-launch settings to automate the removal of the VMware Tools after the source server has been launched in AWS. Note that changes to the post-launch templates will only be applied to newly added source servers. For existing source servers, you modify the post-launch template at the source server level.
- Access the template by selecting: Post-Launch template on the left-hand panel. Edit the post-launch actions settings and activate the settings feature by toggling on, Systems Manager agent installation on launched Test and cutover instances (recommended). Finally, select Save template (Figure 5).
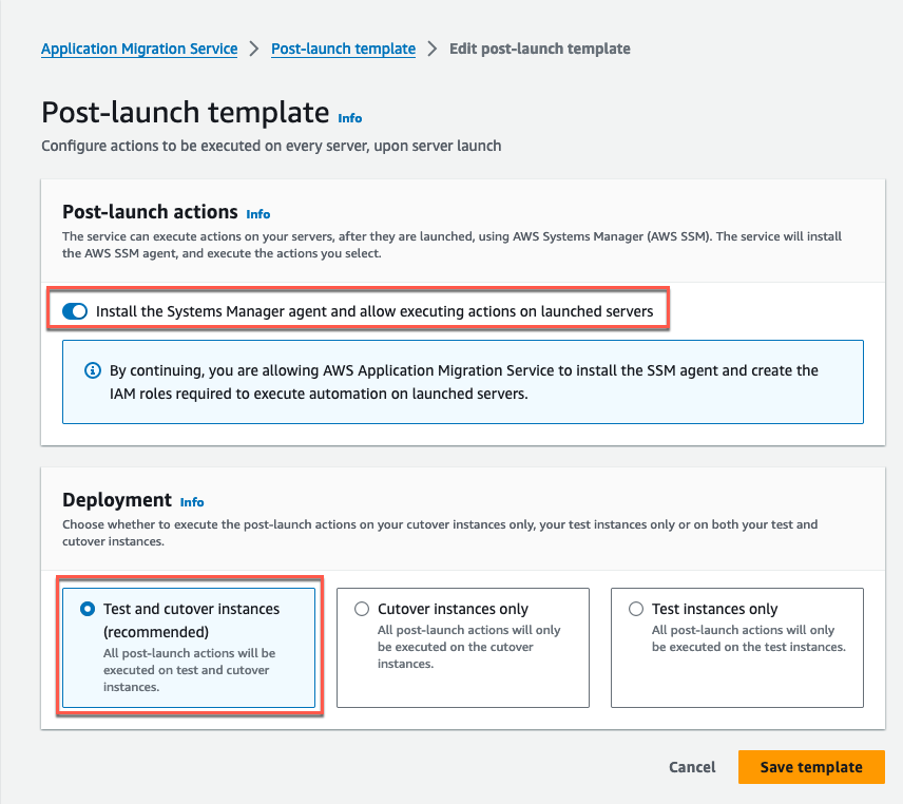
Figure 5 – Enable SSM agent installation for future test and cutover launched servers.
- To purge VMware images from VMware tools, start by creating a custom action. Select Create action (Figure 6).
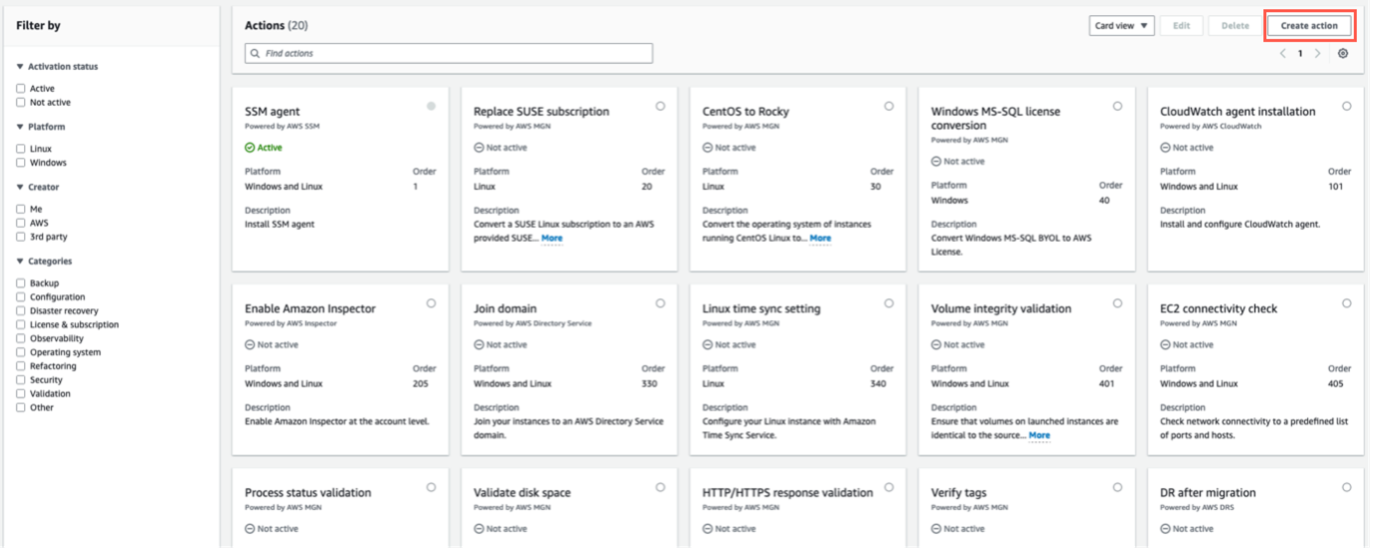
Figure 6 – Select Create action on the top right corner.
- Add the following input in the action settings (Figure 7). Post-launch scripts on Windows run under the Local Service context.
- Action settings
- Action name: CleanUpVMwareTools-Windows.
- Select the option, Activate this action.
- Systems Manager document name: AWS-RunPowerShellScript.
- Description: Run a PowerShell script to clean Windows images from VMware tools.
- Operating systems: Windows
- Action parameters:
The following script can be utilized to uninstall VMTools post migration from Windows Server 2019.- Commands:
Remove-Item –path .\VMware –recurse $regpath = “HKLM:\Software\Microsoft\Windows\CurrentVersion\uninstall” Get-childItem $regpath | % { $keypath = $_.pschildname $key = Get-Itemproperty $regpath\$keypath if ($key.DisplayName -match “VMware Tools”) { $VMwareToolsGUID = $keypath } Msiexec.exe /x $VMwareToolsGUID /qn /norestart } - workingDirectory: C:\Program Files\
- executionTimeout: 300

Figure 7 – PowerShell script to remove VMware tools from replicated Windows launched instances.
- Commands:
- Action settings
- Repeat the above steps for the Linux instance (Figure 8). Post-launch scripts on Linux run under the root user. Refer to Uninstalling VMware Tools for other operating systems than RedHat Linux.
- Action settings:
- Action name: CleanUpVMwareTools-Linux.
- Select the option, Activate this action.
- Systems Manager document name: AWS-RunShellScript
- Description: Run a Shell script to clean Linux images from VMware tools.
- Operating systems: Linux.

Figure 8 – Shell script to remove VMware tools from replicated Linux launched instances.
- Action parameters
- commands:
rm -r ./VMware - executionTimeout: 300
- commands:
- Action settings:
The Post-launch template (Figure 9) will show the two newly created actions. Make sure they are set as Active.
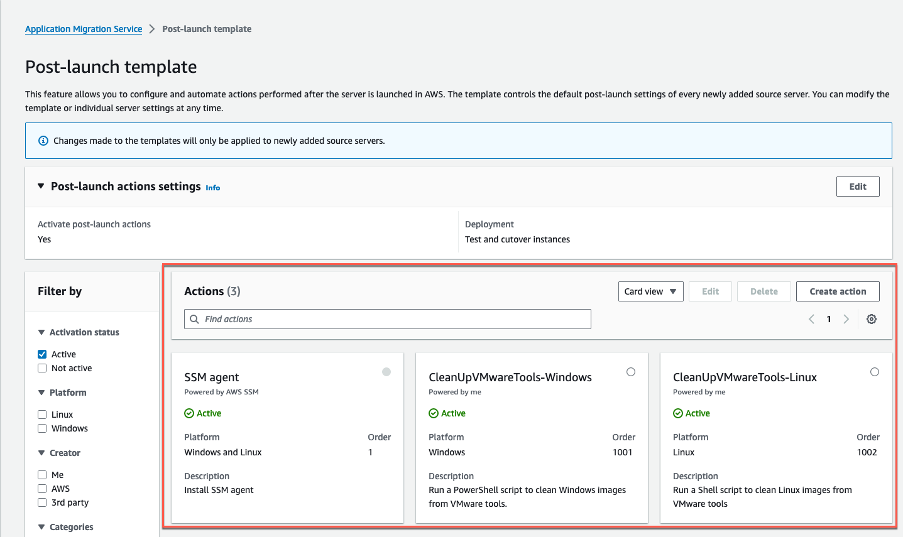
Figure 9 – Verify that SSM Agent installation and the two newly created post-launch actions are enabled.
Step 4 – Adding source servers and install agent on VMs
Each time you add a source server to the Application Migration Service, its Replication settings, Launch settings and Post-launch action settings are initialized based on the default templates.
Once your source servers have been added to the Application Migration Service, you can monitor and interact with them from the Source servers page. On this page, you can view all your source servers, monitor their migration lifecycle, data replication state, see the next step in the migration process for each server, and sort your servers by a variety of categories.
To add a Windows source server, select Add server on the Source servers page.
Use the options below (Figure 10) to create the installer command, adding your IAM access key ID and IAM secret access key. Copy the resulting command and download the installer.
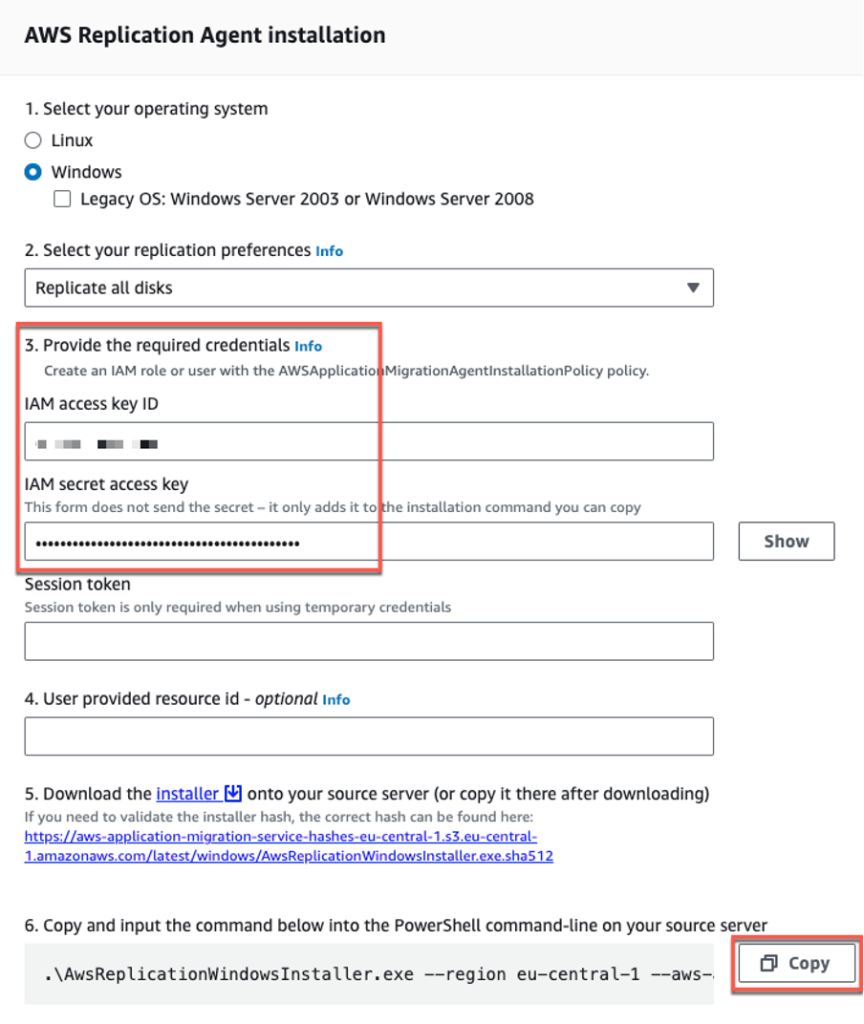
Figure 10 – Generate the installer command line for the AWS Replication Agent.
Once the installer is downloaded, run the copied command in PowerShell. You need to run the agent installer file as an administrator on each Windows server (Figure 11).
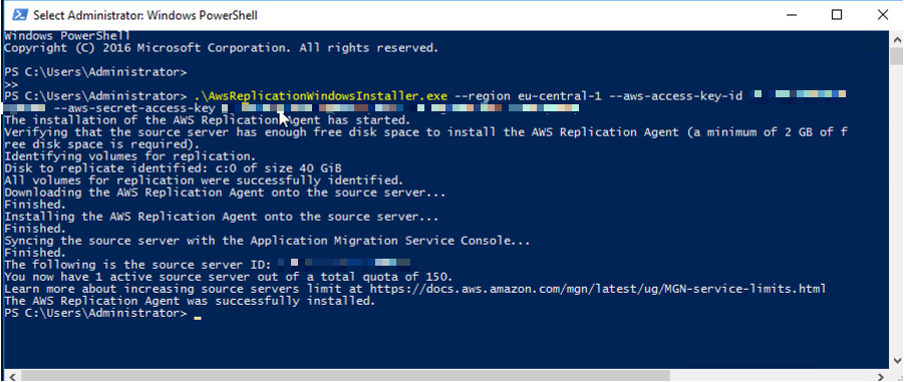
Figure 11 – Run the agent installer command on your Windows source servers.
Note your hostname and go to the Application Migration Service console.
Once the AWS Replication Agent is installed, the server will be added to the Application Migration Service console under Source servers where it will begin the initial synchronization process.
Step 5 – Launching a test instance
Testing the migration of your source servers to AWS is essential before performing the cutover to ensure their proper functionality of the source server within the AWS environment.
Before launching a test instance, ensure that your source servers are ready for testing. Check for the following status on the Source servers page.
- In the Migration lifecycle column, the server status should indicate Ready for testing.
- In the Data replication status column, the server status should be Healthy.
- In the Next step column, the server’s status should be Launch test instance.
To launch a test instance for one or more source servers.
- Navigate to the Source servers page.
- Select the checkbox next to each server you wish to test.
- Select the Test and cutover menu.
- Under Testing, select Launch test instances to initiate the launch of test instance(s) for the selected source server(s) (Figure 12).
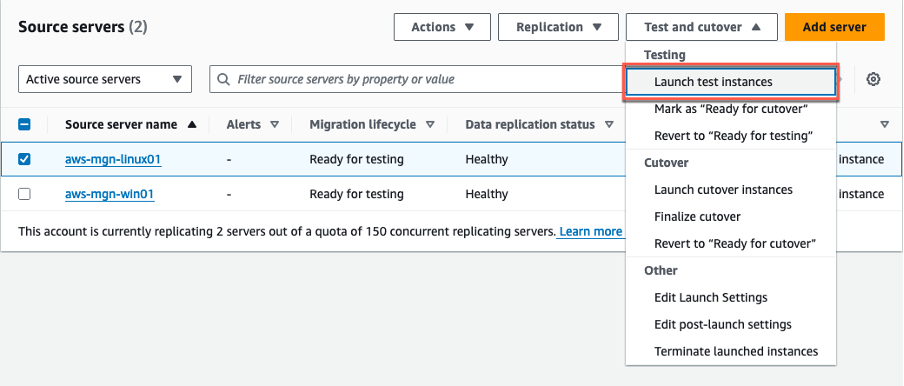
Figure 12 – Select Launch test instances from the Test and cutover dropdown menu.
- Once the Launch test instances for X servers dialog appears, select Launch to commence the test.
- The AWS Application Migration Service console will indicate Launch job started when the test has started. Choose View job details on the dialog to view the specific job for the test launch in the Launch history
- You can confirm the successful initiation of the test instance launch, by observing various indicators on the Source servers page (Figure 13).
- In the Alerts column, you will see a Launched status, signifying the launch of a test instance for this server.
- In the Migration lifecycle column, you will see a status of Test in progress.
- In the Next step column, it will show Complete testing and marked as Ready for cutover.
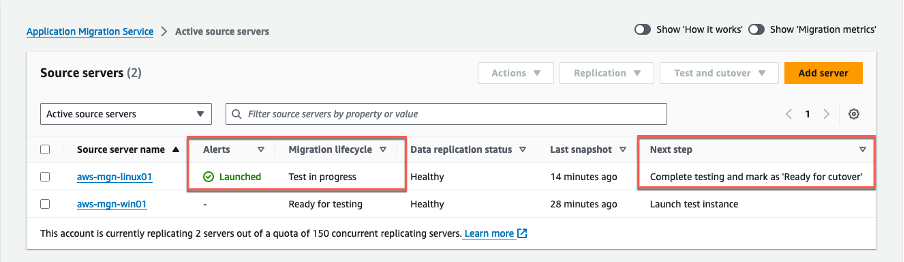
Figure 13 – Mark the server as Ready for cutover when your tests are completed.
Once your test instances are launched, access the to connect to them. Alternatively, you can use AWS SSM Session Manager or AWS SSM Fleet Manager to log into those instances. This is done to verify their proper functionality, assess connectivity, and conduct acceptance tests for your application.
When your testing is complete and you are prepared for the cutover phase, you can conclude the test. To do so, the Migration lifecycle status of your source servers to Ready for cutover. It signifies the completion of all testing and the readiness for cutover. Eventually, conclude the lifecycle test in progress by selecting Terminate test launched instances.
Verify post-launch actions.
- Select Source servers and open the Post-launch settings
- For visibility on the actions that will be triggered, filter by active. The following actions will be triggered (Figure 14).
SSM agent
CleanUpVMwareTools-Linux
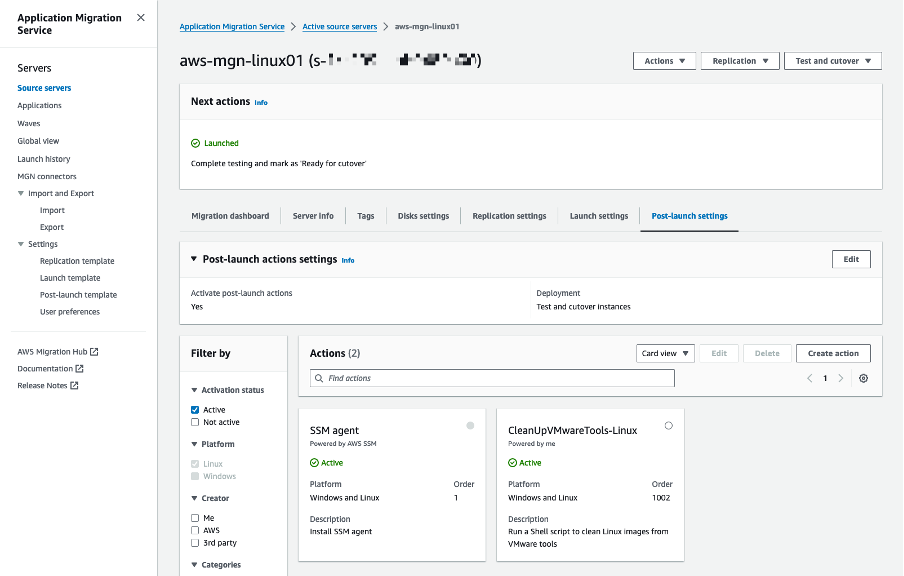
Figure 14 – Validate post-launch actions to be executed.
When the instance is launched, the execution status of the SSM Agent installation and CleanUpVMWareTools can be tracked under the Migration dashboard tab (Figure 15).
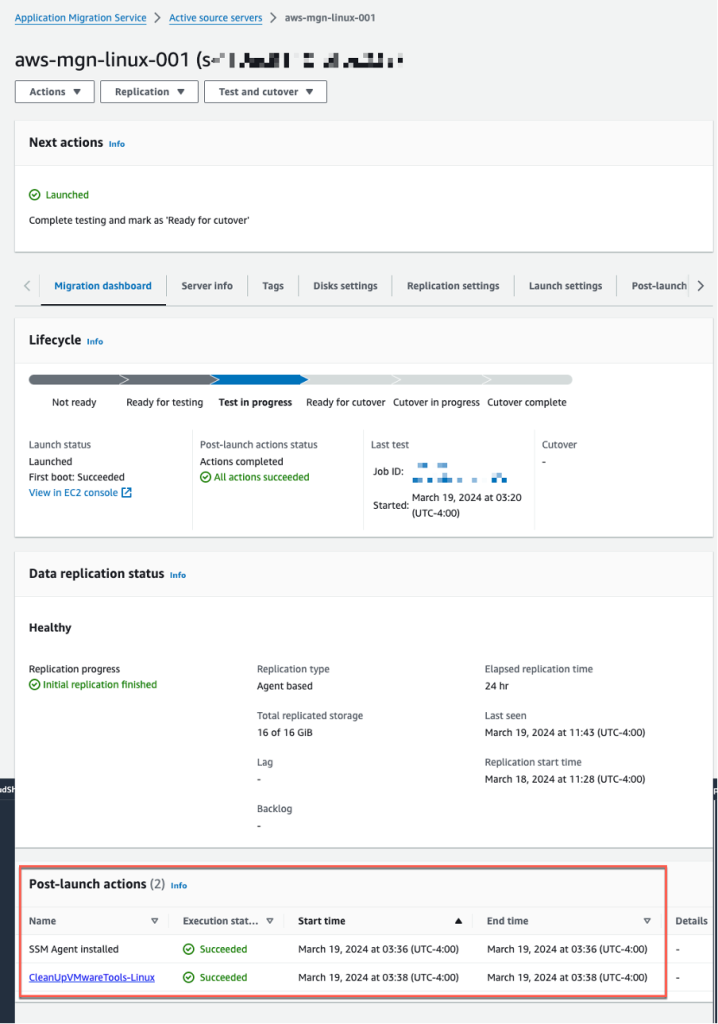
Figure 15 – Note that all the actions completed successfully.
Step 6 – Launching a cutover instance
- Select the checkbox next to each source server with a launched test instance that you wish to conclude the test for.
- Select the Test and cutover menu (Figure 16).
- Under the Testing section select the option Ready for cutover.
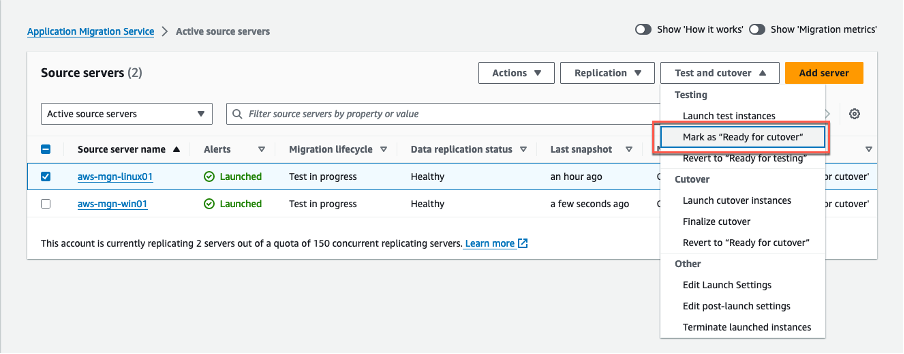
Figure 16 – Mark as Ready for cutover to launch a cutover instance.
In the Mark X servers as Ready for cutover dialog, you can make a choice regarding the termination of the test instances. It is recommended that you terminate these instances because you will incur charges for them, even if they are no longer required. To proceed with termination, choose Yes, terminate launched instances (recommended) and then select Continue.
The AWS Application Migration Service console will confirm that the servers were marked as ready for cutover.
Before proceeding with the launch of a cutover instance, confirm the readiness of your source servers for cutover by checking for the following status on the Source servers page (Figure 17).
- Migration lifecycle status is Ready for cutover.
- Data replication status is Healthy.
- The next step shows Terminate launched instance; Launch cutover instance if you have not terminated your most recent test instance. Alternatively, Launch cutover instance if you have terminated the latest test instance.

Figure 17 – Validate that migration status is Ready for cutover, data replication status is Healthy.
To initiate a cutover instance for one or more source servers.
- Visit the Source servers page and select each server you wish to cutover.
- Select the Test and cutover menu.
- Under Cutover (Figure 18), select Launch cutover instances.
- A pop-up dialog appears showing the cutover instances with their respective names that will be launched. Confirm by selecting Launch.
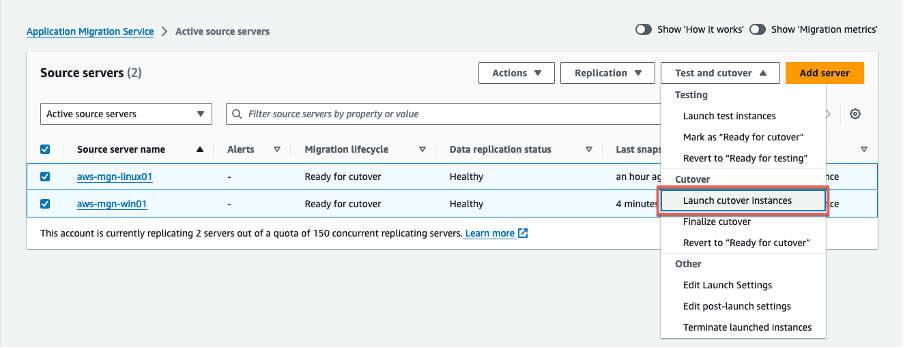
Figure 18 -Select Launch the cutover instances in the Test and cutover menu.
On the Source servers page (Figure 19) the Migration lifecycle column displays Cutover in progress and the Next step column indicates Finalize cutover.
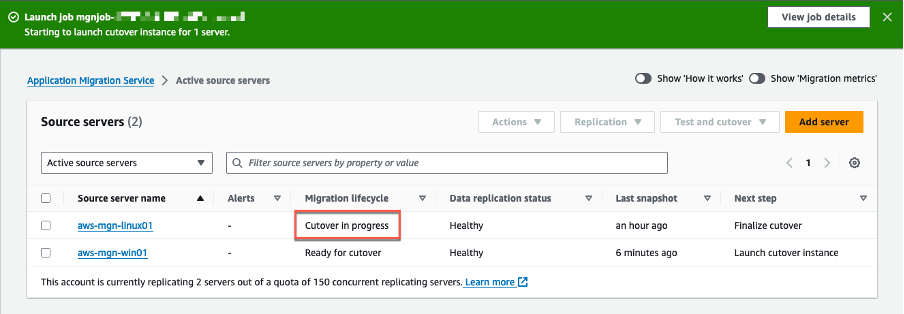
Figure 19 – The migration lifecycle has changed from Ready for cutover to Cutover in progress.
Select your source server to view the job details (Figure 20).
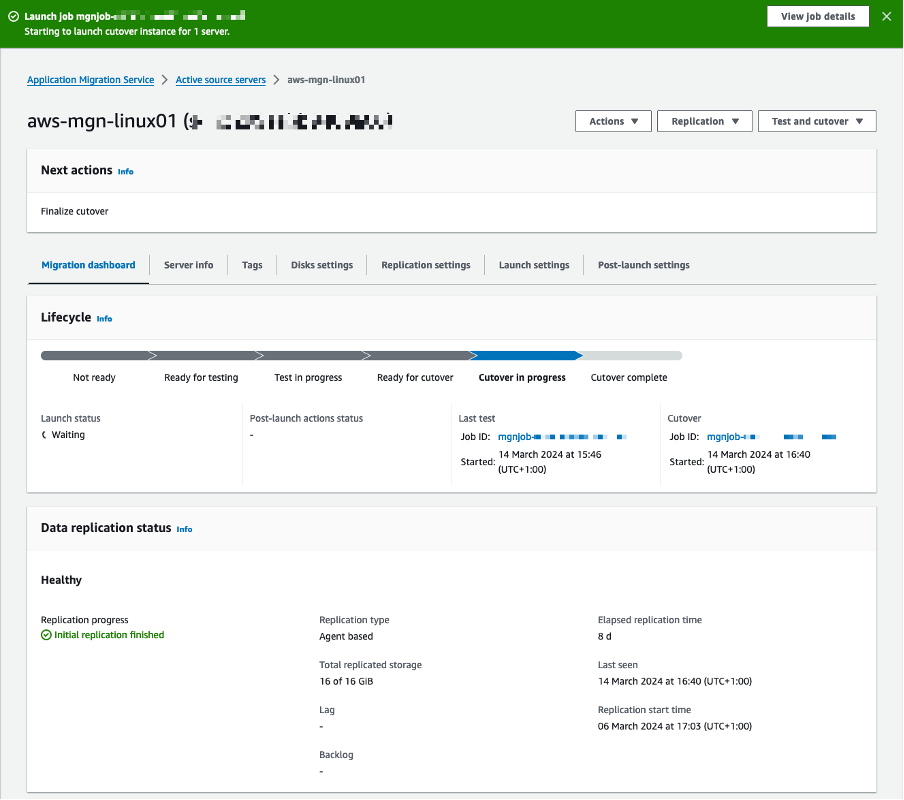
Figure 20 – The current lifecycle is Cutover in progress, meaning the cutover instances are being launched.
After launching your cutover instances, through the Amazon EC2 console. Alternatively, connect to the instance with AWS SSM Session Manager or Fleet Manager. This step is essential to verify their proper operation, confirm connectivity, and conduct acceptance tests for your application.
When you have completed your migration, finalize the cutover (Figure 21):
- Choose each source server you wish to cut over.
- Select: Finalize cutover.
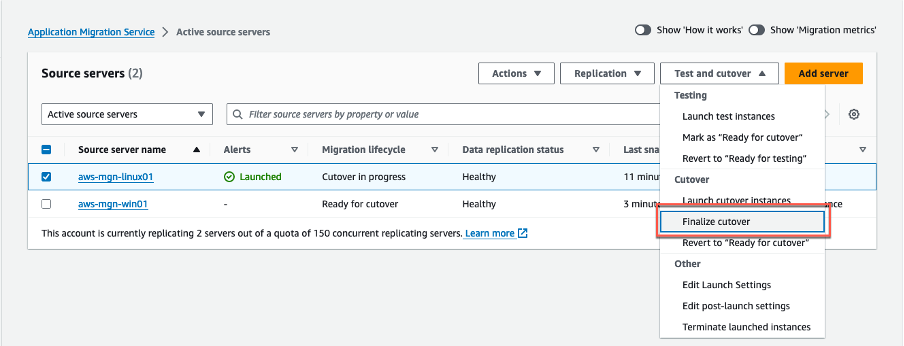
Figure 21 – Switch to Finalize cutover to stop data replication.
In the Finalize cutover for X servers dialog, select: Finalize to start the cutover. This action will update the Migration lifecycle status of your source servers to: Cutover complete, signifying a successful cutover and migration. It will also halt data replication and discard the associated AWS EBS volumes and Amazon EC2 replication servers. The Application Migration Service console will indicate Cutover finalized when the cutover has completed successfully.
Cleanup
To avoid ongoing charges, ensure to clean up relevant resources, including:
- Amazon EC2 instances
- Disconnect any Application Migration Service source servers
- Remove attached EBS volumes to the EC2 instances associated with your testing
- Delete VPC endpoints
Conclusion
In conclusion, this blog post reviews the series of steps for a seamless on-demand migration of a VMware VM to Amazon EC2. The main benefit of this process is automation, which significantly reduces human errors and accelerates the migration. The post-launch actions clean up images from VMware tools. The Application Migration Service remains cost-effective, making it an attractive solution for migrations regardless if the VMware environment is on-premises, in or in VMware Cloud on AWS.
For additional resources, see the following topics in the Application Migration Service User Guide: