AWS Cloud Operations Blog
Preventing blacklisted applications with AWS Systems Manager and AWS Config
AWS Systems Manager Inventory collects metadata from Amazon EC2 instances and on-premises instances. AWS Systems Manager Inventory integrates with AWS Config to record inventory data for historical views, change tracking, or auditing. When you use AWS Config recording for systems inventory data you can enable scenarios such as tracking newly installed or removed software applications, assessing security risks, troubleshooting, and tracking license usage. Additionally, you can create AWS Config Rules to define compliance rules based on inventory data (such as, detecting a blacklisted application) and take remediation action (such as sending email notifications or running an AWS Lambda function to uninstall the application) automatically.
In this blog post, we’ll walk you through an example that shows how to use AWS Systems Manager Inventory with AWS Config to detect and track changes in applications installed on an instance, and with AWS Config and Config rules to detect prohibited (aka blacklisted) applications installed on your managed instances and report non-compliance.
Requirements
This blogs requires a managed instance, that is an EC2 instance or on-premises instance that has AWS Systems Manager Agent (also called SSM Agent) installed and has IAM role with AmazonEC2RoleforSSM policy attached to it. Here are the instructions on how to convert an un-managed instance to a managed instance:
- Create an IAM role. For this blog post we’ll call it MyAmazonEC2RoleforSSM. Attach the AmazonEC2RoleforSSM policy to the role. To do this in the AWS Systems Manager console, from AWS Service Roles, select Amazon EC2 Role for Simple Systems Manager.
- Attach the IAM role MyAmazonEC2RoleforSSM to a new or existing EC2 instance.
- Install SSM Agent: AWS Systems Manager Agent (SSM Agent) is Amazon software that runs on your Amazon EC2 instances and your hybrid instances that are configured for Systems Manager. SSM Agent is installed, by default, on Amazon Linux base AMIs dated 2017.09 and later. SSM Agent is installed by default on Windows Server 2016 instances and instances created from Windows Server 2003-2012 R2 AMIs published in November 2016 or later. You must manually install SSM Agent on other versions of Linux, including non-base images like Amazon ECS-Optimized AMIs. More details are available here
Using AWS Config and AWS Config Rules with AWS Systems Manager
Step 1: Collect Inventory from managed instances
In the AWS Management Console, go to the AWS Systems Manager console and choose Managed Instances on the left navigation pane. This should list all EC2 instances or on-premises managed instances in your account. Choose Setup Inventory and select the EC2 instance you want to collect inventory from. (For the example in this blog post I’m collecting inventory on all default types and using default values for inventory collection schedule.) Choose Setup Inventory to complete the action. Verify that the instance has collected an inventory of applications installed on the instance. When you choose the instance and then choose Inventory, a list of applications displays that is similar to the following one:

Step 2: Start recording AWS Systems Manager Inventory data to AWS Config
On the AWS Systems Manager console, choose Managed Instances, and then choose Edit AWS Config recording for the EC2 instance, as the following shows:

This should redirect to the AWS Config console as follows:

Choose recording to Turn On.
Step 3: Track changes to the applications installed on a managed instance
To see an example of changes that are tracked in software applications that are installed on a managed instance that collects inventory, let’s install a Java Development Kit (JDK) on the managed EC2 instance.
- Use SSH to connect to the managed EC2 instance.
- Install the JDK using the following command.
- Make the default JDK the newly installed JDK 1.8.
- Check to see if the default JDK is 1.8.
- Wait for next scheduled Inventory collection on the instance. Then in the AWS Systems Manager console, on the left navigation pane, choose Managed Instances, then choose EC2 instance, and choose Inventory to ensure that the application is showing as installed on the system. Now choose EC2 instance and go to the AWS Config console. Note that it might take a few minutes for the changes to show up in the timeline of changes in AWS Config, based on the schedule we selected earlier.

- Choosing Changes gives you details of the applications that have been added/changed.

Step 4: Apply AWS Config rules to detect prohibited or blacklisted applications
Today AWS Config has four built-in rules for AWS Systems Manager (more details on AWS Config rules can be found here).
- ec2-managedinstance-applications-blacklisted – Checks that none of the specified applications are installed on the instance. Optionally, specify the version. Newer versions will not be blacklisted. Optionally, specify the platform to apply the rule only to instances running that platform.
- ec2-managedinstance-applications-required – Checks whether all of the specified applications are installed on the instance. Optionally, specify the minimum acceptable version. Optionally, specify the platform to apply the rule only to instances running that platform.
- ec2-managedinstance-inventory-blacklisted – Checks whether instances managed by AWS Systems Manager are configured to collect blacklisted inventory types.
- ec2-managedinstance-platform-check – Checks whether EC2 managed instances have the desired configurations.

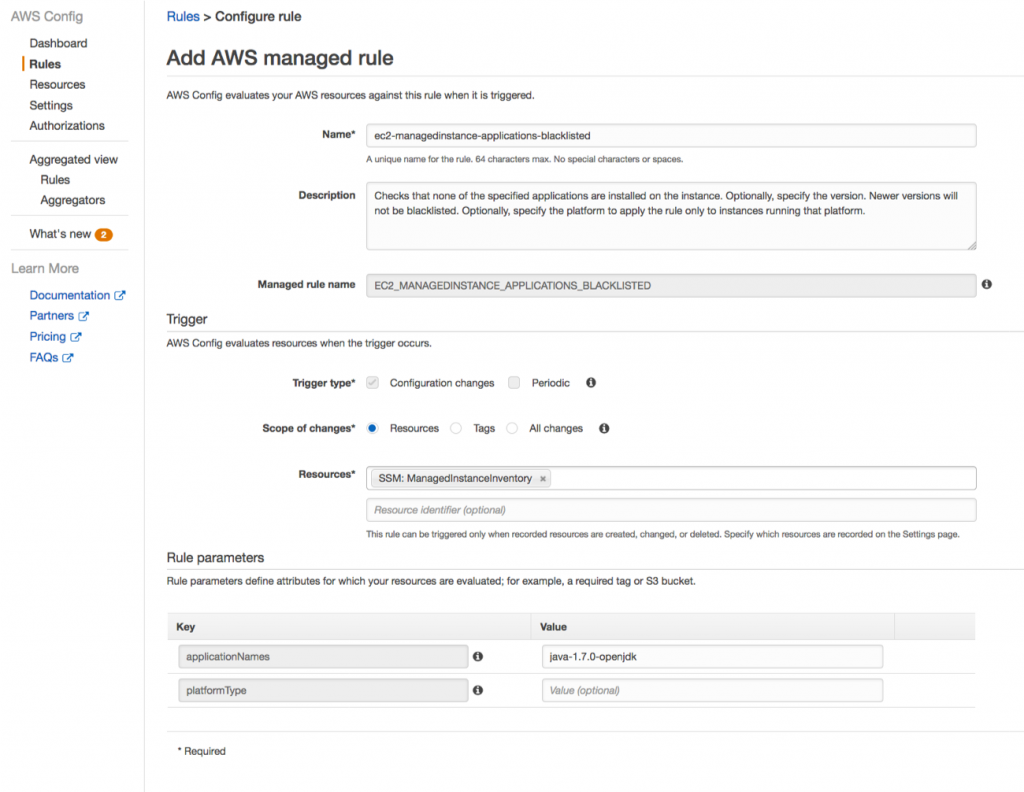
For the purpose of this blog, let’s select a built-in AWS Config rule for EC2 – ec2-managedinstance-applications-blacklisted. Using this rule, we will specify an application that we want to prohibit / blacklist in my organization and set a remediation action so that I get email notifications any time the application is installed on one or more managed instances in my fleet. In this example, we will evaluate if an old JDK like java-1.7.0-openjdk is installed on the managed EC2 instance.
Step A. Select the ec2-managedinstance-applications-blacklisted Config rule.

Step B. Specify java-1.7.0-openjdk as the application to be prohibited
.
Step C: Report compliance against the ec2-managedinstance-applications-blacklisted Config rule.
The AWS Config rule evaluates and shows the findings as compliant or as non-compliant. In this case, since java-1.7.0-openjdk was installed on the instance, the AWS Config rule will report the instance non-compliant as the following indicates.
Step D: Take automated remediation action, such as sending email notification of non-compliance.
(Note: As part of remediation actions that you take using AWS Config Rule, you could also execute an AWS Lambda function that will automatically uninstall the blacklisted application.)
We can stream configuration changes and notifications to an Amazon Simple Notification Service (SNS) topic. In the AWS Config console, in the left navigation pane, choose Settings, and then choose the Amazon SNS topic.

Go to the dashboard in the SNS console and create an subscription to this topic to either send an email, send a SMS, call a Lambda function, or use other delivery options. We will just choose Create subscription to send an email.

Now we’ll choose Confirm subscription to send an email to the email address specified. We will go to the specified email inbox and confirm SNS subscription so that we’re ready to start receiving SNS notifications.
Step E: Maintain compliance by uninstalling the blacklisted application.
- Let’s uninstall JDK 1.7 and see whether the EC2 instance becomes compliant.
- Using SSH, connect to the managed EC2 instance and uninstall JDK1.7
- After the next Inventory collection (by default inventory collection happens every 30 minutes), AWS Config timeline will show that the changes have been recorded

- You will also get an email notification that says that the EC2 instance is now compliant.

- Go to the AWS Config console Rules section and the EC2 instance will now show that it is compliant.

The AWS Config Dashboard will also show the overall compliance across all managed instances.

Conclusion
In this blog post we showed you how easy it is to set up an inventory of applications using AWS Systems Manager and record inventory data with AWS Config. We showed you how to set rules, remediation actions, and report compliance or non-compliance on inventory data based on AWS Config rules.
About the Authors
![]()
Mani Chandrasekaran is an AWS Solution Architect (SA) based in Bangalore, India.

Tanu Mutreja is a Senior Product Manager for AWS Systems Manager. She loves to work on innovative products and solve customer problems with simple end to end experiences.