AWS Cloud Operations Blog
Replacing a Bastion Host with Amazon EC2 Systems Manager
Bastion hosts (also called “jump servers”) are often used as a best practice for accessing privately accessible hosts within a system environment. For example, your system might include an application host that is not intended to be publicly accessible. To access it for product updates or managing system patches, you typically log in to a bastion host and then access (or “jump to”) the application host from there.
In this post, I demonstrate how you can reduce your system’s attack surface while also offering greater visibility into commands issued on your hosts. The solution is to replace your bastion host by using Amazon EC2 Systems Manager.
Bastion host access
Access to the bastion host is ideally restricted to a specific IP range, typically from your organization’s corporate network. The benefit of using a bastion host in this regard is that access to any of the internal hosts is isolated to one means of access: through either a single bastion host or a group. For further isolation, the bastion host generally resides in a separate VPC.
The following diagram illustrates this design:
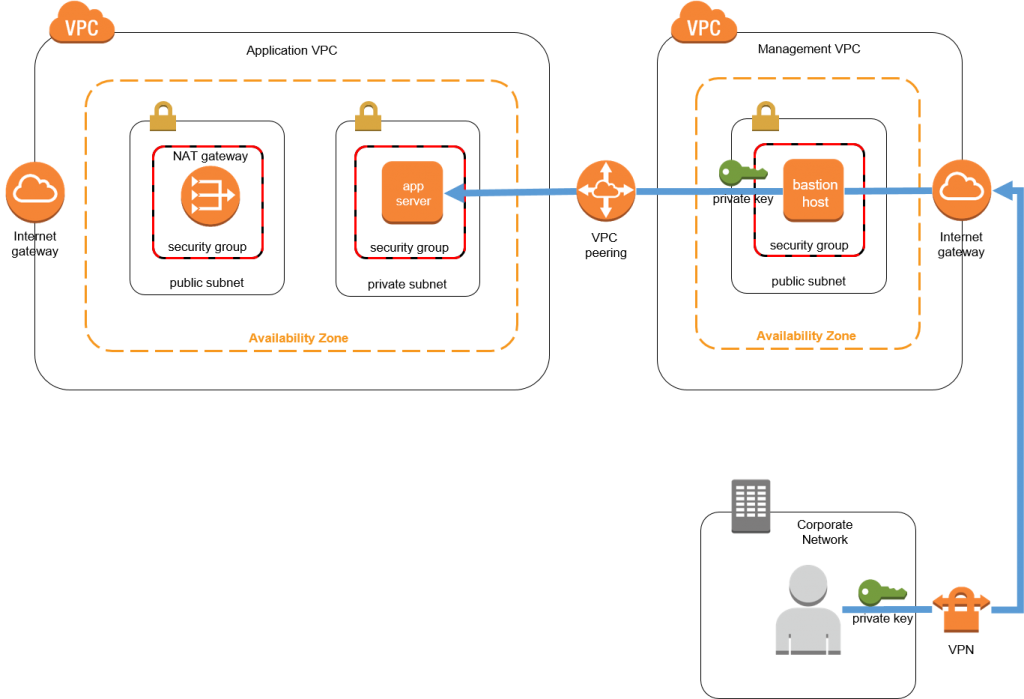
The application host resides in a private subnet in a VPC that is peered with the management VPC. The application host has a security group rule that allows port 22 access only from the management VPC’s bastion host security group. (The examples in this post refer to port 22 and SSH, but Windows users can substitute these for port 3389 and RDP for SSH.) Similarly, the bastion host has a security group rule that allows port 22 access only from the corporate network IP space.
Because the application host resides in a private subnet, it is able to establish outbound Internet connections only through a NAT gateway that resides in the VPC’s public subnet.
To put all of this into context, say that you want to view the network interfaces for the application host. To do so, you would follow these steps:
- Install the application host’s private key on the bastion host.
- Establish an SSH (Secure Shell) session on the bastion host. This is generally done from a trusted network, such as your corporate network.
- Establish an SSH from the bastion host to the application host.
- Run the “ifconfig” command.
- To save the results, you can copy and paste the output, pipe the output to a file, or save the output to a storage device.
The security controls in this system help restrict access to the application and the bastion host. However, the bastion model does have some downsides:
- Like any other infrastructure host, it must be managed and patched.
- It accrues a cost while it is running.
- Each of your security groups that allow bastion access require a security group ingress rule, normally port 22 for SSH (usually for Linux) or port 3389 for RDP (usually for Windows hosts).
- Private RSA keys for the bastion host and application hosts need to be managed, protected, and rotated.
- SSH activity isn’t natively logged.
Alternative solution
Systems Manager allows you to remotely execute commands on managed hosts without using a bastion host (you might know this feature as EC2 Run Command). A host-based agent polls Systems Manager to determine whether a command awaits execution.
Here are some of the benefits:
- This approach uses an AWS managed service, meaning that the Systems Manager components are reliable and highly available.
- Systems Manager requires an IAM policy that allows users or roles to execute commands remotely.
- Systems Manager agents require an IAM role and policy that allow them to invoke the Systems Manager service.
- Systems Manager immutably logs every executed command, which provides an auditable history of commands, including:
- The executed command
- The principal who executed it
- The time when the command was executed
- An abbreviated output of the command
- When AWS CloudTrail is enabled to record and log events in the region where you’re running Systems Manager, every event is recorded by CloudTrail and logged in Amazon CloudWatch Logs.
- Using CloudTrail and CloudWatch rules gives you the ability to use Systems Manager events as triggers for automated responses, such as Amazon SNS notifications or AWS Lambda function invocations.
- Systems Manager can optionally store command history and the entire output of each command in Amazon S3.
- Systems Manager can optionally post a message to an SNS topic, notifying subscribed individuals when commands execute and when they complete.
- Systems Manager is agent-based, which means it is not restricted to Amazon EC2 instances. It can also be used on non-AWS hosts that reside on your premises, in your data center, in another cloud service provider, or elsewhere.
- You don’t have to manage SSH keys.
You are responsible for the costs of the resources that use Systems Manager, such as EC2 instances, SNS messages, and S3 storage.
About the Systems Manager Agent
The Systems Manager agent is an open-source executable that runs on supported versions of Linux and Windows (list of supported operating systems).
The agent assumes an IAM role to communicate with Systems Manager. This role must be associated with a policy that grants it sufficient permissions to interact with Systems Manager and other ancillary services. Fortunately, IAM provides a managed policy called AmazonEC2RoleforSSM that defines these privileges for you. Among other things, it allows the agent to get and reply to Systems Manager messages, publish CloudWatch metrics, and write log files to S3.
The agent communicates with Systems Manager over HTTPS, which means that the communication between the host and the service is encrypted, and security groups don’t require special egress rules.
Ideally, you install the agent when the instance is bootstrapped; however, you can install it on a running EC2 instance or on a non-AWS host to which you already have access. For example, to bootstrap the agent on an Amazon Linux EC2 instance, install it using the package manager in the instance user data:
#!/bin/bash
cd /tmp
curl https://amazon-ssm-region.s3.amazonaws.com/latest/linux_amd64/amazon-ssm-agent.rpm -o amazon-ssm-agent.rpm
yum install -y amazon-ssm-agent.rpm
For more information about installing the agent, see Installing SSM Agent.
Refined architecture
Now that you’ve seen the benefits of Systems Manager, you can see how the architecture is affected by the changes.
The new architecture, seen in the diagram below, shows how the use of Systems Manager eliminates the need for the bastion components and helps simplify the system architecture. Users no longer interact directly with the application hosts; Systems Manager is the broker that facilitates the execution of commands:

In this design, the Systems Manager agent resides on the application host, which qualifies the host as a “managed instance,” meaning that it is eligible to receive commands from Systems Manager. To execute a command, create a new command request in Systems Manager and target this specific instance (or a group of instances to execute the command on multiple instances).
When you create the command request, you can optionally choose an S3 bucket in which to store the results and an SNS topic to which to send a notification of the execution. You can also optionally create a CloudWatch event that is triggered on Systems Manager events.
Walkthrough
In this post, you use the Launch Stack link below to launch an AWS CloudFormation stack, create the above architecture, run a command, and then see the results in the Systems Manager console. Finally, you tear down the CloudFormation stack.
The link launches the stack in Northern Virginia. SSM is available only in some regions.
Also, some resources incur costs as long as the resources are in use.
![]()
- Choose Launch Stack to launch the CloudFormation console (log in to your AWS account if you haven’t done so already) with the prepopulated CloudFormation demo template. Choose Next.
- For Stack name, use the pre-populated ssm-demo or enter a custom name. For Notification Email, enter your email address, to notify you when Systems Manager performs its actions. After the CloudFormation template launches, you get a subscription confirmation email that you must confirm to receive notifications. Choose Next.
- On the Review screen, acknowledge that CloudFormation will create IAM roles as a result of launching the stack. Choose Create.

- To see the stack creation progress, choose Refresh, Restore and then select the ssm-demo stack to see the launch events.

- When the stack is successfully launched, the Status changes from CREATE_IN_PROGRESS to CREATE_COMPLETE. To view the values used in the next section, choose Outputs.

The infrastructure created by this CloudFormation template is used in the next section. You should see the values that are listed in the following table.Output Name Sample Value Purpose S3Bucket ssm-output-history-account-id–region S3 bucket used to store command output history ApplicationHostInstance id-instance-id EC2 instance used to execute a command SnsTopicArn arn:aws:sns:region: account-id:SsmNotificationTopic SNS topic used to send command execution notifications RoleArn arn:aws:iam::account-id:role/ SsmNotificationRole-region Role used to send notifications to SNS
Seeing Systems Manager in action
In this section, you use Systems Manager to issue the same “ifconfig” command that we used in the previous section to view the network interface configuration of the application host.
First, you specify an instance on which to execute the command. After Systems Manager executes the command, it reports the status, display the output, stores the output history in an S3 bucket, and sends you an email notification indicating that it executed the command.
The Systems Manager agent runs with root privileges. Be careful when granting user permissions to execute Systems Manager commands.
To use Systems Manager, follow these steps:
- Log in to your AWS account and navigate to the EC2 console.
- In the left navigation pane, under Systems Manager, choose Managed Instances.
Note: If you see the “Welcome to EC2 Systems Manager – Managed Instances” screen instead of a list of managed instances, be sure that the following conditions are all true:
• The EC2 console that you’re viewing is in the same region where you launched the CloudFormation template
• At least one instance is running the Systems Manager agent
• The instance running the Systems Manager agent has an associated instance role with a policy allowing Systems Manager actions
• The instance has had time to initialize (generally only a few minutes) - Select the instance created by the CloudFormation template from the previous section, and choose Run a command.

- On the Run a command screen, scroll down the list of command documents and select AWS-RunShellScript. The platform type is Linux. If you were targeting a Windows host, select “AWS-RunPowerShellScript” instead. Take notice of the other command documents in this list. We won’t cover the other commands in this blog post, but you can select a command document later that fits a more specific use case.
- Ensure the target instance created from the CloudFormation template in the previous section is selected.
- For Commands, type the following command:
ifconfigThis issues a command to view the host’s network interface configuration. You can enter any valid bash command (for Linux) here, such as commands to install patches, execute applications, or update configuration files.
- Enter the following values and choose Run:
• For S3 bucket, enter the bucket name created from the CloudFormation template in the previous section (leave the S3 key prefix value empty).
• For Role ARN, enter the ARN created from the CloudFormation template.
• For SNS Topic ARN, enter the ARN created from the CloudFormation template.
• For Notify me on, choose All.
• For Notify me for, choose Command.
• Use the default values for all other fields.

- After you initiate the command, choose View Managed Instances.
- To view the command history, under Systems Manager, choose Run Command.
- After a short period of time, the command completes its execution. To see the abbreviated output of the command on the Systems Manager console, choose Output, View Output.

For longer outputs, you can also view the complete command output in the S3 bucket that you specified earlier. In addition, you should have received an email indicating that the Systems Manager command was executed; it can sometimes take few minutes to receive the email.Note: If you don’t receive the email notification, be sure that you accepted the SNS topic notification that was sent to you when the CloudFormation stack was launched.
That’s it! You successfully executed a command on your application host without using a bastion host or accessing the host directly. Further, you have a full account of the command execution. This allows you to audit the commands and use your existing IAM framework to control access to the hosts, without having to manage private RSA keys. For more information, see Configuring Access to Systems Manager.
To clean up the resources created by the CloudFormation template, be sure to delete the stack in the CloudFormation console. If you used Systems Manager to store the execution log in your bucket, then you must manually delete the bucket and its contents before deleting the stack.
Next steps
Most AWS services include a robust API that allows you to automate service interaction. Using the console is a good way to learn and understand the procedures for remote command execution, but automating this ability provides a reliable and consistent means of governing user access to this capability.
For example, many organizations use on-call staff rotation for supporting production infrastructure. Because Systems Manager supports native IAM integration, you can grant or revoke Systems Manager invocation privileges based on who is on call for a specific period of time.
In the example from the previous section, you executed an ad hoc command in the console. Realistically, you would execute a script that is stored in an access-controlled source code control repository and incorporate this capability into your existing support workflow framework to track requests, approvals, and rejections. Using the AWS CLI, AWS APIs, and AWS SDKs, you can also automate the use of Systems Manager to be used without manual intervention.
Other Systems Manager features
Remote command execution is only one feature of Systems Manager. Other capabilities include automated patch management, host software inventorying, automated Amazon Machine Image baselining, and parameter storage. For more information, see the Amazon EC2 Systems Manager product details page.
Conclusion
In this post, I demonstrated how to remotely execute commands on your EC2 instances and on-premises hosts while decreasing your system’s attack surface and simplifying your architecture. You can use AWS services for identity and access management, logging, and alerting to give insight into the commands being issued on your hosts.
You might have some use cases for SSH or RDP that this solution might not satisfy, such as SSH tunneling or proprietary software that relies on SSH. Hopefully, this post gave you some alternative ideas about how to access and manage your hosts.
I welcome your comments or questions below.
About the Author
Rob Barnes is a cloud security architect for AWS Professional Services. He works with our customers to address security and compliance requirements through automation.
