AWS Open Source Blog
Configure Continuous Deployment Using Kustomize Components and Spinnaker Operator in Amazon EKS
Spinnaker is a cloud native continuous delivery platform that provides fast, safe, and repeatable deployments for every enterprise.
In the precursor to this blog, we learned how to manage Spinnaker using the Apache licensed open source Spinnaker Operator and deploy the application using Spinnaker continuous delivery pipeline to an Amazon Elastic Kubernetes Service (Amazon EKS) cluster. We configured different components using Spinnaker YAML, as well as the KubeConfig using Spinnaker Tools.
In this blog, we will streamline the Spinnaker service configurations using Kustomize components, Spinnaker Operator, and Amazon EKS Blueprint. We also presented this topic at the 2022 Spinnaker Summit.
Kustomize is an open source tool for customizing Kubernetes configurations to generate resources from other sources and compose and customize collections of resources. We will also introduce Kustomize patches for Spinnaker resources, which is a new kind of Kustomization that allows users to define reusable Kustomizations. In this blog, we will use the kustomize.yaml file to work with the overlays base components from this repository and the patches from the local files.
We will use two personas when talking about continuous deployment using Spinnaker: platform team and development team.
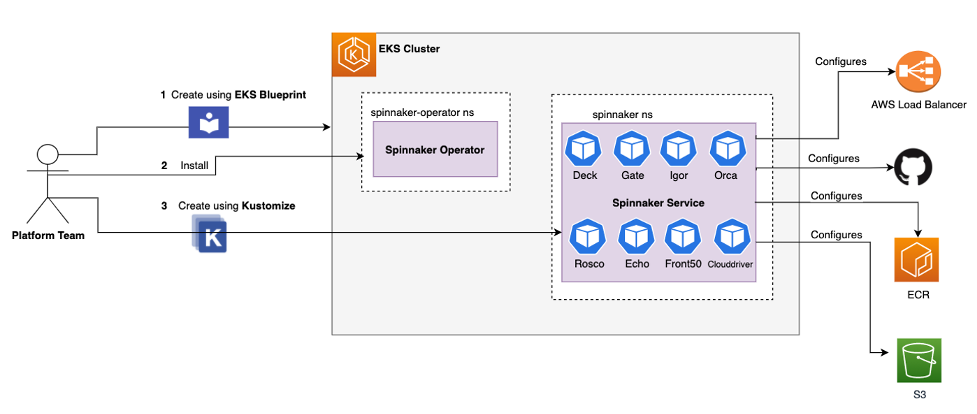
Platform team
In the diagram below, the platform team will setup the infrastructure for Spinnaker using the following steps:
- Use Amazon EKS Blueprints to create the Amazon EKS cluster.
- Install the Spinnaker Operator, a Kubernetes operator for managing Spinnaker that is built by Armory.
- Setup the Amazon Elastic Container Registry (Amazon ECR) repository and Amazon Simple Storage Service (Amazon S3) bucket in your Amazon Web Services (AWS) account. We will create these as part of the walkthrough.
- Use Kustomize components to deploy Spinnaker service on Amazon EKS. We will also use the kustomize patch configuration to integrate with different AWS services. All the patched information to configure the components below will live in the kustomize.yml file:
- Amazon S3 to persist the data for Spinnaker metadata and the pipeline
- Application load balancer to expose the Spinnaker UI
- Amazon ECR for the docker registry
Development team
In this diagram, we document how Spinnaker is used as a CI/CD tool and will help deploy the application using GitOps.
- The DevOps team (who can either be part of the development team or not depending on organizational structure) will be responsible for creating the Spinnaker pipeline. In our case, we have imported the pre-created pipeline.json, which you will see in the walkthrough section.
- The developer will commit code changes that should trigger the build and upload Artifact to Amazon ECR.
- The Spinnaker pipeline will detect the new artifact with a new tag and start the deployment to test environment using a Kustomize configuration for test environment.
- Once approved, the pipeline will complete the deployment to production environment using a Kustomize configuration for production environment.

Walkthrough
Prerequisites
You will need to use AWS Command Line Interface (AWS CLI), eksctl, kubectl, Terraform, jq, and yq. At the time of writing this blog, the latest version of yq was having issues while passing environment variables, so make sure to use the 4.25.1 version.
Step 1 - Provision Amazon EKS Cluster using Amazon EKS Terraform Blueprint
Follow steps from the Amazon EKS Terraform Blueprint Git repository to create an Amazon EKS cluster. For this example, we have named the Amazon EKS Cluster eksworkshop-eksctl and set the version to 1.24. Refer to Amazon EKS Blueprint for Terraform for more information.
Step 2 – Install Spinnaker CRDs
Pick a release from GitHub and export that version. We are using 1.3.0, the latest Spinnaker Operator that was available at the time of writing this blog. You can see the latest Spinnaker operator update on the Spinnaker blog.
The operator pattern allows us to extend the Kubernetes API to manage applications and their components through constructs such as the control loop. The Spinnaker Operator streamlines the following tasks:
- Validate Spinnaker configurations to reduce the incidences of incorrect feature configuration
- Create and monitor all Spinnaker microservices
- Activates upgrades between versions of Spinnaker
To install the Spinnaker CRDs, run these commands:
When successful, you should get the following output:
Step 3 – Install Spinnaker Operator
Next, we need to install the Spinnaker Operator in the namespace spinnaker-operator. We have used cluster mode for the operator that works across namespaces and requires a cluster role to perform validation. Run these commands:
Make sure the Spinnaker Operator pod is running. This may take a couple of minutes. To confirm, run this command:
When successful, you should get the following output:
Step 4 – Create an Amazon ECR instance
Now, we need to create an Amazon ECR instance. Make sure you have your AWS Region and Account ID ready. Run these commands:
Next, push the sample NGINX image into your Amazon ECR instance:
When successful, you should get output like this:
Step 5 – Create an Amazon S3 bucket
Using these commands, create and configure an Amazon S3 bucket:
Step 6 – Create a service account
Run these commands to create a service account on your Amazon EKS instance:
Step 7 – Create a secret
Make sure you have the GitHub token created using the instructions here: https://github.com/settings/tokens. Your username and token as secret will be used by the Spinnaker pipeline to clone the spinnaker-summit-22 git repo, via these commands:
Step 8 – Install Spinnaker
- Clone the Spinnaker repository:
- Change the ~/environment/spinnaker-summit-22/ecr-registry.yml configuration file by adding your account and region.
- Change the ~/environment/spinnaker-summit-22/s3-bucket.yml configuration file by adding your Amazon S3 bucket name.
- Change account/name in the ~/environment/spinnaker-summit-22/gitrepo.yaml configuration file, and run the command below based on your GitHub account.
- Delete the validation webhook. This is the current workaround for the Spinnaker Operator having a validation error in Kubernetes 1.22.
- Create Spinnaker service with these commands:
When successful, you should get the following output:
Check that all pods and services are running with these kubectl commands:
Here is some example output:
Step 9 – Configure Spinnaker pipeline
- In this example we will use a pre-created Spinnaker pipeline.json. However, we need to edit the file ~/environment/spinnaker-summit-22/pipeline,json with your Amazon ECR repository information by inputting the command below. Replace the Amazon ECR endpoint in this command:
- Open the Spinnaker UI by getting the load balancer URL for the Spinnaker service spin-deck from this kubectl command:
The hostname will be listed in the LoadBalancer row in the output, at the end of the line:
- Go to the browser and load the Load Balancer hostname as a URL. From the UI, create an application for continuous deployment.
This image demonstrates all of the information that needs to be entered into the UI to create a new application, specifically, Name, Owner Email, Repo Type, Description, Instance Health, Instance Port, and Pipeline Behavior.

- Create a new pipeline for your application. The UI will prompt you to enter a type (select Pipeline) and provide a pipeline name (for this example, use NginxApp):

- Create the pipeline stages using the JSON file. In the UI, select “Pipeline Actions” then “Edit as JSON”:

- Replace the pipeline json file content with the content from your ~/environment/spinnaker-summit-22/pipeline.json file. Update your Pipeline by selecting “Save Changes.”
- The Spinnaker UI does not auto save in the bake stages. Click the drop down and select your account in “Bake Test” and “Bake Production”:

- Verify your stages in the UI. Your Pipeline should be NginxApp, the tag value should be v1.1.0, and the repo_name should reflect your specific repository:

Test each input before going back to the pipeline and manually completing it:

- Your pipeline will run until the stage, Promote to Production, pause, and wait for approval. Confirm that the application has been deployed to the test environment.

- Using this kubectl command, check if the application has been deployed to the test environment:
- You should get output showing one pod running in the test-environment namespace:
- Click on the “Continue on the Spinnaker Pipeline” popup in the UI for Promote to Production and the pipeline will deploy three pods to the prod environment:

Check if the application has been deployed to the prod environment. You should see three pods running in the production-environment namespace as the output from this kubectl command:
Step 10 – Activate GitOps based automated deployment
- Run deployment.sh. This bash script will create the application container image with a new tag and push the image to your Amazon ECR repository:
- From here, the pipeline should trigger automatically. You can confirm this in the UI:

- Check the pods after test deployment with this kubectl command:
- Check the image used by the pod with this kubectl command. It should match the tag used in the script:
- Check the pod after production deployment with this kubectl command. You should see three pods running in the production-environment namespace:
kubectl get pods -n production-environment
- Check the image used by the pod with this kubectl command. It should match the tag used in the script:
Cleanup
To clean up your environment, run the following commands, being careful to substitute in the correct values for your AWS_REGION, ECR_REPOSITORY, and S3_BUCKET:
Conclusion
In this post, we installed Spinnaker Service using Spinnaker Operator and Kustomize and walked you through the process of setting up a sample application in Spinnaker service using Kustomize. Then we built a Spinnaker CD pipeline which used Kustomize to overlay the test and prod environment during the deployment stage.
We observed how the Spinnaker pipeline got triggered when we pushed a new image into an Amazon ECR repository. Spinnaker then executed the pipeline deployment stage and deployed the sample application artifacts into an Amazon EKS cluster.
To learn more, we recommend you review these additional resources:
Spinnaker Concepts
Spinnaker Architecture Overview
GitHub Spinnaker Operator
Deploy Armory Continuous Deployment or Spinnaker Using Kubernetes Operators
Spinnaker Architecture
Kustomize patches for configuring Armory Continuous Deployment