AWS Open Source Blog
Managing Spinnaker using Spinnaker Operator in Amazon EKS
Overview
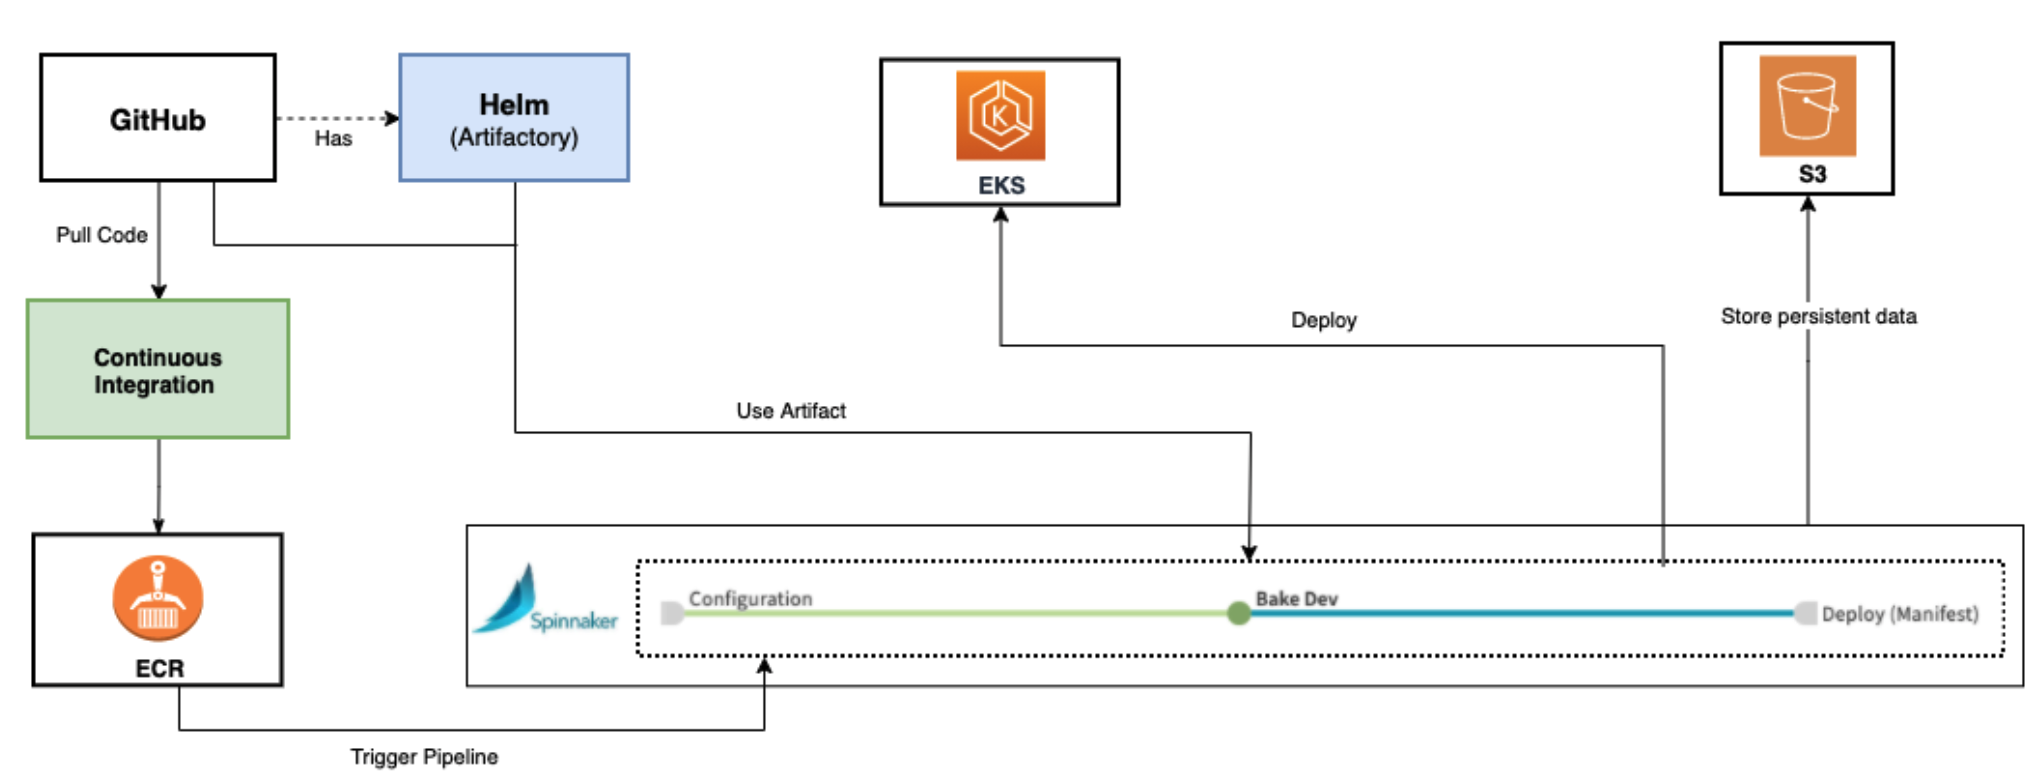
Spinnaker enables developers to focus on writing code and deploying their applications without having to worry about the underlying infrastructure. The development team can focus on application development and leave ops provisioning to Spinnaker for automating reinforcement of business and regulatory requirements. Spinnaker, a cloud-based open source continuous delivery platform built originally by Netflix for releasing software changes rapidly and reliably, supports several CI systems and build tools like AWS CodeBuild with Jenkins. You can integrate Spinnaker for configuring Artifacts from Git, Amazon Simple Storage Service (Amazon S3), Amazon Elastic Container Registry (Amazon ECR), and more.
There are several methods to install open source Spinnaker on Amazon Elastic Kubernetes Service (Amazon EKS):
- Halyard – Halyard is a command-line administration tool that manages the lifecycle of your Spinnaker deployment, including writing and validating its configuration, deploying each of Spinnaker’s microservices, and updating the deployment.
- Kleat – Intended to replace Halyard, Kleat is a tool for managing Spinnaker configuration files. It is currently under active development, but it is ready for early adopters to try in development clusters.
- Spinnaker Operator – is a Kubernetes operator to deploy and manage Spinnaker using familiar tools. You can install a basic version of Spinnaker or use kustomize files for advanced configuration.
In this blog, we will be using Spinnaker Operator, a Kubernetes operator for managing Spinnaker, built by Armory. Operator, which runs in Kubernetes makes managing Spinnaker simple and more automated while introducing new Kubernetes-native features. Basically, the Spinnaker Operator creates a CRD (Custom Resource Definition) on the Kubernetes cluster which has custom Kubernetes kind object, which is the kind: SpinnakerService. You specify the SpinnakerService manifest file describing the statuses that you want Spinnaker to have. Then, you apply the manifest to the cluster. The spinnaker operator pod running inside the cluster takes this Kubernetes kind: SpinnakerService and creates the respective deployment object, service objects, secrets, and so on, for Spinnaker to be run in the cluster. Using Operator, you can use standard tools, like kubectl, or use kustomize to deploy the configuration instead of custom deployment tools like Halyard.
Installing the operator consists of below Kubernetes manifests:
- A Custom Resource Definition (CRD), which extends Kubernetes APIs
- A service account, role, and role binding to grant the operator access to the Kubernetes objects it needs to watch or modify.
- A
Deploymentobject for the operator itself.
Spinnaker Operator lets you treat Spinnaker as just another Kubernetes deployment, which makes installing and managing Spinnaker easy and reliable. Operator unlocks the scalability of a GitOps workflow by defining Spinnaker configurations in a code repository rather than in Halyard commands. The current tool, Halyard, involved significant manual processes and requires Spinnaker domain expertise.
In this blog post, we will focus on managing Spinnaker using Spinnaker Operator and deploying the Product Catalog application using Spinnaker CD Pipeline to EKS cluster.
Spinnaker concepts
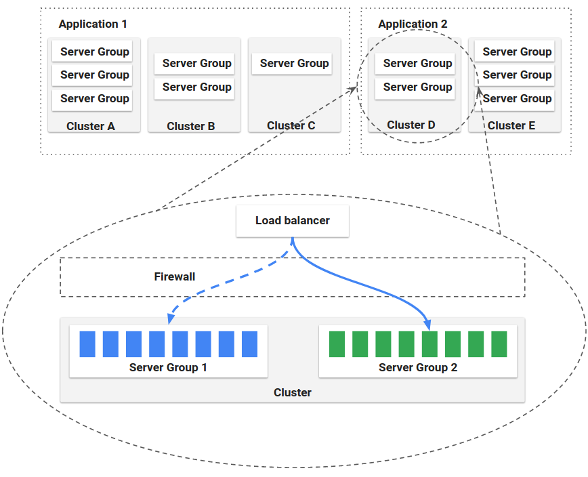
Spinnaker architecture is composed of a number of independent microservices for resiliency and allows for faster iteration on each individual component and a more pluggable architecture for custom components. Spinnaker provides two core sets of features Application management and Application deployment:
Application management
This is also called infrastructure management where we use Spinnaker’s application management features to view and manage the cloud resources.
Application deployment
Spinnaker’s application deployment features allow us to construct and manage continuous delivery workflows.
Pipeline: The pipeline is the key deployment management construct in Spinnaker. It consists of a sequence of actions, known as stages. You can pass parameters from stage to stage along the pipeline.
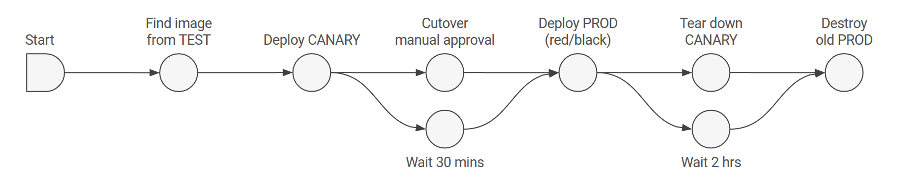
Image source:https://spinnaker.io/docs/concepts/pipelines.png
Stage: A stage in Spinnaker is a collection of sequential tasks and composed stages that describe a higher-level action the Pipeline will perform either linearly or in parallel.
Task: A task in Spinnaker is an automatic function to perform.
Deployment strategies: Spinnaker supports the red/black, also called blue/green, strategy, with rolling red/black and canary strategies in active development.
Walkthrough
Prerequisites:
This tutorial assumes you have already finished the following setup:
- Amazon Elastic Kubernetes Service (Amazon EKS) Cluster.
- Here I have used Amazon EKS 1.20.
- The cluster name is “
eksworkshop-eksctl" - You will need minimum “m5.large” instance type as Spinnaker install has many pods to be deployed as part of Spinnaker service.
- Following tools are installed:
- AWS Command Line Interface (AWS CLI)
- The eksctl utility used for creating and managing Kubernetes clusters on Amazon EKS
- The kubectl utility used for communicating with the Kubernetes cluster API server
- The jq JSON processor
- The Helm CLI used for installing Helm Charts
- GitHub account
Step 1 – Clone the repo
To begin, clone the following:
cd ~/environment
git clone https://github.com/aws-containers/eks-app-mesh-polyglot-demo.git
cd eks-app-mesh-polyglot-demo
helm install workshop ~/environment/eks-app-mesh-polyglot-demo/workshop/helm-chart/
The output will be like below:
NAME: workshop
LAST DEPLOYED: Wed Mar  9 07:12:11 2022
NAMESPACE: default
STATUS: deployed
REVISION: 1
NOTES:
1. Get the application URL by running these commands:
     NOTE: It may take a few minutes for the LoadBalancer to be available.
           You can watch the status of by running 'kubectl get --namespace workshop svc -w frontend'
  export LB_NAME=$(kubectl get svc --namespace workshop frontend -o jsonpath="{.status.loadBalancer.ingress[*].hostname}")
  echo http://$LB_NAME:80
You can access the product catalog application using the below load balancer URL.
export LB_NAME=$(kubectl get svc frontend -n workshop -o jsonpath="{.status.loadBalancer.ingress[*].hostname}")
echo $LB_NAME
Once you go to the load balancer URL, you should see the below UI. There is no data for the product catalog.
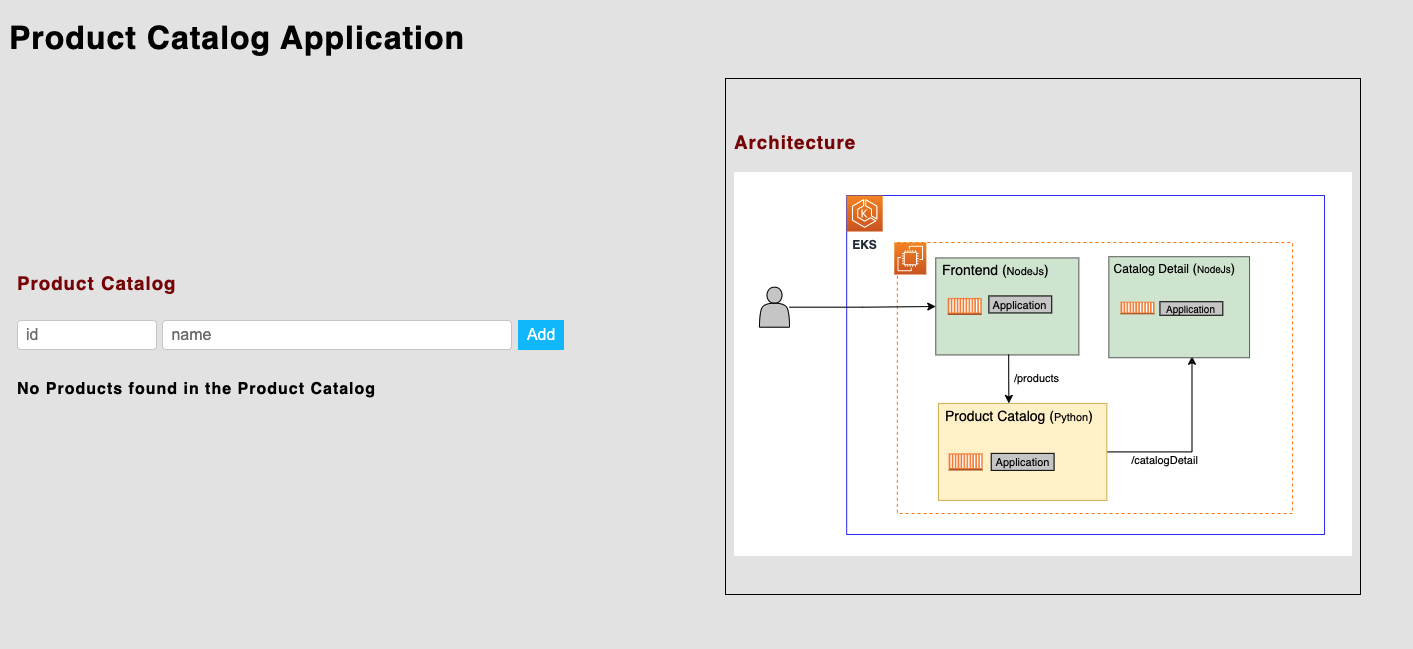
Now add a product. Below, we’ve used “1“ as “id“ and “Table“ as “name.“ Here, you see that “Catalog Detail” has only one vendor, “ABC.com,” which comes from the Catalog Detail service.
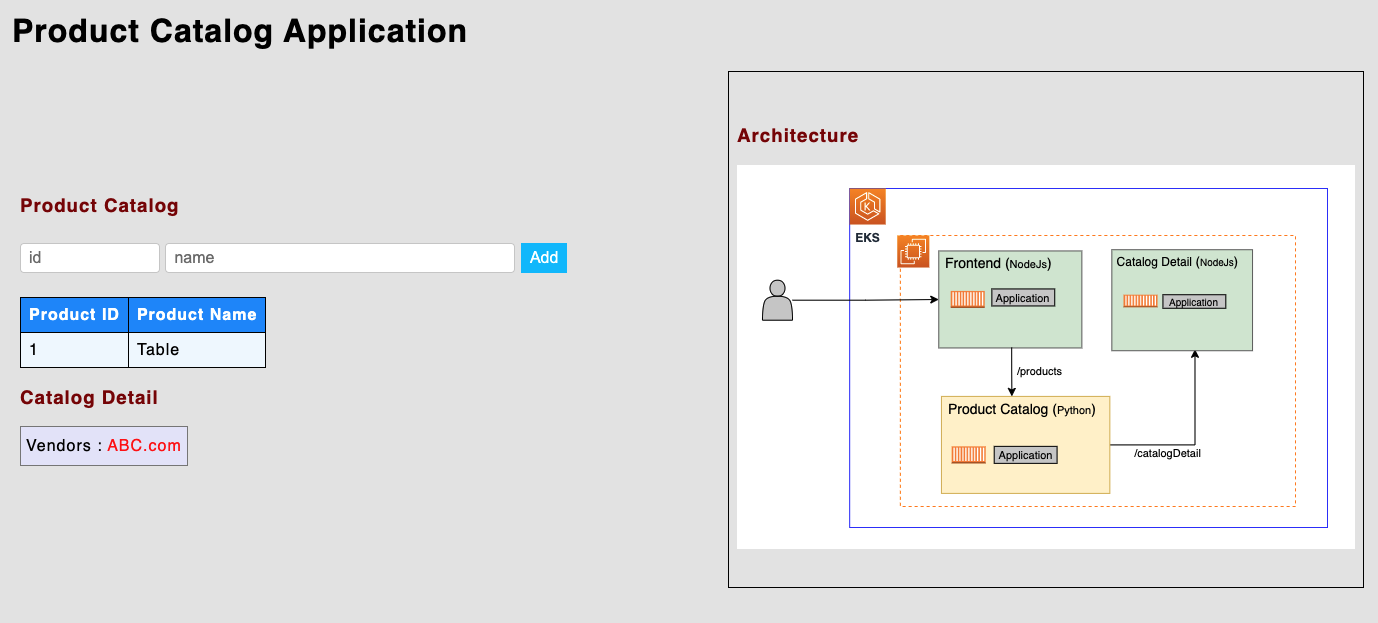
Later in this blog, when we deploy this same application using Spinnaker pipeline, we will see new version of CatalogDetail which shows two vendors “ABC.com” and “XYZ.com”.
Step 2 – Install Spinnaker CRDs
Pick a release from https://github.com/armory/spinnaker-operator/releases and export that version. We are using the latest release of Spinnaker Operator that was available when this blog was written.
export VERSION=1.2.5
echo $VERSION

cd ~/environment
mkdir -p spinnaker-operator && cd spinnaker-operator
bash -c "curl -L https://github.com/armory/spinnaker-operator/releases/download/v${VERSION}/manifests.tgz | tar -xz"
kubectl apply -f deploy/crds/
Output would be as below:
1.2.5  % Total    % Received % Xferd  Average Speed   Time    Time     Time  Current
                                 Dload  Upload   Total   Spent    Left  Speed
100   621  100   621    0     0   2700      0 --:--:-- --:--:-- --:--:--  2688
100 11225  100 11225    0     0  29080      0 --:--:-- --:--:-- --:--:-- 29080
customresourcedefinition.apiextensions.k8s.io/spinnakeraccounts.spinnaker.io created
customresourcedefinition.apiextensions.k8s.io/spinnakerservices.spinnaker.io created
Step 3 – Install Spinnaker Operator
Install operator in namespace spinnaker-operator. We have used Cluster mode for the operator that works across namespaces and requires a ClusterRole to perform validation.
kubectl create ns spinnaker-operator
kubectl -n spinnaker-operator apply -f deploy/operator/cluster
Output would be as below:
namespace/spinnaker-operator createddeployment.apps/spinnaker-operator created
clusterrole.rbac.authorization.k8s.io/spinnaker-operator-role created
clusterrolebinding.rbac.authorization.k8s.io/spinnaker-operator-binding created
serviceaccount/spinnaker-operator created
Make sure the Spinnaker Operator pod is running. This may take a couple of minutes.
kubectl get pod -n spinnaker-operatorOutput will be as below:
NAME                                  READY   STATUS    RESTARTS   AGE
spinnaker-operator-6d95f9b567-tcq4w   2/2     Running   0          82s
Step 4 – Configure Spinnaker services
Let’s configure all the artifacts and storage for Spinnaker services that we will need for our use case.
We will add all configuration to the file located at spinnaker-operator/deploy/spinnaker/basic/spinnakerservice.yml, which was created by Spinnaker Operator install.
First, replace the content of SpinnakerService manifest located at spinnaker-operator/deploy/spinnaker/basic/spinnakerservice.yml with the below YAML file content.
apiVersion: spinnaker.io/v1alpha2
kind: SpinnakerService
metadata:
  name: spinnaker
spec:
  spinnakerConfig:
    config:
      version: $SPINNAKER_VERSION   # the version of Spinnaker to be deployed
      persistentStorage:
        persistentStoreType: s3
        s3:
          bucket: $S3_BUCKET
          rootFolder: front50
          region: $AWS_REGION
      deploymentEnvironment:
        sidecars:
          spin-clouddriver:
          - name: token-refresh
            dockerImage: quay.io/skuid/ecr-token-refresh:latest
            mountPath: /etc/passwords
            configMapVolumeMounts:
            - configMapName: token-refresh-config
              mountPath: /opt/config/ecr-token-refresh
      features:
        artifacts: true
      artifacts:
        github:
          enabled: true
          accounts:
          - name: $GITHUB_USER
            token: $GITHUB_TOKEN  # GitHub's personal access token. This fields supports `encrypted` references to secrets.
      providers:
            dockerRegistry:
              enabled: true
            kubernetes:
              enabled: true
              accounts:
              - name: spinnaker-workshop
                requiredGroupMembership: []
                providerVersion: V2
                permissions:
                dockerRegistries:
                  - accountName: my-ecr-registry
                configureImagePullSecrets: true
                cacheThreads: 1
                namespaces: [spinnaker,workshop]
                omitNamespaces: []
                kinds: []
                omitKinds: []
                customResources: []
                cachingPolicies: []
                oAuthScopes: []
                onlySpinnakerManaged: false
                kubeconfigFile: kubeconfig-sp  # File name must match "files" key
              primaryAccount: spinnaker-workshop  # Change to a desired account from the accounts array
    files:
        kubeconfig-sp: |
            <REPLACE_ME_WITH_FILE_CONTENT>
    profiles:
        clouddriver:
          dockerRegistry:
            enabled: true
            primaryAccount: my-ecr-registry
            accounts:
            - name: my-ecr-registry
              address: https://$ACCOUNT_ID.dkr.ecr.$AWS_REGION.amazonaws.com
              username: AWS
              passwordFile: /etc/passwords/my-ecr-registry.pass
              trackDigests: true
              repositories:
              - $ECR_REPOSITORY
        igor:
          docker-registry:
            enabled: true
    service-settings:
      front50:
        kubernetes:
          serviceAccountName: $S3_SERVICE_ACCOUNT
          securityContext:
            fsGroup: 100
  # spec.expose - This section defines how Spinnaker should be publicly exposed
  expose:
    type: service  # Kubernetes LoadBalancer type (service/ingress), note: only "service" is supported for now
    service:
      type: LoadBalancer
Step 5 – Configure Spinnaker release version
Pick a release from https://spinnaker.io/community/releases/versions/ and export that version. Below, we are using the latest Spinnaker release that was available when this blog was written.
export SPINNAKER_VERSION=1.26.6Step 6 – Configure Amazon S3 artifact
We will configure Spinnaker to access an bucket as a source of artifacts. Spinnaker stages such as a “Deploy Manifest” read configuration from Amazon S3 files directly. Lets enable Amazon S3 as an artifact source.
Spinnaker requires an external storage provider for persisting our application settings and configured pipelines. In this blog we will be using Amazon S3 as a storage source so that Spinnaker will store all of its persistent data in a bucket.
- Create an S3 bucket first: You can create an S3 bucket either using Admin Console or using AWS CLI. Use one of the options from below.
- Using Admin Console:
Go to AWS Console and go to Amazon S3 service and create the bucket as below.

-
Using AWS CLI:
export S3_BUCKET=spinnaker-workshop-$(cat /dev/urandom | LC_ALL=C tr -dc "[:alpha:]" | tr '[:upper:]' '[:lower:]' | head -c 10)
aws s3 mb s3://$S3_BUCKET
aws s3api put-public-access-block \
--bucket $S3_BUCKET \
--public-access-block-configuration "BlockPublicAcls=true,IgnorePublicAcls=true,BlockPublicPolicy=true,RestrictPublicBuckets=true"
echo $S3_BUCKET
- Using Admin Console:
- Set up an IAM service account to access Amazon S3
- Create the OIDC provider for your cluster.
eksctl utils associate-iam-oidc-provider --cluster eksworkshop-eksctl --approveThe output will be:
[ℹ] using region {AWS_REGION} [ℹ] will create IAM Open ID Connect provider for cluster "eksworkshop-eksctl" in "{AWS_REGION}" [✔] created IAM Open ID Connect provider for cluster "eksworkshop-eksctl" in "{AWS_REGION}" - Now, create the service account to access the S3 bucket that uses the managed policy.
eksctl create iamserviceaccount \ --name s3-access-sa \ --namespace spinnaker \ --cluster eksworkshop-eksctl \ --attach-policy-arn arn\:aws\:iam::aws\:policy/AmazonS3FullAccess \ --approve \ --override-existing-serviceaccounts export S3_SERVICE_ACCOUNT=s3-access-sa - Confirm the details on the service account.
kubectl describe sa s3-access-sa -n spinnaker

echo $S3_SERVICE_ACCOUNT
The output will be:
Name:                s3-access-saNamespace:           spinnaker
Labels:              app.kubernetes.io/managed-by=eksctl
Annotations:         eks.amazonaws.com/role-arn: arn:aws:iam::<ACCOUNT_ID>:role/eksctl-eksworkshop-eksctl-addon-iamserviceac-Role1-1WHK24KTB8MC3
Image pull secrets:  <none>
Mountable secrets:   s3-access-sa-token-pvf4k
Tokens:              s3-access-sa-token-pvf4k
Events:              <none>

s3-access-sa
- Create the OIDC provider for your cluster.
Step 7 – Configure ECR artifact
Amazon ECR requires access tokens to access the images, and those access tokens expire after a time. In order to automate updating the token, use a sidecar container with a script that does it for you. Since both Clouddriver and the sidecar container need access to the ECR access token, we will use a shared volume to store the access token. The sidecar needs to be able to request an access token from Amazon ECR. The Spinnaker installation must have the AmazonEC2ContainerRegistryReadOnly policy attached to the role assigned in order to request and update the required access token.
- Create an Amazon ECR repository
We will be testing the trigger in Spinnaker pipeline for Amazon ECR image of one of our microserviceproddetail.We need to push a test container image to the newly created ECR repository because an empty ECR repository does not show up in the Spinnaker UI when we set up the trigger in Pipeline. Below we are building a test container image forproddetailand pushing it to the newly created ECR repo.cd ~/environment/eks-app-mesh-polyglot-demo export ECR_REPOSITORY=eks-workshop-demo/test-detail export APP_VERSION=1.0 aws ecr get-login-password --region $AWS_REGION | docker login --username AWS --password-stdin $ACCOUNT_ID.dkr.ecr.$AWS_REGION.amazonaws.com aws ecr describe-repositories --repository-name $ECR_REPOSITORY >/dev/null 2>&1 || \ aws ecr create-repository --repository-name $ECR_REPOSITORY >/dev/null TARGET=$ACCOUNT_ID.dkr.ecr.$AWS_REGION.amazonaws.com/$ECR_REPOSITORY:$APP_VERSION docker pull nginx docker tag nginx $TARGET docker push $TARGETGo to the Amazon ECR repository in AWS console and check if this repository has been pushed by Docker.

- Create a ConfigMap Create the ConfigMap for ECR token.
cd ~/environment

cat << EOF > config.yaml
interval: 30m # defines refresh interval
registries: # list of registries to refresh
  - registryId: "$ACCOUNT_ID"
    region: "$AWS_REGION"
    passwordFile: "/etc/passwords/my-ecr-registry.pass"
EOF

kubectl -n spinnaker create configmap token-refresh-config --from-file config.yaml
Output should be as below:
namespace/spinnaker createdconfigmap/token-refresh-config createdConfirm if the ConfigMap is created correctly.
kubectl describe configmap token-refresh-config -n spinnakerOutput looks like below:
Name:         token-refresh-config
Namespace:    spinnaker
Labels:       <none>
Annotations:  <none>

Data
====
config.yaml:
----
interval: 30m # defines refresh interval
registries: # list of registries to refresh
  - registryId: "405710XXXXX"
    region: "us-west-2"
    passwordFile: "/etc/passwords/my-ecr-registry.pass"
Step 8 – Add a GitHub repository
Set up environment variables to access a GitHub repo as a source of artifacts. If you actually want to use a file from the GitHub commit in your pipeline, you’ll need to configure GitHub as an artifact source in Spinnaker. So we need the GitHub credentials to access the repository from Spinnaker.
export GITHUB_USER=<your_github_username>
export GITHUB_TOKEN=<your_github_accesstoken>
Step 9 – Add an EKS account
At a high level, Spinnaker operates in the following way when deploying to Kubernetes:
- Spinnaker is configured with one or more “Cloud Provider” Kubernetes accounts, which you can think of as deployment targets.
- For each Kubernetes account, Spinnaker is provided a kubeconfig to connect to that Kubernetes cluster.
- The kubeconfig should have the following components:
- A Kubernetes kubeconfig cluster
- A Kubernetes kubeconfig user
- A Kubernetes kubeconfig context
- Metadata, such as which context to use by default
- Each Kubernetes account is configured in the SpinnakerService manifest under spec.spinnakerConfig.config.providers.kubernetes.accounts key. Each entity has these fields, among others:
- name: A Spinnaker-internal name
- kubeconfigFile: A file path referencing the contents of the kubeconfig file for connecting to the target cluster.
- onlySpinnakerManaged: When true, Spinnaker only caches and displays applications that have been created by Spinnaker.
- namespaces: An array of namespaces that Spinnaker will be allowed to deploy to. If this is left blank, Spinnaker will be allowed to deploy to all namespaces
- omitNamespaces: If namespaces is left blank, you can blacklist specific namespaces to indicate to Spinnaker that it should not deploy to those namespaces
- If the kubeconfig is properly referenced and available, Operator will take care of the following:
- Creating a Kubernetes secret containing your kubeconfig in the namespace where Spinnaker lives
- Dynamically generating a clouddriver.yml file that properly references the kubeconfig from where it is mounted within the Clouddriver container
- Creating/Updating the Kubernetes Deployment (spin-clouddriver) which runs Clouddriver so that it is aware of the secret and properly mounts it in the Clouddriver pod
Now, lets add a Kubernetes/Amazon EKS Account Deployment Target in Spinnaker.
- Download the latest spinnaker-tools release
- This tool helps to create the ServiceAccount, ClusterRoleBinding, kubeconfig for the service account for the Amazon EKS/Kubernetes account
cd ~/environment
git clone https://github.com/armory/spinnaker-tools.git
cd spinnaker-tools
go mod download all
go build
Output should be:
Cloning into 'spinnaker-tools'...remote: Enumerating objects: 278, done.
remote: Counting objects: 100% (6/6), done.
remote: Compressing objects: 100% (6/6), done.
remote: Total 278 (delta 0), reused 4 (delta 0), pack-reused 272
Receiving objects: 100% (278/278), 84.72 KiB | 4.71 MiB/s, done.
Resolving deltas: 100% (124/124), done.
- This tool helps to create the ServiceAccount, ClusterRoleBinding, kubeconfig for the service account for the Amazon EKS/Kubernetes account
- Set up environment variables
- Run these commands to set and check the environment variables:
export CONTEXT=$(kubectl config current-context)
export SOURCE_KUBECONFIG=${HOME}/.kube/config
export SPINNAKER_NAMESPACE="spinnaker"
export SPINNAKER_SERVICE_ACCOUNT_NAME="spinnaker-ws-sa"
export DEST_KUBECONFIG=${HOME}/Kubeconfig-ws-sa
echo $CONTEXT
echo $SOURCE_KUBECONFIG
echo $SPINNAKER_NAMESPACE
echo $SPINNAKER_SERVICE_ACCOUNT_NAME
echo $DEST_KUBECONFIG
If you do not see output from the above command for all the above environment variables, do not proceed to next step.
- Run these commands to set and check the environment variables:
- Create the service account
- Create the kubernetes service account with namespace-specific permissions
./spinnaker-tools create-service-account --kubeconfig ${SOURCE_KUBECONFIG} --context ${CONTEXT} --output ${DEST_KUBECONFIG} --namespace ${SPINNAKER_NAMESPACE} --service-account-name ${SPINNAKER_SERVICE_ACCOUNT_NAME}Output should be:
Cloning into 'spinnaker-tools'...remote: Enumerating objects: 278, done.
remote: Counting objects: 100% (6/6), done.
remote: Compressing objects: 100% (6/6), done.
remote: Total 278 (delta 0), reused 4 (delta 0), pack-reused 272
Receiving objects: 100% (278/278), 84.72 KiB | 4.71 MiB/s, done.
Resolving deltas: 100% (124/124), done.

Getting namespaces ...
Creating service account spinnaker-ws-sa ...
Created ServiceAccount spinnaker-ws-sa in namespace spinnaker
Adding cluster-admin binding to service account spinnaker-ws-sa ...
Created ClusterRoleBinding spinnaker-spinnaker-ws-sa-admin in namespace spinnaker
Getting token for service account ...
Cloning kubeconfig ...
Renaming context in kubeconfig ...
Switching context in kubeconfig ...
Creating token user in kubeconfig ...
Updating context to use token user in kubeconfig ...
Updating context with namespace in kubeconfig ...
Minifying kubeconfig ...
Deleting temp kubeconfig ...
Created kubeconfig file at /home/ec2-user/Kubeconfig-ws-sa
- Create the kubernetes service account with namespace-specific permissions
- Configure EKS account
- Open the
SpinnakerServicemanifest located underdeploy/spinnaker/basic/spinnakerservice.yml.providers: dockerRegistry: enabled: true kubernetes: enabled: true accounts: - name: spinnaker-workshop requiredGroupMembership: [] providerVersion: V2 permissions: dockerRegistries: - accountName: my-ecr-registry configureImagePullSecrets: true cacheThreads: 1 namespaces: [spinnaker,workshop] omitNamespaces: [] kinds: [] omitKinds: [] customResources: [] cachingPolicies: [] oAuthScopes: [] onlySpinnakerManaged: false kubeconfigFile: kubeconfig-sp # File name must match "files" key primaryAccount: spinnaker-workshop # Change to a desired account from the accounts array files: kubeconfig-sp: | <REPLACE_ME_WITH_FILE_CONTENT> # Content from kubeconfig created by Spinnaker Tool - Replace the
<REPLACE_ME_WITH_FILE_CONTENT>in the above section ofdeploy/spinnaker/basic/spinnakerservice.ymlwith the kubeconfig content from${HOME}/Kubeconfig-ws-sa.- From the terminal, Go to
${HOME}/Kubeconfig-ws-sa(in my case it was /home/ec2-user/Kubeconfig-ws-sa) and copy the kubeconfig text starting from “apiVersion…” to the end of file. - Align the tab of the added file content to look as below
- From the terminal, Go to
- Open the
- Verify the Spinnaker manifest
- By now we have completed our configuration for Spinnaker, and the
SpinnakerServicemanifest located atdeploy/spinnaker/basic/spinnakerservice.ymlshould look similar to below. - Note: “$$$” in the YAML below is just a placeholder. Do not copy the content under “kubeconfig-sp:” in this file. Copy the content from
${HOME}/Kubeconfig-ws-sato this section.apiVersion: spinnaker.io/v1alpha2 kind: SpinnakerService metadata: name: spinnaker spec: spinnakerConfig: config: version: $SPINNAKER_VERSION # the version of Spinnaker to be deployed persistentStorage: persistentStoreType: s3 s3: bucket: $S3_BUCKET rootFolder: front50 region: $AWS_REGION deploymentEnvironment: sidecars: spin-clouddriver: - name: token-refresh dockerImage: quay.io/skuid/ecr-token-refresh:latest mountPath: /etc/passwords configMapVolumeMounts: - configMapName: token-refresh-config mountPath: /opt/config/ecr-token-refresh features: artifacts: true artifacts: github: enabled: true accounts: - name: $GITHUB_USER token: $GITHUB_TOKEN # GitHub's personal access token. This fields supports `encrypted` references to secrets. providers: dockerRegistry: enabled: true kubernetes: enabled: true accounts: - name: spinnaker-workshop requiredGroupMembership: [] providerVersion: V2 permissions: dockerRegistries: - accountName: my-ecr-registry configureImagePullSecrets: true cacheThreads: 1 namespaces: [spinnaker,workshop] omitNamespaces: [] kinds: [] omitKinds: [] customResources: [] cachingPolicies: [] oAuthScopes: [] onlySpinnakerManaged: false kubeconfigFile: kubeconfig-sp # File name must match "files" key primaryAccount: spinnaker-workshop # Change to a desired account from the accounts array files: kubeconfig-sp: | apiVersion: v1 clusters: - cluster: certificate-authority-data: $$$$ server: $$$$$ name: arn:aws:eks:$AWS_REGION-2:$ACCOUNT_ID:cluster/eksworkshop-eksctl contexts: - context: cluster: arn:aws:eks:$AWS_REGION:$ACCOUNT_ID:cluster/eksworkshop-eksctl namespace: spinnaker user: spinnaker-token-user name: spinnaker current-context: spinnaker kind: Config preferences: {} users: - name: spinnaker-token-user user: token: $$$$$ profiles: clouddriver: dockerRegistry: enabled: true primaryAccount: my-ecr-registry accounts: - name: my-ecr-registry address: https://$ACCOUNT_ID.dkr.ecr.$AWS_REGION.amazonaws.com username: AWS passwordFile: /etc/passwords/my-ecr-registry.pass trackDigests: true repositories: - $ECR_REPOSITORY igor: docker-registry: enabled: true service-settings: front50: kubernetes: serviceAccountName: $S3_SERVICE_ACCOUNT securityContext: fsGroup: 100 # spec.expose - This section defines how Spinnaker should be publicly exposed expose: type: service # Kubernetes LoadBalancer type (service/ingress), note: only "service" is supported for now service: type: LoadBalancer
- By now we have completed our configuration for Spinnaker, and the
- You are done with the Spinnaker configuration for all the Spinnaker services. Now, let’s install Spinnaker.
Step 10 – Install Spinnaker
Confirm all the environment variables are set correctly, as below.
echo $ACCOUNT_ID
echo $AWS_REGION
echo $SPINNAKER_VERSION
echo $GITHUB_USER
echo $GITHUB_TOKEN
echo $S3_BUCKET
echo $S3_SERVICE_ACCOUNT
echo $ECR_REPOSITORY
If you do not see output from the above command for all the environment variables, do not proceed to the next step.
cd ~/environment/spinnaker-operator/
envsubst < deploy/spinnaker/basic/spinnakerservice.yml | kubectl -n spinnaker apply -f -
Output should be:
spinnakerservice.spinnaker.io/spinnaker createdIt will take some time to bring up all the pods, so wait for few minutes.
# Get all the resources created
kubectl get svc,pod -n spinnaker
NAME TYPE CLUSTER-IP EXTERNAL-IP PORT(S) AGEservice/spin-clouddriver ClusterIP 10.1x0.xx.71 <none> 7002/TCP 8d
service/spin-deck LoadBalancer 10.1x0.yy.xx a1c58905706b1442d94863nnnn-XXXX.$AWS_REGION.elb.amazonaws.com 80:32392/TCP 8d
service/spin-echo ClusterIP 10.1x0.54.127 <none> 8089/TCP 8d
service/spin-front50 ClusterIP 10.1x0.xx.241 <none> 8080/TCP 8d
service/spin-gate LoadBalancer 10.1x0.75.xx a43bb9mmmmm-XXXX.$AWS_REGION.elb.amazonaws.com 80:32208/TCP 8d
service/spin-igor ClusterIP 10.1x0.yy.xx <none> 8088/TCP 8d
service/spin-orca ClusterIP 10.xx.64.yy <none> 8083/TCP 8d
service/spin-redis ClusterIP 10.1x0.xx.242 <none> 6379/TCP 1x0
service/spin-rosco ClusterIP 10.1x0.yy.xx <none> 8087/TCP 8d
NAME READY STATUS RESTARTS AGE
pod/spin-clouddriver-7c5dbf658b-spl64 2/2 Running 0 8d
pod/spin-deck-7f785d675f-2q4q8 1/1 Running 0 8d
pod/spin-echo-d9b7799b4-4wjnn 1/1 Running 0 8d
pod/spin-front50-76d9f8bd58-n96sl 1/1 Running 0 8d
pod/spin-gate-7f48c76b55-bpc22 1/1 Running 0 8d
pod/spin-igor-5c98f5b46f-mcmvs 1/1 Running 0 8d
pod/spin-orca-6bd7c69f-mml4c 1/1 Running 0 8d
pod/spin-redis-7f7d9659bf-whkf7 1/1 Running 0 8d
pod/spin-rosco-7c6f77c64c-2qztw 1/1 Running 0 8d# Watch the install progress.
kubectl -n spinnaker get spinsvc spinnaker -wOutput should be like below:
NAME        VERSION   LASTCONFIGURED   STATUS   SERVICES   URL
spinnaker   1.26.6    3h8m             OK       9          http://ae33c1a7185b1402mmmmm-XXXX.$AWS_REGION.elb.amazonaws.com
You have successfully installed Spinnaker.
Step 11 – Deploy Helm chart
Let’s deploy a Helm-based product catalog application to Amazon EKS using Spinnaker pipeline.
- Access Spinnaker UI: Grab the load balancer URL from the previous chapter, or use the below command to get the load balancer URL.
kubectl -n spinnaker get spinsvc spinnaker -w
Open the URL in the browser. You should see the below Spinnaker UI.

- Create application: Click on
Create Applicationand enternameasproduct-detailandemailas your email. Leave the rest of the fields as default. Then, click on “Create.”

- Create pipeline: Click on
Pipelinesunderproduct-detailand click on linkConfigure a new pipelineand add thenamehelm-pipeline.
- Set up trigger: You should now be in the
Configurationpage.-
- Now click on
Add TriggerunderAutomated Triggers - Select
TypeasDocker Registry. - In the
Registry Namedropdown you should see the valuemy-ecr-registry, select that. - In the
Organizationdropdown you should see the valueeks-workshop-demo, select that. - In the
Imagedropdown you should see the valueeks-workshop-demo/test-detail,select that. - Click on
Save Changes.
- Now click on
This is the ECR registry we set up in Spinnaker manifest in Step 7 – Configure ECR Artifact.

-
- Evaluate variable configuration
-
- Click on
Add Stageand selecttypeasEvaluate Variablesfrom the dropdown. - Add the variable name as
image_nameand value as${trigger['tag']}. - Add another variable name as
repo_nameand value as$ACCOUNT_ID.dkr.ecr.$AWS_REGION.amazonaws.com/eks-workshop-demo/test-detail. Replace$ACCOUNT_IDand$AWS_REGIONbased on your setup. - Click on
Save Changes. We will be using these variables in the nextBake Stage.
- Click on
- Set up bake stage
-
- Click on
Add Stageand selectTypeasBake Manifestfrom the dropdown. - Select
Template RendererasHelm3and enternameasworkshop-detailand enterworkshopasnamespace. - Select
Expected ArtifactasDefine a new artifact- Select your Git account that shows in dropdown. This is the Git account we had setup in Spinnaker manifest in Step 8.
- And then enter the below git location in the
Content URLand addmasteras the Commit/Branch. This is to provide the the Helm template for the deployment. - Keep the branch as “master.”
- Under the
Overridessection, selectAdd new artifact.- Select
Expected ArtifactasDefine a new artifact - Select your Git account that shows in dropdown. This is the Git account we had setup in Spinnaker manifest in Step 8.
- Enter the below git location in the
Content URL. This is to provide the overrides for the Helm template using values.yaml. - Keep the branch as “master”
- Select
- Under the
Overrideskey/value section, click on “Add override.”- Enter first key as
detail.image.repositoryfor repository and value as${repo_name}. - Enter second key as
detail.image.tagfor tag and value as${image_name}. - The keys are based on the Values.yaml from the Helm chart and the values are the variables that we set in previous step “Evaluate Variables.”
- Enter first key as
- Edit the
Produces Artifactsand change the name tohelm-produced-artifactand click Save Artifact. Then, click Save Changes.

- Click on
- Set up deploy stage
-
- Click on
Add Stageand select “Type” asDeploy (Manifest)from the dropdown, and give a name asDeploy proddetail - Select
Accountasspinnaker-workshopfrom the dropdown. This is the EKS account we had setup in Spinnaker manifest in Step 9 – Add EKS account. - Select
Artifactand then selecthelm-produced-artifactfrom the dropdown forManifest Artifactand click Save Changes.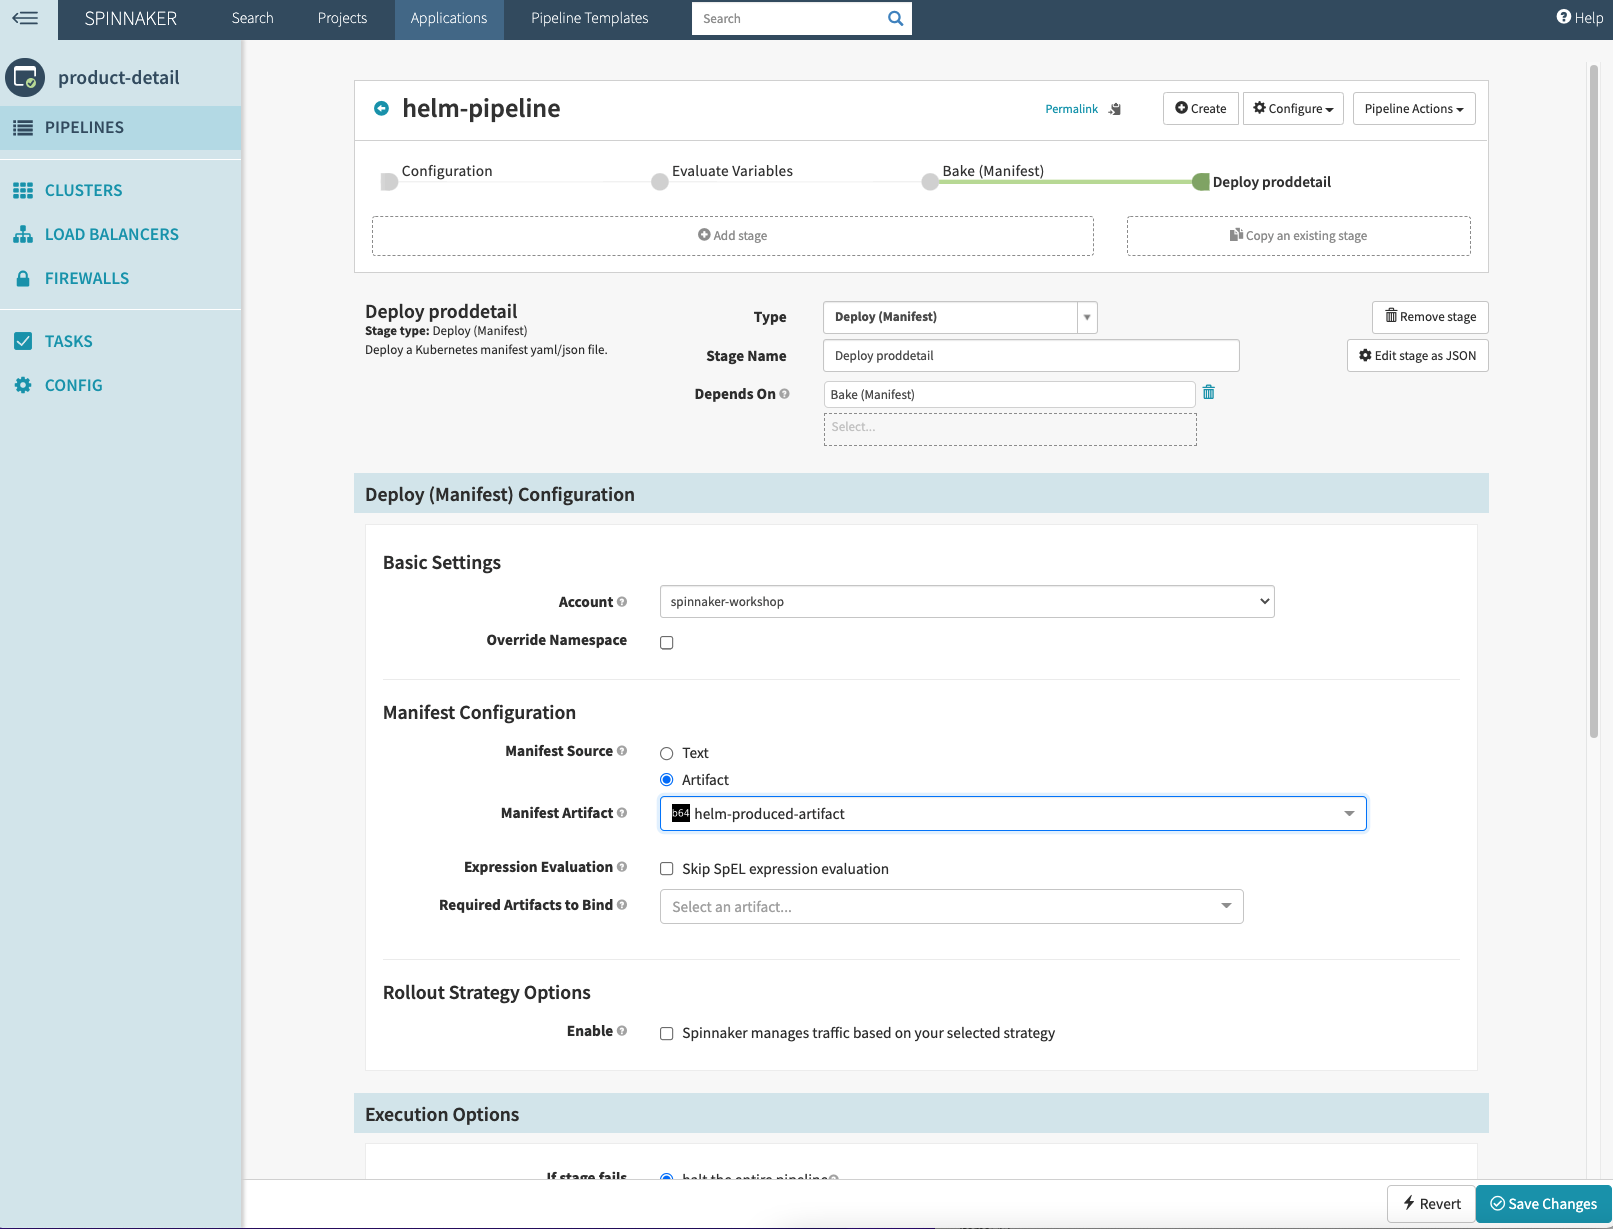
- Click on
Step 12 – Test deployment
- Push the new container image to ECR for testing trigger. To ensure that the Amazon ECR trigger will work in Spinnaker UI:
- First, change the code to generate a new docker image digest. Note: The Amazon ECR trigger in Spinnaker does not work for same docker image digest.
- Go to
~/environment/eks-app-mesh-polyglot-demo/workshop/apps/catalog_detail/app.jsand replace the line"vendors":[ "ABC.com"]with"vendors":[ "ABC.com","XYZ.com"] - Ensure that the image tag (APP_VERSION) you are adding below does not exist in the Amazon ECR repository
eks-workshop-demo/test-detailotherwise the trigger will not work. Spinnaker pipeline only triggers when a new version of image is added to ECR. - Then, run the below command.
cd ~/environment/eks-app-mesh-polyglot-demo/workshop
aws ecr get-login-password --region $AWS_REGION | docker login --username AWS --password-stdin $ACCOUNT_ID.dkr.ecr.$AWS_REGION.amazonaws.com
export APP_VERSION=5.0 ## pick a version that is not there in the ECR
export ECR_REPOSITORY=eks-workshop-demo/test-detail
TARGET=$ACCOUNT_ID.dkr.ecr.$AWS_REGION.amazonaws.com/$ECR_REPOSITORY:$APP_VERSION
docker build -t $TARGET apps/catalog_detail
docker push $TARGET
Building/Pushing Container images for the first time to Amazon ECR may take around 3-5 minutes. You can ignore any warnings you get due to the npm upgrade.
- Watch the pipeline getting triggered
- You should see the image version 5.0 get triggered.

- You should see the image version 5.0 get triggered.
-
- You will see that Docker push triggers a deployment in the pipeline.

- You will see that Docker push triggers a deployment in the pipeline.
-
- Below are the
Execution Detailsof pipeline:


- Below are the
- Get deployment details
-
- Click on
Clustersand you can see the deployment offrontend,prodcatalog, andproddetailservice below.
- Click on
-
- Click on the LoadBalancer icon link for
frontendand you should see below information. Click on that Load Balancer link or Paste the link on browser.

- You should see the service up and running as below.

- Click on the LoadBalancer icon link for
-
- Now add a product. Below, we’ve used “1“ as “id“ and “Table“ as “name.“ And you see that an additional vendor,
XYZ.com, is added from the new container image forproddetailservice we pushed into ECR.

- You can also go to the terminal and confirm the deployment details.
kubectl get all -n workshop
You can see the below output
 NAME READY STATUS RESTARTS AGE

 pod/frontend-7b78bc4cbb-fr2mz 1/1 Running 0 16m

 pod/prodcatalog-f6d7bffb5-rjbz2 1/1 Running 0 16m

 pod/proddetail-75cd46fb7b-k82lg 1/1 Running 0 16m
service/frontend LoadBalancer 10.100.221.87 aa76467f53d53419aa273bf96b8cdd47-XXXXX.us-east-2.elb.amazonaws.com 80:32022/TCP 10h
service/prodcatalog ClusterIP 10.100.213.2 <none> 5000/TCP 10h
service/proddetail ClusterIP 10.100.144.79 <none> 3000/TCP 10h
deployment.apps/frontend 1/1 1 1 10h
deployment.apps/prodcatalog 1/1 1 1 10h
deployment.apps/proddetail 1/1 1 1 10h
- Now add a product. Below, we’ve used “1“ as “id“ and “Table“ as “name.“ And you see that an additional vendor,
Cleanup
Delete Spinnaker artifacts when finished with this walkthrough.
for i in $(kubectl get crd | grep spinnaker | cut -d" " -f1) ; do
kubectl delete crd $i
done

kubectl delete ns spinnaker-operator

kubectl delete ns spinnaker

cd ~/environment
rm config.yaml

rm -rf spinnaker-tools
rm -rf spinnaker-operator

helm uninstall workshop
kubectl delete ns workshop
Conclusion
In this post, we installed Spinnaker Service using Spinnaker Operator and walked through the process of setting up microservices in Spinnaker service using Spinnaker service YAML configuration. Then, we built a helm-based Spinnaker CD pipeline and saw how the pipeline got initiated when we pushed a new image into an Amazon ECR repository which then executed the deployment stage and deployed the Product Detail application artifacts into an Amazon EKS cluster.
To learn more, we recommend you review these additional resources:
- https://spinnaker.io/docs/concepts/
- https://spinnaker.io/docs/reference/architecture/microservices-overview/
- https://spinnaker.io/docs/guides/user/managed-delivery/
- https://github.com/armory/spinnaker-operator
- https://docs.armory.io/armory-enterprise/installation/armory-operator/
- https://docs.armory.io/armory-enterprise/overview/architecture/
- http://docs.aws.amazon.com/AWSEC2/latest/UserGuide/AMIs.html
- https://www.armory.io/blog/spinnaker-operator/