AWS Open Source Blog
Set up Multi-Tenant Kibana Access in Open Distro for Elasticsearch
中文版 – Elasticsearch has become a default choice for storing and analyzing log data to deliver insights on your application’s performance, your security stance, and your users’ interactions with your application. It’s so useful that many teams adopt Elasticsearch early in their development cycle to support DevOps. This grass-roots adoption often mushrooms into a confusing set of clusters and users across a large organization. At some point, you want to centralize logs so that you can manage your spending and usage more closely.
The flip side of a centralized logging architecture is that you must manage access to the data. You want your payments processing department to keep its data private and invisible from, for example, your front end developers. Open Distro for Elasticsearch Security allows you to manage access to data at document- and field-level granularity. You create Roles, assign Action Groups to those roles, and map Users to the roles to control their access to indices.
Access control for Kibana is harder to achieve. Kibana’s visualizations and dashboards normally share a common index, .kibana. If your users have access to that index, then they have access to all of the visualizations in it. The Open Distro for Elasticsearch Security fixes this problem by letting you define Tenants — silos that segregate visualizations and dashboards, for a multi-tenant Kibana experience. In this post, I’ll walk through setting up multi-tenancy for two hypothetical departments, payments and front end.
Prerequisites
Kibana multi-tenancy is enabled out of the box in Open Distro for Elasticsearch. If you have disabled multi-tenancy, our documentation will guide you in enabling it. You’ll also need a running Open Distro for Elasticsearch cluster. I ran esrally, using the http_logs track to generate indexes in my cluster. I’ll use logs-221998 for the payments department and logs-211998 for the front end department.
Important: You must give your roles, users, and tenants different names! I’ve used the convention of appending -role, -user, and -tenant to ensure that the names are unique.
Set up roles
Roles are the basis for access control in Open Distro for Elasticsearch Security. Roles allow you to specify which actions its users can take, and which indices those users can access.
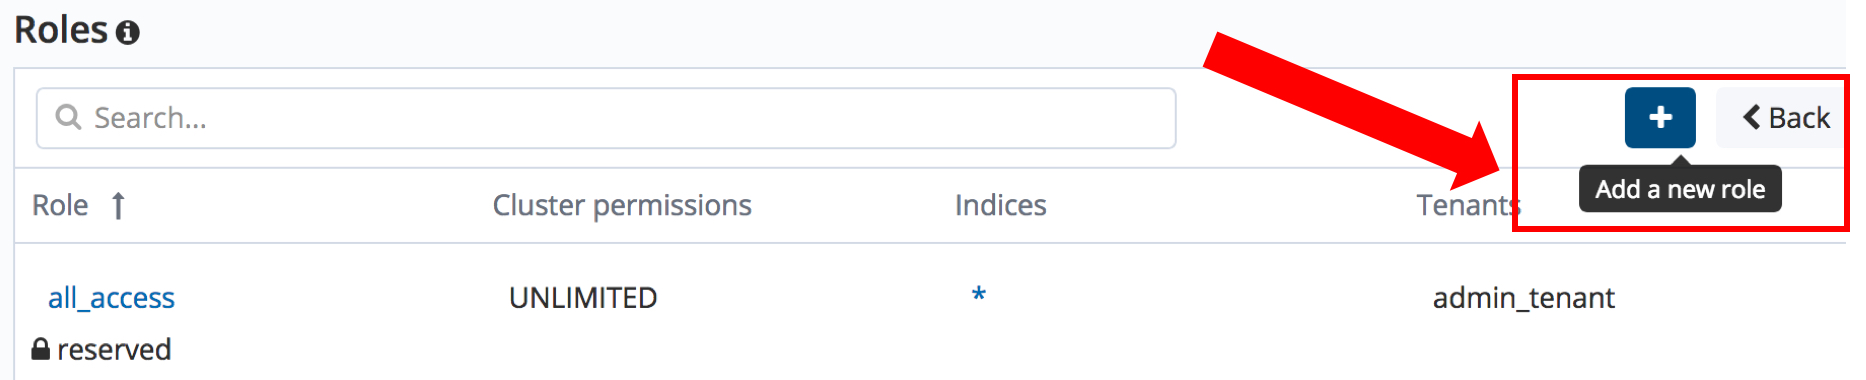
I’ll create two roles — payments-role and frontend-role — each with access to the appropriate underlying index. To create a role, navigate to https://localhost:9200. Log in with a user that has administrator rights (the default admin user is my choice). Click Explore on my own to dismiss the splash screen and click the Security tab in Kibana’s left rail, then click the Roles button:

Next, click the “+” button to add a new role.
In the Overview section, name the role payments-role and then click the Index Permissions tab at the top of the page. You can also give the role cluster-level permissions in the Cluster Permissions tab. For the purposes of this post, I’ll limit to index-level access control.

In the Index Permissions tab, click the Add new index and document Type button. In the resulting page, select logs-221998 from the Index drop-down, then click Save.
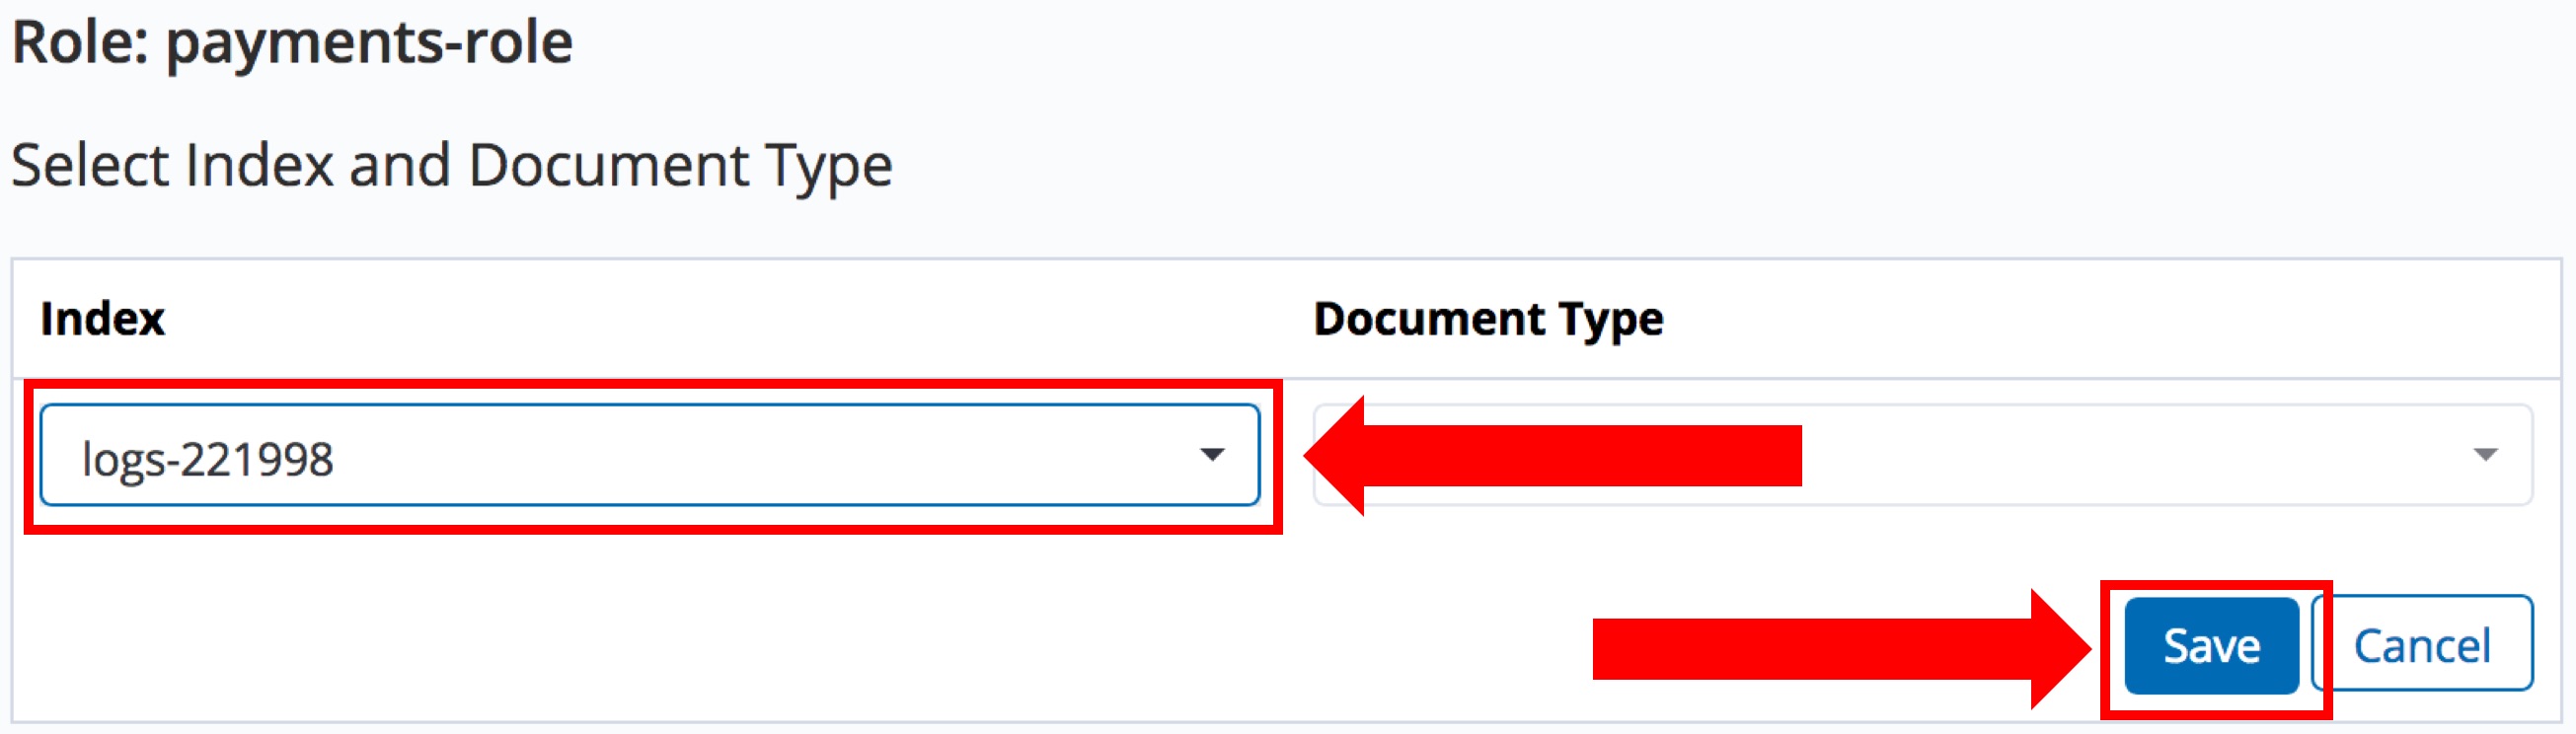
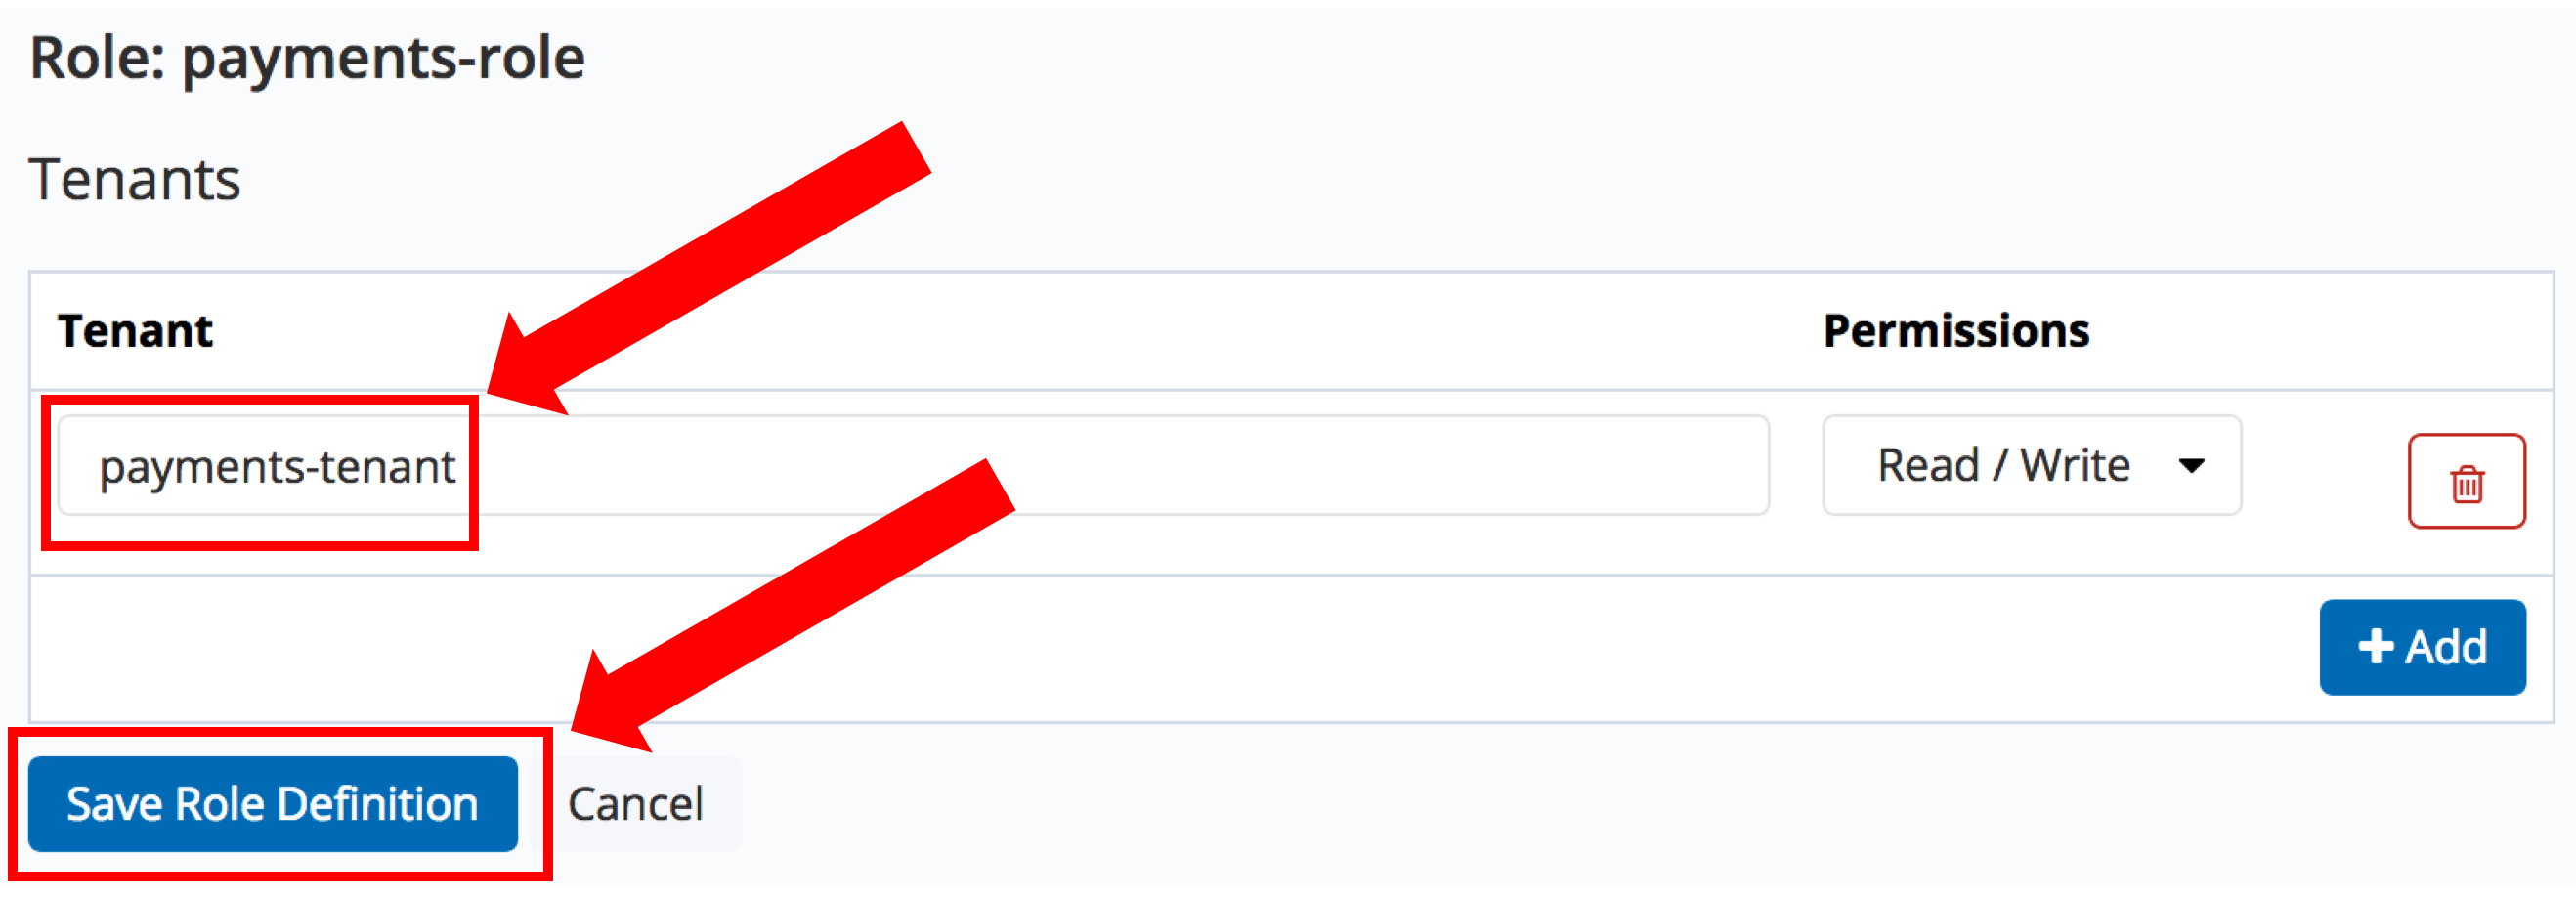
Clicking Save reveals a Permissions: Action Groups drop-down. Select ALL (you can set permissions for this user to be more restricted, by choosing READ, for example, which would limit to read-only access). Don’t click Save Role Definition yet, you still need to add the tenant. Select the Tenants tab and click the Add button. Fill in the Tenant field with payments-tenant. You can use any unique value for the field; it’s just a name you choose to refer to the tenant.
You are done configuring this role. Click Save Role Definition.
Repeat this process to create the frontend-role role, with access to a different index and a different tenant name. I’m using logs-211998, and frontend-tenant in my cluster.
Set up users
Users in Open Distro for Elasticsearch are authenticated entities. You add them to roles to grant them the permissions that those roles allow. The Open Distro for Elasticsearch Security has an internal user database. If you authenticate directly, via Kibana login or basic HTTP authentication, you will directly be assigned to that user.
You’ll also see the term “backend” in many of the following screens. A backend role is the role supplied by a federated identity provider. The backend role is distinct from, and mapped onto, internal roles and users. It’s a little confusing, but for this post, we can ignore the backend roles.
I’ll create two users — payments-user and frontend-user. Click the Security tab in Kibana’s left rail, then click the Internal User Database button.

Click the ‘+’ symbol to create Add a new internal user:

Fill in the Username, Password, and Repeat password fields. Click Submit.

Repeat this process to create the frontend-user and frontend-tenant.
Map Users to Roles
The last step is to map the users you created (along with their tenants) to the roles that you created. Click the Security tab and then the Role Mappings button.

Click the “+” button to add a new role mapping. Select payments-role from the Role dropdown. Click the + Add User button, and type payments-user in the text box. Finally, click Submit.

Repeat the process for frontend-role and frontend-user user.
In order for your users to be able to use Kibana, you need to add them to the kibana_user role, too. From the role mappings screen, click the edit pencil for kibana_user.

On the next screen, click Add User and type payments-user in the text box. Click Add User again to add the frontend-user. Click Submit to save your changes.
Congratulations, your setup is complete!
Test your tenants
Note: you may run into problems if your browser has cached your identity in cookies. To test in a clean environment, with Firefox, use File > New Private Window, which opens a window with no saved cookies. In Chrome, use File > New Incognito Window.
To test your tenancy and access control, you’ll create a visualization as the payments-user, with the payments-tenant, and verify that you cannot access that visualization when you log in as the frontend-user. In your new window, navigate to https://localhost:5601 and log in as the payments-user user. Click on Explore on my own to dismiss the splash screen. Click the Tenants tab in Kibana’s left rail.
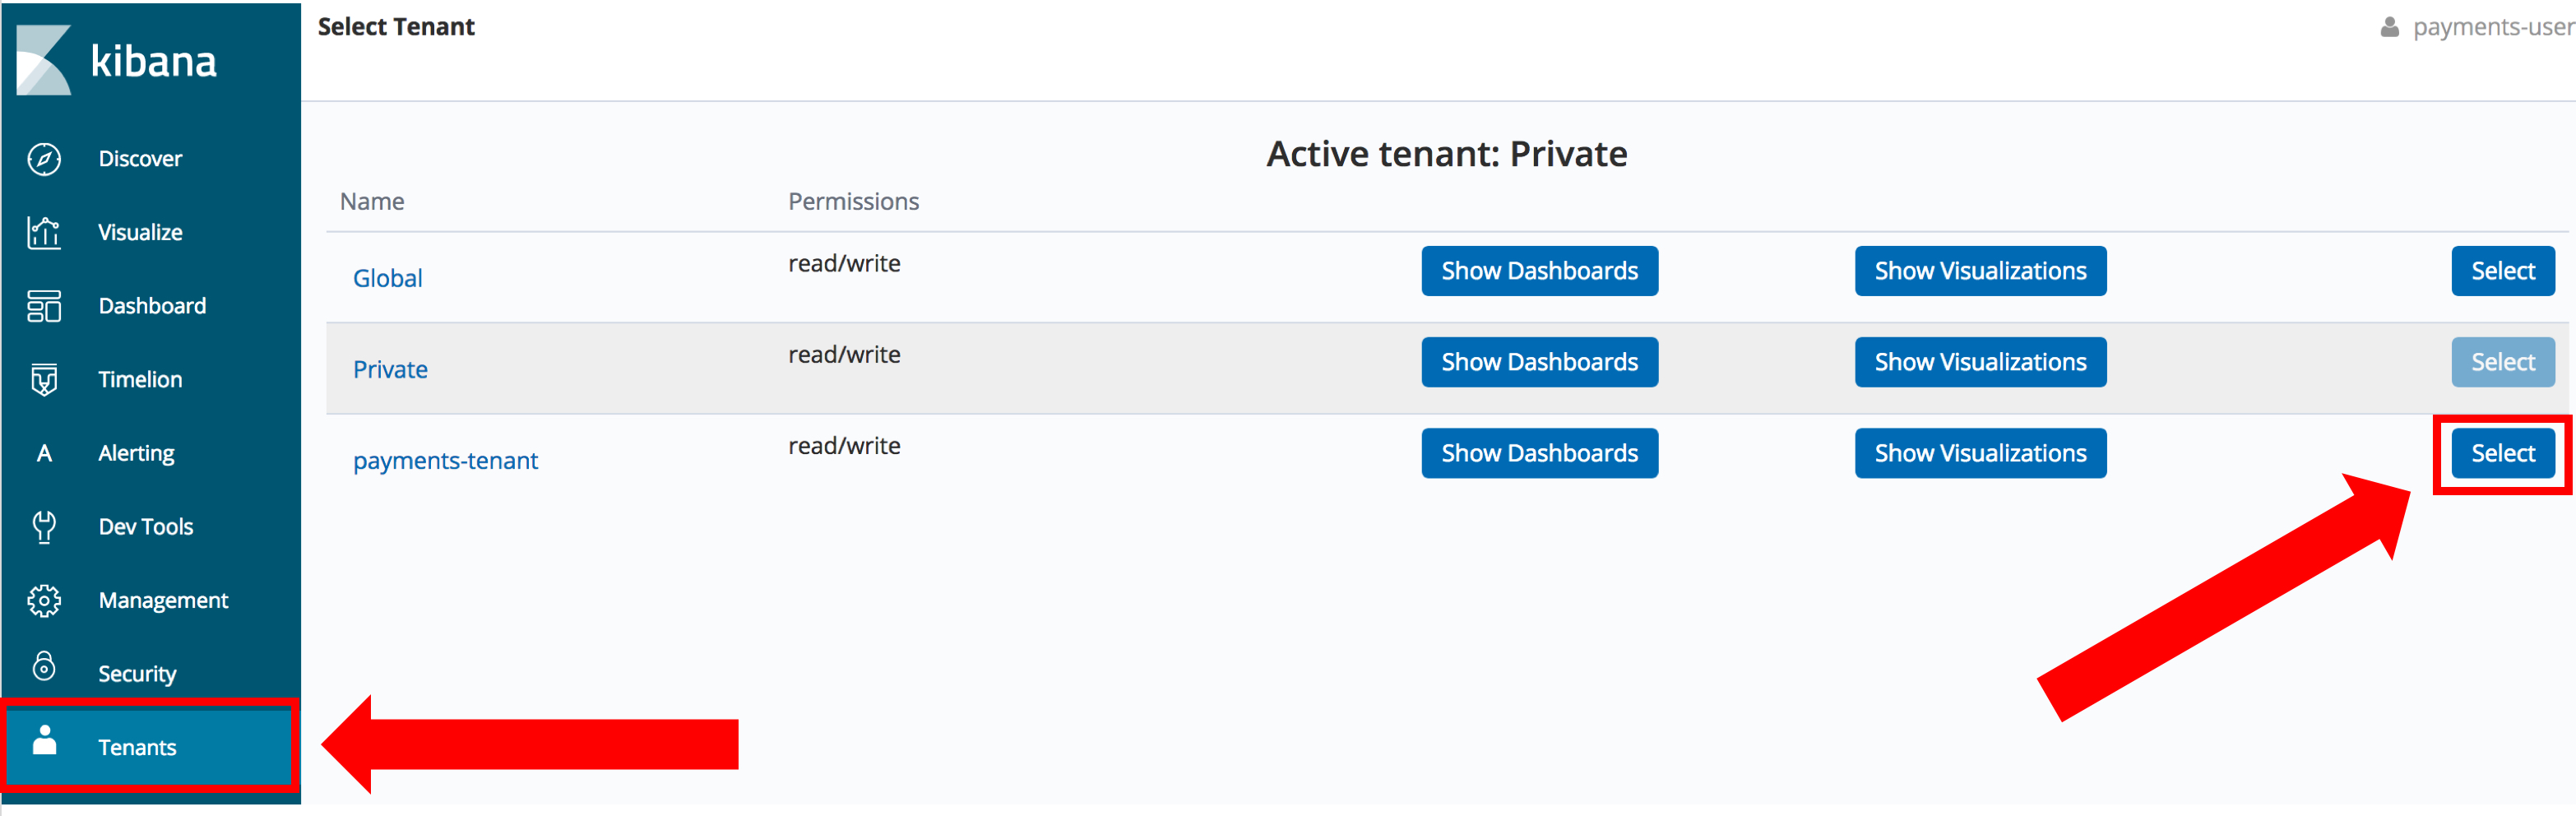
You can see that the Private tenant is currently selected. Every role has a Global tenant and a Private tenant. Work that you do when you select the Global tenant is visible to all other users/tenants. Work that you do in the Private tenant is visible only to the logged-in user (currently, the payments-user). Lastly, you can see the payments-tenant tenant. Only users that have roles with the payments-tenant can see visualizations and dashboards created when that tenant is selected. Click Select next to the payments-tenant to choose the payments-tenant tenant.
Now you need to create and save a visualization. First, create an index pattern. Click the Management tab, and then click Index Patterns. Type logs-221998 in the Index Pattern text box. Click Next Step. On the following screen, set your Time filter field name.
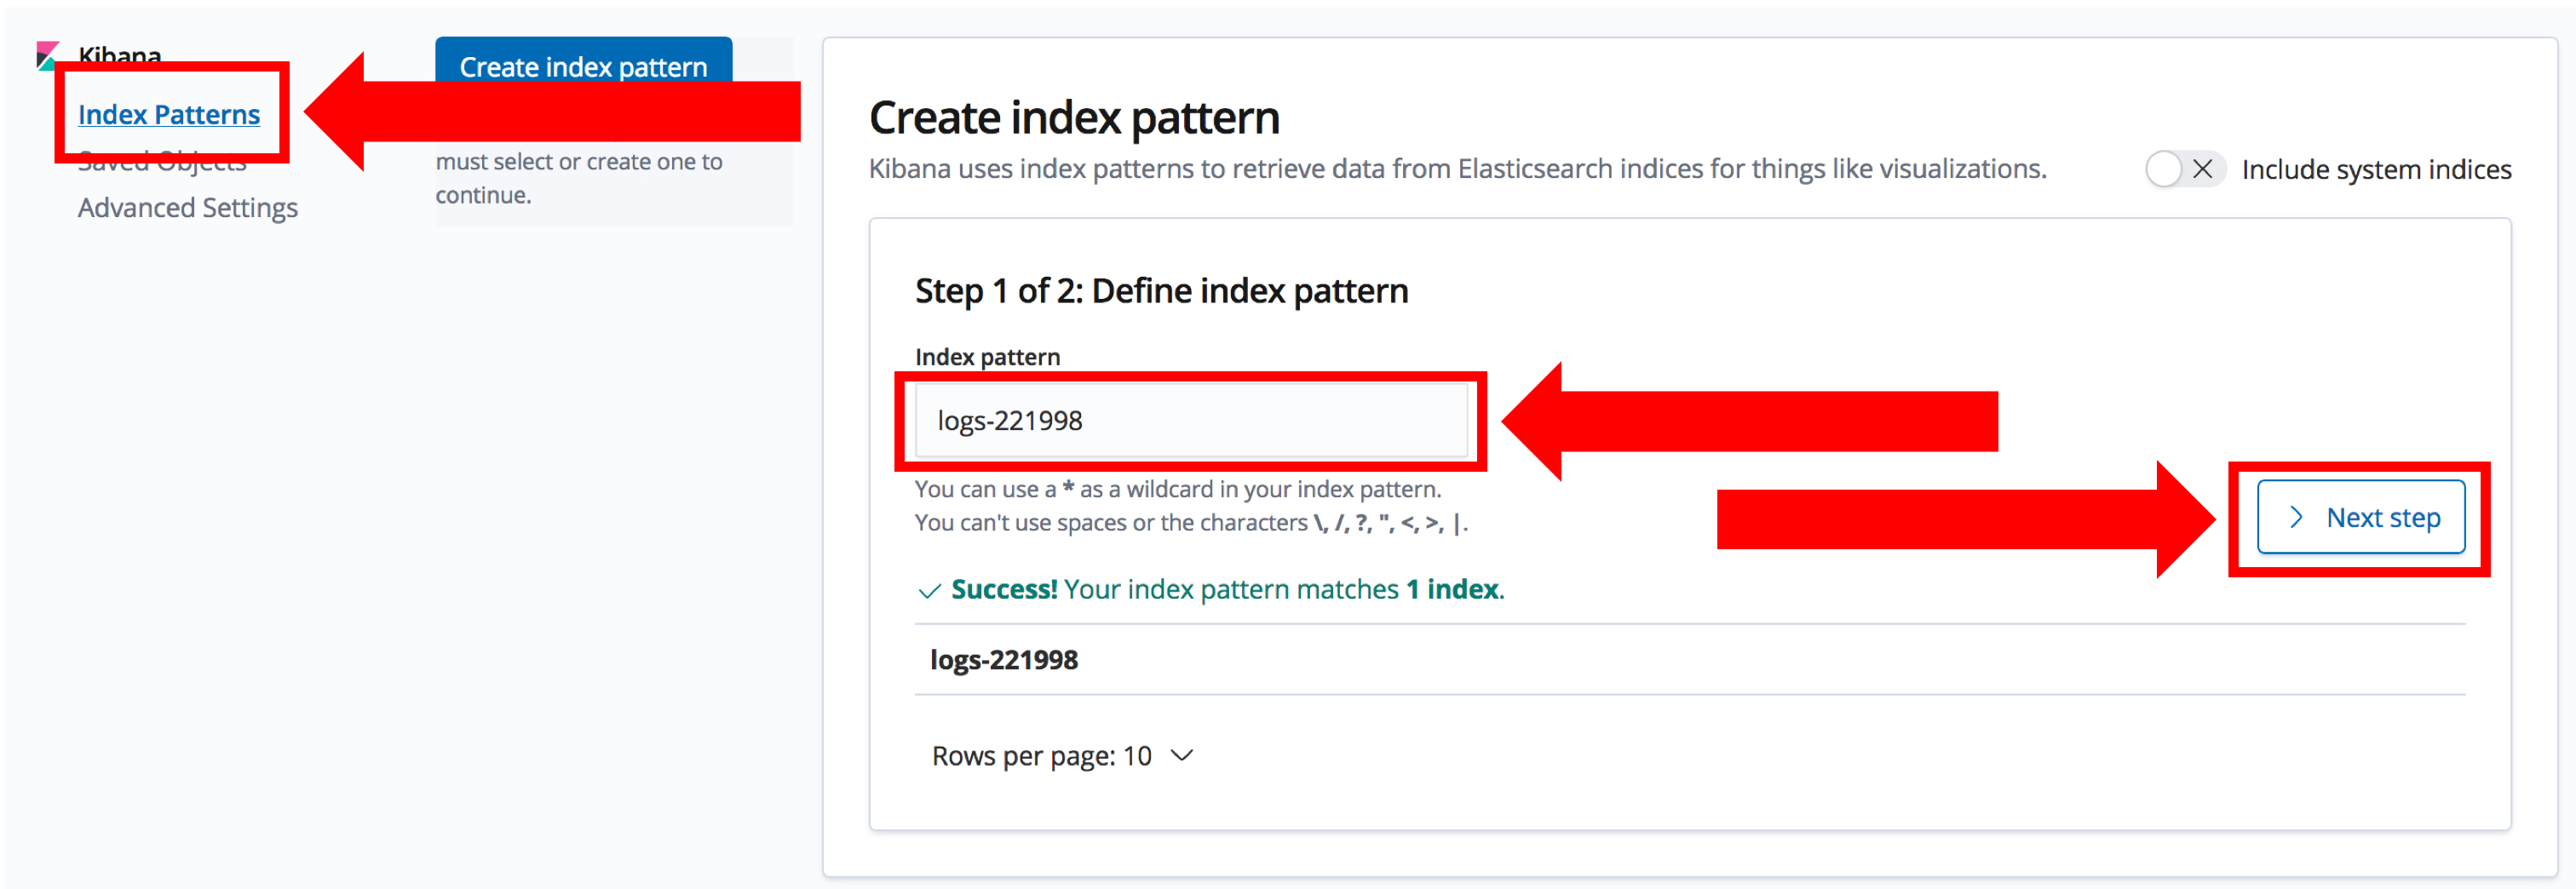
Note: Normally, you use a wildcard for your index pattern. Esrally created 6 indices in my cluster, all with the pattern logs-XXXXXX. When you set up your roles, you gave access to a specific index for each role. In this case, the payments-user has access only to the logs-221998 index. When you create a visualization as this user, Kibana will access all indices that match the wildcard in the index pattern you create now, including the other five indices that are prohibited. Kibana fails with an access error. To work around this issue, type the index name exactly. For centralized logging, make sure that each department uses a unique prefix for its indices. Then your index patterns can contain wildcard values for each department.
In the Visualize tab, build a simple Metric with traffic count (Note, Rally’s http_logs data has timestamps in 1998. You’ll need to set your time selector correctly to see any results.) Save it as payments-traffic.

Log out and log back in as frontend-user in a New Private Window. On the Tenants tab, you will see that you have the frontend-tenant, not the payments-tenant.

Select the Visualize tab and you will be asked to create an index pattern. Use the logs-211998 index. Select the Visualize tab again. Kibana tells you that you have no visualizations.
Conclusion
In this post, you used Open Distro for Elasticsearch Security to create two users with their own Kibana tenants provided through the roles you assigned to them. Open Distro for Elasticsearch’s tenancy model keeps tenants segregated so that your payments department’s visualizations and dashboards are not visible to users in your front end department. You then further restricted access to the underlying indices so that users in your front end department can’t access the data in your payment department’s indices. You’ve created a silo that allows you to manage your sensitive data!
Join in on GitHub to improve project documentation, add examples, submit feature requests, and file bug reports. Check out the code, build a plugin, and open a pull request – we’re happy to review and figure out steps to integrate. We welcome your participation on the project. If you have any questions, don’t hesitate to ask on the community discussion forums.