AWS Open Source Blog
Get Up and Running with Open Distro for Elasticsearch
中文版 – On March 11, 2019, we released Open Distro for Elasticsearch, a value-added distribution of Elasticsearch that is 100% open source (Apache 2.0 license) and supported by AWS. (See also Open Distro for Elasticsearch from Jeff Barr and Keeping Open Source Open – Open Distro for Elasticsearch from Adrian Cockcroft.) In addition to the source code repo, Open Distro for Elasticsearch and Kibana are available as RPM and Docker containers, with separate downloads for the SQL JDBC driver and the PerfTop CLI. You can run this code on your laptop, in your data center, or in the cloud. See the Open Distro for Elasticsearch Documentation for details.
Want an easy way to dive in and test-drive the features? For Mac and Windows, you can use Docker Desktop to deploy and test Open Distro for Elasticsearch. This post walks you through that process.
Deploy Docker Desktop
Docker Desktop (DD) gives you an easy way to run Docker on your laptop within an isolated environment. My laptop is a Macintosh, so I downloaded the Mac image of Docker Desktop from their download page and followed the install instructions, dragging DD to my Applications folder.
In order to test Open Distro for Elasticsearch with the below docker-compose, you will need to increase the RAM that you allocate to DD. Once Docker had completed its initial startup, I went to the Docker icon in my menu bar and selected Preferences…

Select the Advanced tab, and move the memory slider to at least 4 GiB:
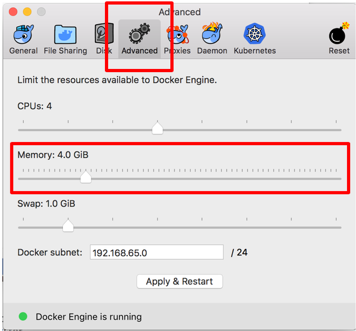
Click the window’s close box. Click Apply to allow Docker to restart with the new settings. Wait for Docker to restart before continuing.
Run Open Distro for Elasticsearch
You first need to pull the Open Distro for Elasticsearch Docker image. Open a Terminal window, and run:
docker pull amazon/opendistro-for-elasticsearch:0.7.0Docker will get the container images for Elasticsearch. You will also want the Kibana distro. Run:
docker pull amazon/opendistro-for-elasticsearch-kibana:0.7.0Now create a directory on your laptop that will hold the docker-compose file, along with any other assets related to your project:
mkdir odfe-docker
cd odfe-docker
Create docker-compose.yml with the following contents:
NOTE! Elasticsearch 7.x+ needs a different config. If you are using Open Distro for Elasticsearch version 1.0.0 or greater, please see our documentation for the correct docker-compose.yml
version: '3'
services:
  odfe-node1:
    image: amazon/opendistro-for-elasticsearch:0.7.0
    container_name: odfe-node1
    environment:
      - cluster.name=odfe-cluster
      - bootstrap.memory_lock=true # along with the memlock settings below, disables swapping
      - "ES_JAVA_OPTS=-Xms512m -Xmx512m" # minimum and maximum Java heap size, recommend setting both to 50% of system RAM
    ulimits:
      memlock:
        soft: -1
        hard: -1
    volumes:
      - odfe-data1:/usr/share/elasticsearch/data
    ports:
      - 9200:9200
      - 9600:9600 # required for Performance Analyzer
    networks:
      - odfe-net
  odfe-node2:
    image: amazon/opendistro-for-elasticsearch:0.7.0
    container_name: odfe-node2
    environment:
      - cluster.name=odfe-cluster
      - bootstrap.memory_lock=true
      - "ES_JAVA_OPTS=-Xms512m -Xmx512m"
      - discovery.zen.ping.unicast.hosts=odfe-node1
    ulimits:
      memlock:
        soft: -1
        hard: -1
    volumes:
      - odfe-data2:/usr/share/elasticsearch/data
    networks:
      - odfe-net
  kibana:
    image: amazon/opendistro-for-elasticsearch-kibana:0.7.0
    container_name: odfe-kibana
    ports:
      - 5601:5601
    expose:
      - "5601"
    environment:
      ELASTICSEARCH_URL: https://odfe-node1:9200
    networks:
      - odfe-net

volumes:
  odfe-data1:
  odfe-data2:

networks:
  odfe-net:
From the odfe-docker directory, run:
docker-compose upYou can see your running containers with docker ps. (Edited to fit the page):
CONTAINER ID  IMAGE                                              STATUS  NAMES
fb1a78290e33  amazon/opendistro-for-elasticsearch-kibana:0.7.0   Up…      odfe-kibana
a53942e76501  amazon/opendistro-for-elasticsearch:0.7.0          Up…      odfe-node1
f33f91837f47  amazon/opendistro-for-elasticsearch:0.7.0          Up…      odfe-node2
To make sure that Elasticsearch is responding, run:
curl -XGET https://localhost:9200 -u admin:admin --insecureElasticsearch will respond with something like:
{
  "name" : "NHKRnp4",
  "cluster_name" : "odfe-cluster",
  "cluster_uuid" : "ItWH-yLSQSCD9eGiWbvDDQ",
  "version" : {
    "number" : "6.5.4",
    "build_flavor" : "oss",
    "build_type" : "tar",
    "build_hash" : "d2ef93d",
    "build_date" : "2018-12-17T21:17:40.758843Z",
    "build_snapshot" : false,
    "lucene_version" : "7.5.0",
    "minimum_wire_compatibility_version" : "5.6.0",
    "minimum_index_compatibility_version" : "5.0.0"
  },
  "tagline" : "You Know, for Search"
}
Log in to Kibana
Kibana is a web client that sends API requests to Elasticsearch to power its visualizations. In your browser, navigate to http://localhost:5601. You’ll see the Open Distro for Elasticsearch login page:

Open Distro for Elasticsearch comes pre-configured with Username: admin and Password: admin. Use those credentials to log in. (Note, this setup is not secure. We’ll show you how to change these passwords in a subsequent post.) You’ll be greeted with Kibana’s splash page. Click Try our sample data. I added the Sample web logs data set in the following screen.
Examine the Sample Data
You can interact with the sample web log data in the normal ways. Click the Discover tab, widen the time window to Last 7 days, and you should see something like this

You can use Kibana’s Dev Tools pane to run queries. Click the tab, then enter the following query:
GET kibana_sample_data_logs/_search
{
  "query": {
    "bool": {
      "must": [
        {
          "term": {
            "machine.os.keyword": {
              "value": "ios"
            }
          }
        },
        {
          "range": {
            "bytes": {
              "gte": 5000
            }
          }
        },
        {
          "term": {
            "clientip": {
              "value": "68.0.0.0/8"
            }
          }
        }
      ]
    }
  }
}
I had eight results from IOS devices, with return bytes > 5,000 and IP address in the 68. CIDR block.
You can continue to explore Kibana and Elasticsearch, build or import your existing visualizations and dashboards, etc., normally.
Conclusions
Congratulations! You’ve successfully deployed Open Distro for Elasticsearch locally on your laptop, logged in, and explored one of Kibana’s sample data sets. Stay tuned! We’ll be digging in to Open Distro for Elasticsearch’s plug-ins in depth in coming posts.
Have an issue or question? Want to contribute? You can get help and discuss Open Distro for Elasticsearch on our forums. You can file issues here.