AWS Robotics Blog
Running high-fidelity O3DE simulations in AWS RoboMaker
Developing autonomous robots is hard. Because it requires both hardware and software to be developed, integrated and tested, doing so in a physical environment is difficult and costly. Using simulations, robot developers can test their code quickly, iterating many times before finally deploying software to the hardware for testing in the real world. Having a high-fidelity simulator allows developers to test vision, perception, and recognition systems for their robots with high confidence. Open 3D Engine (O3DE) is a community driven, open source simulator that provides that level of high-fidelity realistic rendering needed for robotic simulations.
An Introduction to O3DE
O3DE is a 3D engine capable of creating and running realistic 3D worlds for gaming. To achieve photo-realistic rendering, it uses a configurable, multi-threaded rendering engine known as Atom, which supports features such as physically based rendering (PBR), ray-tracing, post-processing, and forward + rendering. O3DE also is capable of simulating real-world physics through its Nvidia PhysX based physics engine.
O3DE is based on a modular system architecture known as the Gems system. This allows you to select and configure any number of packages (Gems) for a project depending on its needs. Gems can come from the O3DE project itself, third-party providers, or custom made. With the recent addition of the ROS 2 gem, this enables O3DE to work with robotics simulations that use the Robotic Operating System (ROS) to develop robots. By providing scene rendering and physics modeling, robotics developers can test and train perception models that closely resemble the real world in a pure simulation environment.
In order to speed up the development cycle, developers can scale out their simulations by running them in parallel in the cloud. Being able to run simulations in the cloud adds performance, cost effectiveness, and scalability to the robot development process by providing access to high performance GPU instances on demand without the need for costly investment in physical hardware or on-site infrastructure. AWS RoboMaker supports GPU-based simulation jobs by running any simulator in an OCI compliant container such as Docker.
This tutorial will go over creating a Docker image from an O3DE sample application (Robot Vacuum Sample) and deploying it as a simulation job in AWS RoboMaker.
Prerequisites
This tutorial requires an AWS account login with Amazon ECR and AWS RoboMaker access IAM permissions. It also requires a development system, or an AWS Cloud9 development environment with the following requirements:
- Linux Ubuntu 20.04 or 22.04
- At least 60 GB of free disk space
- AWS CLI installed
- Docker engine installed.
Walkthrough
Build the container images
The Robot Vacuum Sample application comes with a Dockerfile that is used to build container images for both the simulation as well as the navigation stack.
Note: All of the command line examples in this walkthrough will be based on a workspace folder $WORKSPACE, which can exist anywhere on the host system that is accessible to the currently logged in user. It is recommended to set the environment variable $WORKSPACE to $HOME/o3de-sample.
- Set the environment variable for
$WORKSPACEto use for this walkthrough.export WORKSPACE=$HOME/o3de-sample - Clone the Robot Vacuum Sample application repository.
mkdir -p $WORKSPACE git clone https://github.com/o3de/RobotVacuumSample $WORKSPACE/RobotVacuumSample - Build a simulation docker image named
o3de_robot_vacuum_simulation.cd $WORKSPACE/RobotVacuumSample/Docker docker build --build-arg IMAGE_TYPE=simulation -t o3de_robot_vacuum_simulation . - Build the navigation stack docker image named
o3de_robot_vacuum_navstack.cd $WORKSPACE/RobotVacuumSample/Docker docker build --build-arg IMAGE_TYPE=navstack -t o3de_robot_vacuum_navstack . - If your environment meets the minimum O3DE hardware requirements, you can run these docker containers by following the docker readme.
Build and push the AWS RoboMaker container images to Amazon ECR
The container images created for the demo are designed to run locally on a Linux host machine. In order to run on AWS RoboMaker, the container images need to have the NICE DCV plugins installed. NICE DCV is a high-performance remote display protocol that will be used to stream the simulation from AWS RoboMaker.
- Extend the simulation docker image above to enable NICE DCV by creating a file
$WORKSPACE/Dockerfile.simulation.robomakerand copying the following content into it.FROM o3de_robot_vacuum_simulation:latest ENV WORKSPACE=/data/workspace WORKDIR $WORKSPACE ENV DEBIAN_FRONTEND=noninteractive ENV LAUNCH_FULLSCREEN_OPT=1 # Install NICE DCV (from https://download.nice-dcv.com) RUN wget https://d1uj6qtbmh3dt5.cloudfront.net/NICE-GPG-KEY RUN gpg --import NICE-GPG-KEY RUN wget https://d1uj6qtbmh3dt5.cloudfront.net/2023.0/Servers/nice-dcv-2023.0-15487-ubuntu2204-x86_64.tgz RUN tar -xvzf nice-dcv-2023.0-15487-ubuntu2204-x86_64.tgz \ && mkdir -p /etc/modprobe.d \ && apt-get install -y /data/workspace/nice-dcv-2023.0-15487-ubuntu2204-x86_64/nice-dcv-server_2023.0.15487-1_amd64.ubuntu2204.deb \ /data/workspace/nice-dcv-2023.0-15487-ubuntu2204-x86_64/nice-dcv-gl_2023.0.1039-1_amd64.ubuntu2204.deb \ /data/workspace/nice-dcv-2023.0-15487-ubuntu2204-x86_64/nice-dcv-gltest_2023.0.318-1_amd64.ubuntu2204.deb # Install xterm for direct console access RUN apt update && apt-get install -y xterm - Build a new docker image named
o3de_robot_vacuum_simulation_robomaker.docker build -t o3de_robot_vacuum_simulation_robomaker -f $WORKSPACE/Dockerfile.simulation.robomaker $WORKSPACE - Create a repository in the Amazon ECR for the new simulation docker image.
aws ecr create-repository --repository-name o3de-robot-vacuum-simulationThe command will return a JSON result for the new repository:
{ "repository": { "repositoryArn": "arn:aws:ecr:us-west-2:000000000000:repository/o3de-robot-vacuum-simulation", "registryId": "000000000000", "repositoryName": "o3de-robot-vacuum-simulation", "repositoryUri": "000000000000.dkr.ecr.us-west-2.amazonaws.com/o3de-robot-vacuum-simulation", "createdAt": 1674082385.0, "imageTagMutability": "MUTABLE", "imageScanningConfiguration": { "scanOnPush": false }, "encryptionConfiguration": { "encryptionType": "AES256" } } } - Set an environment variable for the simulation Amazon ECR repository with the
repositoryUriresults from the JSON output.export ECR_SIMULATION_URI=000000000000.dkr.ecr.us-west-2.amazonaws.com/o3de-robot-vacuum-simulation - Log into Amazon ECR from your local Docker runtime.
aws ecr get-login-password | docker login --username AWS --password-stdin $ECR_SIMULATION_URI - Tag the docker image
o3de_robot_vacuum_simulation_robomakerwith the same repository URI.docker tag o3de_robot_vacuum_simulation_robomaker $ECR_SIMULATION_URI - Push the new simulation docker image to Amazon ECR.
docker push $ECR_SIMULATION_URINote: Due to the size of the container image (~20 GB) it may take some time to complete and upload depending on your internet connectivity.
- Extend the navigation docker image above to enable NICE DCV by creating a file
$WORKSPACE/Dockerfile.navstack.robomakerand copying the following content into it.FROM o3de_robot_vacuum_navstack:latest ENV WORKSPACE=/data/workspace WORKDIR $WORKSPACE ENV DEBIAN_FRONTEND=noninteractive # Install NICE DCV (from https://download.nice-dcv.com) RUN wget https://d1uj6qtbmh3dt5.cloudfront.net/NICE-GPG-KEY RUN gpg --import NICE-GPG-KEY RUN wget https://d1uj6qtbmh3dt5.cloudfront.net/2023.0/Servers/nice-dcv-2023.0-15487-ubuntu2204-x86_64.tgz RUN tar -xvzf nice-dcv-2023.0-15487-ubuntu2204-x86_64.tgz \ && mkdir -p /etc/modprobe.d \ && apt-get install -y /data/workspace/nice-dcv-2023.0-15487-ubuntu2204-x86_64/nice-dcv-server_2023.0.15487-1_amd64.ubuntu2204.deb \ /data/workspace/nice-dcv-2023.0-15487-ubuntu2204-x86_64/nice-dcv-gl_2023.0.1039-1_amd64.ubuntu2204.deb \ /data/workspace/nice-dcv-2023.0-15487-ubuntu2204-x86_64/nice-dcv-gltest_2023.0.318-1_amd64.ubuntu2204.deb RUN wget https://d1uj6qtbmh3dt5.cloudfront.net/nice-dcv-ubuntu2204-x86_64.tgz # Install xterm for direct console access RUN apt update && apt-get install -y xterm - Build a new container image named
o3de_robot_vacuum_navstack_robomaker.docker build -t o3de_robot_vacuum_navstack_robomaker -f $WORKSPACE/Dockerfile.navstack.robomaker $WORKSPACE - Create a repository in Amazon ECR for the new navigation stack docker image.
aws ecr create-repository --repository-name o3de-robot-vacuum-navstackThe command will return a JSON result for the new repository:
{ "repository": { "repositoryArn": "arn:aws:ecr:us-west-2:000000000000:repository/o3de-robot-vacuum-navstack", "registryId": "000000000000", "repositoryName": "o3de-robot-vacuum-navstack", "repositoryUri": "000000000000.dkr.ecr.us-west-2.amazonaws.com/o3de-robot-vacuum-navstack", "createdAt": 1674088085.0, "imageTagMutability": "MUTABLE", "imageScanningConfiguration": { "scanOnPush": false }, "encryptionConfiguration": { "encryptionType": "AES256" } } } - Set an environment variable for the navigation stack Amazon ECR repository with the
repositoryUriresults from the json output.export ECR_NAVSTACK_URI=000000000000.dkr.ecr.us-west-2.amazonaws.com/o3de-robot-vacuum-navstack - Tag the docker image
o3de_robot_vacuum_navstack_robomakerwith the same repository URI.docker tag o3de_robot_vacuum_navstack_robomaker $ECR_NAVSTACK_URI - Push the new navigation stack docker image to Amazon ECR.
docker push $ECR_NAVSTACK_URI
Create an AWS RoboMaker simulation
The next step is to create an AWS RoboMaker simulation using the newly created container images. The workflow involves defining the general parameters for the simulation such as an IAM role, compute type (set to CPU and GPU), and the simulation duration. You will also need to create both a Robot application and Simulation application for the simulation. Below is a step-by-step walk through of this process.
- Click on ‘Create simulation job’ from the ‘Simulation jobs’ page. (verify your selected AWS region)

Figure 1 – The simulation jobs page
- Configure the simulation job details and configure the ‘Compute type’ to ‘CPU and GPU’.

Figure 2 – Configure the simulation details such as the job duration, Failure behavior, IAM role, Compute type, and Simulation/GPU Unit Limits.
- Create a new robot application named ‘o3de-robot-vacuum-navstack’ and select ‘o3de-robot-vacuum-navstack’ from ECR by clicking on ‘Browse ECR’. Check on ‘Run with streaming session’, and set ‘Launch command’ to ‘/data/workspace/LaunchNavStack.bash’.

Figure 3 – Define a new robot application based on the uploaded ‘o3de-robot-vacuum-navstack’ docker image
- Create a new simulation application named ‘o3de-robot-vacuum-simulation’ and select ‘o3de-robot-vacuum-simulation’ from ECR by clicking on ‘Browse ECR’. Check on ‘Run with streaming session’, and set ‘Launch command’ to ‘/data/workspace/LaunchSimulation.bash’.

Figure 4 – Define a new simulation application based on the uploaded ‘o3de-robot-vacuum-simulation’ docker image
- Review the simulation job before creating it.

- Click on ‘Create’ to create and launch the simulation job.

Figure 6 – The status will show ‘Preparing’ while the simulation job is being created and launched before you are able to take control of it.
View and control the new simulation job
Once the status of the simulation job changes to ‘Running’, the ‘Connect’ buttons on each tool will be available to view and/or control the simulation job.

The ‘Connect’ for the Simulation application will launch the O3DE launcher that is running the simulation client.

The simulation client presents a 3rd person view of the Robot Vacuum that has been placed inside of a loft scenario. At this point, the robot is awaiting commands that will be sent to it using ROS 2.
To control the robot vacuum, open the RViz 3D visualization tool which is provided as part of the ROS package. This is done by clicking ‘Connect’ for the Robot Application.

Through the RViz tool, you can specify points to direct the Robot Vacuum to navigate to. It will use its simulated Lidar sensor to best navigate to the desired point without colliding with any obstacle. This is done by clicking ‘2D Goal Pose’ in RViz and specifying a point in the visualized map.
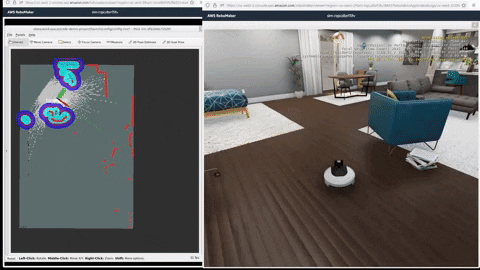
As the robot navigates the room, it maps its environment with its Lidar sensor which will also be visualized in RViz. In an autonomous robot vacuum scenario, a container with the actual automated robot code will replace the sample one in this demonstration to control the robot automatically.
Cleaning up
The container images created in this tutorial total around 20 gigabytes of data. If you no longer need this sample robot vacuum application, you can clear the following artifacts:
- The o3de-robot-vacuum-navstack and o3de-robot-vacuum-simulation repositories in ECR
- The o3de-robot-vacuum-navstack robot application in AWS RoboMaker under ‘Robot Applications’
- The o3de-robot-vacuum-simulation application in AWS RoboMaker under ‘Simulation Applications’
Conclusion
This concludes this tutorial on how to run a robotics simulation using O3DE in AWS RoboMaker. We walked through the steps required to prepare an O3DE container image with a robotics simulation application and executed that container in AWS RoboMaker after a few configuration steps. Now that you have completed running this sample, you can try to create your own robotic simulation project with O3DE and have it run on AWS RoboMaker. To learn more about O3DE, please visit https://www.o3de.org to find out more information.