AWS Security Blog
Use a single AWS Managed Microsoft AD for Amazon RDS for SQL Server instances in multiple Regions
Many Amazon Web Services (AWS) customers use Active Directory to centralize user authentication and authorization for a variety of applications and services. For these customers, Active Directory is a critical piece of their IT infrastructure.
AWS offers AWS Directory Service for Microsoft Active Directory, also known as AWS Managed Microsoft AD, to provide a highly accessible and resilient Active Directory service that is built on Microsoft Active Directory.
AWS also offers Amazon Relational Database Service (Amazon RDS) for SQL Server. Amazon RDS enables you to prioritize application development by managing time-consuming database administration tasks including provisioning, backups, software patching, monitoring, and hardware scaling. If you require Windows authentication with Amazon RDS for SQL Server, Amazon RDS for SQL Server instances need to be integrated with AWS Managed Microsoft AD.
With the release of AWS Managed Microsoft AD cross-Region support, you only need one distinct AWS Managed Microsoft AD that spans multiple AWS Regions; this simplifies directory management and configuration. Additionally, it simplifies trusts between the AWS Managed Microsoft AD domain and your on-premises domain. Now, only a single trust between your on-premises domain and AWS Managed Microsoft AD domain is required, as compared to the previous pattern of only one AWS Managed Microsoft AD per Region—each of which would require a trust if you wanted to allow on-premises objects access to your AWS Managed Microsoft AD domain. Further, AWS Managed Microsoft AD cross-Region support provides an additional benefit when using your on-premises users and groups with Amazon RDS for SQL Server: You only need a single, one-way, outgoing trust between your multi-Region AWS Managed Microsoft AD and your on-premises domain.
As detailed in this post, to enable AWS Managed Microsoft AD cross-Region support, you create a new AWS Managed Microsoft AD and extend it to multiple Regions (as shown in Figure 1 below). Once you’ve extended your directory, you deploy an Amazon RDS SQL Server instance in each Region, integrating it to the same directory. Finally, you install SQL Server Management Studio (SSMS) on an instance joined to the AWS Managed Microsoft AD directory. You use that instance to connect to the RDS SQL Server instances using the same domain user account.
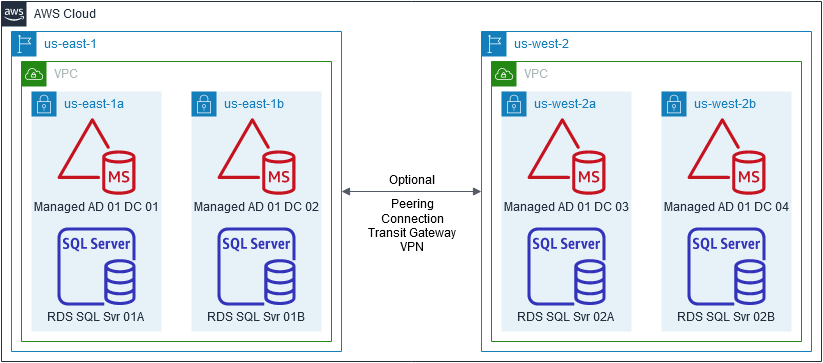
Figure 1: High level diagram of resources deployed in this post
The architecture in Figure 1 includes a network connection between the Regions. That connection isn’t required for the AWS Managed Microsoft AD to function. If you don’t require network connectivity between your regions, you can disregard the network link in the diagram. Since you will be using a single Amazon Elastic Compute Cloud (Amazon EC2) instance in one Region, the network connection is needed between Amazon VPCs in the two Regions to allow that instance to connect to a domain controller in each Region.
Prerequisites for AWS Managed Microsoft AD cross-Region Support
- An AWS Managed Microsoft AD deployed in a Region of your choice. If you don’t have one already deployed, you can follow the instructions in Create Your AWS Managed Microsoft AD directory to create one. For this post, I recommend that you use us-east-1.
- The VPC must be peered in order to complete the steps in this blog. Creating and accepting a VPC peering connection has information on how to create a peering connection between Regions. Be aware of unsupported VPC peering configurations.
- A Windows Server instance joined to your managed Active Directory domain. Join an EC2 Instance to Your AWS Managed Microsoft AD Directory has instructions if you need assistance.
- Install the Active Directory administration tools onto your domain-joined instance. Installing the Active Directory Administration Tools has detailed instructions.
Extend your AWS Managed Microsoft AD to another Region
We’ve made the process to extend your directory to another Region straightforward. There is no cost to add another Region; you only pay for the resources for your directory running in the new Region. See here for additional information on pricing changes with new Regions. For example, in this post you will be extending your directory into the us-east-2 region. There will be an additional cost for two new domain controllers. Figure 3 shows the additional cost to extend the directory.
Let’s walk through the steps of setting up Windows Authentication with Amazon RDS for SQL Server instances in multiple Regions using a single cross-Region AWS Managed Microsoft AD.
To extend your directory to another Region:
- In the AWS Directory Service console navigation pane, choose Directories.
Note: You should see a list of your AWS Managed Microsoft AD directories.
- Choose the Directory ID of the directory you want to expand to another Region.
- Go to the Directory details page. In the Multi-region replication section, select Add Region.

Figure 2: Directory details and new multi-Region replication pane
- On the Add region page:
- For Region to add, select the Region you want to extend your directory to.
- For VPC, select the Amazon Virtual Private Cloud (Amazon VPC) for the new domain controllers to use.
- For Subnets, select two unique subnets in the Amazon VPC that you selected in the preceding step.
- Once you have everything to your liking, choose Add.

Figure 3: Add a Region
In the background, AWS is provisioning two new AWS managed domain controllers in the Region you selected. It could take up to 2 hours for your directory to become available in the Region.
Note: Your managed domain controllers in the home Region are fully functional during this process.
- On the Directory details page, in Multi-Region replication, the status should be Active when the process has completed. Now you’re ready to deploy your Amazon RDS SQL Server instances.
Enable Amazon RDS for SQL Server
Integrating Amazon RDS into AWS Managed Microsoft AD is exactly the same process as it was before the cross-Region feature was released. This post goes through that original process with only one change, which is that you select the same directory ID for both Regions.
Create an Amazon RDS SQL Server instance in each Region using the same directory
The steps for creating an Amazon RDS SQL Server instance in each Region are the same. The following process will create the first instance. Once you’ve completed the process, you change the AWS Management Console Region to the Region you extended your directory to and repeat the process.
To create an Amazon RDS SQL Server instance:
- In the AWS Managed Microsoft AD directory primary Region, go to the Amazon RDS console navigation pane and choose Create database.
- Choose Microsoft SQL Server.
- You can leave the default values, except for the following settings:
- Under Settings select Master and Confirm password.
- Under Connectivity, expand Additional connectivity configuration:
- Choose Create new to create a new VPC security group.
- Enter a name in New VPC security group name.
- Select No preference for Availability Zone.
- Enter 1433 for Database port.

Figure 4: Connectivity settings
- Select the Enable Microsoft SQL Server Windows authentication check box and then choose Browse Directory.

Figure 5: Enable Microsoft SQL Server Windows authentication selected
- Select your directory and select Choose.

Figure 6: Select a directory
- Choose Create database.
- Repeat these steps in your expanded Region. Note that the Directory ID will be the same for both Regions. You can complete the next section while your Amazon RDS SQL instances are provisioning.
Create an Active Directory user and group to delegate SQL administrative rights
The following steps walk you through the process of creating an Active Directory user and group for delegation. Following this process, you add the user to the group you just created and to the AWS Delegated Server Administrators group.
To create a user and group:
- Log in to the domain-joined instance with a domain user account that has permissions to create Active Directory users and groups.
- Choose Start, enter dsa.msc, and press Enter.
- In Active Directory Users and Computers, right-click on the Users OU, select New, and then Group. The New Object – Group window pops up.
- Fill in the Group name boxes with your choice of name.
- For Group Scope, select Domain local.
- For Group type, select Security.
- Choose OK.
- In Active Directory Users and Computers, right-click on your Users OU and select New and then User. The New Object – User window pops up.
- Fill in the boxes with your choice of information, and then choose Next.
- Enter your choice of password and clear User must change password at next logon, then choose Next.
- On the confirmation page, choose Finish.
- Double-click on the user you just created. The user account properties window appears.
- Select the Member of tab.
- Choose Add.
- Enter the name of the group that you previously created and choose Check Names. Next, enter AWS Delegated Server Administrators and choose Check Names again. If you do not receive any error, choose OK, and then OK again.
- The Member of tab for the user should include the two groups you just added. Choose OK to close the properties page.
Delegate SQL Server permissions in each Region using the Active Directory group you just created
The following steps guide you through the process of modifying the Amazon RDS SQL security group, installing SQL Server Management Studio (SSMS), and delegating permission in SQL to your Active Directory group.
Modify the Amazon RDS SQL security group
In these next steps, you modify the security group you created with your Amazon RDS instances, allowing your Windows Server instance to connect to the Amazon RDS SQL Server instances over port 1433.
To modify the security group:
- From the Amazon Elastic Compute Cloud (Amazon EC2) console, select Security Groups under the Network & Security navigation section.
- Select the new Amazon RDS SQL security group that was created with your Amazon RDS SQL instance and select Edit inbound rules.
- Choose Add rule and enter the following:
- Type – Select Custom TCP.
- Protocol – Select TCP.
- Port range – Enter 1433.
- Source – Select Custom.
- Enter the private IP of your instance with a /32. An example would be 10.0.0.10/32.
- Choose Save rules.

Figure 7: Create a security group rule
- Repeat these steps on the security group of your other Amazon RDS SQL instance in the other Region.
Install SQL Server Management Studio
All of the steps after the first are done on the Windows Server instance from Prerequisite 3.
To install SMMS:
- On your local computer, download SQL Server Management Studio (SSMS).
Note: If desired, you can disable IE Enhanced Security Configuration and download directly to the Windows Server instance using IE or any other browser, and skip to step 3.
- RDP into your Windows Server instance and copy SSMS-Setup-ENU.exe to your RDP session.
- Run the file on your Windows Server instance.
- Choose Install.

Figure 8: Install SMMS
- It might take a few minutes to install. When complete, choose Close.
Delegate permissions in SSMS
All of the following steps are performed on the Windows Server instance from Prerequisite 3. Log in to the Amazon RDS SQL instance using the SQL master user account. Next, create a SQL login for the Active Directory group you created previously and give it elevated permission to the Amazon RDS SQL instance.
To delegate permissions:
- Start SMMS.
- On the Connect to Server window, enter or select:
- Server name – Your Amazon RDS SQL Server endpoint.
- Authentication – Select SQL Server Authentication.
- Login – Enter the master user name you used when you launched your Amazon RDS SQL instance. The default is admin.
- Password – Enter the password for the master user name.
- Choose Connect.

Figure 9: Connect to server
- In SMMS, Choose New Query at the top of the window.

Figure 10: New query
- In the query window, enter the following query. Replace <CORP\SQL-Admins> with the name of the group you created earlier.

Figure 11: Query SQL database
- Choose Execute on the menu bar. You should see a Commands completed successfully message.

Figure 12: Commands completed successfully
- Next, navigate to the Logins directory on the navigation page. Right-click on the group you added with the SQL command in step 5 and select Properties.

Figure 13: Open group properties
- Select Server Roles and select the processadmin and setupadmin checkboxes. Then choose OK.

Figure 14: Configure server roles
- You can log off from the instance. For the next steps, you log in to the instance using the user account you created previously.
- Repeat these steps on the Amazon RDS SQL instance in the other Region.
Connect to the Amazon RDS SQL Server with the same Active Directory user in both Regions
All of the steps are performed on the Windows Server instance from Prerequisite 3. You must log in to the instance using the account you created earlier. You then log in to the Amazon RDS SQL instance using Windows authentication with that account.
- Log in to the instance with the user account you created earlier.
- Start SSMS.
- On the Connect to Server window, enter or select:
- Server name: Your Amazon RDS SQL Server endpoint.
- Authentication: Select Windows Authentication.
- Choose Connect.

Figure 15: Connect to server
- You should be logged in to SSMS. If you aren’t logged in, make sure you added your user account to the group you created earlier and try again.
- Repeat these steps using the other Amazon RDS SQL instance endpoint for the server name. You should be able to connect to both Amazon RDS SQL instances using the same user account.
Summary
In this post, you extended your AWS Managed Microsoft AD into a new Region. You then deployed Amazon RDS for SQL Server in multiple Regions attached to the same AWS Managed Microsoft AD directory. You then tested authentication to both Amazon RDS SQL instances using the same Active Directory user.
To learn more about using AWS Managed Microsoft AD or AD Connector, visit the AWS Directory Service documentation. For general information and pricing, see the AWS Directory Service home page. If you have comments about this blog post, submit a comment in the Comments section below. If you have implementation or troubleshooting questions, start a new thread on the AWS Directory Service forum or contact AWS Support.