AWS Compute Blog
Run your Kubernetes Workloads on Amazon EC2 Spot Instances with Amazon EKS
Contributed by Madhuri Peri, Sr. EC2 Spot Specialist SA, and Shawn OConnor, AWS Enterprise Solutions Architect
Update – June 30, 2020: As we continue to improve how Amazon EKS and Spot Instances work together, best practices change. Please read this blog for the latest best practices on how to use Amazon EKS with Spot Instances.
Original post from August 30, 2018:
Many organizations today are using containers to package source code and dependencies into lightweight, immutable artifacts that can be deployed reliably to any environment.
Kubernetes (K8s) is an open-source framework for automated scheduling and management of containerized workloads. In addition to master nodes, a K8s cluster is made up of worker nodes where containers are scheduled and run.
Amazon Elastic Container Service for Kubernetes (Amazon EKS) is a managed service that removes the need to manage the installation, scaling, or administration of master nodes and the etcd distributed key-value store. It provides a highly available and secure K8s control plane.
This post demonstrates how to use Spot Instances as K8s worker nodes, and shows the areas of provisioning, automatic scaling, and handling interruptions (termination) of K8s worker nodes across your cluster.
What this post does not cover
This post focuses primarily on EC2 instance scaling. This post also assumes a default interruption mode of terminate for EC2 instances, though there are other interruption types, stop and hibernate. For stateless K8s sessions, I recommend choosing the interruption mode of terminate.
Spot Instances
Amazon EC2 Spot Instances are spare EC2 capacity that offer discounts of 70-90% over On-Demand prices. The Spot price is determined by term trends in supply and demand and the amount of On-Demand capacity on a particular instance size, family, Availability Zone, and AWS Region.
If the available On-Demand capacity of a particular instance type is depleted, the Spot Instance is sent an interruption notice two minutes ahead to gracefully wrap up things. I recommend a diversified fleet of instances, with multiple instance types created by Spot Fleets or EC2 Fleets.
You can use Spot Instances for various fault-tolerant and flexible applications. In a workload that uses container orchestration and management platforms like EKS or Amazon Elastic Container Service (Amazon ECS), the schedulers have built-in mechanisms to identify any pods or containers on these interrupted EC2 instances. The interrupted pods or containers are then replaced on other EC2 instances in the cluster.
Solution architecture
There are three goals to accomplish with this solution:
- The cluster must scale automatically to match the demands of an application.
- Optimize for cost by using Spot Instances.
- The cluster must be resilient to Spot Instance interruptions.
These goals are accomplished with the following components:
| Solution component | Role in solution | Code | Deployment |
|---|---|---|---|
| Cluster Autoscaler | Scales EC2 instances in or out | Open source | K8s pod DaemonSet on On-Demand Instances |
| Auto Scaling group | Provisions Spot or On-Demand Instances | AWS | Via CloudFormation |
| Spot Instance interrupt handler | Sets K8s nodes to drain state, when the Spot Instance is interrupted | Open source | K8s pod DaemonSet on all K8s nodes with the label lifecycle=EC2Spot |
Here’s a diagram of the solution architecture.
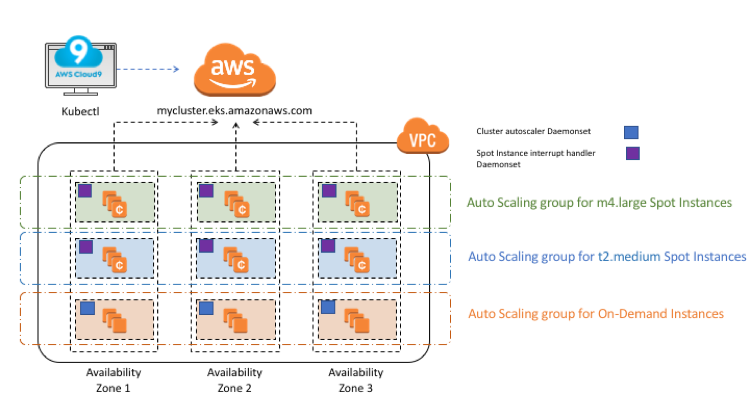
There are a few important things to note in this architecture:
- Cluster Autoscaler is being used to control all scaling activities, with changes to the MinSize and DesiredCapacity parameters of the Auto Scaling group. This separation of duties ensures that there are no race conditions.
- The Auto Scaling groups are used purely to replace any lost instances automatically (for example, terminations or interruptions) and maintain the desired number of instances. There are no scaling policies attached to the groups.
- Auto Scaling, at the time of this post, supports a single instance type. As noted by Jeff Barr’s post EC2 Fleet – Manage Thousands of On-Demand and Spot Instances with One Request, in H2 2018, Auto Scaling groups will support mixed instance types. At that point, multiple groups will not be required, and can collapse into a single group specifying all instance types.
Here’s a further breakdown on the components.
Cluster Autoscaler
Automatic scaling in K8s comes in two forms:
- Horizontal Pod Autoscaler scales the pods in a deployment or replica set. It is implemented as a K8s API resource and a controller. The controller manager queries the resource utilization against the metrics specified in each HorizontalPodAutoscaler definition. It obtains the metrics from either the resource metrics API (for per-pod resource metrics), or the custom metrics API (for all other metrics).
- Cluster Autoscaler scales the worker nodes available for pods to be placed. Cluster Autoscaler is the focus for this post.
Cluster Autoscaler is the default K8s component that can be used to perform pod scaling as well as scaling nodes in a cluster. It automatically increases the size of an Auto Scaling group so that pods have a place to run. And it attempts to remove idle nodes, that is, nodes with no running pods.
When a pod cannot be scheduled due to lack of available resources, Cluster Autoscaler determines that the cluster must scale up. Expander interfaces allow you to apply different pod placement strategies. Currently, the following strategies are supported:
- Random – Randomly select an available node group.
- Most Pods – Selects the group that can schedule the largest quantity of nodes. This can be used balance the load across groups of nodes.
- Least Waste – This is commonly referred to as ‘bin packing.’ It selects the node-group with the least available tied resource (CPU or memory). This helps to reduce the total node footprint, and is the strategy used in this post.
Although Cluster Autoscaler is the de facto standard for automatic scaling in K8s, it is not part of the main release. Deploy it like any other pod in the kube-system namespace, like other management pods. Those management pods would prevent the cluster from scaling down. Override this default behavior by passing in the –-skip-nodes-with-system-pods=false flag.
But how do you reliably control scale-down operations so that you do not remove the pods that you need? This is accomplished using a pod disruption budget (PDB). A PDB limits the number of replicated pods that can be down at a given time. Create a PDB to ensure that you always have at least one Cluster Autoscaler pod running
In summary, Cluster Autoscaler does not remove nodes under the following scenarios:
- Pods with a restrictive PDB.
- Pods running in the kube-system namespace that are deployed (that is, not run on the node by default or which do not have a PDB).
- Pods not backed by a controller object (not created by a deployment, replica set, job, stateful-set, and so on).
- Pods running with local storage.
- Pods running that cannot be moved elsewhere due to various constraints (lack of resources, non-matching node selectors or affinity, matching anti-affinity, and so on).
Auto Scaling Group
With Spot Instances, each instance type in each Availability Zone is a pool with its own Spot price based on the available capacity. A recommended best practice when working with Spot Instances is to use a diversified fleet of instances with multiple instance types, as created by Spot Fleet or EC2 Fleet. These APIs aim to fulfill the specified TargetCapacity across the instance types to launch the number of Spot Instances and optionally, On-Demand Instances.
Unfortunately, Cluster Autoscaler does not support Spot Fleets at this time. You need a different strategy to provide diversification. Cluster Autoscaler for AWS provides integration with Auto Scaling groups. It enables users to choose from four different options of deployment:
- One Auto Scaling group
- Multiple Auto Scaling groups
- Auto-Discovery
- Master Node setup
For this post, you use the Multi-ASG deployment option. For Cluster Autoscaler and other cluster administration and management pods that run on EKS worker nodes, create a small Auto Scaling group using On-Demand Instances. This ensures that the health of the cluster is not impacted by Spot interruptions.
In K8s, label selectors are used to control where pods are placed. Use the K8s node label selector to place the appropriate pods on Spot or On-Demand Instances.
Interrupt handler
The last component to consider handles how the cluster responds to the interruption of a Spot Instance. The workflow can be summarized as:
- Identify that a Spot Instance is being reclaimed.
- Use the 2-minute notification window to gracefully prepare the node for termination.
- Taint the node and cordon it off to prevent new pods from being placed.
- Drain connections on the running pods.
- To maintain desired capacity, replace the pods on remaining nodes.
Spot interruptions are reported in the following ways:
- In the EC2 instance, using the EC2 metadata service
- In the AWS account, using CloudWatch Events
For this post, you use a K8s DaemonSet, which means running one pod per node. The pod periodically polls the EC2 metadata service for a Spot termination notice. If a termination notice is received (HTTP status 200), then it tries to gracefully stop and restart on other nodes before the 2-minute grace period expires. This approach is based on an existing project at the kube-spot-termination-notice-handler GitHub repo.
Walkthrough
Here’s the suggested workflow for this solution:
- Provision the worker nodes with EC2 instances using CloudFormation templates.
- Deploy the K8s Cluster Autoscaler pods as a DaemonSet, with a PDB.
- Deploy the Spot Instance interrupt handler pods as a DaemonSet.
- Deploy the sample application
Prerequisites
You should have the following resources or configurations before starting this walkthrough:
- An EKS cluster master endpoint
- An EKS service role ARN
- Subnet IDs and the control plane security group values
- EKS master cluster certificates
- Configuration of kubectl against the master EKS endpoint
For more information, see Amazon EKS – Now Generally Available and Deploy a Kubernetes Application with Amazon Elastic Container Service for Kubernetes.
When you describe the EKS cluster, you get a response like the following sample output:
I use the cluster name DemoSpotClusterScale throughout this post. Replace that with your cluster name in the following commands.
Get started
Provision the worker nodes
Add worker nodes to your cluster so that you can deploy your applications. Worker nodes can be either Spot or On-Demand Instances. In this example, use Spot Instances for worker nodes.
You can use this customized AWS CloudFormation template to create the Auto Scaling groups described earlier. This template also labels the node with a lifecycle key value indicating whether it is an On-Demand or Spot Instance node.
The template deploys Auto Scaling groups dedicated to the following instance types:
- Spot Instances, m4.large, across three Availability Zones.
- Spot Instances, t2.medium, across three Availability Zones.
- On-Demand Instances, across three Availability Zones.
Make sure that you apply the aws-auth-cm.yaml file with the appropriate NodeInstanceRole value, as provisioned by the CloudFormation template. Find this parameter on the Resources tab.

If the kubectl get nodes command worked as documented, then you are ready to proceed to the next section
Deploying Cluster Autoscaler and PDB
- Download the manifest file cluster-autoscaler-ds.yaml. There are six K8s resources that enable the cluster-autoscaler add-on to work in the EKS environment:
- Service account
- Cluster role
- Role
- Cluster role binding
- Role binding
- Two Auto Scaling groups created by the CloudFormation template for Spot and On-Demand Instances
You also see the cluster-autoscaler command with configured parameters.
- Edit the cluster-autoscaler-ds.yaml file to replace the [OD-NodeGroup-Name], [Spot-NodeGroup1-Name], [Spot-NodeGroup2-Name] sections in lines 141-143 with the resources created in your worker node cloudformation template as shown in screenshot above. Deploy the cluster-autoscaler-ds.yaml manifest
- Monitor the deployment:
- Download and deploy the Cluster Autoscaler PDB:
Deploy the Spot Instance interrupt handler
Each K8s EC2 node being launched must have the lifecycle=Ec2Spot value for -node-label, as in the following example. This line is an excerpt from the CloudFormation template:
“sed -i s,MAX_PODS,”, !Join [ “”, [ “‘”, { “Fn::FindInMap”: [ MaxPodsPerNode, { Ref: SpotNode2InstanceType }, MaxPods ] }, ” –node-labels “, “lifecycle=Ec2Spot” , “‘” ] ], “,g /etc/systemd/system/kubelet.service”, “\n”,
The Docker image contains the instance metadata poll script, as shown in entrypoint.sh. Publish this image to your repository. In the following screenshot, I used my ECR repository. A sample image is available on Docker Hub.

Deploy the Spot interrupt handler pod using spec. This sets up the DaemonSet only on the instances that have a K8s label of lifecycle=Ec2Spot.
When the Spot Instance is interrupted, this pod catches the interruption and vacates the pods.
Deploy the sample application and test out scaling up & down
Deploy a sample application with three replicas. Create a new manifest file named greeter-sample.yaml from the code below, or download it from here
You are using node affinity to prefer deployment on Spot Instances. If the Ec2Spot label is unavailable, the manifest file allows the application to run elsewhere
Scale up, and watch Cluster Autoscaler manage the Auto Scaling groups. Verify that Cluster Autoscaler is working by scaling up the sample service beyond the current limits of the cluster.
Check the AWS Management Console to confirm that the Auto Scaling groups are scaling up to meet demand. This may take a few minutes. You can also follow along with the pod deployment from the command line. You should see the pods transition from pending to running as nodes are scaled up.
Scale down, and watch Cluster Autoscaler manage the Auto Scaling groups:
Check the K8s logs to watch the terminations occur:
Conclusion
In this post, I showed you how to use Spot Instances with K8s workloads, by provisioning, scaling, and managing terminations effectively in EKS clusters to leverage both cost and scale optimizations. Happy coding!