AWS Machine Learning Blog
Build custom Amazon SageMaker PyTorch models for real-time handwriting text recognition
In many industries, including financial services, banking, healthcare, legal, and real estate, automating document handling is an essential part of the business and customer service. In addition, strict compliance regulations make it necessary for businesses to handle sensitive documents, especially customer data, properly. Documents can come in a variety of formats, including digital forms or scanned documents (either PDF or images), and can include typed, handwritten, or embedded forms and tables. Manually extracting data and insight from these documents can be error-prone, expensive, time-consuming, and not scalable to a high volume of documents.
Optical character recognition (OCR) technology for recognizing typed characters has been around for years. Many companies manually extract data from scanned documents like PDFs, images, tables, and forms, or through simple OCR software that requires manual configuration, which often requires reconfiguration when the form changes.
The digital document is often a scan or image of a document, and therefore you can use machine learning (ML) models to automatically extract text and information (such as tables, images, captions, and key-pair values) from the document. For example, Amazon Textract, an API-based AI-enabled service, offers such capabilities with built-in trained models, which you can use in applications without the need for any ML skills. At the same time, custom ML models use computer vision (CV) techniques to automate text extraction from images; this is particularly helpful when handwritten text needs to be extracted, which is a challenging problem. This is also known as handwriting recognition (HWR), or handwritten text recognition (HTR). HTR can lead to making documents with handwritten content searchable or for storing the content of older documents and forms in modern databases.
Unlike standard text recognition that can be trained on documents with typed content or synthetic datasets that are easy to generate and inexpensive to obtain, HWR comes with many challenges. These challenges include variability in writing styles, low quality of old scanned documents, and collecting good quality labeled training datasets, which can be expensive or hard to collect.
In this post, we share the processes, scripts, and best practices to develop a custom ML model in Amazon SageMaker that applies deep learning (DL) techniques based on the concept outlined in the paper GNHK: A Dataset for English Handwriting in the Wild to transcribe text in images of handwritten passages into strings. If you have your own data, you can use this solution to label your data and train a new model with it. The solution also deploys the trained models as endpoints that you can use to perform inference on actual documents and convert handwriting script to text. We explain how you can create a secure public gateway to your endpoint by using Amazon API Gateway.
Prerequisites
To try out the solution in your own account, make sure that you have the following in place:
- You need an AWS account to use this solution. If you don’t have an account, you can sign up for one.
- The solution outlined in this post is part of Amazon SageMaker JumpStart. To run this JumpStart 1P Solution and have the infrastructure deploy to your AWS account, you need to create an active Amazon SageMaker Studio instance (see Onboard to Amazon SageMaker Domain). When your Studio instance is ready, use the instructions in SageMaker JumpStart to one-click launch the solution.
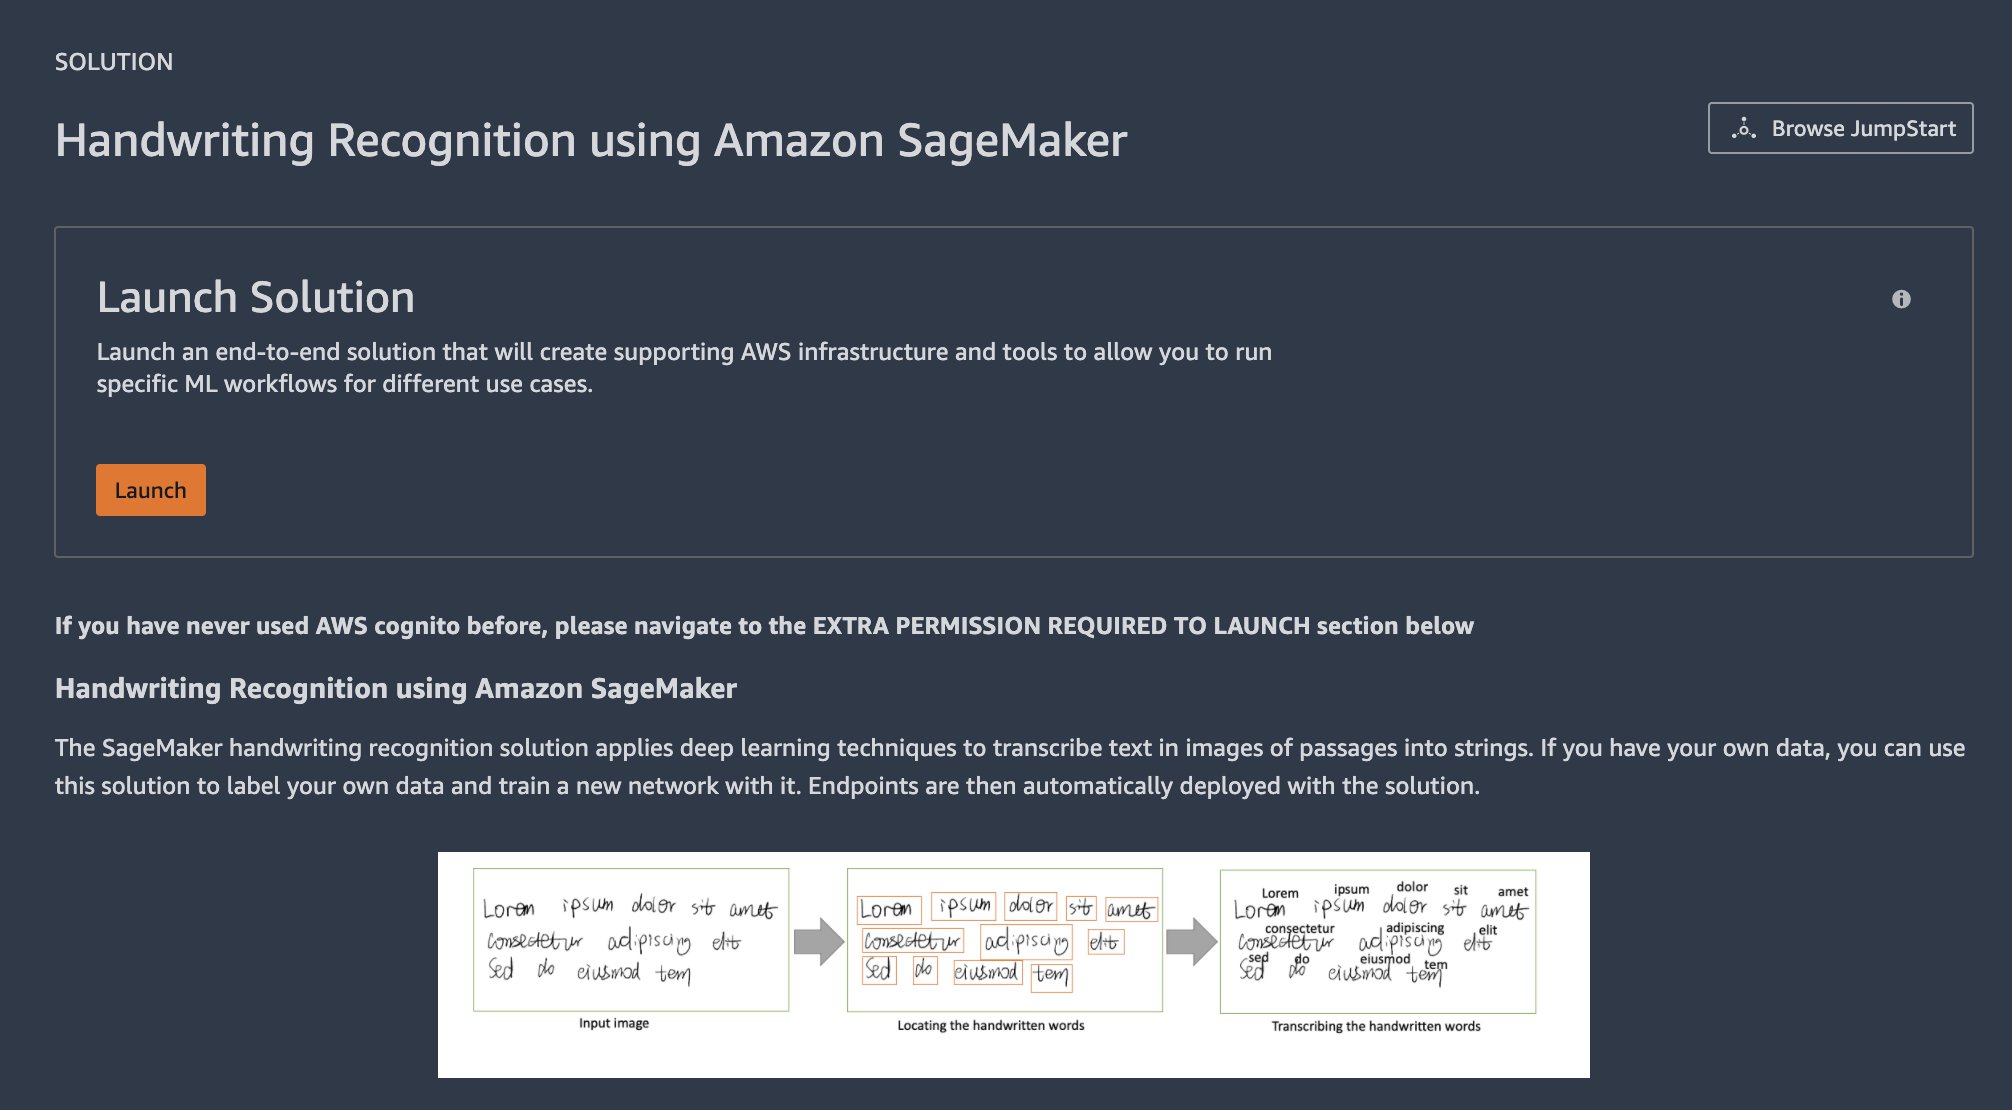
We recommend using the JumpStart solution, which creates the resources properly set up and configured to successfully run the solution.
You can also use your own data to train the models, in which case you need to have images of handwritten text stored in Amazon Simple Storage Service (Amazon S3).
Solution overview
In the next sections, we walk you through each step of creating the resources outlined in the following architecture. However, launching the solution with SageMaker JumpStart in your account automatically creates these resources for you.
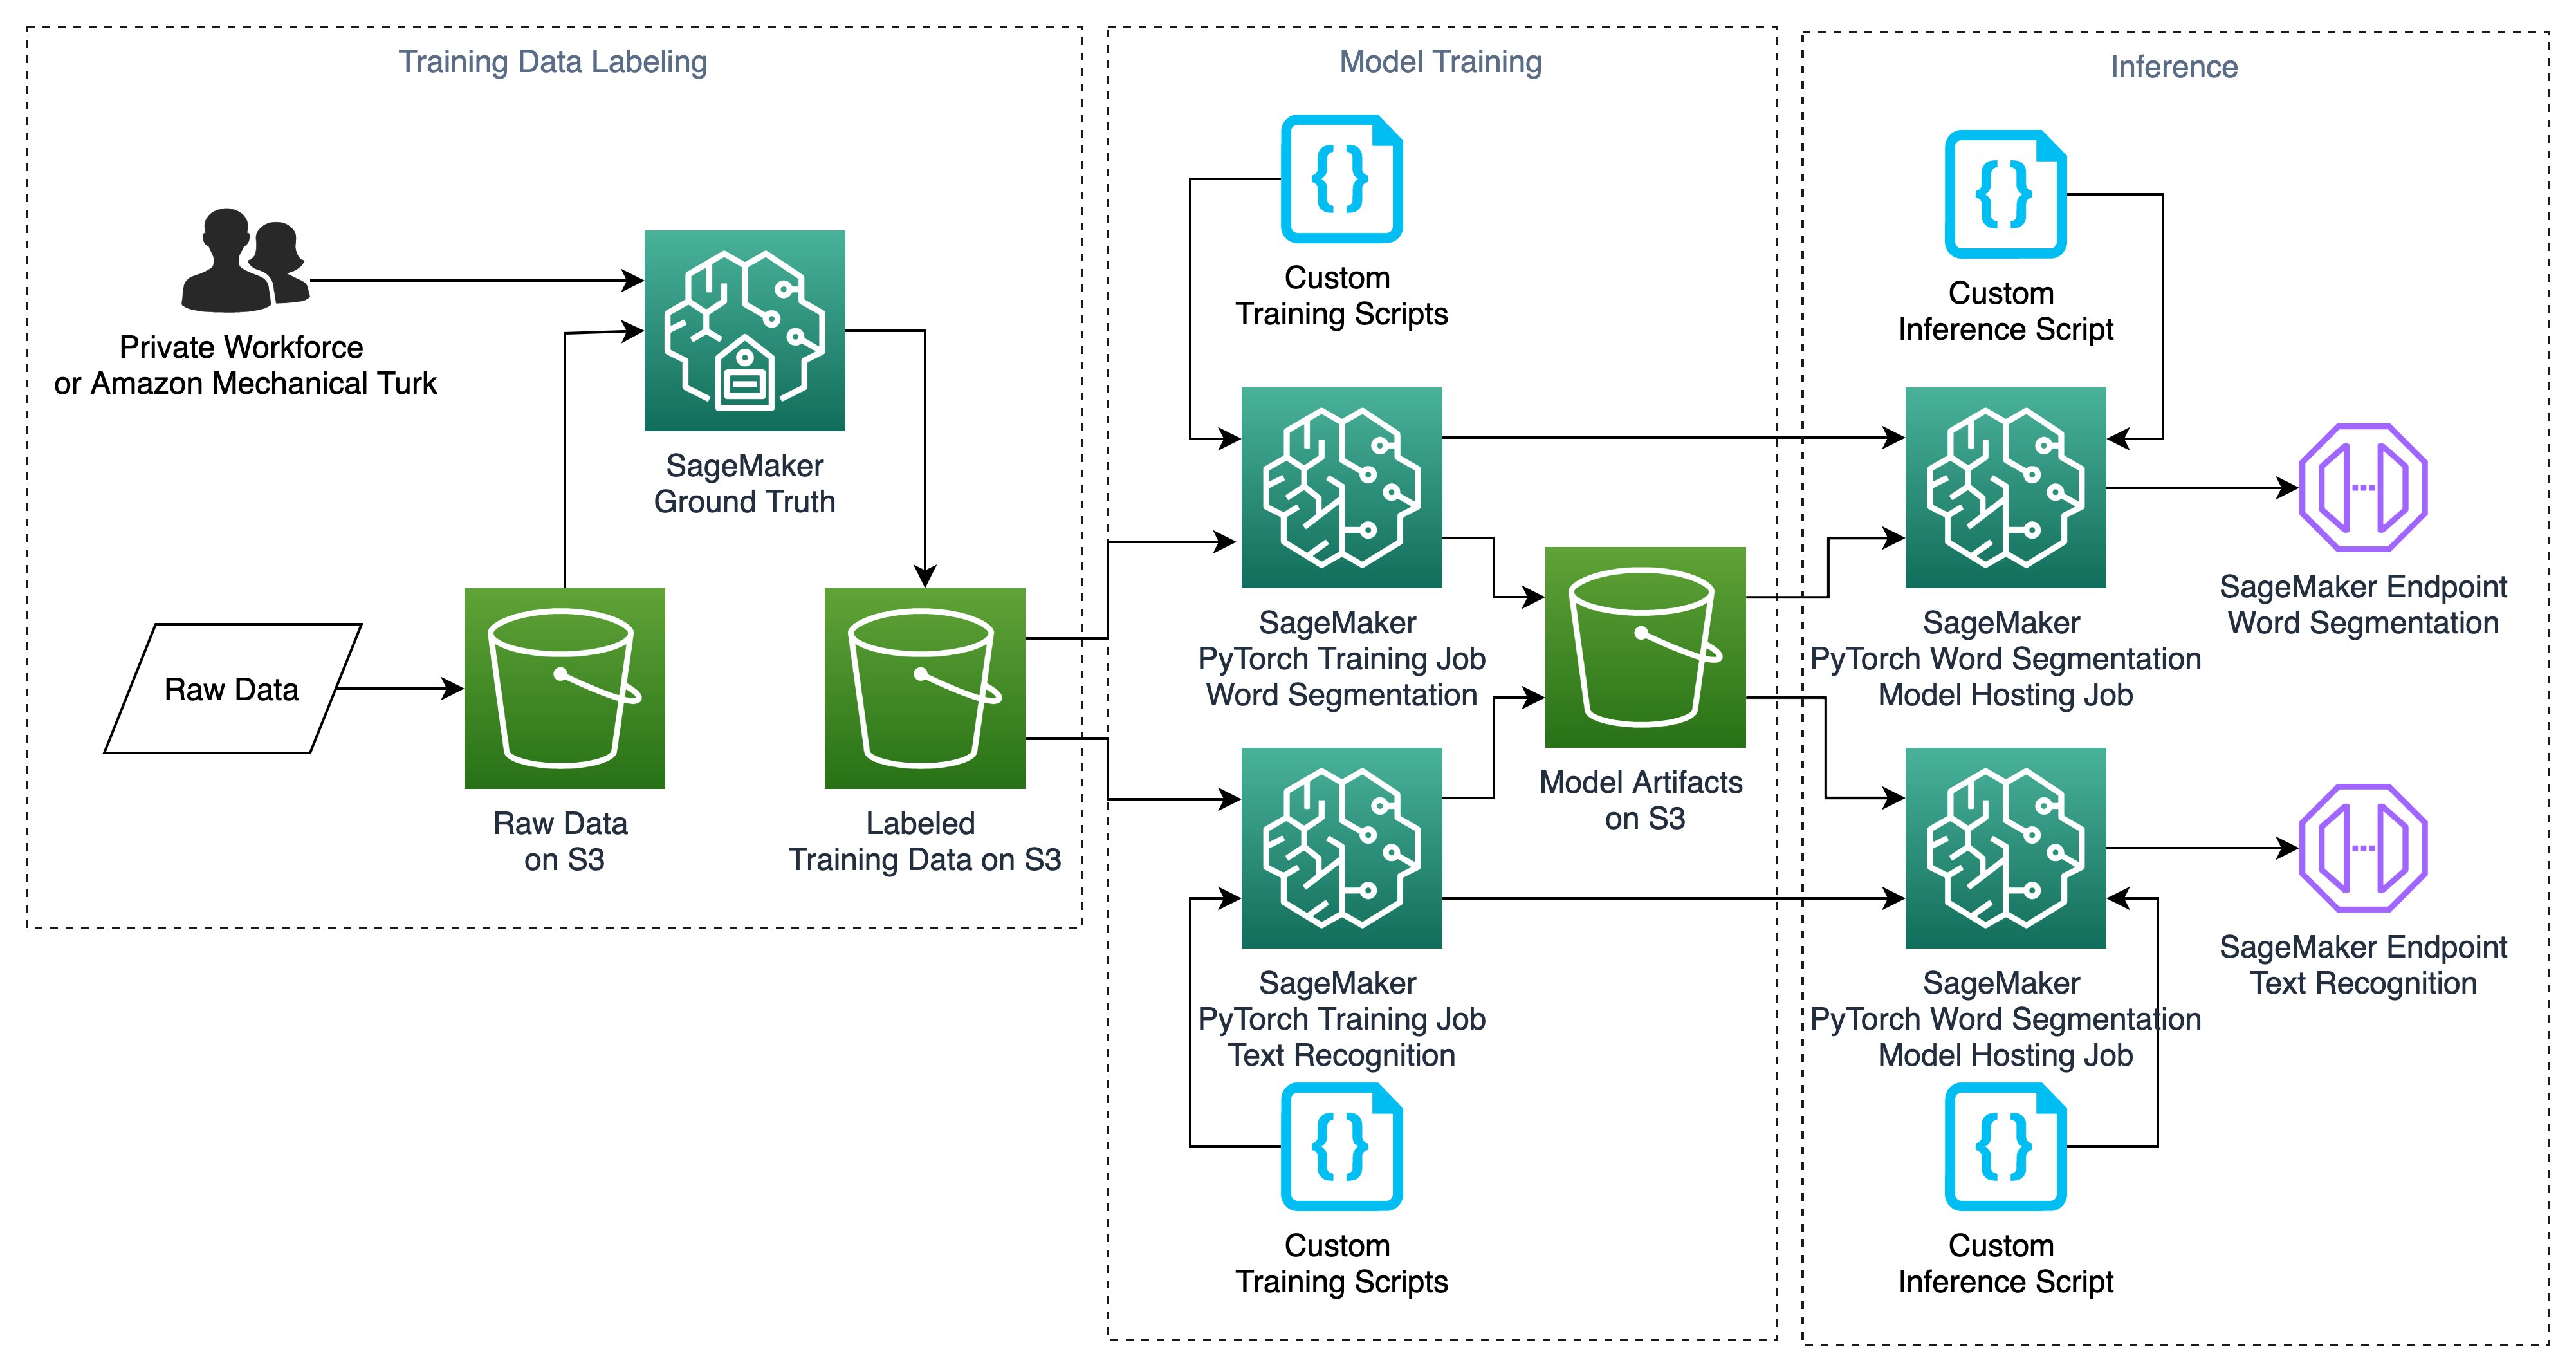
Launching this solution creates multiple resources in your account, including seven sample notebooks, multiple accompanying custom scripts that we use in training models and inference, and two pre-built demo endpoints that you can use for real-time inference if you don’t want to do the end-to-end training and hosting. The notebooks are as follows:
- Demo notebook – Shows you how to use the demo endpoints for real-time handwritten text recognition
- Introduction – Explains the architecture and the different stages of the solution
- Labeling your own data – Shows you how to use Amazon SageMaker Ground Truth to label your own dataset
- Data visualization – Visualizes the outcomes of data labeling
- Model training – Trains custom PyTorch models with GNHK data
- Model training with your own data – Allows you to use your own labeled data for training models
- Endpoints – Creates SageMaker endpoints with custom trained models
GNHK data overview
This solution uses the GoodNotes Handwriting Kollection (GNHK) dataset released by GoodNotes under CC-BY-4.0 License. This dataset is presented in a paper titled GNHK: A Dataset for English Handwriting in the Wild at the International Conference of Document Analysis and Recognition (ICDAR) in 2021, with the following citation:
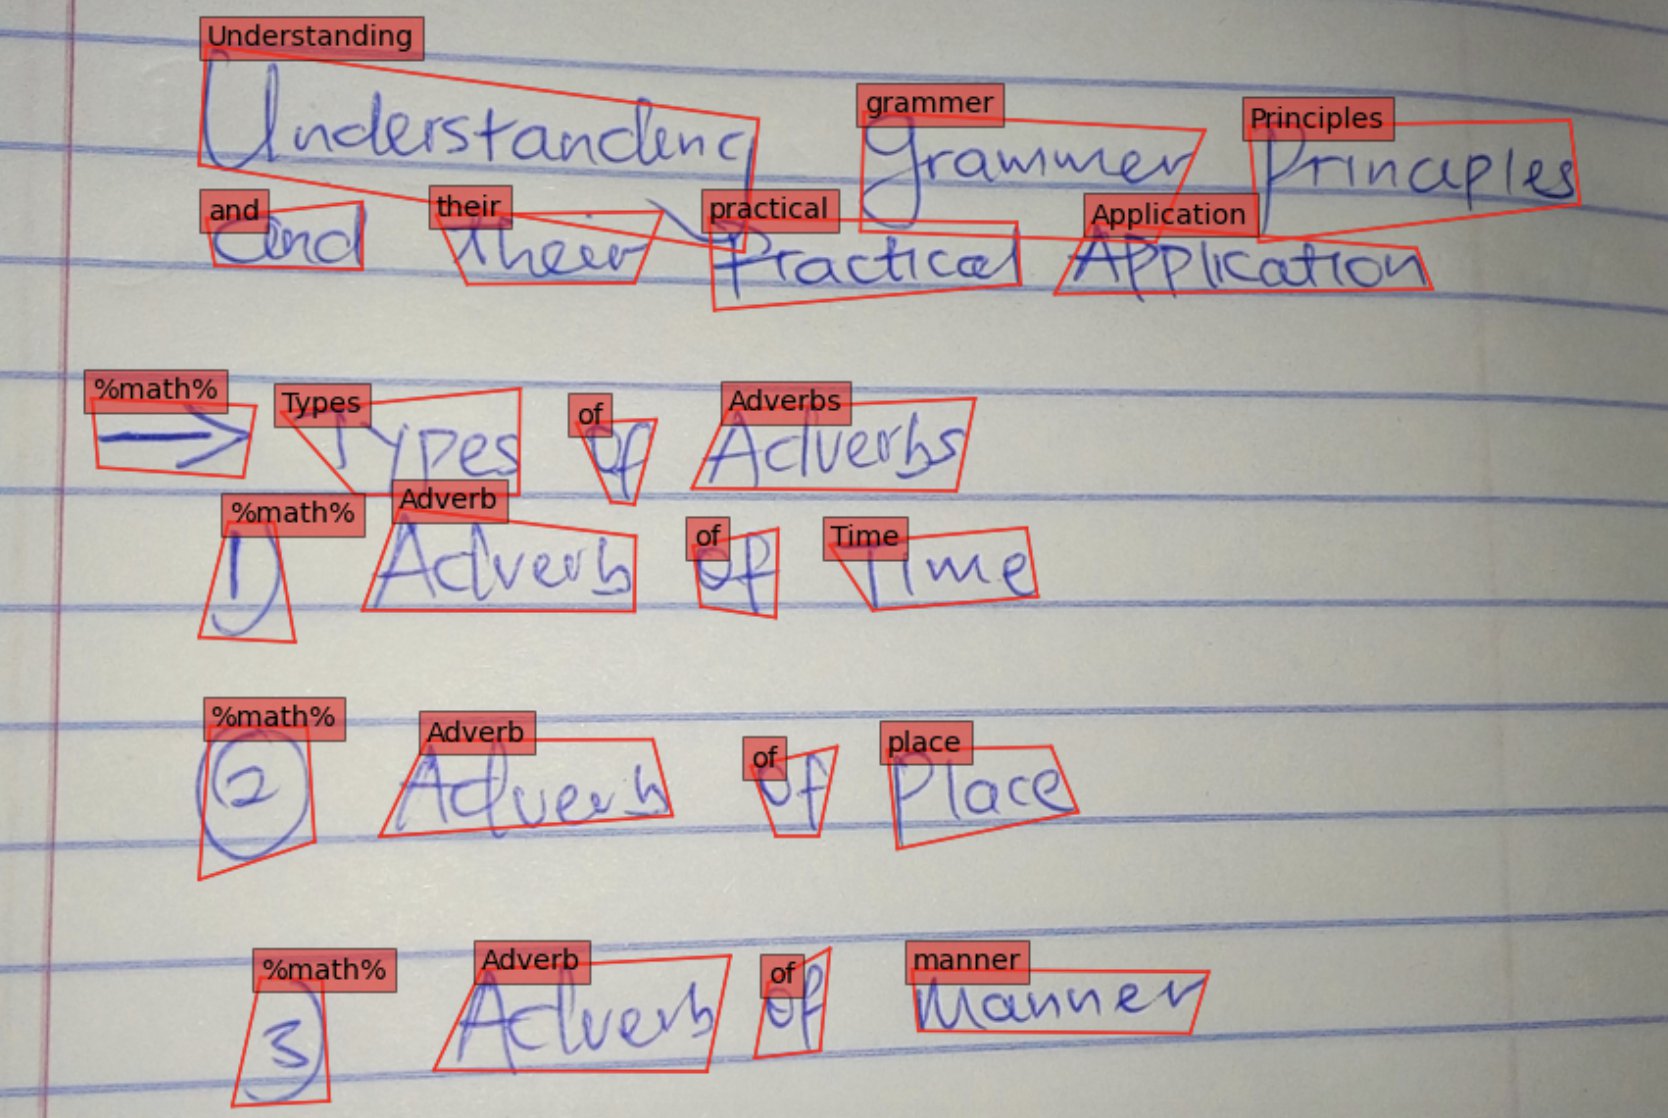
The GNHK dataset includes images of English handwritten text to allow ML practitioners and researchers to investigate new handwritten text recognition techniques. You can download the data for SageMaker training and testing in manifest format, which includes images, bounding box coordinates, and text strings for each bounding box. The following figure shows one of the images that is part of the training dataset.
Use your own labeled dataset
If you don’t want to use the GNHK dataset for training, you can train the models with your own data. If your data is labeled with the bounding box coordinates, you can create a custom manifest training file with the following format and readily use it for training the models. In this manifest file format, each line is a JSON that includes the following content:
Label your raw data using Ground Truth
If you don’t have a labeled training dataset, you can use Ground Truth to label your data using your private workforce or external resources such as Amazon Mechanical Turk. Ground Truth is a fully managed data labeling service that makes it easy to build highly accurate training datasets for ML. Ground Truth offers built-in workflows that support a variety of use cases, including text, images, and video. In addition, Ground Truth offers automatic data labeling, which uses an ML model to label your data. The following figure illustrates how Ground Truth works.
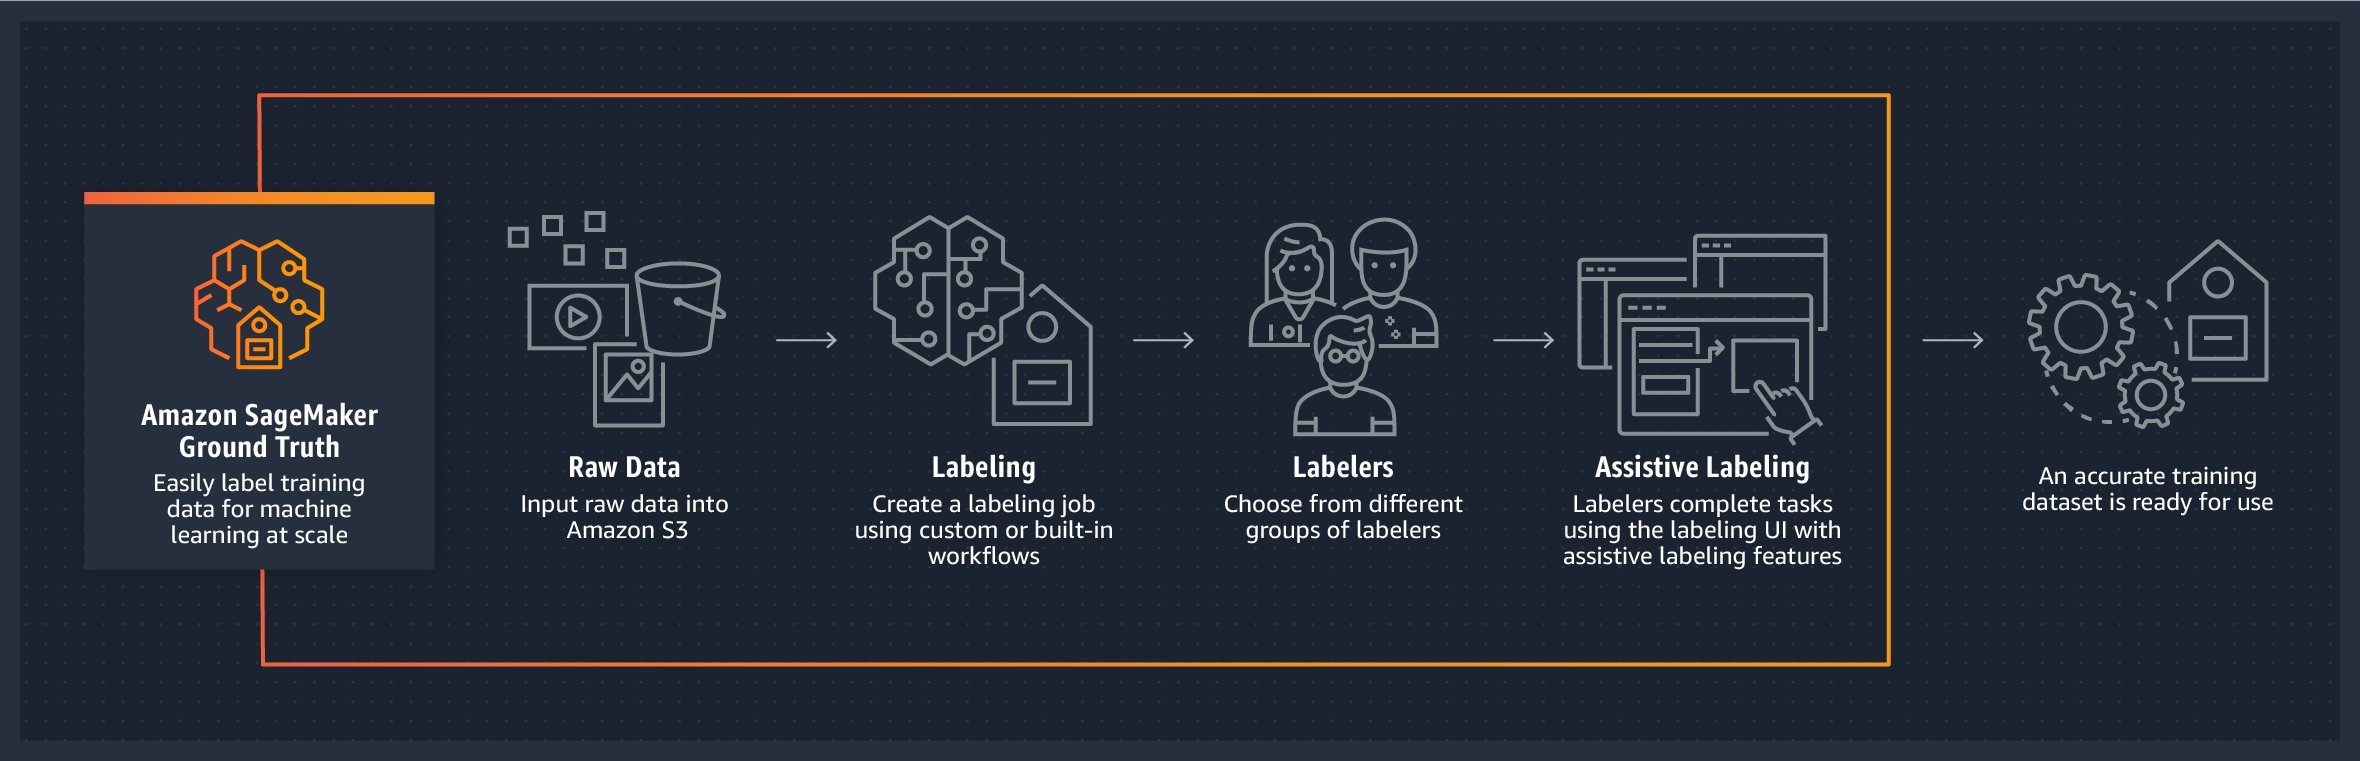
The JumpStart solution that is launched in your account creates a sample notebook (label_own_data.ipynb) that allows you to create Ground Truth labeling jobs to label your data using your private workforce. For details on how to set up labeling jobs for images as well as training and tutorial resources, see SageMaker Ground Truth Data Labeling Resources.
When data labeling is complete, you can use the accompanying data_visualization.ipynb notebook to visualize the results of the data labeling.
Train word segmentation and handwriting text recognition models
Now that the labeled data is prepared, you can use that to train a model that can recognize handwritten passages and return the text string equivalents. In this section, we walk you through this process and explain each step of building and training the models. We use PyTorch to take advantage of state-of-the-art frameworks for object detection and text recognition. You can also develop the same approach using other deep learning frameworks, such as TensorFlow or MXNet. SageMaker provides pre-built Docker images that include deep learning framework libraries and other dependencies needed for training and inference. For a complete list of pre-built Docker images, see Available Deep Learning Containers Images.
Train and test datasets
Before we get started with model training, we need to have a training dataset and a test (or validation) dataset to validate the trained model performance. The GNHK dataset already offers two separate datasets for training and testing in SageMaker manifest format, and this solution uses these datasets. If you want to use your own labeled dataset, the easiest way is to split a labeled data manifest file into train and test sets (for example, 80% training and 20% test).
SageMaker reads the training and test datasets from Amazon S3. After splitting the data, you need to store the manifest files and the corresponding images to Amazon S3, and then use the URI links in the training scripts, as outlined in the following sections.
Train the word segmentation model
For inference on images of handwritten text that consists of multiple lines and each line of multiple words, we need to create two models. The first model segments the image into single words by using bounding box prediction (or localization); the second model runs a text recognition on each segment, separately. Each model is hosted on a SageMaker inference endpoint for real-time inference. Both models use PyTorch framework containers for version 1.6.0. For more details on training and deploying models with PyTorch, including requirements for training and inference scripts, see Use PyTorch with the SageMaker Python SDK. For training purposes, we use the SageMaker PyTorch estimator class. For more details, see Create an Estimator. For training, you need a custom training script as the entry point. When launching this JumpStart solution in your account, SageMaker automatically adds all accompanying custom training and inference codes to your files. For the localization model, we use the custom 1_train_localisation.py code under the src_localisation folder. The estimator utilizes one GPU-based instance for training purposes.
In the following code snippet, we define model performance metrics and create a PyTorch estimator class with the entry point directing to the training script directory in the code repository. At the end, we launch the training by calling the .fit method on the estimator with the training dataset and validation on the test dataset.
Train the handwriting text recognition model
After the word segments are determined by the previous model, the next piece of the inference pipeline is to run handwriting recognition inference on each segment. The process is the same, but this time we utilize a different custom training script, the 2_train_recogniser.py script under src_recognition as the entry point for the estimator, and train a new model. Similar to the previous model, this model also trains the model on the train dataset and evaluates its performance on the test dataset. If you launch the JumpStart solution in your account, SageMaker automatically adds these source codes to your files in your Studio domain.
Next, we attach the estimators to the training jobs, and wait until the training is complete before proceeding with deployment of the models. The purpose of attaching is that if the status of the training job is Completed, it can be deployed to create a SageMaker endpoint and return a predictor, but if the training job is in progress, the attach blocks and displays log messages from the training job, until the training job is complete. Each training job may take around 1 hour to complete.
When both model trainings are complete, you can move on to the next step, which is creating an endpoint for real-time inference on images using the two models we just trained.
Create SageMaker endpoints for real-time inference
The next step in building this solution is to create endpoints with the trained models that we can use for real-time inference on handwritten text. We walk you through the steps of downloading the model artifacts, creating model containers, deploying the containers, and finally using the deployed models to make real-time inference on a demo image or your own image.
First we need to parse trained model artifacts from Amazon S3. After each training job, SageMaker stores the trained model in the form of a tar ball (.tar.gz) on Amazon S3 that you can download to utilize inside or outside of SageMaker. For this purpose, the following code snippet uses three utility functions (get_latest_training_job, get_model_data, and parse_model_data) from the sm_utils folder that is automatically added to your files in Studio when you launch the JumpStart solution in your account. The script shows how to download the PyTorch word segmentation (or localization) model data, compress it into a tar ball, and copy it to Amazon S3 for building the model later. You can repeat this process for the text recognition model.
Now that we have the trained model files, it’s easy to create a model container in SageMaker. Because we trained the model with the PyTorch estimator class, we can use the PyTorch model class to create a model container that uses a custom inference script. See Deploy PyTorch Models for more details. After we create the model, we can create a predictor by deploying the model as an endpoint for real-time inference. You can change the number of instances for your endpoint or select a different accelerated computing (GPU) instance from the list of available instances for real-time inference. The PyTorch model class uses the inference.py script for each model that is added to your files when you launch the JumpStart solution in your Studio domain. In the following code, we create the word segmentation model. You can follow the same approach for creating the text recognition model.
Now we can build the endpoint by calling the .deploy method on the mode and creating a predictor. Then we attach the serializer and deserializer to the endpoint. You can follow the same approach for the second mode, for text recognition.
Endpoint creation should take about 6–7 minutes to complete. The following code creates waiters for endpoint creation and shows as complete when they’re done.
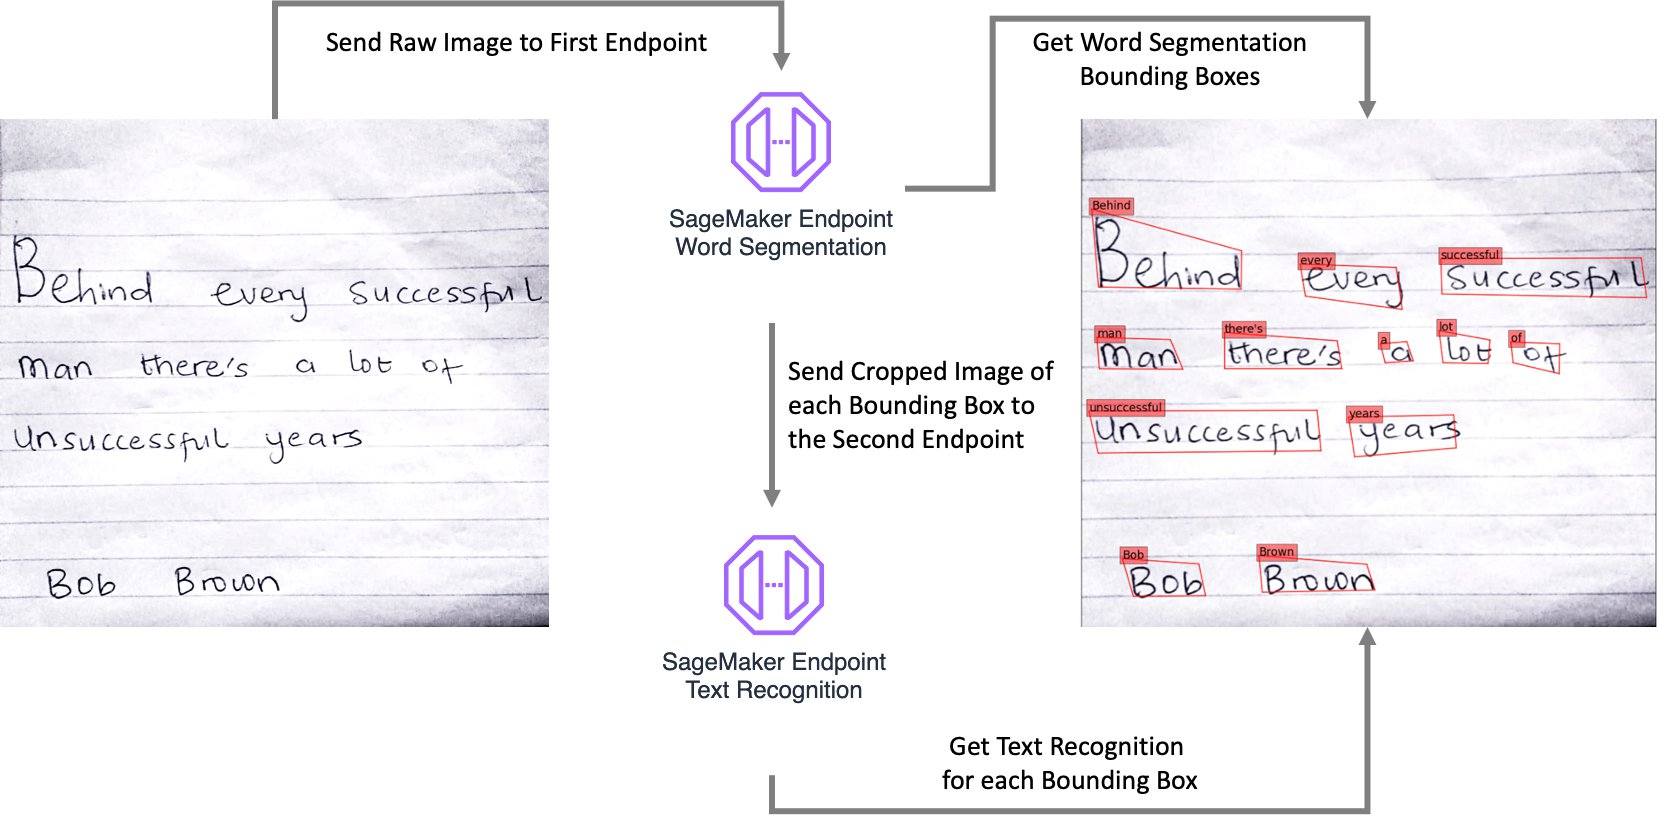
When the model deployments are complete, you can send an image of a handwritten passage to the first endpoint to get the bounding boxes and their coordinates for each word. Then use those coordinates to crop each bounding box and send them to the second endpoint individually and get the recognized text string for each bounding box. You can then take the outputs of the two endpoints and overlay the bounding boxes and the text on the raw image, or use the outputs in your downstream processes.
The following diagram illustrates the overall process workflow.
Extensions
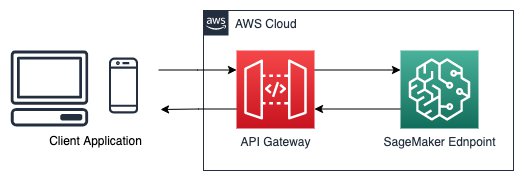
Now that you have working endpoints that are making real-time inference, you can use them for your applications or website. However, your SageMaker endpoints are still not public facing; you need to build API Gateways to allow external traffic to your SageMaker endpoints. API Gateway is a fully managed service that makes it easy for developers to create, publish, maintain, monitor, and secure APIs at any scale. You can use API Gateway to present an external-facing, single point of entry for SageMaker endpoints, and provide security, throttling, authentication, firewall as provided by AWS WAF, and much more. With API Gateway mapping templates, you can invoke your SageMaker endpoint with a REST API request and receive an API response back. Mapping templates enable you to integrate your API Gateway directly with SageMaker endpoints without the need for any intermediate AWS Lambda function, making your online applications faster and cheaper. To create an API Gateway and use it to make real-time inference with your SageMaker endpoints (as in the following architecture), see Creating a machine learning-powered REST API with Amazon API Gateway mapping templates and Amazon SageMaker.
Conclusion
In this post, we explained an end-to-end solution for recognizing handwritten text using SageMaker custom models. The solution included labeling training data using Ground Truth, training data with PyTorch estimator classes and custom scripts, and creating SageMaker endpoints for real-time inference. We also explained how you can create a public API Gateway that can be securely used with your mobile applications or website.
For more SageMaker examples, visit the GitHub repository. In addition, you can find more PyTorch bring-your-own-script examples.
For more SageMaker Python examples for MXNet, TensorFlow, and PyTorch, visit Amazon SageMaker Pre-Built Framework Containers and the Python SDK.
For more Ground Truth examples, visit Introduction to Ground Truth Labeling Jobs. Additional information about SageMaker can be found in the technical documentation.
About the Authors
 Jonathan Chung is an Applied Scientist in Halo Health tech. He works on applying classical signal processing and deep learning techniques to time series and biometrics data. Previously he was an Applied Scientists at AWS. He enjoys cooking and visiting historical cities around the world.
 Dr. Nick Minaie, is the Manager of Data Science and Business Intelligence at Amazon, leading innovative machine learning product development for Amazon’s Time and Attendance team. Previously, he served as a Senior AI/ML Solutions Architect at AWS, helping customers on their journey to well-architected machine learning solutions at scale. In his spare time, Nick enjoys family time, abstract painting, and exploring nature.
 Dr. Li Zhang is a Principal Product Manager-Technical for Amazon SageMaker JumpStart and Amazon SageMaker built-in algorithms, a service that helps data scientists and machine learning practitioners get started with training and deploying their models, and uses reinforcement learning with Amazon SageMaker. His past work as a principal research staff member and master inventor at IBM Research has won the test of time paper award at IEEE INFOCOM.
 Shenghua Yue is a Software Development Engineer at Amazon SageMaker. She focuses on building machine learning tools and products for customers. Outside of work, she enjoys outdoors, yoga and hiking.