Containers
Running Windows workloads on a private EKS cluster
Legacy applications in the automotive industry tend to run on Windows. Customers want to scale these workloads on Kubernetes alongside their Linux workloads. The automotive industry has a particularly high standard on security, and an Amazon Elastic Kubernetes Service (Amazon EKS) cluster with private endpoint is applicable to run their workloads.
This blog post shows how a Windows worker node can be added to an already existing Amazon EKS cluster and how to do an end-to-end test to ensure that Windows container workloads can be successfully executed. This blog post focuses on how a manual bootstrap of a worker node works so that this approach can be adapted for an infrastructure as code (IaC) deployment. The blog post will also show how to use the Terraform EKS module to add a worker node to an Amazon EKS cluster.
Additionally, a repository implementing a complete private Amazon EKS setup with Windows and Linux worker nodes in Terraform is available as part of the AWS-Samples repository.
After reading this blog post, you will be able to migrate and run your Windows workloads on an EKS cluster with nodes that are communicating to the control plane via a private endpoint.
Overview of solution
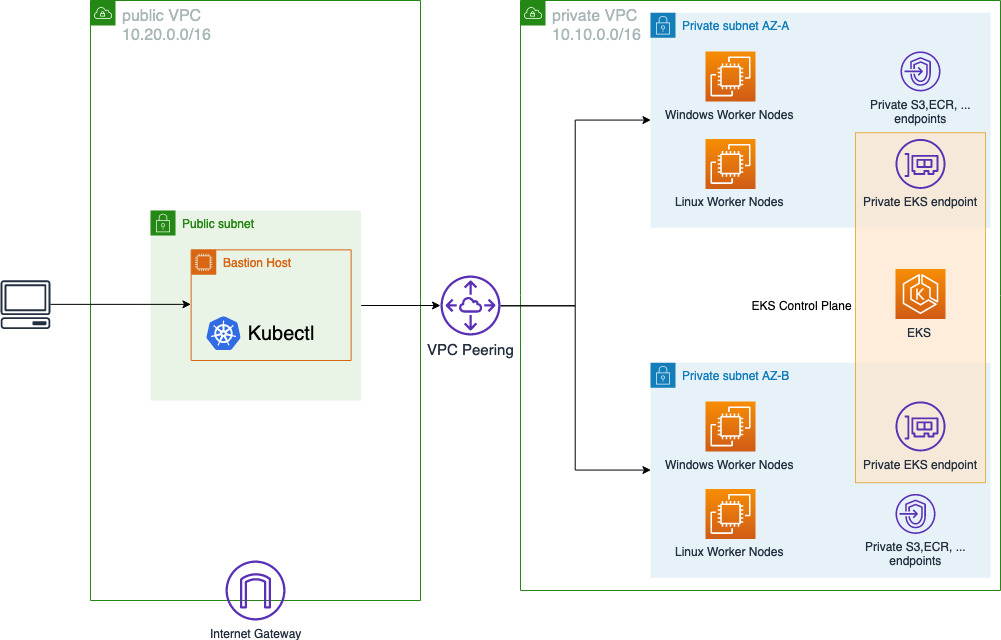
Walkthrough
In this blog post, we will show how to do the following:
- Enable Windows support in an EKS cluster.
- Create the necessary EC2 user data script for the Windows worker node.
- Allow Windows worker nodes to interact with the cluster internal networking.
- Launch a Windows EC2 instance with the user data script.
- Add necessary tags to the EC2 instance.
- Perform end-to-end tests on a Windows Pod.
- Add Windows support for Amazon EKS in Terraform and add a Windows node group.
Prerequisites
The following are prerequisites to follow this walkthrough:
- An AWS account.
- An existing Amazon EKS cluster. You can use the Creating an Amazon EKS cluster guide to walk you through creating the cluster.
- Private endpoint enabled and public endpoint disabled.
- Necessary VPC endpoints are already created. (Check VPC endpoints for private clusters for required endpoints).
- Cluster is running on a supported platform version. Compare how to enable Windows support on an EKS cluster for details.
- A bastion host that can be used for troubleshooting and is accessible from your workstation.
- kubectl is installed on the bastion host and has access to the EKS cluster.
- Security group access between bastion host and worker nodes in the Amazon EKS cluster.
Tip: We recommend creating and using a new VPC and Amazon EKS cluster to complete this tutorial. Procedures like modifying the aws-auth ConfigMap on the cluster may impact other nodes, users, and workloads on the cluster. Using a new VPC and Amazon EKS cluster will help minimize the risk of impacting other applications as you complete the tutorial.
An Amazon EKS cluster that is deployed via Terraform and already fulfills all these requirements is available as part of the AWS-examples repository: private-eks-for-windows-workloads-with-terraform
Enable Windows support in the EKS cluster
Windows support for an existing EKS cluster needs to be enabled by following how to enable Windows support on an EKS cluster. This is mandatory, and the necessary steps are dependent on the platform version of the EKS cluster, which is shown in the documentation. This blog post uses the new Windows support implementation, which is mostly integrated into the Control Plane. It is recommended to use an EKS cluster with at least platform version eks.3 for 1.21.
Create the necessary EC2 user data script for the Windows worker node
The EKS optimized Windows AMI that is provided by AWS includes scripts and executables that are needed to join the nodes to the EKS cluster once they are ready.
This blog post will use the Amazon EKS optimized Windows server core edition.
C:\Program Files\Amazon\EKS\Start-EKSBootstrap.ps1
C:\Program Files\Kubernetes\kubelet.exe
C:\Program Files\Kubernetes\kube-proxy.exe
The file Start-EKSBootstrap.ps1 starts and configures the necessary local components like kubelet and kube-proxy to join the given cluster.
The following command can be used on a node to join the EKS cluster:
./Start-EKSBootstrap.ps1 -EKSClusterName "<EKS cluster name>" -APIServerEndpoint "<EKS API endpoint>" -Base64ClusterCA "<Certificate data>"EKS cluster name: Name of your EKS cluster
EKS API endpoint: Private endpoint of your EKS cluster
Certificate data: The cluster base64 encoded certificate authority.
The bootstrap script will create a kubelet and kube-proxy Windows service on the node and start both with the provided configuration.
Get EKS API endpoint and certificate data (console)
- Open the EKS console.
- In the navigation pane, under Amazon EKS, choose Clusters.
- Open the cluster in which the Windows node should be added.
- On the navigation bar, choose Configuration.
- In the subnavigation bar, choose Details.
- Make note of the value of the API server endpoint and certificate authority.
Get EKS API endpoint (AWS CLI)
- Open a command line on your workstation or bastion host that has access to your AWS account running your EKS cluster.
- Perform the command:
aws eks describe-cluster --region <cluster region> --name <EKS cluster name> --query "cluster.endpoint" - Make note of the value that is returned.
Get EKS certificate data (AWS CLI)
- Open a command line on your workstation or bastion host that has access to your AWS account running your EKS cluster.
- Perform the command:
aws eks describe-cluster --region <cluster region> --name <EKS cluster name> --query "cluster.certificateAuthority" - The response will have the following format:
{ "data": "<certificate data>" } - Make note of the value that is at the place of certificate data.
The following is the complete user data content for the EC2 instance bootstrap:
Insert the values for <EKS API endpoint> & <Certificate data> with the values that were collected in the previous steps. Note the User data content down as it will be used in one of the next steps.
Allow Windows worker nodes to interact with the cluster internal networking
The roles that are attached to the nodes, Linux and Windows alike, need to be allowed to access the resources required by the kube-proxy component. They need to have access to the cluster role system:node-proxier (see Core component roles for details). Such a cluster role binding already exists in an EKS cluster: eks:kube-proxy-windows.
Execute the following command to see the details of the cluster role binding:
kubectl get clusterrolebinding eks:kube-proxy-windows -o yaml
In order to allow your Windows worker nodes to access the necessary networking components, add the following to the end of the aws-auth ConfigMap as part of the mapRoles section in the kube-system namespace:
- rolearn: arn:aws:iam::444455556666:role/Admin
  username: system:node:{{EC2PrivateDNSName}}
  groups:
    - system:bootstrappers
    - system:nodes
    - eks:kube-proxy-windows
Replace the rolearn with your ARN for the node role. See Enabling IAM user and role access to your cluster for details about the aws-auth ConfigMap.
You can also download an example and modify it accordingly:
curl -o aws-auth-cm-windows.yaml https://amazon-eks.s3.us-west-2.amazonaws.com/cloudformation/2020-10-29/aws-auth-cm-windows.yaml
However, this example does not include any additional roles or users that were already defined as part of your cluster setup.
Create a Windows EC2 instance with the user script:
- Open the Amazon EC2 console.
- In the navigation pane, under Instances, choose Instances.
- Open Launch Instances.
- Search for Windows_Server-2019-English-Core-EKS_Optimized.
- In the navigation pane, choose Community AMIs.
- Select an AMI that fits your Kubernetes version. For Kubernetes version 1.21, search for Windows_Server-2019-English-Core-EKS_Optimized-1.21.
- Select your preferred instance type, for example, t3.xlarge. Refer to Windows support for unsupported instance types.
- Choose Configure Instance Details.
- For Network, choose the private VPC that your EKS cluster is running in.
- For Subnet, choose a private subnet of your EKS cluster.
- For IAM role, choose the role that is already used by the Linux worker nodes.
- Scroll down to Advanced Details.
- For User data, enter the user data script from the last step.
- Choose Add Storage.
- Choose Add Tags.
- Choose Add Tag.
- For Key, enter kubernetes.io/cluster/<cluster-name> but replace <cluster-name> with the name of your cluster.
- For Value, enter owned.
- Choose Configure Security Group.
- For Assign a security group, choose Create a new security group.
- Select Type RDP and provide the bastion host security group ID as Source.
- Choose Add rule.
- Select All Traffic and provide the security group ID of the Linux worker nodes as Source.
- Choose Add rule.
- Use Port 10250 and provide the security group ID of the EKS cluster as Source.
- Choose Add rule.
- Use Port https and provide the security group ID of the EKS cluster as Source.
- Choose Review and Launch.
- After reviewing the configuration, choose Launch.
- Provide either an existing key or create a new key pair.
Make sure that the security groups attached to the Windows and Linux worker nodes allow all traffic between them for node-to-node communication. Additionally, make sure that the security groups of the EKS cluster allow https from the Windows security group. See Amazon EKS security group considerations for details.
The tag is necessary as additional information for the bootstrap script and is accessed via the EC2 instance metadata.
After a few minutes, the instance should be started and should show up as part of the EKS cluster:
kubectl get nodes
Perform end-to-end tests for example Windows workload
Review Deploy a sample application to deploy a Windows workload.
Modify example Windows workload to be able to execute in private EKS environment
- Download the file eks-sample-deployment, which is already prepared to be executed in a private endpoint EKS cluster.
- Deploy the sample Windows workload.
- Deploy the sample Windows service as provided by Deploy a sample application.
This creates a simple webserver without any dependency on a public endpoint and is derived from Webserver.yaml.
For the Windows AMI version Windows_Server-2019-English-Core-EKS_Optimized-*, the image used by the sample workload is already available on the node. If another Windows server version was used, make sure to replace the value “image” inside of the .yaml definition with the correct tag of the correct kernel version.
Once the workloads and the services run successfully on the cluster, execute the following commands in order to test the setup.
Test internal webserver from Windows Pod:
- Open a command line on the bastion host.
- Execute the following command on the bastion host.
kubectl exec -it -n eks-sample-app <windows-pod> powershell - Execute the following commands in the PowerShell of the Windows Pod that just opened.
curl eks-sample-windows-service -UseBasicParsing- The request should return a response from the webserver. The Windows webserver needs a few seconds to respond the first time.
The execution of these workloads validates the following:
- DNS resolution works as expected inside of a Windows Pod.
- Networking between different subnets and Pods (DNS) works as expected.
- Workloads get scheduled on the correct node.
Adding Windows support for EKS in Terraform and adding a Windows node group:
The following code-snippets are using version 18.6.0 of the Terraform eks module and they automate the steps that were manually done in this blog post. For a complete working example, refer to the aws-samples repository.
Enable Windows Support for EKS cluster
This code enables the EKS cluster to run Windows workloads while using the files additional_roles_aws_auth.yaml and vpc-resource-controller-configmap.yaml:
Dynamically create Windows AMI ID
Amazon EKS optimized Windows AMIs get released frequently with the latest security patches. The following code gets the most current Windows AMI that is available during execution time:
Create self-managed Windows node group within EKS module:
The following code-snippet shows an example of a Windows self_managed_node_group that can be added to an existing EKS module implementation.
The Terraform eks module uses a template of a bootstrap script similar to the one used in this blog post. See windows_user_data.tpl for details.
Cleaning up
To avoid incurring future charges, delete the resources that were created. If you manually added the EC2 instance as described in this blog post, then you can simply delete the EC2 instance. If you created the cluster with the linked Terraform code, then you can use the following command to delete the Terraform managed resources:
terraform destroy -var-file main-input.tfvars
Conclusion
In this blog post, we demonstrated how to run Windows worker nodes on a private EKS cluster. We have shown how to do an admission of a Windows worker node and have provided the necessary user data script for the EC2 instance. Additionally, we have shown how to test the overall EKS setup to validate that the setup is complete and the cluster can be used for actual workloads.
Finally, we have shown the necessary Terraform implementation to enable Windows support and to add a Windows node group. The repository private-eks-for-windows-workloads-with-terraform complements this blog post by providing a complete Terraform implementation of a private EKS cluster which you can use to get started running your Windows workloads on EKS.